01/26/2022 2,479 VAZ 2110
Author: Ivan Baranov
The automotive ignition system consists of many components and mechanisms that ensure normal starting and operation of the power unit. On a VAZ 2110 car, the starter is a component that, if it breaks, will make it impossible to start the engine. You can learn more about this device, as well as its installation, from this material.
[Hide]
Design and principle of operation
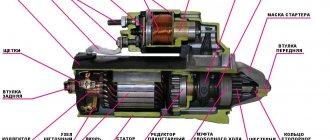
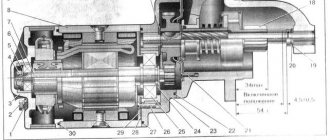
The VAZ 2110 starter does not have a very complex design, but a person who wants to repair this mechanism should know that its elements include:
- Drive shaft;
- Hubs with ring;
- Cover sleeve;
- Gears equipped with teeth and a coupling ring;
- Carrier;
- Drive shaft supports equipped with a liner;
- Anchor core.
- Gear axles are of the planetary variety.
- Permanent magnet;
- Gaskets;
- Frame;
- Collector;
- Lever bracket;
- Drive lever;
- The back cover is equipped with a special sleeve;
- Anchor relay and shaft;
- Holding winding;
- Brush holder;
- Traction relay core;
- Contact plate and bolts;
- Staples.
The starter components described most often require replacement, diagnosis or repair when problems occur.
Four devices creating a magnetic field are mounted to the starter housing. On the inside they are secured with an aluminum sleeve. The lid is tightly attached to the body. Reliable fixation is ensured thanks to two studs. The anchor shaft rotates in special bearings.
The starter plays a major role in starting the car, as it rotates the crankshaft
Through a planetary type gearbox, the torque “goes” to the drive shaft. Its transmission is ensured by a special gear. After the vehicle starts moving, it ensures their separation in order to protect the gearbox from damage.
When starting the engine, voltage is transmitted to two windings of the traction relay. After closing the contacts it stops working. The voltage should not exceed 8 V. If its value is higher or lower, then this “indicates” that there is a problem in the system.
The starter on the VAZ 2110 is located to the left and slightly below the battery
Catalog number and cost of a good starter for Lada Priora
Car owners have a predominantly negative attitude towards original starters on Priora. This is due both to a large number of defects and to the presence of breakdowns that are not typical for starters from other manufacturers. For example, it is not uncommon for stator magnets to come off. Therefore, drivers recommend paying attention to analogues. Among them there are many decent options at an affordable price. The tables below provide a list of brands that have proven themselves in use in a car.
Table - Good analogues of the original 1.4 kW Lada Priora starter
| Manufacturer | vendor code | Approximate cost, ruble |
| Lauber | 221182 | 5300-6100 |
| Krauf | STR1182 | 2100-2700 |
| Bosch | 986023780 | 6400-7300 |
| HC Parts | CS1182 | 2200-2700 |
| Eldix | ELDST2110 | 3200-3700 |
Table - The best analogues of a branded starter with a power of 1.8 kW
| Manufacturer | Catalog number | Approximate cost, ruble |
| Bosch | 1108203 | 8800-11000 |
| Eldix | ELDST2110R | 2800-3500 |
| As-pl | S9009 | 2100-2900 |
| Motorherz | STB1182WA | 4200-4800 |
| WPS | 33306N | 2900-3600 |
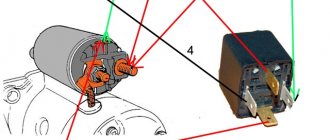
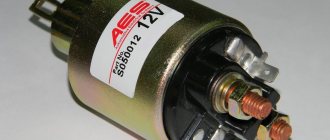
Where is the VAZ 2110 starter relay located?
The solenoid relay is built inside the main body along with the starter itself. To dismantle, you need to follow the following algorithm:
- Determine the location of the starter itself. It is located to the left, just below the battery. You need to look for it in the immediate vicinity of the checkpoint.
- Disconnect the negative contact from the battery. This will help avoid troubles during dismantling (electric shock).
- Dismantle the air filter to free up the “passage” for further actions.
- Disconnect all wires that go to the relay.
- Dismantle the nut that serves as a fastener for the end of the wire. For this procedure you need a key of 13.
- Unscrew the nuts that focus the starter itself. To unscrew them, you need to use a 15mm wrench. The top one can be unscrewed without any noticeable problems, but to remove the bottom one, you will need to apply a noticeable force (it is located in an inconvenient place).
- Completely remove the starter.
- Remove the nut that secures the output of the relay that performs the retracting functions, and disconnect the wiring.
- Unscrew the bolts securing the relay (you need to use a wrench
 and remove it.
Assembly is carried out in reverse order.
Belt attachment in a 16-valve Largus unit
We carry out installation using the reverse algorithm.
- The roller paired with the tension mechanism, as noted, is replaced with new analogues.
- We hang the belt on all the pulleys. Note that the last step will be to attach this consumable to the tension roller.
- The tensioning component is installed on the stud of the LADA Largus cooling pump. To do this, insert the bent edge of the device bracket into the corresponding groove made on the pump body.
- Now it’s time to unscrew the control bolt from the previously marked hole and remove the locking bar with which we previously locked the camshafts.
- We rotate the crankshaft a couple of full revolutions until the grooves made on the end sections of the camshafts align.
- We check the correct position of the shaft again by screwing in the control screw. If everything is correct, then remove the bolt and close the hole opening with the indicated plug.
- We proceed to the installation of all previously removed components and parts.
We remind you! When hanging a belt, we use hints in the form of arrows printed on the product, because they are oriented along the clock, which is very important.
The procedure for installing a belt on a 16-valve K4M engine can be viewed in this video:
Node malfunctions
The most common starter breakdowns are divided into several types. These include:
- Damage to the electrical circuit. A sign of such problems is slow rotation or complete absence of it at the crankshaft when starting the internal combustion engine. The reasons for this phenomenon may be a discharge of the battery, rupture of the contacts of the ignition device, unreliable fixation, wear of the wires, or violation of the integrity of the wiring suitable for the relay contact group. If, when starting the internal combustion engine, the armature does not respond and the relay does not operate, then the cause of the failure is most likely due to a break in the solenoid relay wire. In the absence of the described “symptoms”, it is necessary to dismantle, check the plates for short circuits, and the presence of traces of “burning” in the collector system.
- Worn starter brushes. The presence of such problems may be indicated by difficulty starting the car, but not always. The reason for this phenomenon may be “hidden” in a battery failure. Complete wear of the brushes leads to the spring “resting” against the brush holder (contact is ensured only due to its mass). This can be easily checked by changing the position of the starter. The reason for premature wear is the misalignment of the brushes during the operation of the starter.
- Broken traction relay. This is indicated by a failure of the internal combustion engine, since it will not be possible to start the engine without a working relay. The “symptoms” of a malfunction of this starter element include its rapid rotation, even after starting the internal combustion engine, idling movement (without contact with the flywheel of the engine, which does not start), and a click after turning the key in the ignition device. It may not exist if there is a break in the coil, the armature is jammed, or there is no power for some reason.
- Lack of starter rotation with a characteristic “buzzing” sound. This phenomenon indicates the occurrence of a short circuit in the electrical circuit, in which power is supplied to the brushes of the electric motor. However, it is in working condition. In such a situation, the holding coil often does not work and the bendix does not move. Its gear cannot engage the flywheel gear, and the electric motor runs in idle mode. The reason may be that the force of the retracting element “enters” the bendix through a lever made of plastic (has the shape of a grip). If the movement resistance of the bendix is high, then the plastic elements break down. As a result, it is not moved to the working position and the starter rotates, but does not transmit torque to the flywheel. Another reason for the failure of the rotor can be severe wear of the teeth, which are located on the rotor shaft of the electric motor. Do not forget that complete destruction of the mentioned teeth can also cause failure. This type of malfunction is related to the breakdown of the motor and is not related to the functioning of the drive. The presence of such a breakdown is indicated by the activation of all starter mechanisms, that is, the rotation of the electric motor and the transition of the bendix to the working position. It can be locked by turning the key in the ignition.
The main malfunctions of the unit include: the appearance of oxide on the wires and terminals, failure of the traction relay and traction winding, wear of the brushes, breakage of the armature
The listed faults can cause more serious problems if they are not corrected in time. Ignoring problems will most likely lead to vehicle failure at the most inopportune moment. The best solution is to contact a specialized service station when the first signs of the listed problems appear.
How to select components for replacing the timing belt on a Lada Largus
The most important thing when selecting this product is the manufacturer. The car owner must be able to distinguish between manufacturers from whom timing belts can be purchased. Below is a list of trusted manufacturers you can trust:
- Renault;
- Lada;
- Gates;
- Contitech;
- Bosch;
- Dayco;
- Lemforder.
Often, original kits may contain belts from manufacturers such as Gates or Contitech. Therefore, there is no point in overpaying. It's better to get a cheaper set.
Another important point when choosing a timing belt is its shelf life. Since this is a rubber product, it has a limited time during which it can be stored.
Special numbers on the belt itself, for example, “5-30”. The number 5 means the year - in this case 2015, and 30 is the number of the week in which the product was manufactured. The permissible storage period of the belt is 5 years. If its age is higher, it is clearly not worth installing such a spare part.
If you install a timing belt on a Lada Largus with an expired expiration date, its breakage may occur even earlier than the required replacement according to the regulations - after 10 or 20 thousand kilometers. By the way, it is after this that bad reviews about the best manufacturers may appear.
To find out the expiration date, just pay attention to the special inscriptions placed on the packaging. For example, “Install < 08.2021”, as in the photo above. This means that this belt can be installed no later than August 2022.
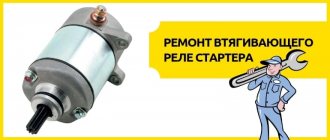
DIY starter repair
Maintenance or repair of the starter must be carried out in accordance with certain algorithms, compliance with which requires certain experience and knowledge, as well as the use of the necessary tools. Troubleshooting always begins with disassembling the starter, after which diagnostics are carried out, and if problems are detected, repairs are carried out.
Tools and Supplies
To troubleshoot, you need to prepare the following tools:
- Socket heads for 13 and 15.
- Extension.
- Handle equipped with a ratchet.
- Ohmmeter.
- A special analyzer equipped with a light bulb.
- Phillips and flathead screwdrivers.
Spare parts will be used as consumables to replace failed components. You can determine which parts require replacement at the diagnostic stage described above. To repair the starter, it is recommended to use only high-quality parts.
How to remove and disassemble
To prepare for repairs, it is necessary to completely disassemble the starter. This procedure should be carried out in the following sequence:
- Remove the negative battery terminal.
- Remove the air filter housing to ensure convenience for further operations.
- Disconnect the wire leading to the traction relay.
- Place the disconnected wiring to the side so that it does not interfere with further repairs.
- Unscrew the nuts that secure the starter to the gearbox.
- Remove the unit and carry out further repairs in more convenient conditions.
- Disconnect the wire that is in contact with the mounting bolt.
- Remove the traction relay. To do this, you need to unscrew the two bolts that secure it.
- Remove the relay armature. To do this, you need to lift it up a little, and then remove the loop from the lever.
- Unscrew the nuts securing the tie rods.
- Remove the cover with the drive, as well as the gearbox assembly.
- Completely “remove” the tie rods. This will make it easier to further remove the drive and gearbox.
- Remove the planetary gears. They need to be replaced if there is damage to the teeth or the integrity of the needle bearings is compromised.
- Replace the brush holder assembly (if necessary).
- Remove the cover from the manifold side.
- Unscrew the two screws and then remove the brush holder from the cover.
- Bend the clips and remove the spring.
- Check the anchor for defects. To do this, you need to remove it from the case.
- Remove the gear from the anchor shaft.
- Remove the armature from the stator mechanism.
- Remove the sealing support from the lever.
- Knock the stopper off the retaining ring using a special mandrel.
- Dismantle the restrictor and retaining rings.
- Remove the drive assembly.
General view of a completely disassembled starter
Assembly must be done in reverse order.
Troubleshooting
When conducting a full check of the functionality of the VAZ 2110 starter, you must act in accordance with the following algorithm:
- Check how well the unit rotates. If the crankshaft moves poorly, you should pay attention to the presence of lubricant and, if necessary, lubricate the mechanisms. There are situations when the oil does not correspond to the current season. Replacing it with a more suitable one will solve the problem.
- Check the battery for charge and oxidation of tips and inputs. If necessary, it is necessary to charge and replace failed elements. In such a situation, it is necessary to carry out maintenance of the contact group and the battery itself, after which the functioning of the starter will be restored.
- Inspect the brushes and check the tightness of the wire ends. To do all the necessary actions, you will need to dismantle and disassemble the device, clean the commutator, replace the brushes and adjust the degree of spring tension.
- Determine the presence or absence of clutch slipping. If necessary, it is necessary to completely replace the starter drive. Another way to solve the problem is to wash the threaded shaft and then lubricate it.
- Inspect the flywheel ring teeth for nicks. Their presence may be indicated by a characteristic grinding sound. To eliminate it, you will need to eliminate the nicks or install a new buffer spring if the old one is noticeably weakened.
- Carry out diagnostics of the starter pole fastening. Its weakening may be indicated by the characteristic noise present during operation of the mechanism. The problem can be solved by securely fastening the starter or reinforcing the said fastening.
To ensure that the bolt is in contact with the plate, it is necessary to measure the resistance on the contact bolts
If you check using the described algorithm, you will be able to accurately determine the “source” of the malfunction and effectively eliminate it. However, there are breakdowns that cannot be eliminated during an inspection.
How to fix
After the preparatory work is completed, you can begin the repair procedure. To achieve a positive result, you must act in accordance with the following algorithm:
- Check whether the bolt is locked to the contact plate. You need to “push” the armature inward, and then measure the resistance on the contact bolts using a tool called an ohmmeter. If it is missing, then the relay must be replaced or repaired.
- Repair the relay (if necessary). To do this, you need to unscrew two screws, dismantle the winding terminals, remove the cover and clean the contact plate and bolt heads using special sandpaper. If they are “burnt” quite badly, then you need to turn them 180 degrees.
- Repair the gearbox. The gears, which are located inside the housing, wear out over time, and the properties of the lubricant deteriorate noticeably; moreover, metal shavings appear, making work difficult. Repairs are carried out by replacing worn elements, as well as cleaning the housing from chips and old grease, after which the internal components must be re-lubricated. The wear of the elements of this mechanism in the future can be reduced by periodically “renewing” the lubricant.
- Check the winding using a light bulb rated for 220 V. It should not burn if voltage is applied to the core and collector plate.
- Replace bendix (if necessary). To do this, you need to pull it out of the gearbox cover along with the drive.
- Replace the ring if it has lost elasticity or is severely bent.
Broken gear teeth cannot be repaired, so they must be replaced
It is possible to carry out the procedures in the described algorithm, even in a private garage, without having special tools or equipment for computer diagnostics at hand.
Starter repair, which includes checking, determining the “source” of the malfunction, completely disassembling the mechanism and installing serviceable components to replace the failed ones, can take varying amounts of time depending on the person performing the maintenance and the individual characteristics of a particular vehicle. In a specialized car service, such a procedure takes no more than a few hours, if you do not need to wait a long time for the delivery of spare parts.
How to remove the belt?
- Before performing actions, we determine the position in which the camshafts are present.
- For this purpose, we dismantle the air intake manifold resonator and remove the plugs that are present in special openings on the left end of the block head. It is convenient to remove the plugs using a screwdriver.
- Now, by rotating the crankshaft, we reach the position of the camshafts when their marks on the ends of the gears coincide with the upper plane of the head surface (viewed from the end of the engine).
- To immobilize the camshafts, we use a device installed in the corresponding grooves on the designated shafts.
- To check the correct position of the crankshaft, we resort to the hole located under the oil pressure monitoring sensor inside the unit. In normal mode, this hole is closed with a plug.
- After turning the protective plug into the hole, we screw a control bolt, the length of the threaded part of which is 75 mm, and the size and type of the thread itself is “M10”. If the crankshaft is in the correct position, then we see the possibility of completely screwing in this bolt, which will subsequently rest against the surface of a special pad located on the shaft. This action will also help secure the shaft from the risk of turning during repair operations.
- Now we loosen the tension on the belt drive. For this purpose, we “arm ourselves” with a size 13 wrench and loosen the nut securing the tension roller. We relieve tension in the belt by turning the designated roller against the clock.
- The loose belt is completely removed from the LADA Largus.
- Next, we take advantage of the opportunity to remove the tension mechanism and support roller (we also replace them). To dismantle the roller itself, we use a Torx wrench with size T50 in our tool kit.
DIY VAZ 2110 starter repair step by step and with photos
Sometimes it didn’t work the first time, the retractor shoots, but the starter doesn’t turn. Sometimes it would turn with a crunch.
I decided that it was the Bendix, but it turned out that it was not the problem, it was perfect.
removed the starter
Bendix is ideal
Just in case, I checked the flywheel ring, it is also in perfect condition.
To begin with, I sentenced the retractor. Although it worked, the contact of the supply pin was burnt. The pin got so hot that it melted the attachment point. It is clear that this is most likely not a cause, but a consequence.
burnt contact
I immediately bought a new retractor.
New traction relay
Further disassembly of the starter revealed a broken planetary gear. It is plastic, burst and crumbled. Now it’s clear why the starter jammed.
The cost of a new metal gear is 150 rubles. The cost of the assembled gearbox is 750 rubles. There is no point in taking it as a collection, because... All other parts of the gearbox are in excellent condition. I also purchased a tool to remove the retaining ring for RUR 170
I assembled the gearbox with a new metal gear. Lubricated it with CV joint.
I put the starter in place, and a miracle happened: the car started up normally.
Repair cost
Retractor - 620 RUR Gear - 150 RUR Pliers for circlips - 170 RUR Lubricant, wash
total 1000 RUR
But it was too early to rejoice, after driving for a couple of days, the problem partially returned. The starter sometimes jammed and in general began to turn noticeably slower. I had to take it off again. This time, I was not lazy and disassembled it completely. It turned out that the magnets had fallen apart.
Most likely, this happened as a result of the starter jamming on an old, broken gear and its subsequent overheating.
As a result, I didn’t bother with further repairs and bought a new, factory, KZATE gear starter for 3200 rubles.
Now it starts just fabulous. The new starter spins like a hurricane. I should have not been too lazy right away and disassembled the starter completely, it would have saved money and time. But there is also a plus: I gained interesting experience in repairing gear starters.
Installation of a new belt on Lada Largus
- First, we put the new component on the crankshaft pulley.
- Now we hang (pulling by hand) the timing belt on the toothed pulley of the cooling circuit pump.
- Next, we move to the camshaft and hang the timing belt on the pulley in the same way.
- We wrap the remaining section along with the slack behind the tension roller.
Now you need to tension the belt drive.
- To do this, turn the roller itself in a counterclockwise direction and fix it with a bolt.
- We fix the indicated bolt of the generator pulley in place. We rotate the crankshaft until the marks on it and the camshaft coincide.
After making sure that the installation procedure is correct, we install the protective casing.
DRL on Largus
The starter does not turn on the injection VAZ 2110?
It is no secret that it is impossible to start a car without a starter. Therefore, his condition should always be treated with increased attention. If it was not possible to save the element, then it is quite possible to carry out the repair yourself. It will be much cheaper than going to a service station.
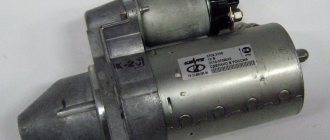
First, study the VAZ 2110 starter from the photo, which will allow you to get a first idea about it. Don't worry if you've never even seen this element. This is not a hindrance to understanding the device.
It may have two problems - a complete breakdown that requires replacement, or it simply does not turn the engine. We will consider each issue separately in order to understand the causes and methods of eliminating the malfunction.
Article number and approximate price for the original Lada Priora starter
There are two types of starters installed on Lada Priora cars. They differ in power and mounting method. The units are not interchangeable, so it is important for the owner to know which starter is installed on his car.
The original unit with a power of 1.4 kW has article number 21100370801002. The cost of a new product is from 3600 to 4000 rubles. At car dismantling yards, spare parts can be found with a price starting from 800 rubles. However, most used starters are in very poor condition.
The Priora uses a 1.8 kW starter. The branded unit comes with catalog number 5702370815. Its price ranges from 2300 to 4100 rubles for a new product. A used spare part will cost from 900 rubles.
Doesn't it turn?
If the starter on an injection VAZ 2110 does not turn, there may be several reasons for this.
- The culprit is the solenoid relay. If you insert the key, turn it, the instrument panel lights up, the fuel pump turns on, but when you turn it further, the panel goes out and the starter does not turn on, you should check the solenoid relay. Make sure there is voltage in it. Try closing the starter, turning off the alarm, which can also cause problems. If everything works separately, but in the end the starter does not turn on, then the reason is in the solenoid relay. It needs to be replaced with new ones and the problem will disappear.
- Overrunning clutch does not work. You started a cold engine, drove a couple of tens of kilometers, stopped to get out for a couple of minutes, returned, and the starter clicks, but does not turn on your VAZ 2110. Only when the car cools down, you manage to start the engine. First of all, the overrunning clutch, or popularly Bendix, is to blame. Replace it with a geared analogue. Additionally, check the wires that go from the Bendix to the battery.
- There are no contacts. The starter starts, but it is very difficult, making a lot of clicks. If the situation repeats regularly, be sure to check your contacts. The terminals are probably oxidized. Cleaning didn't work? Then check the ground contact with the car body and the starter contacts. For them, oxidation is a natural phenomenon. Another way is to ask a friend to turn the key in the ignition, and then hit the relay with a hard object a couple of times. If the car starts, then the closing contacts are simply stuck. But here it is better to completely replace all the relays than to repair and disassemble the unit.
- The problem is in the immobilizer. It is not uncommon for the starter activation circuit on the injection VAZ 2110 to be disrupted due to the immobilizer. The engine may suddenly stall, the starter stops turning, and it is not possible to start it even with a push. The terminals are clean and the battery is charged. If the immobilizer is turned on, this may be the cause. Due to the protection being triggered, the engine does not respond. You will no longer be able to start the car, so call a tow truck and go to the nearest service station.
- Problematic injector. We have examined almost all starter problems characteristic of a carburetor engine. But today the “tens” are injection ones. They don’t really like low-quality fuel, which VAZ 2110 owners so often like to refuel with. Therefore, the starter may not work for the simple reason that the injector is clogged or dirty. By performing a flush, you will eliminate the problem.
Engines
The designers have provided three power units for installation on this car, these are two eight-valve VAZ 11189 and K7M from Renault, as well as a 16-valve French engine K4M. The working volume of these engines is 1600 cm3, which is considered optimal for this class of cars. The power of the VAZ engine is 87 horses, the French engine can produce up to 90 hp. With. Both power units have an injection power system and comply with Euro-5 environmental standards.
K7M
This French engine began to be installed on domestic cars after Renault acquired shares in an automobile plant in Tolyatti.
This engine became the next in a series of modifications to the K7 series engines; its piston stroke was increased, rocker arms were added to the valve mechanism, and the diameter of the clutch and flywheel was increased. Average fuel consumption is approximately 7.2 liters per hundred kilometers.
Manufacturers declare a service life of 400 thousand km, but repairs often occur at 350 thousand km. The motor is combined with a manual gearbox having 5 stages.
VAZ 11189
This is a higher quality and modified VAZ 11186, which is installed on other VAZ passenger cars. It also has an injection power system and can deliver up to 87 hp. With. Its cost is lower than that of a French engine, which is why it is installed on most cars.
The average fuel consumption of the VAZ 11189 is slightly higher, it is equal to 8.2 l/100 km. As a disadvantage, experts note the shorter service life compared to the French engine, it is equal to 200 thousand km. Both engines bend the valves when the timing belt in the timing drive breaks.
Main causes of malfunction
Minor or partial repairs will not always save the situation. But before removing the starter from the VAZ 2110, we recommend that you familiarize yourself with the main reasons for its failure, which serve as a reason for replacement.
- When turning the ignition key, a grinding noise occurs in the engine compartment. This is the cause of a faulty bendix or flywheel.
- Clicking noises are heard when turning the key. The reason is the solenoid relay, which needs to be replaced.
- The engine turns over with a friend. This indicates that the starter brushes are worn out.
Which kit to choose
The main supplier of all rubber products is the production of these parts in Balakovo. This plant has been supplying components for VAZ for several decades and has proven itself to be a reliable partner.
In addition to this, they use spare parts from other, no less reliable and well-known manufacturers. Components from Gates[/anchor], Bosch, Dayco, and other companies have proven themselves well. It is recommended to change the tension roller along with the belt.
Replacing the unit
Now another question arises - how to disassemble it? There shouldn’t be any particular problems with this matter if you arm yourself with the instruction manual and also read our recommendations.
Arm yourself with a set of keys for 10, 13, 15 and 8 millimeters. Actually, you don’t really need anything else in terms of tools.
The sequence of dismantling and repair is as follows:
- Drive the car into the pit or lift it using a lift. You must have access to the underside of the car.
- If you have just arrived, give the engine some time to cool down. It is better to work with a cold engine.
- Remove the negative cables from the battery.
- First remove the protection and then the tin casing that protects your gearbox. To do this, you will need two keys - 8 and 10 millimeters.
- The power wire plug is removed from the starter. You just need to pull it towards yourself a little.
- Now take a 13 mm wrench and use it to unscrew the power wiring located on the solenoid relay.
- Place the loose wire aside and secure it with something temporarily so that it does not interfere with further repairs.
- The starter is attached to the gearbox housing with two nuts. They are easily loosened with a 15mm wrench. If you have problems unwinding, lubricate the fasteners with the almighty WD40.
- Dismantle.
- Now check the condition of the bushings on the gearbox housing.
- Make sure that the armature shaft is in good condition; when moving, there should be no play or jamming. If such defects occur, then it is recommended to immediately replace the bushings with new and high-quality ones.
- There are always two bushings. One is at the bottom of the starter, and the second is on the gearbox housing. The bushing on the starter can be changed without any problems, but difficulties may arise with the second one. To dismantle it, you need a special tool called a rubber. It is better to entrust the work to specialists from a service station.
- If the cause of the starter malfunction is the bendix or the solenoid relay, there is no need to call the experts for help.
- To remove the relay, unscrew the power wire, or rather its fastening, from the starter housing. You will need a key for 13.
- Using a size 8 wrench, remove the two bolts securing the relay to the starter housing. It is important to be careful here, because when removing the bolts, there is a spring in the relay that can spring back. Hold it with your hand when dismantling.
- Remove the relay piston from the rocker arm hook located on the bendix.
- Proceeding in reverse order, install a new relay.
- If you need to replace the bendix, then remove the solenoid relay, unscrew the two bolts with a 10mm wrench at the back of the starter. Now disconnect the starter housing from the front of the starter where the bendix, rotor and fork are located.
- Use a flathead screwdriver to pry up the plastic fork to remove it from the armature, and remove the armature itself and the bendix from the front of the body.
- Remove the retaining ring located on the tip of the armature and remove the desired bendix.
- The structure can be assembled in the reverse order, but the splines must first be lubricated with Litol.
- Test the new starter in place before beginning installation. To do this, connect the power terminals of the battery.
- The nuts responsible for fastening the terminals are tightened with a 13mm wrench. But it is not recommended to apply much force, since the terminals are made of copper. Clamping too hard will damage the threads, causing even more problems.
We figured out how to disassemble the starter on a VAZ 2110 and we can say that this procedure is not particularly simple, but it does not require mandatory execution by a professional auto mechanic.
The starter on the “ten” is somewhat capricious, but if you operate the car correctly, check the condition of the contacts, and also periodically flush the engine on the injection VAZ 2110, it can last a long time and reliably.
Motor line of the Largus model
This station wagon from Togliatti is a “clone” of the popular “French” Dacia Logan MCV. For the Lada Largus, the manufacturer has provided two versions of the power unit, namely:
- 87-horsepower “four” (series “11189”) 8 valves, which is very familiar to adherents of VAZ models (according to Granta and Kalina);
- French unit “K4M” 16 valves, the power of which reaches 102 hp. With.
The 1.6-liter engines are equipped with distributed injection, which ensures compliance with Euro-5 standards.
Among the design features of 8-valve motors, there is a risk of valves bending when the timing belt breaks, and then the timing belt needs to be replaced. This aspect forces Lada Largus owners not to delay checking the condition of the belt in a timely manner and to resort to replacement after both the regulated period (mileage) and when the slightest signs of wear appear.
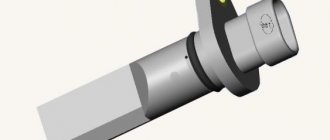
What is a starter
The VAZ-2110 is equipped with a starter with a gearbox, which has one advantage - it consumes less current. It is capable of ensuring rotation of the crankshaft even with a weak battery charge. Thanks to this feature, your car will start even in conditions where other models refuse to work. However, with prolonged use, the electric motor with gearbox may fail for no apparent reason. In this regard, starters without gearboxes are more advanced - they are easy to repair due to the simplicity of their design.
The electric motor on the VAZ-2110 consists of several elements:
- drive shaft;
- gear with inner ring;
- shaft support equipped with a liner;
- relay armature and its components (for example, core);
- winding;
- brushes;
- magnet.
The most worn element is the brushes. During operation, they wear out, which is why they need to be replaced. Brushes are sold separately.
Replacing the Priora starter, main faults
The car starter starts the engine. The Priora will not start without his participation. Without it, starting a movement is simply impossible. Sometimes the Lada Priora does not start because the fuse has blown, or the starter relay has malfunctioned; it is marked K3. Sometimes it clicks but doesn't turn. The reasons are in the details.
The starter on a Priora consists of the following parts: bendex, retractor relay, armature and others - for a complete list of how many parts the starter of a Priora car contains, see the article below. It is advisable for car owners to know where this mechanism is located on a Lada Priora car - it is located immediately under the air filter.
The price of the part is a starter for a Priora engine (16 valves): from 2750 to 4500 rubles. When a breakdown occurs, the device on the Priora stops turning.
Standard starter and analogues - article number and price
Unfortunately, if the mechanism does not work, the problem can only be solved by replacing it. Neither installing new parts under the body, nor any cleaning will save the situation. The standard starter for a Priora with 16 valves goes under catalog number 2111.3708010-01, its cost is about 4,000 rubles. As analogues we can consider:
- "Baker." Article 5702370800010, costs 3,700 rubles;
- "Starvolt." Article lst0190, price - 3,200 rubles;
- Valeo. Article 438285, costs from 3,700 rubles;
- For automatic transmission, article number 219002370801000, costs from 3,900 rubles;
- "BATE". Article 51323708000, costs from 2,750 rubles;
- Gearbox – 51213708000bate, costs from 2950 rubles;
- "Kzate." Article 5702370800, costs from 3,300 rubles;
- Pramo (Eltra). Article TS12E901, price – 3,800 rubles;
- Fenox gearbox. Article 2110-3708010, price – 4,500 rubles.
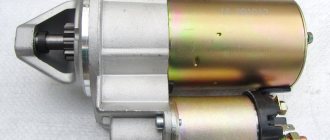
Lada Priora starter: device and principle of operation
As mentioned earlier, this part can be installed on the Priora of two types: geared and gearless. Sometimes it may be necessary to remove the starter, note that it is located under the engine, on the right - closer to the space under the air filter.
To ensure that the starter unit does not wear out so quickly, it has a special mechanism that disengages the gear from the crankshaft flywheel - the Priora starter retractor relay. If it were not there, the service life of the unit would be greatly reduced, or repairs would be required.
Geared
This mechanism is small in size. It turns out this way because the gearbox allows you to increase or decrease the torque. The planetary gearbox itself in the car in question is located between the armature and the bendix; it serves as a “buffer” and an intermediate part between them. Thus, it does not take up so much space in the case, under which there are:
- bendix;
- fork;
- anchor;
- stator;
- solenoid relay;
- mask;
- gearbox
Its main difference is that the bendix is fixed on its own shaft, and it interacts with the Priora engine through a gearbox.
Gearless
A gearless starter is much larger than its counterpart, but it does the same job of receiving electrical energy from the battery and sending it to the crankshaft to start the engine. It consists of the following components:
- relay;
- an electric motor containing the traction relay cores and winding;
- brushes and holders, “brush assembly”;
- solenoid relay;
- stator;
- fork;
- contact bolts;
- anchor;
- starter mask;
- retaining ring;
- freewheel;
- front bushing and rear bushing;
- starter bendix Priora;
- gear.
The gearbox operates according to the following algorithm:
- Power is supplied from the battery through the wiring harness.
- The anchor is retracted.
- The Bendix is attached to the gear, “thrown out”, the pin contacts are closed, and voltage is applied to them.
- The armature rotates, the torque is transmitted to the bendix, through it to the gear, and it is already in contact with the engine flywheel.
- As soon as the ignition key is released, the retractor relay disconnects the bendix and the gear.
Basic faults
Externally, a breakdown of the Priora starter can be recognized by the following signs:
- “turns” and at the same time starts the engine;
- does not “twist”;
- continues to “twist” after the key is released;
- creaks, clicks are heard;
- It spins, but for too long.
- The reason may lie in a faulty battery, in the starter itself and fuses. The most common are those that are most likely to disable
- the car – it’s worth taking a closer look.
Doesn't turn on
If the engine does not start, the problem may be:
- discharged or broken battery;
- no closure of contacts 50 and 30;
- terminals or tips are oxidized;
- interturn closure;
- short circuit to ground;
- open circuit “starter - traction relay”;
- the ignition module is faulty;
- break in the traction relay winding;
- brush wear;
- the anchor jams;
- the additional relay or the control circuit connected to it is damaged.
How is diagnostics carried out?
Finding a specific fault is a complex and time-consuming job. You need to check absolutely everything - even the fuses. Below is a standard algorithm of actions that allows you to find the weak link in a short time:
- disconnect the battery, put the car on the handbrake, the transmission in neutral mode;
- disassemble the air filter mounts, remove the intake hose;
- remove the control wire from the solenoid relay bolt;
- thoroughly clean the contacts on the starter;
- connect a known good battery to the starter using crocodiles.
Applying current to the starter should cause a click. If it is not there, most likely the ground compound is oxidized. This should be checked first.
- remove the negative wire from the starter and connect it to the lower bolt of the traction relay, plus - to the upper bolt of the relay.
If there is a clicking sound, check the starter brushes. If there is no sound, the solenoid relay is damaged.
- Connect the negative wire to the starter, and throw the positive wire onto the lower bolt of the relay.
The starter will start turning. In normal condition, the speed will rise to 11,000 rpm. If the device does not rotate fast enough, you need to check the brushes or armature. If there is no revolution at all, there is a breakdown inside the winding.
- Connect both wires to the upper bolt of the traction relay.
A loud noise will indicate damage to the bendix or gearbox.
Thus, the Lada Priora starter is often damaged due to the following:
- the battery is discharged, the terminals are oxidized, the case is damaged;
- solenoid relay - winding breaks;
- brushes - wear up to 4 mm or more;
- bendix - teeth break, jams;
- windings - break due to increased currents or a jammed overrunning clutch.
It is recommended to check the starter itself on a professional stand.