The advanced security system with the Starline B9 key fob (English article - Starline B9 Twage) not only protects the car from theft, but also has a large number of additional functions. So, the owner of this car alarm can set:
- silent security mode;
- activate the “anti-robbery” or “panic” command;
- install a turbo timer;
- set up automatic engine start based on temperature, alarm clock, timer, etc.
The set includes a complete set for installing the system, a main key fob with an LCD display, as well as a second remote control in case the main one is lost (without display). Additionally, you can install a GSM module, which makes it possible to control many functions from your phone. Programming and linking the key fob is a relatively easy procedure. You can learn about these capabilities, as well as the system setup procedure, from this article. About the Starline B9 alarm unit.
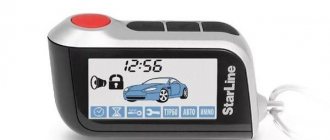
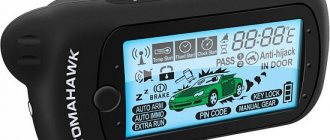
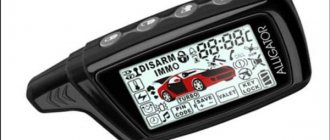
Buttons and symbols
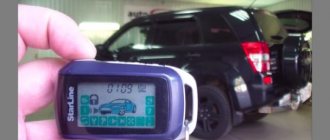
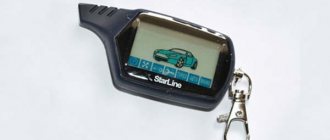
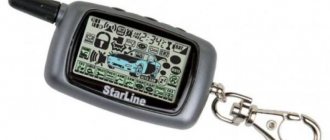
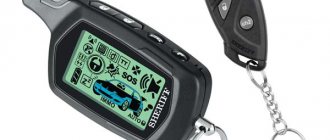
The Starline B9 Twage (W807) or Starline B9 Dialog (W809) alarm kit includes two key fobs. The main one has a liquid crystal screen with color and sound indication. There are also many icons on the display to help you understand the capabilities of the system and understand which functions are currently enabled (active icons will be highlighted).
The second remote control is designed in case of loss of the main key fob or its complete discharge. It is not equipped with a screen, but there is an LED lamp on the body for indication. The number of buttons is three, just like on the main remote control. The decoding of symbols and the main functions of the keys are presented below.
- Button 1, as a rule, is responsible for activating the main options - those that have already been programmed.
- Button 2 usually acts as a deactivator of these tasks.
- Key 3 helps set additional modes, activate the search option or view the current engine temperature.
Depending on the combinations of presses, as well as their duration, a large number of tasks can be performed. The main key fob has a ton of different indications to help you navigate through the alarm's capabilities.
A clock icon with the caption Clock Start or Fixed Start – auto-start mode using an alarm clock or timer.
Thermometer – autostart based on temperature.
Wrench with Valet inscription - service mode.
Extra Run – turbo timer option.
Auto ARM - autonomous arming.
Auto Immo – immobilizer.
Key Lock – locks the key fob buttons from accidental pressing.
Recording the code for a new key fob
Before you start programming codes, it is recommended to make sure of the following:
- The new key fob really fits, that is, it is compatible with the signaling model used (B9 and B9 Dialog are considered incompatible);
- The internal battery must not be discharged (it is better to replace it with a new one);
- You have a complete set of keychains that the owner needs.
Pay attention to points “1” and “2” - these requirements are often not met. Below is the appearance of the key fobs, main and additional, suitable for the Dialog alarm system:
Composition of the B9 Dialog kit
If you have just such a signaling, then remember: on the “large” key fob you need to simultaneously press buttons “2-3”, on the small one “1-2”. For alarm B9, everything is different: you will need to press the combination “1-2”.
Operator actions: step-by-step instructions
So, you have all the key fobs (maximum 4), as well as the ignition key. Then proceed as follows: first of all, you need to disarm the car. This can be done using a working key fob by pressing button “2”. Once inside, insert the key into the lock, but do not turn on the ignition:
4 key positions
Keep the key in the LOCK position. Second step: find the VALET button located in the car interior.
The sequence of actions required to record key fob codes:
- Press the VALET button 7 times in a row;
- We start the engine (START). The siren will sound 7 times;
- Each key fob is registered as follows: press the “1-2” buttons simultaneously until the siren sounds (on “Dialogue” press the “2-3” combination);
- We repeat step “3” for each key fob, maintaining an interval between entries of no more than 5 seconds.
- Turn off the ignition. The dimensions will then blink 5 times.
It should be noted that for some alarms everything is done differently: at step “3” the buttons are not held until the beep, but held for 3-4 seconds (then released). A second passes and then the beep sounds. These are the “wisdoms”.
Composition of the B9 signaling key fob kit
It is important to know that you need to press two keys at the same time, otherwise nothing will be recorded.
They often do this: they register new key fobs, but forget the old ones. After this, you have to repeat the entire operation, from start to finish. The following combinations are suitable for “Dialogue”: “2-3” on the “large keychain”, but on the small one - only “1-2” (there are no other keys there).
Where to get useful information
The owner of the Starline signaling must have official instructions supplied in printed form. It would be strange if the manufacturer did not provide the buyer with all the necessary information. For B9 models of both revisions (before 12/1/07 and after), a text is provided that tells how to register the key fob code. And for “Dialogue” the authors tried their best and drew a diagram:
Screenshot of Starline Dialog instructions
Actually, this is where we learned about the combination “2-3” (see the inscription under number “2”).
All information for B9 signals is given in one booklet.
For “Dialogue” there are two of them: user and installer instructions. Good luck.
Such an operation as recording key fob codes is also carried out at service stations. This happiness costs only 300-350 rubles, and for any signaling. Advice: when heading to the service station, be sure to take all key fobs (old and new) with you. Their total number, as we have already said, cannot exceed 4. This is a feature of Starline alarms.
What about others?
Let's say we had an A9 model alarm. Then you would have to turn on the recording mode in a different way: VALET is pressed when the ignition is on. Other key combinations would also be suitable: “3-4” for a key fob without a display, “1-2” for the main one.
Alarm kit Starline A9
The main thing is that it uses one principle, regardless of the signaling model. First, they always activate the “recording mode”, and only then register the key fobs. It's simple.
The instructions for Starline in general look like this:
- Using the VALET button, we activate the “recording mode”;
- We begin to register the key fob no later than 5 seconds after the “beep”;
- We repeat the recording procedure as much as necessary;
- We exit the special mode (for B9, just turn off the ignition).
The main thing is that now you understand the principle. And all the details are given in the official instructions. Just find the item “Recording key fob codes” in the contents, and there will be no problems. But in the instructions for “Dialogue” there is no link to the required chapter.
All Starline alarms have two controls: a round button (called VALET) and an LED indicator.
Control elements, car interior
There are signaling models in which the LED going out indicates that the special mode has turned on. But the siren is also used. Note that the booklet for the B9 model (as well as Dialog) says nothing about the indicator. So, there is no need to pay attention to his condition. The main thing is that it remains possible to disable the security mode. Without this, all of the above makes no sense.
Programming Starline B9 key fob
To program custom parameters convenient for the car owner, the driver must enter the appropriate mode. To do this, you will need the Valet service button. If the car alarm is new, then the driver should know where it is installed. If the car was bought secondhand, then you need to inquire about its location. As a rule, installers place it in hidden places so that an attacker cannot reach it and reset the settings.
- under the decorative cover of the front panel, near the fuse box;
- on the inside of the storage compartments on the front doors or inside the glove box;
- near the pedal assembly or around the steering column from below;
- on the central tunnel between the front seats;
To switch to this mode, you must turn off the ignition and press the Valet service button 6 times. After turning the key to On mode, six beeps will sound and the car will blink its headlights six times. Now you need to press the Valet button a second time. The number of presses will indicate the number of the function that needs to be reprogrammed. For example, three presses allow you to configure autorun by timer, and three – by temperature. After this, by pressing the button on the key fob, the corresponding parameters are set.
Starline A9 alarm connection diagram
Below is a help video on how to enter the mode and configure or reprogram custom functions.
How to register an alarm key fob
To correctly configure and control all additional functions, registration of the remote control is required. This is how the system will “understand” that the signal is sent by the owner and not by the attacker. It is best to record several remote controls at once - both standard, with an LCD display, and additional. If the procedure was unsuccessful or the already linked key fobs cannot interact with the system, then it is necessary to flash the alarm. If even the firmware did not help, and all the glitches remain, you need to give the car to specialists for diagnostics. Below are instructions on exactly how to register a key fob.
How to attach an alarm key fob to a car
The Starline B9 system has two versions: Dialog and Twage. Depending on the option, the connection has its own characteristics. Binding the key fob The dialogue is carried out as follows:
- the ignition key is turned to the Off position;
- The Valet service button is pressed seven times. After turning on the ignition, the car emits seven sound and light signals;
- The second and third buttons on the remote control are pressed simultaneously. They are held until a melodic signal sounds, indicating that the binding was successful.
- The spare remote control is registered in the same way. The main requirement is that the interval between bindings should not be more than five seconds;
- the ignition turns off again. The successful completion of the procedure will be indicated by the dimensions of the car blinking five times.
To connect the key fobs of the Starline B9 Tweig system, you need to complete the following steps:
- With the ignition off, press the Valet button seven times;
- turn on the ignition, listen to seven signals;
- press the first and second buttons simultaneously until the sound signal sounds. Attach all existing keychains;
- exit the binding mode by turning off the ignition.
How to set the time on a key fob
There is a clock on the Starline B9 alarm remote control. It is very important to set this parameter correctly, otherwise many functions will not work correctly. For example, autostart on an alarm clock will occur at the wrong time. To set the clock you need:
- Press and hold the third button for a few seconds, until it emits a melodic signal. Afterwards, another sound should sound, and two melodies should also be played. Now the owner has entered the time settings mode, and the clock indicator blinks on the display.
- Using the first and second parameter buttons, the “Clock” is changed. In the first case, it increases, in the second, it decreases. After setting the correct parameter, you must press the third button again. The “Minute” indicator now starts flashing. Its adjustment is carried out in the same way, by pressing keys one and two.
- The next click on the third button switches to the alarm setting mode. The procedure for programming it is exactly the same - the first button is responsible for increasing the parameter, the second - for decreasing it.
- Pressing key three again allows you to activate or deactivate the alarm. In this case, the first button turns it on, and the second button deactivates it.
- Another click of the third button allows you to go to the alarm timer setting menu. Parameters are reduced or increased in the same way.
- It’s very easy to finish setting the clock on the Starline remote control - just don’t press anything for 5 seconds. The system will remember and save the changes made.
How to set up auto start on alarms
The system also has additional options that allow you to start the car automatically at a specified time or upon reaching a specific temperature value. Setting up automatic start based on temperature is as follows:
- turn the ignition key to the OFF position, press the Valet service key 6 times;
- turn on the ignition, listen to 6 sound and light signals from the car, confirming entry into the programming mode;
- press the Valet button four more times;
- Now on the key fob we press the buttons corresponding to the required value (1st key = -5 degrees, 2nd = -10 degrees, 3rd = -18 degrees, long press of the first button = -25 degrees);
- confirmation of the received command is the corresponding number of sound or light signals (from 1 to 4). Memorizing this function will be automatic; you just need to not press anything for five seconds.
Temperature-based autostart can also be activated from the key fob - you need to use buttons 3 and 1 to move the cursor to the thermometer icon and activate this option. As confirmation, one beep from the key fob will sound and the headlights will flash several times.
If you need to start the car at a certain time in order to get into an already warmed-up car, then it is better to use an alarm start.
You need to position the cursor on the corresponding clock icon (using the third button). Then you need to press the first button and hear a melodic signal. The time on the key fob should blink, and the car's dimensions should blink once;
Instructions for autostarting the Starline B9 key fob
Now the corresponding icon is displayed on the remote control, and the system has begun the countdown to autostart. The alarm clock indicators themselves are set in the same place as the clock parameter.
After this, autostart by alarm can be activated from the key fob:
- You need to successively press keys 3 and 1 to move the cursor to the clock icon. Afterwards, a melodic signal from the remote control will sound;
- To turn off this mode, you now need to press the second key.
How to turn off the engine
If the car has warmed up, but the trip is cancelled, then it can be easily turned off remotely. To do this, you only need to press the second button for a long time, and then again briefly press the third key. The motor will turn off, and the key fob will emit a melodic signal.
How to open the trunk with the key fob
Optionally, the system can be equipped with a remote lock for the luggage compartment. An additional channel is responsible for this, which is programmed according to function 13. The function is activated as follows: on the key fob, press the third button for a long time, and then press the first key again briefly. The car emits three sound and light signals, and the trunk door opens.
Factory reset
If the car was purchased secondhand or the system periodically fails, then it makes sense to reset the Starline B9 settings to factory settings. To do this you will need:
- turn off the ignition, press the Valet service button nine times;
- turn on the ignition, listen to nine sound and light signals;
- press the service button again, listen to another signal;
- click on the first key on the remote control to confirm the factory reset;
- turn the ignition off and on again. Confirmation of a successful procedure will be five light signals from the car.
Alarm management
A complete B9 alarm manual in Russian comes with the system and describes in detail all possible manipulations. All main options are activated by pressing buttons or a combination of them.
Starting and disabling the security mode
The security option is activated in a car with the engine turned off, the doors, hood and trunk tightly closed, and the hand brake raised. To activate protection, click on the first button. The system will notify you of the completed action with a signal, and a closed lock icon will appear on the control panel. Deactivation is performed by the second key, a sound signal and an icon will confirm the deactivation of the function.
Starting security mode without sound
This function is launched under the same conditions as protection activation. The difference is that you will need to press the buttons twice: to turn on silent mode - button No. 1, to turn off - button No. 2.
Opening and closing doors with the engine running
The option is activated by the following procedure:
- the engine starts, the car is put on the handbrake, one of the doors opens;
- button No. 2 is pressed until the siren signal appears and the smoke pipe icon appears, the engine operation timer appears;
- the key is removed from the ignition, the driver gets out of the car and closes the doors;
- security is activated and deactivated in the standard way.
Remote engine start and stop
Remote engine start is performed by sequentially pressing buttons 1 and 3. In this case, 1 button must be held down a little longer than 3. Activation of the motor will be confirmed by a sound and light signal. To turn off the engine from a distance, you need to click on keys 2 and 3 in the same way.
Warming up the engine at a given temperature
During the cold season, you can set the engine to warm up on a schedule. The option is activated by switching the cursor on the key fob screen to the thermometer icon, where the automatic engine start temperature is set. The function is activated after clicking on the second key.
Automatic engine start according to schedule
Autorun has a number of additional settings, which determine the adequacy of the option’s operation. First, set the current time and alarm clock. If the alarm clock rings at exactly the set time, the cursor is hovered over the bell on the pager display, and buttons 1 and 3 are pressed simultaneously. To turn off, hover the cursor over the clock icon and click button 2.
Activating the vehicle search function
It is recommended to register the GPS search function for the B 9 model immediately after installing the alarm. The option is launched after double-clicking the 3rd key within a second. If successful, the siren and headlights will sound six times.
Triggering of alarm sensors
Alarm sensors are activated when there is an impact or external impact on the vehicle. Startup occurs automatically, and shutdown by pressing key No. 2.
VALET mode
The service mode is started by holding down key No. 3 until the siren sounds. Using the same button, the pointer moves to the Valet inscription, then click on 1 button.
How to disarm without a key fob
If the remote control is lost, an emergency shutdown of the alarm is provided.
The car owner must open the car door using the key. Next, within 20 seconds, turn on the ignition and press the service button three times. Turn off the ignition again - if everything went well, the car will beep twice. If the emergency shutdown mode is selected by entering a personal code, the action algorithm is different:
- the door opens with a key;
- within 20 seconds, the ignition is turned on, and the service button is pressed a number of times equal to the first digit of the code;
- the ignition turns off. If the code is two-digit, then the procedure is repeated, only the Valet button must be pressed a different number of times (equal to the second digit of the code). If the code is three-digit, then the third stage follows.
How to turn off the alarm from the key fob
Also, if you have a working key fob, you can turn off the alarm using it. Disabling is simple - by pressing the second key. The car will make two sounds. You can disarm it without sound confirmation - this option will be activated if you make two consecutive short presses of the second button. There is also a silent security mode to protect the car without a siren or light indication. First, two presses of the second key are made on the key fob - one long, and the second short. After this, the car will not emit signals, and the owner’s key fob will only receive notifications.
Key fob programming
Before registering the Starline B9 key fob, the user must install a working battery in the new communicator.
If you do not write the communicator code into the memory of the microprocessor module, the consumer will not be able to use all alarm options.
How to register a new Starline B9 Dialog key fob
In accordance with the B9 Dialog operating manual, in order to program a new communicator yourself, you need to perform the following steps:
- You need to program the device with the ignition off, so if the system was turned on, it must be deactivated. To do this, the key is scrolled to the “Lock” position.
- The button to enter the service mode must be pressed seven times. If the location of the key is unknown, it should be checked with the anti-theft system installer. In most cases, the service button is installed under the instrument cluster and can be disguised in one of the bundles with standard wiring. Additionally, the installer could wrap its wire with electrical tape.
- Then the ignition system in the car is activated by turning the key in the lock to the “ACC” position. If the control unit is ready to reflash the communicator, the alarm siren will emit seven sound pulses.
- On the key fob to be registered, buttons 2 and 3 are pressed simultaneously. These elements must be held until the control unit accepts the code. This will be indicated by one siren signal and a melodic impulse from the remote control.
- Similar steps are performed in order to flash additional devices. It is important that the time interval between binding is no more than five seconds, otherwise the alarm will exit the programming menu.
- After binding, you must turn off the ignition system by setting the key to “Lock” mode. The car's external lighting devices (parking lights or warning lights) will blink five times.
Video: binding the Starline B9 communicator
User Leonid Akimtsev in his video clearly showed the process of programming a key fob to control the Starline B9 anti-theft system.
How to attach a key fob to a Starline B9 Twage alarm
To record the remote control on the Twage model, you need to perform the following algorithm:
- The ignition in the car is deactivated. The button to enter the alarm service mode is pressed seven times.
- The ignition is activated - the key is turned to the “ACC” position. Upon successful entry into the programming menu, the alarm siren will emit seven sound pulses.
- On the connected device, the first and second keys are “clicked” simultaneously. If the control unit accepts the code, the siren will play a single signal. These steps are repeated for each device, the time interval between recordings should be no more than five seconds. When pairing the second remote control, the siren will emit two beeps, the third - three, and the fourth - four.
- The vehicle's ignition system is turned off. When successfully exiting the binding menu, the external lights will flash five times.
Photo gallery
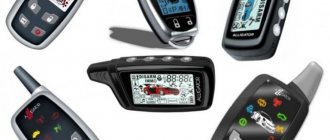
Photo of the correspondence of the controls on the main and additional remote control of the car alarm of the Starline B9 Twage model:
Compatibility of Starline B9 key fobs
There are several different variations of the Starline B9 alarm system - these are Dialog and Tweig. The difference between car alarms is minimal , as is the range of functions performed. Almost everything here is identical - the only differences are in the appearance of the keychains .
The body of the B9 Dialog remote control has a rough structure, while the Twage has a smooth structure. The buttons have different icons, although they perform identical functions. There are also differences in the LCD graphics, vehicle designation and icons. However, these remote controls are interchangeable and are perfect for both versions of the Starline B9 car alarm.
Installation and operation instructions for StarLine B9 alarm key fob
To correctly install the security system, you will need the following set of “helpers”:
- a set of tools, including spanners, as well as removable heads of various sizes;
- set for soldering wires: blowtorch, solder kit (tin, rosin);
- drill, heat shrink tubing, insulating tape;
There are also basic points that need to be taken into account in order to properly install the alarm:
- the central unit is placed in a place inaccessible to moisture and prying eyes, and the wires are laid in such a way that an attacker cannot reach them from the outside;
- the transceiver is mounted away from metal parts (at least 5 cm). The wires are also laid at a distance from parts that create interference (armored wires, etc.) for correct signal transmission;
- the siren is mounted away from high temperatures, and the engine temperature sensor is fixed to its body using M6 bolts (pictured).
Common key fob malfunctions and their solutions
If the communicator is not registered, this may be due to the following malfunctions:
- Damage or discharge of the battery installed in the key fob. On the main device, battery failure can be determined by a special icon located on the screen. On additional remote controls, a discharge can be indicated by a change in the color of the LED light. To replace the battery, you need to open the back cover and remove the battery. Installation of a new battery is carried out observing polarity.
- Malfunction of the buttons on the key fob. To eliminate the cause, you need to completely disassemble the remote control by unscrewing the bolt located on the back cover or in the battery compartment. To unscrew, use a Phillips head screwdriver. Failed keys can be identified by a damaged contact that connects the control element to the board. To restore functionality, soldering will be required; the button is installed along a plastic guide, but you can only use controls from similar devices.
- The antenna in the communicator has failed. The role of this element is played by a special spring located inside the case and connected to the board. To troubleshoot the problem, the antenna must be re-soldered using a soldering iron with a thin tip.
- The lack of response of the control unit to pressing buttons may be due to incorrect installation of the transceiver with a built-in antenna. The module must be placed on the inner surface of the windshield, at least 5 cm from electronic devices and metal products. Otherwise, the antenna signal will be muted and the transceiver will not be able to receive key fob commands. The user will not be able to not only register a new remote control, but also send any commands to the microprocessor unit.
- The internal components of the board are clogged with dust. To fix the problem, the device must be completely disassembled and cleaned. For cleaning, use a dry cloth or soft brush. When performing the task, you must act carefully so as not to damage other components of the circuit. It is necessary to clean not only the board, but also the contacts through which the keys are connected to it.
- Oxidation of contact elements or circuitry as a result of prolonged exposure to moisture. To solve the problem, you will need to disassemble the device and clean all components. You can use a cotton swab with alcohol, but you must act carefully so as not to spill the liquid on other elements of the board. If the reason is exposure to moisture, then the circuit must be dried in a dry and warm place. To perform this task, you cannot use a household hair dryer or stove, since critically high temperatures can completely damage the board.
- Mechanical failure of the key fob as a result of a fall. With this problem, there is usually serious damage to the internal electrical circuitry. The board cannot be repaired; it will need to be completely replaced. If you can’t find a similar electrical circuit, then the remote control changes completely.
- Malfunctions in the operation of the software component of the communicator. In such cases, the cause of the problem is usually firmware glitches. To fix the problem, you need to change the software version or completely reset it. You can only reflash the key fob using special equipment and software, so it is recommended to contact specialists for a solution.
What to do if StarLine B9 does not work
Sometimes the owner experiences problems with the alarm and needs to understand the existing problem. For example, the car does not see the feedback key fob or does not respond to the command. Accordingly, the owner cannot open the car, start the car or select the required security mode. In this case, you need to check the condition of the remote control power supply and replace the battery if necessary.
Moreover, if the car does not receive the remote control well, then the reason for this may be a poor signal from the transceiver located near metal parts that create interference. It needs to be moved to a more protected place.
There are also options when the car alarm constantly notifies the owner about hacking attempts, the key fob regularly vibrates, and the SP error is written on the display. The reason for this behavior is that the shock sensor is too sensitive. Both stages (impact and hacking) can be adjusted using a standard screwdriver, reaching the sensor itself (it has special controls).
If false alarms sometimes occur and additional software glitches appear, then it is best to reset to factory settings. After this, most of the problems should disappear, but if you can’t fix them, it’s better to take the car to a specialized service center, where qualified specialists will sort out the issue and fix all the problems.
Keychain Starline B94
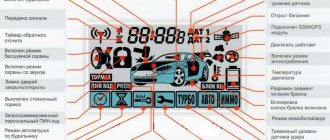
Designation of symbols on the Starline key fob
Description of indicators and symbols on the display of the main car alarm key fob:
- Icon of the enabled remote start of the power unit according to the alarm clock.
- Engine start by timer, at certain time intervals.
- Automatic engine start based on ambient temperature.
- Indicator for entering the service mode for servicing the anti-theft system.
- Icon of the enabled “Turbo timer” option for a diesel engine.
- Symbol for activating the car security function in automatic mode.
- The engine immobilizer is enabled or disabled.
- Icon of the activated button lock option on the communicator.
- Battery charge symbol in the remote control. If one division remains on the indicator or the icon blinks, the battery must be replaced.
- Determining the temperature level of the engine or interior.
- The Anti-Robbery function is enabled.
- The power unit of the car is started. The indicator lights up if the engine autostart is successful.
- Icon of connected additional equipment, in particular the GSM search unit.
- Symbol for bypassing the warning zone of the shock sensor, tilt sensor or additional controller.
- Icon for disabling both levels of the sensitivity controller - warning and alarm.
- The vehicle's ignition system is turned on. If the indicator lights up together with the hood, door or trunk icons, this indicates that one of the body elements is open.
- Scoreboard indicating the current time. This field can display information about the on-board network voltage and temperature.
- Alarm mode for autostart is enabled.
- Countdown timer indicator.
- Feedback symbol between the transceiver module and the communicator.
- Unlocked door locks icon.
- Indicator of the activated alarm mode with accompanying siren signals. If the icon is made in the form of a crossed out megaphone, this indicates the activation of silent security, without sound impulses.
- The vehicle door locks are locked.
- Indicator of emergency shutdown of the anti-theft system using a personal password.
- The manual transmission mode is turned on when preparing the engine for autostart.
Designation of symbols on the screen of the Starline B9 signaling system
How to replace the display on a key fob
Sometimes the Starline alarm remote control receives mechanical damage, due to which the display may crack and a certain number of symbols will simply no longer be displayed. This is extremely inconvenient, especially since this problem can be corrected by replacing it. To do this, you will need a new screen, a screwdriver and a set of soldering accessories (blowtorch, rosin, tin). First you need to disassemble the key fob and unsolder the old display, disconnecting it from the cable. Next, you may need to bend the contacts so that they do not rest against the board itself. Now you need to tin all the contacts on the key fob for better impulse transmission and solder the display to the cable. After assembly, the remote control should work properly.
Common problems and their solutions
Users of Starline anti-theft systems most often encounter the following malfunctions:
- The control panel stops responding to commands. If the owner has correctly linked the key fob to the system, most likely the reason is a dead battery. You should buy a new battery and install it in the remote control.
- The remote control does not work after falling into water. The pager must be opened, dried and cleaned of debris and dust. Do not dry with a hairdryer, radiator or other heating device.
- If the remote control is dropped and deformed, and then does not respond to influences, it is necessary to replace the device and register it in the alarm system.
- The software is buggy and responds to key presses. Problems of this kind can be corrected by flashing the device, which is best left to the experts.
- The alarm does not recognize the new control panel. The reason is that the Starline B9 key fob was not registered in the system. Try the activation procedure again. If this does not help, you need to check the compatibility of the new key fob with the software.
If breakdowns occur that cannot be repaired on your own, the vehicle should be shown to a mechanic.
Price
The cost of the Starline B9 keychain may vary depending on whether it is an original or a Chinese spare part. Below is a table with approximate prices for two versions of the remote control in various cities of Russia.
| City | Cost, original (rubles) | Price, Chinese equivalent (rubles) |
| Moscow | 1800 | 999 |
| Saint Petersburg | 2000 | 700 |
| Volgograd | 1900 | 1000 |
| Ekaterinburg | 2100 | 1050 |