01/25/2022 2,091 Alarms
Author: Victor
Programming the Starline A9 key fob, like other models, begins with binding (maximum 4 pieces) to the microprocessor control module using the Valet button and keys on the remote control. After this, you can configure the assignment of buttons and the launch of modes (autostart, immobilizer, turbo timer, etc.) on the main or additional communicator - both devices can perform similar options.
[Hide]
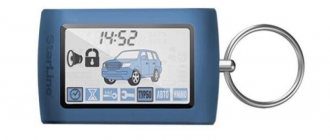
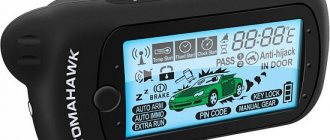
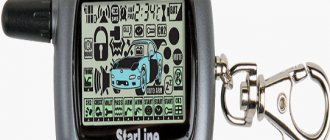
1. Liquid crystal display of the Starline A9 key fob
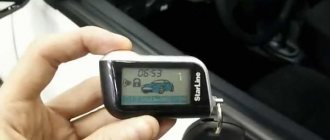
The set includes 2 key fobs: the main one with 3 buttons, an LCD display and a feedback unit; additional with 4 buttons and low-power signal transmitter.
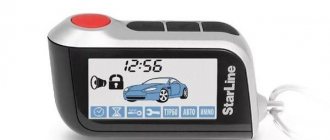
Keychain Starline A9 without display
The key fob with the display has more capabilities; it allows you to program autostart and configure the alarm processor unit. If the main Starline A9 key fob is inoperative or lost for some reason, an additional one is used, but it does not have feedback. It also activates most of the car alarm modes and functions. Therefore, the following instructions are intended for using the main key fob.
Using the display, it is convenient to monitor the status of the sensors in the car and issue control commands. Different icons are displayed on the screen, each of which corresponds to a specific function. Shortcuts are used to activate various modes and functions.
Liquid crystal display of Starline A9 key fob
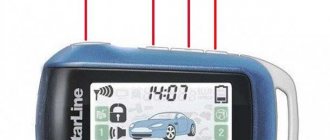
1.1. Icons
To make the most of your key fob, you need to know what each icon means. There are 12 of them in total - they are shown in the figure and designated in English letters from A to L.
In the following image you can see which command each label corresponds to. The functions of the icons are activated by the cursor method - the enabled state of any mode is confirmed by the constant illumination of a specific label at the bottom of the display.
1.2. Badges
Additionally, other icons may be displayed on the display. In the picture you can see what modes or functions each of them represents. Further in the instructions, different icons will be mentioned, indicating their numbers in the figure.
Note! To make it more convenient to use the remote control and to prevent accidental activation of functions, 10 seconds after the last key press, the system automatically returns the cursor to the CHEK command icon.
Problems and their solutions
Problems with the control panel arise due to the destruction of buttons and moisture entering electronic components. To restore the functionality of the button, you need to replace the rubber backing along with the printed circuit board or purchase a new remote control. After replacing the battery, the remote control and alarm unit become desynchronized. If the owner does not update the product in a timely manner, then it will not be possible to control the complex using the key fob.
If, after pressing the setup button, the control panel is not registered, then you need to make sure that the key is connected correctly. The complex is equipped with an additional anti-robbery key with an identical switch connector. For some owners, after attempting to enter the programming mode, the relay is triggered, causing the external light alarm to turn on.
The defect occurs due to the exclusion of a cable with a yellow insulator from the ignition switch circuit; during setup, a jumper is installed between the cords with yellow and red insulation. The jumper simulates the operation of the key in the lock; after the remote control has been recorded in memory, the element is removed from the block.
- Override button on Tomahawk 9010 alarm system
- Steering wheel remote control for car radio
- The best summer tires for crossovers
- What kind of oil to pour into Priora 16 valve
2. Programming Starline A9 buttons
Like the Starline 91 key fob, there are 3 keys on the side of the device that can be pressed separately (short or long) or in combination. This determines what command will be transmitted to the car alarm unit.
2.1. Button 1
Button 1 is indicated on the Starline A9 key fob with the Roman numeral I. It can be programmed to execute any command. You can change the function any number of times. Depending on the duration of the press, the button performs different commands:
- 0.5 s (quick press) – programmable command (the one you set yourself);
- 3 s – remote start and stop of the engine;
- 3 s – activation of the security mode with the engine running.
The manufacturer recommends programming button 1 to turn the security mode on and off. But you can specify any function. How to do it:
- Briefly press key 3, indicated by an asterisk, 2 or more times. To change the direction of cursor movement, pause 1-2 s between clicks.
- By pressing 3 buttons, move the cursor to the icon corresponding to the command you want to set.
- Hold button 3 for 6 seconds until a double and then triple beep sounds. This confirms the choice of function.
- To check that the settings are correct, press key 1.
Using this instruction, you can program key 1 an unlimited number of times. To change the command, you just need to do everything again.
2.2. Button 2
Button 2 is indicated on the key fob by the Roman numeral II. The functions depend on the duration of the press:
- 0.5 s – command corresponding to the current cursor position;
- 3 s – trunk unlocking.
The key assignment determines the current cursor position on the display. To move the cursor you need to:
- Briefly press button 3 2 or more times so that the cursor begins to move. If you pause and press again, the cursor will change direction.
- Continue pressing button 3 to move the cursor through the icons. Set it to the position that corresponds to the desired command.
- Press 2 to execute the selected command.
2.3. Button 3
Button 3 on the Starline A9 key fob is indicated by an asterisk (*). Key functions depending on the duration of pressing:
- 0.5 s – cursor movement on the display;
- 0.5 s – interruption of the alert signal;
- 3 s – setting the clock, timer, alarm clock, energy saving mode;
- 6 s – button programming.
2.4. Button combination
- 1 + 2. When pressed for 0.5 s, search mode is activated, 3 s – panic mode.
- 3 + 1. When pressed for 0.5 s – select the key fob notification mode.
- 3 + 2. When pressed for 0.5 s – quick timer setting.
Key Features
Key features provided by the alarm:
- The security complex creates several individual security zones on the vehicle. A separate zone protects the electrical circuits for starting and operating the engine. The limit switches are activated when the doors are unauthorized and the parking brake lever is released. The impact sensor protects body panels and glass from damage. Additionally, the circuits and ignition switch are protected.
- The main processing unit has non-volatile memory that saves the system state when the power is turned off.
- Built-in anti-robbery mode. It is activated by a button on the key fob or a separate key included in the package.
- Panic mode with the possibility of remote activation.
- Additional immobilizer functions and built-in turbo timer.
- Automatic start and warm-up of the engine at a distance and according to a preset program.
- It is possible to extend the operation of the power unit using a key fob.
How to register the Starline A9 key fob
From the very beginning, the remote control must be linked to the car alarm. Up to 4 key fobs can be connected to one microprocessor module. To do this you need:
- With the ignition on, hold down the Valet service button until 4 short beeps sound. The Valet button is a small device with an electrical wire that connects it to the main unit of the security complex. It may be located under the dashboard, steering wheel, in the glove compartment or fuse hatch, near the gearshift lever or mounting block.
- Immediately after this, simultaneously press: 1 and 2 buttons of the main remote control, 3 and 4 buttons of the additional key fob (without display). If the connection is correct, a beep will sound.
- To link the following key fobs, you must also press buttons 1 and 2 on them, keeping the interval between them no more than 5 seconds.
- After binding, you can turn off the ignition and begin programming the key fob: setting up key assignments and starting modes.
This is what the service button looks like, aka Valet
Important! When linking new key fobs, you must overwrite the old ones, otherwise they will be deleted from the system.
A9 Specifications
The Starline Twage car alarm model has the following characteristics:
- operating frequency of the radio transmitter - 433.92 MHz;
- radius of signaling by communication key fob (with display) - 600 m;
- the range of reception by the pager of signals supplied by the head unit is 1200 m;
- operating distance of the auxiliary control panel - no more than 15 m;
- shock sensor design type - piezoelectric element;
- permissible operating temperature of the head unit is from minus 40 ºС to plus 85 ºС;
- voltage at the power terminals is not higher than 18 V and not lower than 9 V;
- the current taken by the alarm in standby mode is 0.25 mA.
The declared distances for sending and receiving signals are achieved only in open space. In urban areas and in the presence of interference, the reception distance is reduced several times.
The design of the circuit boards of the Tweige A9 head unit allows the operating current values indicated in the table.
| Purpose of the circuit | Rated current value, A |
| Signaling the siren | 2,0 |
| Operation of external light alarm (duplicated) | 7.5 (each) |
| Controlling the operation of passenger compartment door locks | 15,0 |
| Ignition system | 40,0 |
| Additional ACC equipment | 40,0 |
| Starting the engine with the starter | 40,0 |
| Engine Control System Controller | 40,0 |
| Additional functions of the complex | 0,3 |
4. Starline A9 set the time
The main Starline A9 key fob has a built-in clock (icon No. 6 on the display). How to set the time correctly:
- Long press button 3 until 2 short beeps. The clock indicator on the display should start flashing.
- First set the clock: button 1 – increase the value, button 2 – decrease it. If you hold down the key, the hours will change quickly.
- Set the minutes - to switch from hours to minutes, press button 3. To increase and decrease the readings, also press buttons 1 and 2, respectively.
Equipment
The installation kit includes:
- keychain communicator equipped with a liquid crystal screen and a receiver-transmitter for two-way communication;
- auxiliary key fob that works only for signal transmission;
- a main unit including a control processor and a relay module;
- antenna module (with additional transmitter and temperature sensor);
- temperature sensor in the engine compartment;
- adjustable shock sensor;
- control diode;
- setting and service button with wiring;
- anti-robbery function control key;
- limit switch;
- set of connecting harnesses;
- technical documentation, including installation and configuration instructions.
The A9 alarm is supplied in a cardboard box, the components are placed in a foam backing that protects the parts from shock.
Photo gallery
The photo shows the type of components included in the alarm set.
General view of the delivery set
Set removed from the car
Additional control panel
Main keychain
5. Setting an alarm
When the alarm is set, icon No. 22 is displayed on the display. To install it, you need:
- Perform a long press on button 3 until 2 beeps sound.
- By successively pressing button 3, scroll through the icons until the icon in the form of an alarm clock (No. 22 in the figure). It will flash on the screen.
- Set the alarm time according to the same principle as setting the clock: button 1 increases the readings, button 2 decreases it, button 3 moves to minutes.
- To activate the mode, briefly press button 3, and then: button 1 to turn on (ON), button 2 to turn off (OFF).
When the alarm goes off, the key fob emits a pleasant melody. To turn it off, you need to press button 3, otherwise the sound signal will sound 3 more times with an interval of 5 minutes.
Flaws
According to owners, the alarm has disadvantages:
- there is no possibility of performing restarts at programmable time intervals;
- short range of receivers and transmitters in urban environments;
- commands are encoded using an outdated algorithm that is easily intercepted and decrypted;
- There have been cases of purchasing an alarm system with an incorrectly working head unit;
- weak key fob body, the supporting elements of the buttons are destroyed;
- Software failures are possible.
8. Setting modes
The Starline A9 key fob allows you to turn on, turn off and configure different security alarm modes:
- energy saving;
- alerts;
- security;
- autostart;
- immobilization;
- turbo timer.
8.1. Power Saving Mode
To extend the battery life of the main Starline A9 key fob, it can be switched to energy-saving mode. The system turns off the receiver's electrical circuitry, thereby reducing power consumption. After 2 minutes have passed after turning off the security mode, the energy consumption of the key fob is reduced to a minimum.
How to activate the mode:
- Press button 3 until 2 beeps sound.
- By pressing button 3, move the cursor to icon No. 20.
- Press button 1 (ON) to activate the mode or button 2 (OFF) to deactivate. When energy saving is turned on, icon No. 17 disappears on the screen (indicates the operation of the receiver).
8.2. Alert Mode
The Starline A9 key fob can notify the user about events with sound signals or vibration. If you select the latter, then instead of sounding with other settings, the remote control will vibrate. How to set the alert mode:
- Press buttons 3 and 1 at the same time.
- If the MUTE icon (No. 7 in the figure) appears on the display, then 2 vibration signals will follow, indicating that the vibration alert mode is turned on.
- When you turn on the sound mode, the MUTE icon will disappear and the key fob will emit a melodic signal.
8.3. Security mode
The Starline A9 key fob provides several security modes:
- with sound signals;
- silent security;
- with the engine running.
8.3.1. With sound signals
Before turning on this security mode, you must make sure that the ignition is turned off, the parking brake is on, and the trunk, hood and doors are securely closed. To activate, you need to press key 1. Icons No. 15-16 will be shown on the screen (15 – locking the locks, 16 – unlocking if the mode is turned off) and No. 11, and a sound signal will follow. If the doors are connected to the alarm system, they will automatically lock.
Note! Please note that to enable the mode in this way, button 1 must be programmed for this function. Above, in the instructions for programming this key, it was said that most often it is configured this way. If the button is used for another command, you will need to press key 3 to move the cursor to the G icon and confirm the selection with key 2.
8.3.2. Silent security mode
First, you also need to make sure that the trunk, hood and doors are securely closed. The parking brake must be set. To activate the mode, you need:
- Press button 3 until the cursor is positioned on the F icon.
- To confirm that the mode is enabled, press key 2.
When turned on, the parking lights will flash 1 time, the doors will automatically lock and the LED will begin to flash. A short beep will sound and icons No. 15-16 and No. 10 will appear on the display.
To deactivate the mode, you need to again place the cursor on the F label and press button 2. Confirmation of deactivation will be 2 flashes of dimensions and the appearance of icon No. 16 on the display.
8.3.3. Engine running
When stopping the car for a short time, the security mode is convenient, operating when the engine is on. The maximum operating time corresponds to the programmed warm-up time during autostart: 10, 15, 20 minutes or without limitation (icon r99).
How to activate the mode:
- Apply the parking brake (the engine continues to run).
- Press button 1 until 3 flashes of side lights and 1 sound signal.
- Remove the key from the ignition and leave the vehicle.
- Press button 1. When the mode is on, icons No. 15-16, No. 11 and No. 4 will be displayed on the screen.
8.4. Autorun mode
Automatic engine start allows you to warm up the car at the right time. The Starline A9 key fob provides several ways to enable this mode:
- Using an alarm clock. It needs to be set to the desired autorun time, then place the cursor on icon D and press button 2. Icons No. 22 and No. 25 will appear on the screen. To deactivate the mode, you must repeat the same steps.
- By temperature. Autostart occurs when the temperature drops to a certain threshold: –5, –10, –15 or –20 °C. To turn on the mode, you need to move the cursor to icon C and press button 2. Icon No. 3 and the selected temperature threshold will appear on the display. To turn it off, do the same, and the icons will disappear from the screen.
- At a given time. Place the cursor on icon E and press button 2. Icon No. 25 will appear on the display.
8.5. Immobilizer mode
The Starline A9 alarm system has an immobilizer mode, when turned on, the engine circuits are automatically blocked 10 seconds after each ignition is turned off. This is not affected by whether the security mode is activated or not. From the moment the immobilizer starts, the diode indicator begins to blink constantly. This mode can be enabled when programming the key fob.
8.6. Turbo timer mode
Another programmable function of the Starline A9 key fob is a pipe timer (works only when the parking brake is on), relevant for cars with turbocharging. By activating this mode, the engine is maintained in operating condition after the ignition is turned off for the time required to stop the turbine. Running at idle speed allows the supercharger and exhaust manifold to cool evenly. When programming, the engine operating time is set: 1, 3 or 6 minutes.
Note! The turbo timer mode cannot operate when the immobilizer is turned on.
Connecting a temperature sensor - errors
If we talk about the Starline A9 alarm, check the temperature like this:
- If an external sensor is connected, it monitors the engine temperature and the remote control displays the internal temperature;
- Without connecting the sensor, keep in mind that the alarm measures the temperature inside its housing.
It seems that the option using an external sensor is the most suitable. The connection, in turn, is carried out in parallel with the micropulsor contacts:
The button closes when the hood is opened.
The above is true for Starline Twage A9 systems and, in general, for any additional car alarms. The sensor itself, that is, the resistor, is connected to a standard microbutton. But during operation the following effect occurs:
- When the hood is open, the contacts are closed: everything is correct here;
- By closing the cap, you can get a “positive” potential at the signal output, which is unacceptable.
The latter is due to the fact that in the standard circuit the microbutton is connected to a lamp, which in turn always receives energy. The filament of the lamp has low resistance and “12 Volts” remains at the signal input. Well, or “almost 12”.
There are two solutions to the problem described above. If the light under the hood is not used during operation, cut the cable leading to the lamp:
But tampering with standard wiring is wrong. It is better to install an additional micro button. It is also always present in Starline A9 kits.
Of course, you need to do something according to the instructions. But the characteristic features of each car are also taken into account. This rule is used when installing alarms. We wish you success.
9. Programming Starline A9
To program a number of parameters, including immobilizer and turbo timer modes, you need to configure the Starline A9. How to do it:
- Press the Valet service button 6 times (the ignition must be on).
- After this, turn off the ignition, which should be followed by 6 siren signals and 6 LED flashes - this confirms that you have entered the programming mode.
- Press the Valet button the number of times that corresponds to the serial number of the programmable function. For convenience, every 5th press is accompanied by a long beep.
- Within 10 s, press button 1 or 2: briefly (0.5 s) or long (3 s), depending on how exactly you want to configure the function. The system will notify you of the set value with 1, 2, 3 or 4 short beeps.
- To move on to setting the next function, press the Valet button again. Use keys 1 or 2 to set the required parameters again.
- To exit programming, turn on the ignition. Confirmation will be 5 flashes of dimensions.
General information about the system
Here are a few immediate notes:
- You can register up to 4 key fobs (4 or less) in the Starline system;
- The control panel must be compatible with your alarm system. For example, there are revisions B6 and B6 Dialog, but they are incompatible with each other!
- If the newly registered key fob has not been used for a long time, its battery could be discharged. In this case, you won’t be able to write anything.
Of the three mentioned comments, the last two are obvious. They are suitable for all alarms (not only Starline). However, errors are often associated with non-compliance with requirements “2” and “3”. We hope you have taken everything into account.
10. How to disable Starline A9
To disable Starline A9 security without a key fob, you must do the following:
- Open the car door with the key. The car alarm will turn on the alarm mode: the siren will scream and the turn signals (dimensions) will flash.
- Turn on the ignition.
- Press the jack button 4 times within 20 seconds. The time is counted from the moment the ignition is turned on.
- Turn off the ignition. If everything is done correctly, the car alarm will be disarmed: the siren will beep 2 times, the emergency lights will blink 2 times.
If you did not have time to complete step 3 within 20 seconds, then turn off the ignition and turn it on again. You again have 20 seconds to press the jack button 4 times.
Attention! If the auto-arming function is activated, then after step 4, be sure to turn on the ignition for 10 seconds. Otherwise, the alarm may be armed again.
Video
User Alexander Shkurevskikh showed in his video a problem where the communicator is not registered, and also talked about how to fix it.
Do you have any questions? Specialists and readers of the AUTODVIG website will help you ask a question
Was this article helpful?
Thank you for your opinion!
The article was useful. Please share the information with your friends.
Yes (100.00%)
No
X
Please write what is wrong and leave recommendations on the article
Cancel reply
Rate this article: ( 3 votes, average: 5.00 out of 5)
Discuss the article:
User manual
The manufacturer strongly recommends that you first read the instructions for the Twage A9. This will help avoid quick breakdowns.
Designation of buttons and icons on the key fob
The Starline key fob is equipped with several buttons:
- Button number 1 (aka A). On the main communicator it is closest to the antenna, on the additional one it is marked with a lock icon.
- Button B. On the main remote control it is middle, and on the additional remote control it has a key icon.
- Key C - marked with an open trunk icon.
- Key D. It is provided only on the additional key.