VAZ-2106, master brake cylinder: principle of operation, design, repair
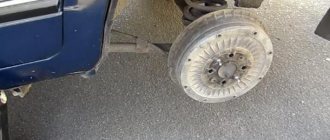
The main brake cylinder on the VAZ-2106 is necessary to create high pressure in the pipe system and on the calipers. This pressure compresses the brake pads, which lock the discs. The brake system is one of the most important, so it must be maintained in good condition. If there is the slightest malfunction, repairs must be made. Quite often, the cause of a breakdown is the gas turbine engine, but before repairing it, you need to make sure that it is the one that is faulty.
Repair of chassis and transmission
Most often, the rubber bushings of the anti-roll bar and rear links, the boots of ball joints and steering rod pins are changed due to wear. Next comes the replacement of the ball joints themselves, the steering linkage and silent blocks. The bearings of the front hubs and rear axle shafts need to be changed as they wear out; a faulty part makes itself felt with a characteristic hum.
Brake pads are a consumable item, but the front discs last quite a long time and are replaced when grooves and grooves are detected on the working surface. Cracks in the front beam are not that uncommon. Minor defects can be eliminated by welding, but you must keep in mind that such car repairs are temporary; the cracked beam will continue to deteriorate.
In the brake system, the working cylinders on the wheels often fail. This happens due to the fact that the rubber sealing rings become unusable. Car enthusiasts are well aware of the rule: it is easier to replace the brake wheel cylinder once than to replace rubber seals many times. Not so often, but still there are problems with the main brake distributor and clutch slave cylinder for the same reason.
Transmission parts that are well known to the owners of the “classic” are clutch parts, which are quite difficult to change on a VAZ 2106 car with your own hands. These are the clutch disc and release bearing, the lifespan of which ranges from 20 to 50 thousand km, depending on the quality of the product.
The difficulty is that to replace these parts you need to remove the gearbox, and before that the driveshaft. The latter has 2 crosspieces installed, which serve approximately 20 thousand km. The transmission unit, which sometimes makes itself felt with a continuous humming sound of varying volume and tonality, is the rear axle gearbox. Repairing it is expensive, since it cannot be done without the involvement of a serious specialist.
To save money, a car enthusiast can only remove the gearbox from the car to take it to a mechanic for repairs and subsequent adjustments, and then put it back. The VAZ 2106 gearbox is quite reliable, only in the latest 5-speed models there were sometimes some problems with 5th gear. The result is the same as with the gearbox - a trip to a specialist.
Typical malfunctions of the brake system
Before repairing the master cylinder, make sure that the following problems are not present:
- Very often air gets into the hydraulic brake system. As a result, work efficiency decreases several times. Make sure there is no air at all. To do this, you need to bleed the system.
- Carefully examine all elements of the brake system for leaks. If there are any, then it is necessary to replace the damaged elements and completely bleed the system.
- Jamming of the working pistons or the turbocharger can occur due to uneven wear; the problem is solved by completely replacing the turbocharger.
- If the vacuum seal is broken, the brake pedal will be pressed with very great force.
- If the handbrake cable is jammed, the rear wheels may rotate tightly.
As soon as you make sure that all the above malfunctions are absent, you need to turn your attention to the brake cylinder. The cuffs and pistons may fail, resulting in brake fluid leakage. If the return springs are faulty or broken, the pressure in the system will be constantly high. And if there is fluid leakage on it, braking efficiency decreases several times.
Signs of a broken master cylinder
The main signs characteristic of a breakdown of the main brake cylinder on a VAZ-2106 are the following:
- The presence of traces of brake fluid on the vacuum booster and inside it.
- The brakes cannot be pumped.
- Jamming and sinking of the brake pedal.
- The presence of jerks when pressing the brake pedal.
When repairing the master brake cylinder, there is no need to place the car on an inspection hole or overpass. Everything is done much simpler here. The master cylinder can be replaced by simply opening the hood.
But it’s best to pump the brakes on an overpass. Otherwise, you will need to lift the wheels one by one using a jack. If all work is carried out on a lift or inspection pit, you can not only bleed the system, but also at the same time adjust the tension of the handbrake cable.
How to remove the GTZ?
Replacing the master brake cylinder on “sixes” is carried out according to the following scheme:
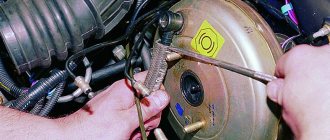
- Use a bulb to completely drain the fluid from the expansion tank of the brake system.
- Loosen the clamps that secure the hoses coming from the brake fluid reservoir. Please note that if factory compression rings are installed, they may not need to be removed. It is enough to pull the hoses towards you with little effort.
- Using a special wrench, you need to unscrew the brake pipes from the master cylinder.
- Move these tubes so that they do not interfere with the work.
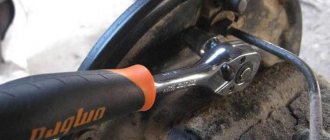
- Using a 13mm wrench, unscrew the two nuts that secure the device to the vacuum booster.
After all this work, you can completely remove the GTZ.
Comments
The GTZ will need to be replaced. Thank you.
Login to leave comments
Well written. At
Well written. With a certain amount of skill, if you are clever and quickly “close” the fittings of the main pipes when removing, you can do without pumping, or do the bleeding “by gravity.” Caps from GTZ are excellent for closing fittings.
From personal experience, I will say that the VAZ GTZ is complete nonsense at a cost of 80-100 UAH (10-15 $) and a service life of 1-1.5 years. Two main disadvantages: 1. Low-pressure nylon fittings are held in place by crown-springs (bad metal), and with a little effort they pull out of the socket - they were adjusting the valves and accidentally touched the repair belt. I used the kit as a temporary measure. 2. after 20 thousand-30 thousand km the piston in the cylinder begins to bypass. It manifests itself - the pedal is either soft or hard, there is a dependence on the ambient temperature and the intensity of the impact on the pedal, pumping the brakes does not help.
After replacing two VAZ stock units every year, I installed an Italian one (I don’t remember the name) and forgot about the existence of such a part as a GTZ in my car. The main difference from the VAZ one is the metal low-pressure fittings. issue price 25-30$
Login to leave comments
ATTENTION EVERYONE. Author I'll kill you))) joke
Because of the author, I postponed everything since the repair was on the street. I am writing to EVERYONE who will do this procedure on the street, instead of having a key for 13 > with a knob. Otherwise, you won’t be able to unscrew the bolt that holds the turbocharger to the vacuum seal; there’s very little room for the wrench to fit through.
Author I'll kill you))) joke. Because of the author, I postponed everything since the repair was on the street. I am writing to EVERYONE who will do this procedure on the street, instead of having a key for 13 > with a knob. Otherwise, you won’t be able to unscrew the bolt that holds the GTZ to the vacuum seal; there’s very little room for the wrench to fit through.
GTZ repair
To repair the master brake cylinder, you will need to do the following:
- There should be a clean rag on the table on which to place the brake master cylinder body.
- The mechanism has two pistons (that’s exactly how many circuits there are in the brake system). The pistons have slots in the lower parts that limit the stroke inside the cylinder. The pistons are secured using two locking bolts located in the slots.
- Remove the boot and unscrew the bolt that secures the first piston.
- If the piston does not come out under the influence of the spring, you need to lightly press on it so that it sinks a little in the cylinder. After this manipulation, the piston will come out of the cylinder without any problems.
- A similar action is performed for the second cylinder. Unscrew the bolt that secures the element. And in the same way the piston of the second circuit is removed.
- Be sure to place all the elements that you remove from the master cylinder in the order in which you removed them.
- Install new cuffs using the plastic cone included in the repair kit.
The design of the master brake cylinder on the VAZ-2106 is simple, there are only a few key elements in the design. But they affect the functioning of the entire braking system.
Be sure to make sure that the inner surface of the cylinder is perfectly mirror-like. If there are sinks or other damage, it is necessary to replace them - repair is useless. If the inside has taken the shape of an ellipse, then it is unlikely that you will be able to bleed the brake system, and even if you do, the new cuffs will not last long.
Master Cylinder Assembly
Assembly is carried out in reverse order. If you have repaired the main brake cylinder of a VAZ-2106, then you must:
- Install new cuffs.
- Insert the secondary circuit piston and return spring into the cylinder. Before installing them, lubricate the inner surface of the cylinder with brake fluid.
- Secure the position with a bolt.
- Insert the primary circuit piston with the return spring and secure its position with a bolt.
After this, check the tightness of the fixing bolts and install the cylinder:
- Using two nuts, tighten onto the vacuum booster studs.
- Screw the tubes to the GTZ.
- Install the hoses and secure them with clamps.
After all the work has been done, you need to pour liquid into the expansion tank.
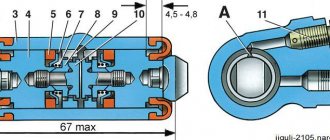
↑ Checking wheel cylinder parts
↑ Wheel cylinders
Check the cleanliness of the working surfaces of the cylinder, pistons and thrust rings. The surfaces must be completely smooth, without roughness, to prevent fluid leakage and premature wear of seals and pistons. Eliminate defects on the cylinder surface by lapping or grinding. However, increasing the internal diameter of the cylinder is not allowed.
↑ Wheel cylinder parts
1 — piston assembly; 2 — cylinder body; 3 - thrust screw; 4 - thrust ring; 5 - crackers; 6 - spring; 7 — support cup; 8 - seal; 9 - piston; 10 - protective cap
Check the condition of the thrust screw 3, spring 6, support cup 7 and cotters 5. If necessary, replace damaged parts with new ones.
Replace the seals 8 with new ones. Check the condition of the protective caps 10 and replace them if necessary.
↑ Pads
Carefully check the pads for damage or deformation.
Check the elasticity of the tension springs, both upper and lower; if necessary, replace them with new ones.
The springs must not have residual deformations when stretched with a force of 343 N (35 kgf) for the lower springs and 411 N (42 kgf) for the upper ones.
Check the cleanliness of the linings, if dirt or traces of grease are found, thoroughly clean the linings with a wire brush and rinse with white spirit, in addition, check for any leakage of grease or oil inside the drum; eliminate the faults. Replace the pads with new ones if the thickness of the linings is less than 1.5–2 mm.
↑ Brake drums
Inspect the brake drums. If there are deep grooves or excessive ovality on the working surface, rebore the drums on the machine.
Then use a lathe to sand the drums with fine-grained abrasive stones. This increases the durability of the linings and improves uniformity and braking performance.
The largest permissible increase in the nominal diameter of the drum (250 mm) after boring and grinding is 1 mm. The limits of this tolerance must be strictly observed, otherwise the strength of the drum as well as the braking efficiency will be compromised.
Bleeding the system
The procedure for bleeding the brake system of a VAZ-2106 (like any other car):
- Rear right and left wheels.
- Front right and left.
When working, you move from the far brake mechanism to the near one (relative to the GTZ). Your goal is to get rid of air jams. When pumping, carefully monitor the fluid level in the tank and top up if necessary.
The principle of operation of the master brake cylinder on the VAZ-2106 is that two pistons create pressure in the system. This pressure pushes out the calipers and sets the pads in motion. If there is even a little air in the system, the brakes will not work.
Bleeding the brakes: step-by-step instructions
To better pump the brakes of the “Seven” you will need an assistant. One will be under the car and work on the brake cylinders, while the other presses the brake pedal inside the car. The following tools will be useful in your work:
- head for 8 and 10 caps;
- head for 8 and 10, open-end or for brake pipes;
- transparent container for waste;
- hose of the required diameter.
Pumping starts from the furthest tire from the GTZ, therefore, start from:
- right rear tire;
- left rear;
- right front;
- left front.
To bleed the rear tire brakes, go under the car. All work related to the front brakes is carried out after the tires have been removed in advance. Otherwise the procedure is identical:
Remove the protective cap from the brake cylinder fitting. Loosen the fitting slightly with an 8 and 10 mm wrench. Connect the hose to the fitting and place the opposite end into a container. Press the brake pedal until hardness appears and keep it pressed. Unscrew the fitting half a turn. The fuel fluid will begin to flow out of the hose, the pedal is pressed to the floor. Do not release the pedal until the liquid stops oozing. Tighten the fitting and repeat the process until liquid and air come out of the tube. Repeat the manipulations with the remaining tires of the VAZ-2107. To bleed the front brake, simply remove the wheel. To complete the pumping, close the fitting with a rubber cap. During pumping, you should monitor the fluid level in the expansion tank.
It is important that there is no air in the system.
Where is the brake cylinder of the VAZ 2106
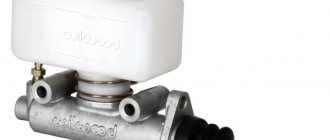
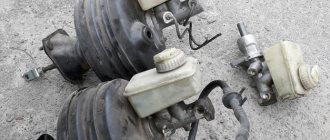
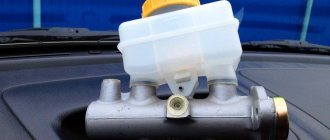
The brake master cylinder is installed in the engine compartment of the VAZ 2106, above the engine. The device is located about half a meter from the driver. Just above the cylinder there is a small expansion tank into which brake fluid is poured.
The cylinder has an oblong shape. The body is made of high quality steel.
The housing has several threaded holes for screwing in contour brake pipes. This device is screwed directly to the brake booster using two 8mm bolts.
Main function of the cylinder
In short, the function of the master brake cylinder is reduced to the timely redistribution of brake fluid between several brake circuits. There are three such circuits on the “six”.
There is one circuit for each front wheel, plus a circuit for servicing the two rear wheels. It is from the master brake cylinder that the fluid comes, which then begins to put pressure on the wheel cylinders, forcing them to tightly compress the brake pads and stop the car. In addition, the master cylinder performs two additional functions:
- abductor function. If the brake fluid has not been completely used by the working cylinders, then the remainder goes back into the reservoir until the next braking;
- return function. When the driver stops braking and removes his foot from the pedal, the pedal rises to its original position under the action of the master cylinder.
How the cylinder works and how it works
The VAZ 2106 drive cylinder has a lot of small parts, so at first glance the device seems very complex. Nevertheless, there is nothing complicated about it. Let's list the main elements.
- The case is steel with two internal chambers.
- Washer fixing the main fitting.
- Brake fluid drain fitting (it connects directly to the expansion tank).
- Union seal.
- Washer for the limit screw.
- Stopper screw for brake piston.
- Return spring.
- Support cap.
- Compensator spring.
- O-ring for the brake piston (there are 4 such rings in the cylinder).
- Spacer washer.
- Rear brake circuit piston.
- Small spacer washer.
- Front brake piston.
A steel plug is installed at one end of the cylinder body. The second end is equipped with a flange with mounting holes. And the master cylinder works as follows:
- Before pressing the pedal, the pistons stand in the cylinder body at the walls of their chambers. Each spacer ring is restrained by its own limiting screw, and the chambers themselves are filled with brake fluid;
- after the driver, by pressing the pedal, releases the entire free play of this pedal (this is approximately 7–8 mm), the pusher in the cylinder begins to put pressure on the main piston, moving it to the opposite wall of the chamber. At the same time, a special cuff blocks the hole through which the brake fluid goes into the reservoir;
- when the main piston reaches the opposite wall of the chamber and squeezes out all the liquid into the hoses, an additional piston is activated, which is responsible for increasing the pressure in the rear circuit. As a result, the pressure in all brake circuits increases almost simultaneously, which allows the driver to use both front and rear pads for braking;
- As soon as the driver releases the brakes, the springs return the pistons back to their starting point. If the pressure in the cylinder was too high and not all of the liquid was consumed, then its remains are drained into the tank through the outlet hose.
Video: principles of operation of brake cylinders
Rear brakes
On Zhiguli of the classic 2107 family and others, a drum brake system is used. Because its installation is explained by savings and a reduction in the overall cost of the machine. Moreover, the VAZ of previous years did not have high speeds, so installing rear disc brakes was not advisable, although their efficiency is higher.
Design
- Drum. It consists of two parts: the first is mounted on the axle (fixed), the second is on the hub and rotates with the wheel
- Brake pads
- Brake slave cylinder
- Tension springs
- Spacer plate
- Parking brake lever
Principle of operation
To fully activate the rear brakes, the driver needs to press harder on the pedal. In this case, the second piston of the GTZ starts working and another brake circuit is activated, which is responsible for transmitting force to the brake mechanisms of the rear wheels.
The pressure in the working cylinder (there is only one) pushes the pistons, which are located on the sides, apart. They rest against the brake pads, spreading their upper part to the side. The pads are seated on support posts. They can turn on them and move left or right. That is, the upper part moves to the side, the lower part, turning on them, tries to come together. But, the lower edges of the pads rest against the rivets, the force of the pistons moves them on the support posts towards the drum cover, and they evenly adhere with their entire surface to the moving part of the drum, which is connected to the wheel and, under the influence of friction, the rear axle slows down.
By releasing the pedal, the pressure in the brake line and cylinder decreases. The pistons return to their original positions (recessed inside), and the pads, under the action of return springs, converge, moving away from the drum cover. These springs do not allow the pads to move spontaneously, braking the hub.
Video of how the rear brakes work on the “seven”:
Malfunctions
The “sores” are the same as those of the front brake system. Due to the design features, new ones are added to them.
- Broken or stretched pressure springs. In this case, the rear axle will spontaneously begin to brake.
- Cracks, chips on the inside of the drum. Dirt can accumulate on it, rust can form, which can jam the wheels, although the pads will be brought together, since there is a miniature gap between them and the drum cover
Which cylinder to choose for installation
A driver who decides to replace the brake master cylinder will inevitably face the problem of choice. Practice shows that the best option is to install an original VAZ cylinder purchased from an official auto parts dealer. The original cylinder number in the catalog is 2101–350–500–8.
However, it is not always possible to find such a cylinder, even from official dealers. The fact is that the VAZ 2106 was discontinued a long time ago. And spare parts for this car are becoming increasingly rare on sale. If this is the situation, then it makes sense to look at the products of other manufacturers of cylinders for the VAZ classics. Here they are:
The products of these companies are in high demand among owners of "sixes", although the price of cylinders from these manufacturers is often unreasonably inflated.
I once had the opportunity to compare prices of brake cylinders from different manufacturers. That was six months ago, but I don’t think the situation has changed much since then. When I went to a spare parts store, I found an original VAZ cylinder on the counter, which cost 520 rubles. Nearby lay a Belmag worth 734 rubles. A little further along were the LPR and Fenox cylinders. LPR cost 820 rubles, and Fenox - 860. After talking with the seller, I found out that original VAZ cylinders and LPR cylinders are in greatest demand among people, despite their high cost. But for some reason the “Belmags” and “Phoenoxes” were not dismantled so actively.
Signs of cylinder failure and checking its serviceability
The driver should immediately check the brake cylinder if he notices any of the following warning signs:
- a light flashed on the dashboard, signaling that the level of brake fluid in the reservoir had decreased;
- the free play of the brake pedal has become longer or the pedal has generally begun to sink into the floor of the cabin;
- braking has become uneven: when you press the pedal, the car pulls to the side;
- it has become more difficult to brake: even if the pedal is completely recessed into the floor of the cabin, the car does not stop completely.
All these points indicate that there is something wrong with the drive cylinder, and you need to figure out this problem as soon as possible. Here's how to do it:
- The first and easiest way to diagnose a cylinder is a routine inspection. If brake fluid leaks are visible on the cylinder body, the problem has been found. When the seals in the cylinder lose their tightness, fluid begins to flow either to the vacuum booster or to the spar under the cylinder. In all these cases, the cylinder will have to be removed and disassembled;
There is another, more complex way to check the cylinder. Let us list its main stages.
- Using a 10mm open-end wrench, unscrew all the contour hoses from the cylinder. In their place, bolts of 8 are screwed in, which will serve as plugs.
Article: 2101-3505008, additional articles: T1963C3
Order code: 008706
- You may need
- show more
Buy analogues
- Passenger cars / VAZ / VAZ-21013 drawing
» href=»/catalog/vaz-3/legkovye_avtomobili-30/vaz_2101-3/mehanizm_upravleniya_tormozami-168/#part3653″>Main cylinderBrakes / Brake control mechanism - » href=»/catalog/vaz-3/legkovye_avtomobili-30/vaz_2101-3/mehanizm_upravleniya_tormozami-169/#part10000517″>Main cylinderBrakes / Brake control mechanism
- » href=»/catalog/vaz-3/legkovye_avtomobili-30/vaz_2101-3/mehanizm_upravleniya_tormozami-169/#part3673″>Main cylinderBrakes / Brake control mechanism
Passenger cars / VAZ / VAZ-21032 drawings
- » href=»/catalog/vaz-3/legkovye_avtomobili-30/vaz_2103-106/mehanizm_upravleniya_tormozami-133/#part11706″>Main cylinderBrakes / Brake control mechanism
» href=»/catalog/vaz-3/legkovye_avtomobili-30/vaz_2103-106/mehanizm_upravleniya_tormozami-133/#part11705″>Main cylinderBrakes / Brake control mechanism
Passenger cars / VAZ / VAZ-21072 drawings
- » href=»/catalog/vaz-3/legkovye_avtomobili-30/vaz_2107-8/lementy_privoda_tormozov-182/#part25566″>Main cylinderBrakes / Brake drive elements
» href=»/catalog/vaz-3/legkovye_avtomobili-30/vaz_2107-8/lementy_privoda_tormozov-182/#part25565″>Main cylinderBrakes / Brake drive elements
Passenger cars / VAZ / VAZ-21041 drawing
- » href=»/catalog/vaz-3/legkovye_avtomobili-30/vaz_2104-5/mehanizm_upravleniya_tormozami-132/#part14961″>Main cylinderBrakes / Brake control mechanism
Passenger cars / VAZ / VAZ-21023 drawings
- » href=»/catalog/vaz-3/legkovye_avtomobili-30/vaz_2102-4/mehanizm_upravleniya_tormozami-169/#part8157″>Main cylinderBrakes / Brake control mechanism
» href=»/catalog/vaz-3/legkovye_avtomobili-30/vaz_2102-4/mehanizm_upravleniya_tormozami-168/#part8137″>Main cylinderBrakes / Brake control mechanism » href=»/catalog/vaz-3/legkovye_avtomobili-30/vaz_2102- 4/mehanizm_upravleniya_tormozami-169/#part10000518″>Main cylinderBrakes / Brake control mechanism
Passenger cars / VAZ / VAZ-21062 drawings
- » href=»/catalog/vaz-3/legkovye_avtomobili-30/vaz_2106-7/lementy_privoda_tormozov-144/#part21340″>Main cylinderBrakes / Brake drive elements
» href=»/catalog/vaz-3/legkovye_avtomobili-30/vaz_2106-7/lementy_privoda_tormozov-144/#part21339″>Main cylinderBrakes / Brake drive elements
Passenger cars / VAZ / VAZ-21052 drawings
- » href=»/catalog/vaz-3/legkovye_avtomobili-30/vaz_2105-603/lementy_privoda_tormozov-76/#part1679786″>Main cylinderBrakes / Brake drive elements
» href=»/catalog/vaz-3/legkovye_avtomobili-30/vaz_2105-603/lementy_privoda_tormozov-76/#part1679785″>Main cylinderBrakes / Brake drive elements
- There are no reviews for this product yet.
Today, the next article in the series “Crystal VAZs or typical breakdowns of domestic cars” is dedicated to the “classics”: VAZ-2101, 2103, 2104, 2104, 2105, 2106 and 2107. These cars have been driving along our roads for decades and, despite Despite all the shortcomings that we will talk about, their popularity is still high.
Replacing the master cylinder of the VAZ 2106 brakes
In the vast majority of cases, replacing the cylinder is the best repair option. The fact is that it is not always possible to find individual parts of brake cylinders (pistons, return springs, spacers, etc.) on sale. It is much more common to find sets of seals for cylinders on sale, but the quality of these seals sometimes leaves much to be desired. In addition, they are often counterfeited. That is why car owners prefer not to bother with repairing the old cylinder, but simply install a new one on their “six”. To do this, we will need the following tools:
- set of spanners;
- pliers;
- flat screwdriver;
- rags;
- medical syringe;
- canister of brake fluid (capacity 0.5 liters);
- 5 x 6 bolts (they will be used as plugs for the brake hoses).
On my own behalf, I can add that recently even original VAZ repair kits for seals for the master cylinder have become of very mediocre quality. Once I purchased such a kit and installed it in the leaking cylinder of my “six”. At first everything was fine, but six months later the leak resumed. As a result, I decided to buy a new cylinder, which is still in the car to this day. Three years have passed, and I have not yet noticed any new brake fluid leaks.
Sequence of work
When starting to replace the master cylinder, you should make sure that the car engine is completely cool. In addition, all brake fluid should be drained from the reservoir. The most convenient way to do this is with a medical syringe (if you don’t have one at hand, a medical bulb will do). Without these preparatory measures, it will not be possible to change the cylinder.
- Use an open-end wrench to unscrew the fastening nuts on the brake hoses. The hoses are carefully removed from the cylinder body. 8 bolts are screwed into the vacated sockets. They will serve as plugs and will not allow the brake fluid to leak out when tilting and removing the cylinder. The brake hoses are also sealed with 6mm bolts to prevent leakage.
Video: changing the brake cylinder on a “classic”
Disassembling the cylinder and installing a new repair kit
If the driver decides to do without replacing the cylinder and change only the sealing collars, then the cylinder will have to be disassembled. The sequence of actions is listed below.
- First, use a screwdriver to remove the rubber seal located in the cylinder body on the side of the mounting flange.
- Now the cylinder should be placed vertically in a vice. And using a 22-mm open-end wrench, slightly loosen the front plug. Use a 12 wrench to unscrew the limiting bolts located next to it.
Video: replacing the repair kit on a classic brake cylinder
How to bleed the brakes on a VAZ 2107 yourself (Video, photo)
When is it necessary to pump the brakes of a VAZ 2107
It is necessary to bleed the brake system in four cases:
- Replacing brake fluid. Brake fluid has a limited service life. Over time, it absorbs moisture from the air, which can cause corrosion of the surface of the brake cylinders and their failure. Water also worsens the main property of brake fluid - it reduces the boiling point.
- The recommended service life of brake fluid on VAZ cars is 2 years, after which it is worth replacing it. This applies to standard glycol-based brake fluid.
- Troubleshooting the brake system. When replacing brake hoses and cylinders, brake fluid leaks and air enters the system. Therefore, after repair work, the VAZ 2107 brakes must be bled.
- Air ingress during operation. This manifests itself in deterioration in braking efficiency, a “soft pedal” or uneven braking of individual wheels.
What is needed to bleed the brake system
It is almost impossible to bleed the brake system yourself. The work is carried out by two people. One person (“mechanic”) works with the brake system, unscrews the fittings. The second (“partner”) is located inside the car and must press or release the brake pedal on command.
You also need the following tools:
- 8/10 socket wrench;
- a PVC tube or rubber hose, the inner diameter of which corresponds to the diameter of the fitting;
- container for collecting waste liquid.
- Brake fluid is also needed.
How to bleed the brakes on a VAZ 2107
For ease of work and to ensure free access to the brake cylinder fittings, you should use an inspection hole. The design of the front brake mechanisms requires removal of the wheels to bleed the brake system.
Before starting work, it is necessary to fill the brake reservoir to the maximum, and during bleeding, you must ensure that it is constantly filled with brake fluid. If you miss this moment, air will get into the working cylinder and you will have to start work again.
The procedure for each of the 4 working cylinders is as follows:
- Remove the protective cap from the fitting.
- Loosen the fitting using a spanner. If the fitting has not been unscrewed for a long time, significant effort may be required. You must be especially careful not to damage the edges, otherwise the work may become very difficult, even to the point that the brake cylinder will need to be replaced.
- Place the tube on the fitting and lower it into the brake fluid container.
Direct pumping is performed as follows:
- The “partner” sitting in the cabin, at the command of the “mechanic”, presses the pedal all the way.
- The “mechanic” unscrews the fitting half a turn so that the liquid, along with air bubbles, comes out into the container through the inserted tube. The brake pedal “sinks” to the floor.
- The “fitter” tightens the fitting, and the “partner” releases the pedal on command.
The procedure is repeated until no more air bubbles come out of the tube. During bleeding, the end of the tube must be constantly lowered into the brake fluid so that air does not enter the cylinder.
In this way, all four working brake cylinders are pumped. A certain sequence should be followed when bleeding the cylinders. They are pumped “from far to near”:
- Right rear.
- Left back.
- Right front.
- Left front.
After completing bleeding of each cylinder, it is necessary to tighten the fitting and put on the protective cap.
Bleeding the brakes of a VAZ 2107 is quite feasible at home and does not require expensive special tools and devices. No special qualifications are required either. Even a child can release and press the brake pedal at the “locksmith’s” command.
Often, owners upgrade the brake system by installing more efficient, high-quality and expensive parts. However, this does not change the bleeding method in any way and does not eliminate the need for periodic work to replace the brake fluid.
semerkavaz.ru
How to remove air from the brake system
When the driver changes the drive cylinder, air enters the brake system. It's almost inevitable. Air bubbles accumulate in the brake hoses, making normal braking difficult. So the driver will have to remove air from the system using the recommendations outlined below. It should be noted here that to perform this operation you will need the help of a partner.
- The front wheel of the car is jacked up and removed. Access to the brake fitting is provided. A piece of plastic tube is put on it. Its second end is directed into an empty bottle. Then the nut on the fitting is carefully unscrewed.
Video: bleeding classic brakes without the help of a partner
So, the brake cylinder on the “six” is an extremely important part, on the condition of which the life of the driver and passengers depends. But even a novice car enthusiast can change this part. No special skills or knowledge are required for this. All you need is to be able to hold a wrench in your hands and strictly follow the recommendations outlined above.
Master brake cylinder VAZ 2106
The brake system of a car is one of its life support systems and therefore any malfunction of the system must be repaired immediately.
When considering an operation such as VAZ 2106 master brake cylinder repair, you must first make sure that it is the culprit of the malfunction.
Replacement
Clamp it in a vice.
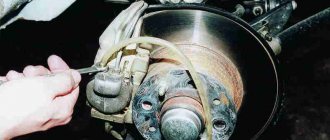
Unscrew and remove the working connecting tube of the working cylinders from the front caliper (see Repair of the front wheel brake cylinders.
Press the screwdriver onto the retainer and use a soft metal socket to knock the wheel cylinder out of the caliper.
Pay attention to the presence of a retainer on the new brake cylinder. If there is not one, then move it from the old one.
Installing the brake cylinder is carried out in reverse order. After installing the caliper on the car, bleed the brake system to remove any air pockets.
To replace the rear brake cylinder, the brake drum must be removed.
Using a screwdriver, use a screwdriver to remove first one and then the other lower edge of the block from the support and move them down.
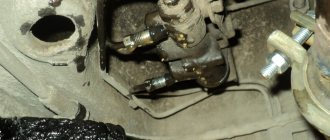
Next, we need to unscrew the brake pipe fitting using a 10mm wrench. To prevent brake fluid from leaking, cover the tube with a protective rubber cap.
Using a ratchet with a 10mm head, unscrew the bolts securing the brake cylinder to the shield and pull out the cylinder.
The new cylinder is installed in the reverse order. After assembling the unit, do not forget to bleed the brake system to remove any remaining air. Otherwise, the effectiveness of the braking system will be reduced.
Brake system repair follow the link.
Repair
For convenience, we can disconnect the brake reservoir from the GTZ. After this, you can unscrew the locking screws one by one. First, unscrew the first locking screw from the cylinder plug, unscrewing the second screw, hold the piston from “exploding.”
The front brake drive piston will “pop out” from the cylinder without any problems. But the second piston (rear brake drive) with cuffs will have to be shaken out from the brake cylinder. We lay out everything that we managed to get from the brake cylinder sequentially. The picture you should get is the same as in photo 10. This should help you correctly assemble the parts of the brake master cylinder.
After the insides are taken out, we inspect the condition of the mirror in the cylinder itself. If there are traces of corrosion, deep scratches and cavities on the mirror, the GTZ should be thrown into scrap metal. Since further repairs will have a short-term result, and the cylinder will work for another week, two or a month, and will remind itself again.
If everything is ok with the cylinder, then you can start replacing the cuffs. After all the cuffs have been changed, you can fill the pistons with springs into the housing, having first lubricated the cuffs with brake fluid. Install the locking screws. Using a screwdriver (simulating pressing the pedal) we check the operation of the cylinder.
We fix the tank pipes and install the GTZ on the car. We do not tighten the brake pipe nuts, pour brake fluid into the reservoir and wait until it begins to pass through the fittings. At first, the liquid will come out with air bubbles, and when the liquid comes out without bubbles, you can tighten the fittings. Under favorable conditions, the brake system does not need to be bled after this. And if you still have to bleed the system, it will be much easier to do.
Assembly
After disassembling the master cylinder, perform a thorough visual inspection and check all parts for defects, scratches, cracks and all kinds of chips. The presence of all these defects is not allowed.
Every time the master cylinder is disassembled, regardless of the condition of the o-rings, they must be replaced with new ones.
When assembling the master cylinder, lubricate all parts with clean brake fluid of the same brand you use.
Leveling up
Air that gets into the hydraulic brake drive when replacing pipelines, hoses, o-rings or lack of tightness of the brake system causes an increase in the brake pedal travel, as well as its “softness” and significantly reduces braking efficiency.
While removing air, it is necessary to maintain an optimal level of brake fluid in the brake hydraulic reservoir.
If there is no air in the brake system, the brake pedal should not travel more than 1/2–3/4 of its entire travel.
In order to exclude any influence of the vacuum booster and pressure regulator on the pumping of the hydraulic brakes, removal of air bubbles must be carried out with the engine not running and the rear wheels loaded.
To bleed the brake system and remove air from it, you must perform the following steps (you must have an assistant to press the brake pedal):
First, make sure that all brake drive units and their connections are sealed, check and, if necessary, fill the reservoir to the optimal level with Neva or Tom brake fluid.
Next, very carefully clean the fittings from dirt, dust and other contaminants in order to remove air and remove the protective caps from them.
Air is first removed from one circuit, then from the other. It is necessary to start each time from the most distant wheel relative to the master cylinder, which is located under the hood (this turns out to be the rear right wheel).
Remove the front wheel and put rubber hose 1 on the head of the fitting, and release the other end of the hose into some container 2 (preferably transparent), which is partially filled with liquid.
After this, sharply pressing the brake pedal about 3-5 times, with an interval between presses of 2-3 seconds, unscrew the fitting by half or 3/4 of a turn while the pedal is pressed.
Next, while continuing to press the pedal, force out the fluid in the brake system along with the air.
Now, after the brake pedal reaches its deepest position and the flow of fluid from the hose stops, you need to tighten the air release fitting until it stops completely. These simple operations must be repeated until no more air bubbles come out of the hose.
Wipe the fitting dry and put the protective cap back on. Repeat these operations for the remaining wheels, first on the second wheel of the same circuit, and then sequentially on both wheels of the second circuit. Before bleeding each subsequent wheel, check the brake fluid level in the reservoir. If necessary, add it to the level. Do not allow the reservoir to empty under any circumstances, otherwise you will have to bleed the brakes again.
There may also be a case when, after a long removal, the air continues to come out of the hose in the form of bubbles. This means that it enters the system somewhere through possible damage in the pipelines, i.e. due to insufficient tightness of the connections or due to a malfunction of the main or wheel cylinders.
If you are removing air from a car whose brake system has been in operation for quite a long time, then replace the brake fluid in the system with new one.
Selecting brake fluid and the procedure for replacing it on a VAZ 2114
For the normal functioning of the vehicle’s vehicle with maximum efficiency, it is important for the car owner to correctly select the working fluid for the hydraulic brake drive. Modern TG, such as “Rosa” and its varieties, are based on polyglycols and this accounts for from 93 to 98 percent of the total composition. The rest is various additives that are necessary to combat oxidation of fuel fluid and prevent corrosion of metal parts of the vehicle.
The rest is various additives that are necessary to combat oxidation of fuel fluid and prevent corrosion of metal parts of the vehicle.
When purchasing a vehicle, you need to pay attention to the following parameters:
- boiling point, it should be high to reduce the likelihood of plug formation from steam bubbles;
- good viscosity, which characterizes the ability to pump liquid in the system;
- the ability to absorb water, that is, hygroscopicity;
- ability to lubricate internal surfaces;
- neutrality in relation to rubber parts of the braking system;
- oxidation resistance and corrosion resistance.
According to the TZh class for the VAZ 2114, they are marked DOT 3.
How to change the brake fluid on a VAZ 2114 - for the correct actions you need to carefully study the car’s operating manual.
Before starting work, you need to prepare the necessary tools and materials:
- TJ in the amount of 0.5 liters;
- keys and screwdrivers;
- transparent flexible hose;
- container for draining spent fuel oil;
- rags to wipe surfaces, especially plastic and painted ones, since the liquid is toxic and aggressive to these surfaces.
To replace the turbocharger, you need to hire an assistant, because it requires bleeding the system using the brake pedal.
- Open the lid on the GTZ tank and place it on the prepared surface. The cover is combined with the float of the fuel fluid level sensor and there are remnants of old toxic fuel fluid on it.
- Unlock the rear brake lever using a screwdriver, which must be inserted between the piston and the plate.
- Clean the air outlet valve of the right rear brake from dust and dirt and unscrew the rubber cap that closes this valve.
- Place a flexible hose, previously inserted into a transparent container, onto the fitting of this valve.
- At intervals of two seconds, press the pedal all the way four times, and on the fifth press, lock it in the pressed position.
- Unscrew the valve at least half a turn. As the fuel drains, the pedal should fall. As soon as the liquid stops flowing, immediately close the air valve.
- During these actions, it is necessary to monitor the fluid level in the tank, constantly adding it to prevent an air lock. It is necessary to add and drain the fluid until new, clean fluid flows from the tube.
Didn't find the information you are looking for? on our forum.
We recommend reading:
VAZ on methane
Wiring diagram of VAZ 11113 Oka with description
Injector for VAZ
How to replace the bearing in the rear hub on a VAZ 2109
Replacing hydraulic compensators on a VAZ 2112 16 valves
Lada Vesta which gasoline is 92 or 95. Recommendations from the manufacturer
VAZ 2110 how to insulate a car
Exhaust for VAZ 2110 8 valves
How to disassemble and assemble the main brake cylinder VAZ 2106-2103
Disassembly and reassembly of the main brake cylinder is carried out if there are smudges of brake fluid on it and reduced efficiency of the brake system.
For repairs you will need the following tools:
- Spanner 12;
- Head 22;
- Collar;
- Screwdriver.
- First of all, dismantle the master cylinder;
- The removed cylinder is secured in a vice so that the screws locking its pistons are in the upper position; the screws are unscrewed and removed together with the washers;
- The cylinder is turned over in a vice, the plug is unscrewed and removed from the body, along with the washer and spring;
- Remove the cup from the piston of the rear wheels along with the pressure spring of the sealing ring, after which the piston itself is removed, along with the spacer and sealing rings;
- The cylinder is released from the vice, after which the piston of the front wheels is moved with a screwdriver for its further disassembly;
- The washer and o-ring are removed from the cylinder, which will make it possible to easily remove the return spring and piston cup, along with the o-ring pressure spring. Then remove the piston itself along with the spacer and sealing rings;
- The cylinder is again clamped in a vice and, prying the lock washer with a thin screwdriver, the fitting and sealing gasket are removed from the body;
- The sealing and spacer rings are removed from the rear and front drive pistons. This completes the disassembly of the brake master cylinder.
When disassembling and assembling the brake master cylinder, you should pay attention to the fact that the front wheel drive piston is equipped with two sealing rings.
After disassembling the cylinder, you should carefully visually inspect it and check all parts for cracks, scratches and chips. The presence of these defects is unacceptable.
After each disassembly of the cylinder, the o-rings are replaced with new ones, regardless of their condition.
When disassembling and assembling the master cylinder, all parts are lubricated with fresh brake fluid, similar to that already used.