01/26/2022 19 167 VAZ 2115
Author: Ivan Baranov
When using a vehicle for a long time, the clutch system is subject to wear and mechanical damage. A drive that is not properly adjusted is inconvenient for the driver. In addition, untimely adjustment can lead to clutch failure, which entails a time-consuming and expensive replacement procedure. In this article we will look in detail at how to adjust the clutch on a VAZ 2115 - a video of this process will help you further understand it.
[Hide]
When is clutch adjustment required?
VAZs use a dry type of clutch, that is, there is a basket consisting of two parts - driving and driven
Clutch adjustment of the VAZ 2114, and other vehicles, is carried out in cases where defects associated with the operation of this mechanism appear. Such malfunctions include:
- clutch pedal adjustment;
- clutch cable adjustment;
- pedal height adjustment;
- clutch adjustment.
In another case, the need to adjust the clutch drive may arise due to previous incorrect adjustment. It is possible to reduce or increase the working stroke of its pedal.
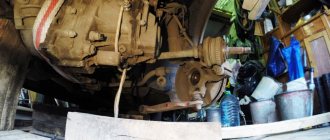
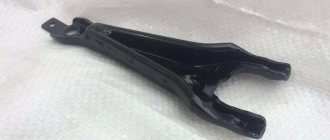
The photo shows the clutch of a VAZ 2114
As a result, malfunctions occur in the operation of the drive - the clutch begins to “slip” or “drive”, gear shifting becomes difficult, jerks appear when starting from a standstill, fuel consumption increases, etc.
Video: Clutch adjustment VAZ 2114
Why do you need a clutch?
Requests for the design and replacement of an auto component come from owners of Soviet and Russian Zhiguli cars, since the part has long been worn out by default, even under the most gentle operating conditions. The clutch is an important component of a car's performance. The unit is installed in cars with manual transmissions, where it is required.
To understand the importance of clutch, you need to remember why the car moves in the first place. The wheel torque is obtained from an internal combustion engine. But not directly, but through a complex chain of mechanisms. A simplified diagram looks like this: internal combustion engine-transmission-wheels.
But between the engine and the gearbox there is a clutch. One side of it is attached to the engine flywheel, the other - to the gearbox shaft. To connect two key units - power and transmission - the VAZ-2110 uses a clutch. However, it not only connects the motor to the gearbox (transmits the power flow), but also briefly, at the right moment, disconnects them - interrupts the rotational energy.
The transmission of torque between the internal combustion engine and the gearbox occurs when the discs with friction linings are pressed against each other - at this time the mechanism is inactive, that is, the pedal is not pressed. If the driver presses the pedal to the floor, the clutch disconnects the plates of the units: this moment is used to switch to another gear.
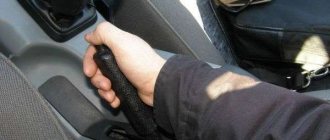
Clutch pedal
Thus, two main clutch functions have been identified:
- Transmit torque from the engine to the gearbox.
- Briefly disconnect the engine from the gearbox when the driver, having reached the required number of engine revolutions, wants to speed up or slow down the car - go to another stage.
The tasks of the clutch also include: smooth gear shifting, damping torsional vibrations from the engine.
Checking the working stroke of the clutch pedal VAZ 2114
Let's measure the travel of the car's clutch pedal. Before doing this, we move the carpet on the floor of the car back so that the measurements are more accurate.
- Using a tape measure, measure the distance from the floor of the car to the bottom edge of the clutch pedal
- The image shows how best to do this.
- It should be approximately 18-20 cm.
- Press the clutch pedal all the way with your hand and measure the distance from the floor to the bottom edge of the pedal.
- It should be 6-7 cm
- Subtract from 18-20, 6-7, it turns out 13-14 cm
This is the norm for the full travel of the clutch pedal of VAZ 2108, 2109, 21099 cars and their modifications. Many repair manuals indicate a working stroke size of 12.5-13.5 cm, which is also very close to our measurement.
If the clutch pedal travel differs more or less, it is necessary to adjust the clutch drive.
The clutch pedal has failed, reasons, what to do
A car clutch failure is always unpleasant. In such a situation, you have to think about how to repair the car, what parts to buy for replacement, and where to get the money.
The clutch pedal has failed
In this case, the worst thing is if the malfunction manifests itself on the road. What to do if the clutch pedal fails? How to get to a garage or service station when the device refuses to work? Let's consider the solution using the example of a VAZ car. You need to know that the VAZ 2101-07 has a hydraulic clutch, and the VAZ 2108-2110, Lada Kalina and others use a cable.
Causes of failure
Clutch problems are a common problem with cars, caused primarily by improper use and wear of parts. Be that as it may, to troubleshoot the problem, it is important to know the reasons why the clutch pedal fails.
Clutch pedal adjustment
Periodic adjustment of the VAZ 21014 clutch pedal is carried out for the following reasons:
- When driving on a non-adjustable clutch pedal, subsequent repairs are possible, because exaggerated energy costs for incorrect operation of the mechanism will cause malfunctions of other components of the car.
- Due to improper functioning, the clutch pedal periodically does not function. This leads to the fact that the pressure plate of the unit is forced into “engagement” with the motor flywheel, as a result of which they are subject to accelerated wear.
- If the pedal stroke is insufficient, the vehicle slips, i.e. the required torque of the wheel pair is lost.
To carry out diagnostic work on adjusting the clutch pedal, you need to use an arithmetic ruler to measure the length of the pedal stroke to the floor. If it does not correspond to 16 cm, then adjustments are necessary.
Signs of incorrect operation of the clutch mechanism: there is no possibility of a smooth start from a standstill, movement from a standstill is accompanied by jerks and jolts, when changing gears the transmission makes increased noise, the pedal of the mechanism falls to the lower position. In practice, it turns out this way: if the vehicle began to move from the moment the pedal began to be lowered, then the free play does not correspond to the required value. When the pedal is completely released, the vehicle does not move, which means there is no free movement in the car.
Clutch pedal adjustment:
- Unscrew the nut located under the clutch pedal.
- Tighten the locknut located below until it stops.
- Next, screw in the fasteners located under the clutch pedal.
- We tighten the rubber washer to the clutch fork as far as possible.
- To increase the pedal stroke, you need to screw the fastener onto the tip. To reduce the pedal stroke, you need to unscrew this fastener. The VAZ 2109 clutch pedal is adjusted until the limit of 12-13 cm is reached.
- After completing the pedal adjustment operations, you need to: depress the pedal three times, measure the length of the pedal stroke, adjust the operation until the required stroke length is achieved.
To adjust the hydraulics you need:
- Remove the spring from the mountings of the working cylinder and the clutch fork.
- Adjust the fasteners located on the clutch cylinder rod.
- The recommended free play value is 0.5 cm.
Often, a large pedal stroke depends on the height of its location from the driver's floor, and this creates certain difficulties. To adjust the height, a series of simple plumbing operations and a wrench set to “12” are required:
We find two fasteners on the steering column shaft, one is a thrust screw that limits the height adjustment position, the second is a lock nut that changes the movement of the pedal.
- Unscrew the stop screw.
- We give it rotation until the pedal movement normalizes.
- Screw in the locknut.
If slippage is observed after adjusting the clutch, then the following operations must be performed:
- Remove the stem locknut.
- Move it until there is no free movement.
- Return the rod one full turn.
- Determine whether the clutch has free play.
- Test the operation of the transmission gears. If there is an incomprehensible noise, you need to perform the above operations again.
- Screw in the locknut.
When is it necessary to adjust the Lada Samara clutch drive?
As practice shows, the culprits of clutch failures are most often the car owners themselves. A sharp start with “slipping”, as well as prolonged holding of the pedal in a depressed state, negatively affects the performance of the mechanism. The presence of noise or vibration when shifting gears indicates a problem in the transmission line. Below are a few signs that may require adjustment:
- Loss of power due to “slipping”, i.e. unreliable connection between the disk and the flywheel.
- Difficulty changing gears.
- Changing the travel distance of the clutch pedal (the norm is from 125 to 135 mm ).
- Jerking or sticking when pressing the pedal.
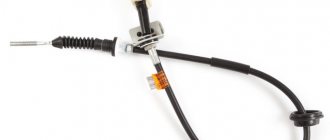
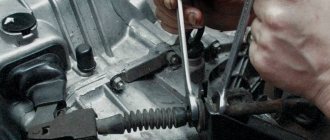
Adjusting the clutch drive (cable) of the VAZ 2114
The clutch drive adjusting nut is located in the engine compartment of the car on the drive cable sheath, inserted into a special bracket mounted on the gearbox housing. It is protected from unscrewing by a lock nut located there.
Holding the adjusting nut with one 17 mm wrench, use another 17 mm wrench to loosen the lock nut a few turns.
Adjusting the clutch cable VAZ 2114
We rotate the adjusting nut clockwise with one key, holding the locknut with the other - this is to increase the clutch pedal travel (the pedal will rise) or counterclockwise to decrease its travel (the pedal will lower to the floor)
How much to reduce or, conversely, increase the pedal stroke is determined based on the results of the check described above.
Lightly tighten the locknut
Press the clutch pedal several times and check again
If the resulting figure does not fit within the norm, we carry out the adjustment again. And so on until we achieve the required result.
After completing the adjustment, tighten the locknut
When the clutch is properly adjusted, the clutch pedal should be approximately level with the brake pedal.
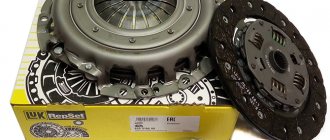
ABOUT THE CLUTCH DEVICE
Its design on this car is similar to mechanisms 2113 and 2115. It is made of a dry, single-disc mechanism. It is produced with a device that dampens torsional vibrations, and also has a pressure spring. The VAZ 2114 clutch device is shown in the figure.
Clutch components
The VAZ 2114 clutch consists of (see picture):
- Cable with a casing;
- Cable tip (lower);
- Adjusting nut;
- Housing for attaching the shell to the gearbox;
- Separating washers;
- Nut for adjustments;
- Rubber protective shell;
- Cable lead;
- Shutdown plug;
- Basket;
- Bolts securing the basket to the flywheel;
- Pressure disk;
- Flywheel;
- Driven disk;
- Gearbox input shaft;
- Shield;
- casing;
- Spring (pressure);
- "Squeeze";
- Pad;
- Release housing;
- Cable end;
- Cable thrust washer;
- Cable fastening unit;
- Pedal axle;
- Release spring;
- Off pedal.
As can be seen from the mechanism diagram, there are two working units, one of them will be the master, and the second will be the slave. The second includes a disk with linings riveted on both sides and damper springs installed. It is installed and moves along the splines that are present on all gearbox input shafts. When the pedal is pressed, the driven disk is pressed against the flywheel by the pressure disk.
The drive unit includes a pressure disc with a clutch housing, which is attached to the flywheel with six bolts. To center it, there are pins on the flywheel and guide holes in the housing. The clutch has a backlash-free design and is operated by a cable.
To turn it off, a clutch drive is installed, which operates by pressing the pedal. The cable is hingedly attached to it with its upper tip. The lower end of the cable also has a hinged connection with the shutdown fork. With its movement, the “cable” turns it, and it moves the “releaser”.
Adjusting the VAZ 2109 clutch
Tightening the VAZ 2114 clutch
This operation is carried out in cases where there are shocks or friction when the clutch is engaged, slight slipping of the clutch when the clutch is pressed for a long time, the clutch “drives”.
To adjust the clutch, do the following:
- Place the gearshift lever in the “neutral” position.
- We dismantle the clutch housing.
- We dismantle the bearing. Repair operations should be carried out smoothly and calmly, because the bearing may be defective.
- Rotate the adjusting fastener until the pedal movement is completely adjusted.
- We test the clutch for oil leaks, otherwise the clutch mechanism may slip. To eliminate this problem, it is necessary to treat the coupling with a degreasing compound.
Video: Adjusting the cable and tightening the clutch VAZ 2114
Self-adjustment of clutch VAZ-2115
As a vehicle ages, all its main components and mechanisms also wear out. For this reason, it is extremely important to periodically inspect the machine - this will allow you to identify the problem in time and fix it before it leads to a more serious breakdown.
Timely adjustment and inspection of the clutch on the VAZ-2115 will avoid failure of this unit and eliminate the need to replace it. In a car service, as you know, this procedure is not cheap, and it takes a lot of time.
At the same time, an improperly adjusted clutch makes driving uncomfortable for the driver.
In this material we will tell you in detail exactly how to correctly perform this operation and the sequence in which to perform all the necessary actions.
Soft start: how to adjust the clutch on a VAZ 2114 yourself?
Front-wheel drive cars of the new family from Togliatti have lost the classic design of the hydraulic release fork drive. The designers explain this modernization by the greater reliability of the cable mechanisms. However, they also require periodic adjustment, which is confirmed, in particular, by the experience of operating Lada Samara cars.
Briefly about the design of a friction clutch and its purpose
Any self-respecting motorist will study the design of the unit before adjusting the clutch on a VAZ 2114. This will help you approach the issue wisely and avoid mistakes.
The mechanical drive design is simple and reliable. Compared to hydraulics, the cable requires minimal maintenance, and changing it is not labor-intensive. The mechanical drive consists of the following elements:
- Adjustable sheathed cable.
- Control pedal.
- Clutch release fork lever.
- Bracket for fastening the end of the cable sheath.
- Brake and clutch pedal bracket.
The mechanism serves to transmit force from the pedal to the release fork, which, in turn, removes the friction disc from the flywheel.
When adjustment is necessary
The clutch drive, as a rule, if it is not adjusted properly, is located either slightly above the brake pedal or slightly below. As a result, it becomes completely inconvenient to use, which ultimately significantly increases the risk of creating an emergency situation on the road.
The problem arises primarily due to the fact that the position of the pedal changes as the spacers installed on the driven disk wear out. The longer the vehicle is in operation, the more noticeable this defect is.
For VAZ-2115 cars, the manufacturer has established the standard travel of the clutch control pedal - a minimum of 12.5, a maximum of 13.5 centimeters. The maximum permissible deviation in this case cannot be more than 16 centimeters.
Among other things, it is necessary to carry out adjustments in a situation where the unit in question has stopped completely shutting down or is slipping. The procedure itself involves debugging by shortening or lengthening the clutch cable, as well as its sheath.
Determining the pedal stroke
First of all, you will need to determine how much the clutch pedal has deviated from the standard values. To take a measurement, you need to do the following:
- the pedal is lowered by hand to the highest possible level;
- then she is released;
- In parallel, you will need to determine the stroke length of the drive using a ruler or tape measure.
First, find out what the distance is from the center point of the pedal to the floor of the cabin in the lowered position, and then take a measurement in the raised position. If it turns out that the deviation from normal permissible values exceeds the maximum, you will need to adjust the clutch.
There is also an option to check without exact measurements. In this situation:
- the machine is installed where there is a completely flat area;
- first gear is engaged;
- The drive is smoothly released, after which forward movement begins.
Debugging will be needed if the vehicle moves only when the pedal has reached the lowest point.
Adjustment
The essence of the adjustment is to change the length of the cable, or rather its sheath. This is done using the above-mentioned keys - they loosen or, conversely, tighten the existing 2 nuts that secure it directly to the bracket.
For this:
- raise the hood;
- dismantle the air filter;
- underneath it, near the generator, is the cable itself;
- The nuts we need are located below.
Unfortunately, VAZ designers did not care too much about the convenience of the person servicing the car, for this reason you will have to suffer quite a bit during the adjustment process.
As the nuts rotate, the length of the cable changes, as previously reported. To reduce the amplitude of movement of the drive, it is necessary to loosen the fastening element located directly inside the bracket. At the same time, you will also need to tighten the nut located from the outside.
If you need to lengthen the stroke, everything is done exactly the opposite - the inner nut is tightened, and the outer one is loosened. Under no circumstances should the cable sheath be over-tightened or left slack. In the first case, it will break very soon, in the latter, it will be impossible to completely disengage the clutch.
Sometimes it happens that the threads on the nuts have oxidized - in this situation a special compound will help or, at worst, a little:
- gasoline;
- brake fluid;
- machine oil.
Upon completion of the adjustment, it is imperative to check the operation of the unit and compliance with standards. This is done in exactly the same way as described above. If you have not made any mistakes, the clutch pedal travel as a whole will not be more than 13.5 centimeters.
If your efforts lead to nothing, you will most likely need to completely replace the entire assembly.
To get a more complete picture of the adjustment process, you should watch the video below:
How to adjust?
An out-of-control drive is located several centimeters higher or lower relative to the brake. This makes the drive inconvenient to use and can cause accidents.
The drive position changes as a result of wear on the driven disk linings during prolonged driving of the vehicle. For VAZ 2115 cars, pedal travel is considered normal to be 125-135 mm. The maximum safe stroke does not exceed 160 mm. Adjustment is also necessary if the unit does not turn off completely or is slipping. Debugging is carried out by changing the length of the clutch cable and its sheath.
Tools
2 keys for 17. On the VAZ 2115, the lower end of the cable “jacket” is held on by two fasteners, which are loosened using these keys.
17 keys - the main tools for adjusting the clutch cable
Step-by-step instruction
- Initially, it is worth measuring the pedal deviation from the norm. To do this, you need to push the drive to the maximum, then release it. It is necessary to measure the stroke length - the distance from the center of the pedal pad in its lower position, when it is resting on the floor, and in its upper position. If the deviation from the normal length is significant, the pedal should be adjusted.
Before adjusting, you need to measure the travel length of the clutch pedal. - Deviations from the norm can be detected without measurements. To do this, you need to place the car on a flat horizontal surface, engage first gear and, smoothly releasing the drive, start moving. If the car starts moving only at the end of pressing the pedal, debugging is necessary.
- In order to adjust the drive of the VAZ 2115, it is necessary to change the length of the cable jacket. To do this, you need to loosen or tighten the two nuts with which it is attached to the bracket.
Clutch cable adjustment - Open the hood. Remove the air filter. We find the cable and nuts that secure it to the bracket. They are located on its threaded part. Unfortunately, on the VAZ 2115 these parts are located inconveniently. When manipulating the nuts, the length of the cable jacket changes. In order to reduce the stroke, loosen the nut located inside the bracket and tighten the nut outside, and vice versa, if you need to increase it. It is important to remember that constriction, as well as weak tension, are unacceptable. When overtightened, the cable will quickly break, and if the tension is weak, the clutch will no longer disengage completely.
- If the threads are rusty, you can use liquid to make the threads easier to remove. If there is none, you can use engine oil or brake fluid.
- After debugging, you should check changes in the operation of the node. This should be done in the same way as during the initial check for deviation from the norm. After correct adjustment, the stroke does not exceed 135 mm. If the procedure does not lead to anything and the clutch of your VAZ 2115 continues to slip, then the element has become unusable and needs to be replaced.
Re-measurement of clutch travel
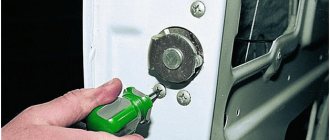
How does a clutch release bearing work?
The bearings that we will discuss further are of two types: hydraulic (the force is created by a hydraulic system) and roller (working using rigid connections between rods). Despite the fact that they have different principles of operation, they perform the same functions - turning the clutch on and off, and also helps disengage the disc from engagement with the basket.
Passenger car clutch
Tips: Wheel alignment, what is it?
Thanks to the clutch, the engine is smoothly disconnected from the transmission when gears are changed. This clutch operation has a beneficial effect on the mechanisms and elements of the transmission - it protects them from overload and dampens vibrations. This mechanism works according to the following scheme. By means of a pressure plate attached to the housing, the driven disk is pressed against the flywheel, and its hub can move along the input shaft to which it is connected. Smooth gear shifting and damping of vibrations occurs thanks to damper springs located in the hub.
The interaction of the diaphragm spring, which is made in the form of petals, with the pressure disk is aimed at providing the necessary force. It is these petals that fall under the influence of the release bearing, which is functionally designed to ensure interaction of the clutch with the drive. The clutch fork, in turn, ensures the movement of the bearing with the release clutch.
Possible causes and symptoms of bearing wear?
When the clutch is depressed, the bearing moves backward and pulls the driven disk behind it. Due to the impact of torque, it is not recommended to hold the clutch with the gear engaged at the same time, since the part is subjected to uneven loads and, accordingly, wears out faster. Of course, if you use the clutch correctly, you will not have problems with the operation of the mechanism for a long time.
The role of the clutch release bearing in the processes described above is quite large. One of the main signs that you may need to replace the release bearing in the near future is the characteristic sound that appears when you depress the clutch. If you suspect that something is not working correctly, try to determine whether the bearing is the cause of the possible problem. You can do this in the following way:
- When you start the car engine, you should listen carefully to the noise;
- Next, you need to squeeze the clutch all the way;
- If the noise does not disappear or, on the contrary, intensifies, we can safely talk about the bearing as the cause of the problem.
Old and new release bearing
Tips: The handbrake is frozen - what to do?
If the noise disappears when you press the clutch, then the cause of such noise is problems in the operation of the gearbox. If extraneous sounds (knocking) appear in the winter season, with a high degree of probability, your worries will be in vain. The fact is that in the manufacture of the clutch release bearing, high-strength steel was used, with a rather small coefficient of linear expansion, which cannot be said with just a glass that serves as a “container” for bearing parts.