Procedure and torque for tightening the Chevrolet Niva cylinder head
Drain the engine cooling system as described. Reduce the pressure in the supply system as described. Disconnect the throttle drive cable from the throttle assembly and receiver. Remove the bearing housing together with the camshaft from the cylinder head studs, having previously made marks with a ratchet wrench and removed the camshaft sprocket as described.
Ratchet key. The procedure and torque for tightening the cylinder head of the Niva Chevrolet valve drive levers, unscrew all the hydraulic mounts of the levers from the holes in the cylinder head. Remove the oil supply ramp to the hydraulic mounts. Disconnect the wiring harness connector from the throttle position sensor. Disconnect the wiring harness connector from the sensor, idle air control. Disconnect the wiring harness connector from the engine coolant temperature sensor. Disconnect the injector wiring harness connector.
Disconnect the wiring harness from the knock sensor. Move the engine harness to the side. Disconnect the wires from the spark plugs.
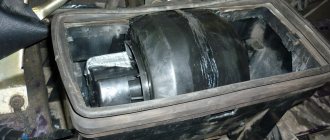
Slide the protective cap and disconnect the wire from the coolant temperature gauge sensor. Disconnect the exhaust pipe from the exhaust manifold. It's all due to the locking ring, which prevents the plunger from completely jumping out of the sleeve.
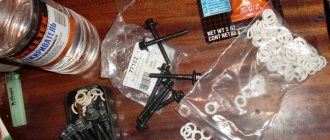
The purpose of this ring is purely for transportation purposes and after the first disassembly of the hydraulic mount, the ring does not need to be reinstalled; nothing will jump out during engine operation, don’t worry. To disassemble the compensator, you need to show some ingenuity - clamp the plunger bushing in a vice, a gas wrench, pliers, or simply in the slot of a nail puller, and with another tool I personally used wire cutters, you need to pull the head of the plunger; the pliers simply broke off here.
But be careful not to overdo it! When you disassemble the valve body, do not lose the valve spring, it is very small! After disassembly, we thoroughly wash all the parts with the above-mentioned Profoam type cleaner, which very easily removes all oil deposits.
procedure and tightening torque for Chevrolet Niva cylinder head
Be sure to clean the chamfered ball seat from dirt. This can be done with a toothpick. It is also a good idea to flush the oil ramp. After cleaning, it is recommended to rinse the parts with plain water and dry thoroughly.
After this, we assemble the hydraulic compensators back, clamp them in order and the tightening torque of the Chevrolet Niva Niva cylinder head and press the plunger with our thumb. The hydraulic valve should shrink and return to its original position without any jamming. This is a check for jamming. But before that, just in case, we try to rotate the hydraulic support well by hand. Correctly screwed wells should not unscrew. After this, remove oil deposits from the wells with a 2 or 5 ml syringe; a thicker syringe simply will not get through the remaining oil from the wells of the hydraulic supports; if necessary, clean the wells with a rag from oil deposits and put the hydraulic compensators back in their places on the same ones, do not confuse them.
We take out the upper and lower parts of the plunger pair and fill the plunger bushing with fresh engine oil. Now we place the lower part of the plunger pair into the bushing and seat it. But incompressible oil does not allow us to do this. This is where toothpicks or a stiff wire or a paper clip come in handy - that is, we take and press the order and tightening torque of the cylinder head valve ball, while simultaneously plunging the lower part of the plunger pair into the bushing until we rest against the plunger spring. We carry out this procedure with all hydraulic compensators.
Chevrolet Niva cylinder head: properly tighten the cover after replacing the gasket
After this, you can check the hydraulic supports by pressing them with force to check for punching. A working hydraulic valve does not immediately compress; the gaps in the hydraulic support are very small and viscous oil does not flow out so quickly under load; it begins to sink only when sufficient force is applied for seconds, depending on how you press.
Here you can check it in another way - if all the hydraulic supports are pressed equally hard, then everything is working normally. If one or more expansion joints are compressed noticeably easier than others, then you should think about replacing them. After the hydraulic compensators, we install the rocker, the camshaft, but do not tighten the oil rail yet.
We put the sprocket back on the camshaft, press out the hydraulic tensioner, if it interferes, set the order and tightening torque of the Chevrolet Niva Niva cylinder head, lock washer, tighten the bolt, but do not bend the edge of the lock washer yet. A non-shrinkable metal-reinforced gasket is installed between the block and the head. Reuse of the gasket is not permitted. To ensure a reliable seal and avoid tightening the bolts during vehicle maintenance, we tighten them in four steps: Turning scale for tightening the cylinder head - Hydraulic support of the valve lever.
Which camshaft is better to install?
One way to avoid main engine noise is to replace them with adjusting bolts. In this case, it is also necessary to purchase a 213th camshaft, which can improve engine performance.
Problems with the shaft itself include:
- bearing wear;
- bullying in bed;
- cracks, fractures, axial deformation;
- seal damage.
Video 1, the shaft burst 2 times in a row.
Cylinder head repair
Even with gentle operation, the engine cylinder head sooner or later requires repair. For domestically produced SUVs, this issue is especially relevant. 1. “Niva” is not bought for traveling to the Bolshoi Theater on city roads. 2. Domestic off-road is not a training ground with calibrated obstacles; the loads on the car and engine are serious. 3. The quality of fuel and lubricants, unfortunately, does not contribute to extending the life of the cylinder head.
You can look at the video for signs of a malfunction :
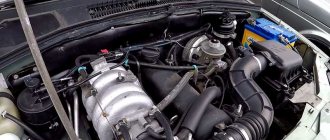
IMPORTANT! For such maintenance there is no need to dismantle the power plant. There is enough space under the hood to carry out work directly on the car. The design of the 21213 engine is quite simple. Major repairs or replacement of the cylinder head gasket are carried out in a garage, by one owner who has basic experience in servicing his car.
Let's prepare the tool:
- Ratchet with a set of sockets (we will need sizes from 10 to 17 mm) and an extension. Open-end and ring wrenches with similar sizes. Torque wrench operating in the range from 10 to 110 N/m. Candle key. A flat-head screwdriver with a wide blade, a scraper (you can use a narrow construction spatula), they can be used to separate the stuck cylinder head gasket. Retaining ring pullers . Desiccant, a wooden block to support valve cotters. Crown-shaped brush, drill. A hammer with a rubber or polyethylene head (for seating valves). A syringe with a thick needle (for sucking out technical fluids from hard-to-reach cavities) Fire extinguisher, rags, containers of different sizes. Magnet on copper wire for removing fallen fasteners.
Before servicing, make sure that the hood lid stops are secure, put the car on the handbrake and block the wheels with shoes.
- Disconnect the battery and relieve pressure in the fuel rail. Unscrew the radiator expansion tank cap and drain the antifreeze. Carefully unscrew the throttle block mounting bolts, having first disconnected the throttle cable. We dismantle the unit as an assembly if it does not require maintenance. If the gasket is intact, it is not necessary to change it.
- We dismantle the pipes connecting the cooling jacket of the cylinder head and the radiator. First loosen the clamps. We open the connectors of the control cables of the injectors. Temperature may cause the fasteners to break off, so don’t apply too much force. Disconnect the connectors from the temperature sensors on the cylinder head. We pull off the caps of the high-voltage wiring from the spark plugs and simultaneously check the condition of the insulation. Disconnect the fuel supply and return lines. Before starting work, be prepared to catch any remaining fuel. Separate the intake pipe of the exhaust manifold. If necessary, replace the gasket with a new one.
- We dismantle the thermal protective screens. Loosen the timing chain tensioners and fix the chain itself to the gear using a wire. We unscrew the mounting bolts and remove the camshaft.
- Remove the levers pushing the valves. Unscrew the cylinder head mounting bolts. Their location on engines 21213 and 21214 is similar. Carefully remove the cylinder block, starting from the front. The gasket remains on the lower block.
16. Place the block on a flat surface and remove the cooling system flanges. If the gasket is damaged, replace it.
Maintenance includes replacing the cylinder head gasket, cleaning oil passages, and lapping valves. At the same time, the camshaft is inspected for scoring and other wear. The choice of a spare parts manufacturer is a personal matter for the owner. However, such an important part as the gasket has different quality depending on the manufacturer.
When comparing the three options, the branded spare part turned out to be the poorest quality, there are no complaints about the Spanish model (it is the most expensive), and the golden mean is the Yegoryevsk consumables.
The unit is installed in several stages, following the sequence:
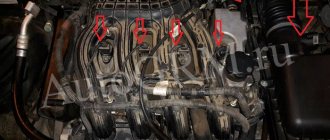
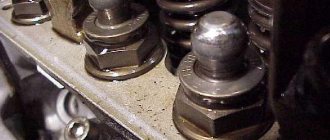
- All bolts except 11, observing the order, are tightened with a torque of 20 N/m. Then, repeating the sequence, we tighten the same bolts with a torque of 69-85 N/m. We tighten bolt 11 in one pass, with a torque of 32-39 N/m. We replace the torque wrench with a regular handle, and turn all the bolts by 90°.
If you have the tools, you can do the work yourself. • We bore inlet and outlet flanges to a diameter of 34 mm. Figure 8
Tightening torques for threaded connections Niva Chevrolet
Tightening the cylinder head. Do it yourself!
Remove the bearing housing together with the camshaft from the cylinder head studs, having previously made marks with a ratchet wrench and removed the camshaft sprocket as described. Niva cylinder head bolts, installation I won’t invent anything, just completely follow the factory manual.
REPAIR MAINTENANCE OPERATION OF VEHICLES Chevrolet Chevrolet Niva. Chevrolet Chevrolet-Niva. Detail. Thread. Tightening torque, N m (kgf m)….
I had to take it apart myself and take pictures on my phone. Make sure that the chain does not disengage with the oil pump drive shaft sprocket.
We put the sprocket back on the camshaft, press out the hydraulic tensioner, if it interferes, install a new lock washer, tighten the bolt, but do not bend the edge of the lock washer yet.
And in the worst case, this is a beating in the drill reamer and the channels, plus you can open the oil channel, then the scribe head will definitely be screwed. In the end, I decided not to cut. If anything happens, I’ll do it on occasion... Flushing hydraulic compensators using the example of new-style hydraulic supports from August of this year in a Chevrolet Niva. Maybe this instruction will help someone carry out a similar operation on their car, because essentially there is nothing complicated here.
The original hydraulic compensators of the new type have the article number manufactured by INA.
Parts and consumables:
You can order from exist or autodoc. Among other things, you will need a new valve cover gasket, wire, several toothpicks or a paper clip, a ml syringe, plastic ties, a small chisel, pliers, and a special tool - a torque wrench, although many do without it.
Chevrolet Niva - Removing the cylinder head
You will need some kind of cleaner to clean it. According to my observations, a special cleaner like Profoam will be very good. It cleans and dissolves all oil deposits easily!
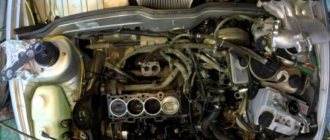
It’s a pity I didn’t start using it right away, but at first I struggled with gasoline galoshes, which is much inferior in this regard. There is nothing complicated here - we unscrew the bolts, remove the hoses that are in the way, and you can also take them to the side and tie them to something so they don’t get in the way.
Next, it is advisable to jack up the car and turn the wheel in 5th gear until the mark on the sprocket aligns with the mark on the camshaft housing. In general, this line is a little hard to see, so for clarity, I put a small piece of chewing gum on it, see below.
Now we need to remove the camshaft. But to do this, you first need to remove the sprocket and deal with the chain tensioner.
Next, we pass a plastic tie through one of the holes in the camshaft gear and fasten the gear to the chain so that the gear teeth do not jump and disrupt the timing of the gas distribution mechanism.
After this, we take the wire and tie it until we only secure the sprocket to the upper hood lock so that the sprocket and chain do not sag too much and the chain does not disengage with the oil pump sprocket.
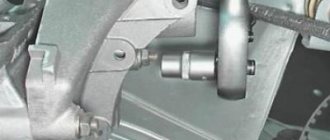
Now you can bend the edge of the sprocket lock washer, carefully use a small chisel and hammer and unscrew the bolt. So, the sprocket was removed and secured with wire to the hood lock, see.
Now unscrew the nuts securing the oil rail and remove it. After this, we unscrew the remaining nuts securing the camshaft housing and remove the camshaft itself, carefully, without turning it inside the housing and without knocking the rocker out of place so as not to confuse it later.
Here you can inspect the RV for the presence of possible workings and damage. It is best to prepare eight numbered bags and put everything in your bags, the rocker and main valve of the first valve in the first bag, the second in the second, etc.
According to science, when they say torsion bar, they mean deformation from twisting. When they say Lenin, they mean the party. And in this case, tensile deformation. In stores, these bolts are also called Chevrolet Niva cylinder head bolts.
I also came across the name torx or chamomile. These bolts, unlike hardened ones, provide a constant load. That is, in a very primitive way we can talk about the grommet effect, that is, about the constant force to compress the cylinder head gasket in the axial direction of the bolt.
Tightening scheme
Using a large screwdriver, the chain tensioner is removed, then the camshaft gear is placed in its original place. The bolt and washer are tightened. The latter is controlled with pliers.
Next, the thermal clearance of the valves is adjusted. Assembly is carried out in reverse order.
Video 2: replacing the timing tensioner.
Read news about the new Niva
- How to make an all-terrain vehicle from Oka? — 4WHEELS — MirTesen media platform
- Renault Duster automatic: is it worth choosing automatic transmission
- Removal and installation of generator Niva 2121, Niva 2131
- Fuel consumption on a Chevrolet Niva per 100 km: indicators
- Which automatic transmission to choose: what is the difference between an “automatic” and a “robot”
- Choosing oil for a Chevrolet Niva engine
- In Barnaul, a Niva with a dead driver at the wheel drove into oncoming traffic and crashed into a Lexus
- Toyota Hilux - when there is nothing else to drive
Block plane and gasket penetration
Loosen the fastening clamp and disconnect the hose of the lower thermostat pipe. Loosen the fastening clamp and disconnect the hose of the thermostat side pipe. Loosen the fastening clamp and disconnect the fluid supply hose to the heater radiator from the cylinder head pipe.
Unscrew the nuts of the fuel pipes and disconnect the fuel supply and drain lines. Remove the upper bolt securing the rear intake pipe strut, loosen the lower bolt of the strut and move it to the side.
Torsion bolts (plastically deformable)
Remove the two nuts securing the starter heat shield. Move the shield to the side. Remove the chain from the camshaft sprocket. Carefully place it on the tensioner shoe.
Let's start disassembling (procedure)
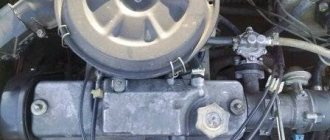
- The first step is to remove the air filter. The four screws along the edges of the cover are unscrewed. The pipes are detached.
- The cable and the gas damper drive open.
- The valve cover must be cleaned of dirt; this is done in order to avoid clogging the engine from dust and debris accumulated under the cover.
- Next, you need to loosen the camshaft fastenings. It is important to secure the engine from accidental rotation; fixation can be done using any strong metal object clamped between the chain and the sprocket (for example, a screwdriver).
After completing all these steps, you can start replacing.
When should you change the cylinder head gasket?
Such work will have to be done when the gasket is damaged. These could be cracks or holes in the gasket. If damaged, the car owner will observe the appearance of air in the cooling system . This will also be indicated by the bubbling of antifreeze.
Crack in the cylinder head gasket.
You will also need to change the gasket when there is not enough compression in the combustion chamber. In this case, the gasket may simply wear out and will no longer be able to perform its functions. Also, when cracks appear, antifreeze will enter the combustion chamber, which will lead to unstable engine operation.
The cylinder head gasket on the Shniva burned out.
In all of the above cases, replacing the gasket will be simply necessary . If you do not replace it in time, the consequences can be dire.