How bad it is that you can’t weld the valve cover and forget about oil leaks forever! So, after driving 6-7 thousand, the oil started leaking out from under the valve cover again! At the time of replacement, there was one leak in the spark plug well and two damp corners. We must pay tribute to the KAMAZ rings that were placed under the cover bolts (not one of them leaked oil, unlike the factory ones). Having collected a lot of information from all kinds of forums, clubs, etc. and putting it in a pile, he began to change this fluid seal.
What was needed:
1) Pad
. This time, instead of the standard GM one (96 353 002), I installed it with a T-shaped profile (96351213), although many people use Reinz 155345601.
2) Valve cover bolts
15pcs. (94 500 909). According to some clubmates, they are made from raw meat and have the ability to stretch. It’s hard to believe, but we’re changing it :)
3) Ring sealing
(standard 96353007 - they tan quickly) We bought KAMAZ ones (tested), white ones made of silicone.
4) Sealant
(safe for oxygen sensors)
5) Dude with a torque wrench
, he’s a drinking buddy, he’s a conversation partner, etc! :)
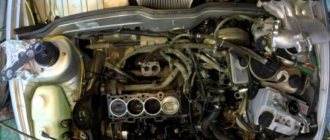
One day, before the fall, I decided not to install a decorative cover on the engine. Underneath there is impressively thick thermal insulation. I think in traffic jams and in the heat it will not play the best role in removing heat from the engine.
Drive device
The camshaft is responsible for the correct and timely operation of the valve mechanism. The design and number of camshafts for each engine type are selected individually. The part is a shaft on which cams of a certain shape are made. As they rotate, they put pressure on the pushers, hydraulic compensators or rocker arms and open the valves. The type of circuit depends on the specific engine.
Gas distribution mechanism
The camshaft is located directly in the cylinder head. The drive to it comes from the crankshaft. It can be a chain, belt or gear drive. The most reliable is the chain one, but it requires additional design solutions. For example, a damper to dampen chain vibration and a tensioner. The camshaft rotation speed is two times lower than the crankshaft rotation speed. This ensures coordination of their work.
The number of camshafts depends on the number of valves. There are two main schemes:
- SOHC (single shaft);
- DOHC (double shaft).
If there are only two valves, one camshaft is sufficient. Rotating, it ensures alternate opening of the intake and exhaust valves. The most common four-valve engines have two camshafts. One ensures the operation of the intake valves, and the other exhaust valves. Engines with V-shaped cylinders have four camshafts. Two on each side.
The camshaft lobes do not push the valve stem directly. There are several types of “intermediaries”:
- roller levers (rocker arm);
- mechanical pushers (cups);
- hydraulic pushers.
Roller levers are a more preferred design. The hydraulic pusher is pressed by so-called rocker arms, which swing on plug-in axles. To reduce friction, the lever has a roller that contacts directly with the cam.
Another scheme uses hydraulic pushers (lash compensators), which are located directly on the rod. Hydraulic compensators automatically adjust the thermal gap and ensure soft and less noisy operation of the mechanism. This small part consists of a cylinder with a piston and spring, oil passages and a check valve. To operate the hydraulic pusher, oil is used, which is supplied from. You can read more about hydraulic compensators in a separate article on our website.
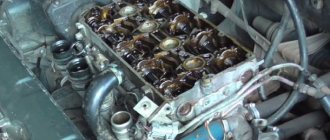
Removing the valve cup with a magnet
Mechanical pushers (cups) are a sleeve closed on one side. They are installed in the cylinder head housing and directly transmit force to the valve stem. Their main disadvantages are the need to periodically adjust the gaps and knocking when operating on a cold engine.
Specifications
All of the listed sealants can be used for application to the automatic transmission pan at ambient temperatures from plus 5 to 25 degrees. They can withstand temperatures from + 240 degrees Celsius to minus 300. They can easily tolerate short-term heating of 300 degrees Celsius plus.
The following table shows specific information about each of the listed sealants recommended for automatic transmissions.
| Name | Operating temperature maximum and minimum | Drying time (min) | Seam (mm) | Best before date |
| Victor Raines | — 50 + 250 (short-term + 300) | 15 (complete drying 24 hours) | Up to 0.5 | 2 year |
| Permatex Automatic Transmission RTV Gasket Marker | — 54 + 204 (short-term + 260) | 15 (complete drying 24 hours) | Up to 0.6 | 2 years |
| Done Deal Gray RTV Silicone Gasket marker | — 75 + 345 | 10 (complete drying 24 hours) | Up to 0.5 | 2 years |
| Permatex Ultra Gray | — 54 + 232 | 15 (complete drying 24 hours) | Up to 0.6 | 2 years |
| Mannol Red Gasket Marker | — 50 + 240 | Complete drying - 24 hours | Up to 0.5 | 2 years |
Attention! Although these sealants are not toxic to the human body, apply them with rubber gloves to avoid skin contact.
Solving the problem yourself
Replacing the 1.6 valve cover gasket should not cause difficulties for car owners, since the procedure itself is simple. It is quite possible to do everything quickly and efficiently in a private garage; all you need is desire and a minimum set of tools.
To do everything right, you should follow the recommendations of professionals and act step by step. The algorithm for such repairs itself provides for the following sequence of actions.
- The first thing you need to do is buy a sealant with the specified parameters, as well as purchase a high-quality sealant and degreaser. As for the sealing composition, it must be designed for high-temperature operating conditions, and also maintain its original characteristics under significant temperature changes.
- Having prepared the tools and consumables, you can begin dismantling the valve cover, which is preceded by disconnecting all associated elements, for example, pipes. Next, the mounting bolts are unscrewed and the motor cover is removed.
- All connecting surfaces of the dismantled part must be cleaned of old sealant residues and other contaminants, after which they are degreased. These operations are performed carefully and accurately.
- Having cleaned and treated all surfaces, we move on to the sealant. The new gasket must be lubricated with sealant on both sides, after which it is installed in its regular place in the power unit.
- The final step is to install the valve cover followed by tightening the bolts.
All of these steps are extremely simple, and therefore there should be no difficulties with replacing the seal. However, practice shows that quite often the leak after such a repair becomes more intense than with the old gasket. There may be several reasons for this phenomenon, namely:
- the new seal has a manufacturing defect or is of poor quality;
- the sealant was not applied as a monolithic strip or has unsuitable characteristics;
- The mounting bolts were not tightened evenly, which led to the cover being skewed.
The problem can be solved by repeating the procedure described above. And in this case, it is highly undesirable to reuse the seal, since cleaning it with a 90% probability will lead to damage to the part.
Experienced drivers strongly recommend purchasing original gaskets for each specific car model. If this is not possible, then you should look for a high-quality analogue of a well-known brand, and not buy the first thing that catches your eye, or what is cheaper.
Accurate information about the optimal seal, as well as recommendations from mechanics regarding alternative solutions, can be found on specialized forums on the Internet. If you are not confident in your own choice, then you should seek help from specialists.
The same goes for tightening the mounting bolts. Without the necessary tool, which is a torque wrench that sets the correct force, or without knowing the sequence of performing this operation, drive the car to our service center.
We will restore the tightness and performance of your car’s engine in the shortest possible time, offering a reasonable price and a company guarantee for the work performed and the components used.
The cost of our services is very affordable, especially for Moscow. We purchase all used technical fluids, consumables and spare parts from reliable suppliers. In addition, our specialists regularly improve themselves by attending specialized seminars and master classes.
That is why we always guarantee an excellent final result of the repair, regardless of its complexity and scope of work. As for replacing the valve cover seal, this is a simple procedure that will not take much time to complete, and therefore the downtime of vehicles with this problem in our auto repair center will be minimal.
Source
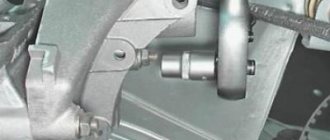
What you need to know about a torque wrench
The bolts are tightened in a certain sequence - from the center to the edges, one at a time. If you are not a motor mechanic with extensive experience and an experienced hand, then the main condition for the correct performance of the work will be the use of a torque wrench. This tool is widespread everywhere, it is easy to buy or rent - just look at the newspaper advertisements or go to your neighbor’s garage.
Torque wrenches come in different designs, but they are all designed to measure the tightening force of threaded connections. When choosing a key, you need to find out in what units the measurement is taken and whether it matches the car manufacturer’s instructions.
In the international SI measurement system, the tightening force is called newton meters, in Russia it is often called kilogram meters, for some foreign cars you can find measurements in pound-force feet. To avoid errors when converting one unit of measurement to another, you can purchase a key with different scales.
Table: how to convert measurements from newton meters to pound-force feet
| Newton meter | 10 | 50 | 100 | 250 | 500 | 1 000 | 2 500 | 5 000 |
| Pound-force-foot | 7.376 | 36.878 | 73.756 | 184.391 | 368.781 | 737.562 | 1 843.906 | 3 687.811 |
To make sure your actions are correct, you can use a protractor to monitor the angle of rotation of the bolt after tightening it with a torque wrench.
This is what a torque wrench looks like, allowing you to correctly determine the force for tightening threaded connections
Valve cover tightening torque and pattern
#1 Udav81
- Members
- 120 messages
- Gender: Man
- Country Russia
- Moscow city
- Moto: zzr1400
Has anyone studied the manual? It's leaking from the corner, but I'm afraid to overtighten it
#2 max232
TOADMANIACS MCC 3,825 posts
- Gender: Man
- Country Russia
- City: Yelets, Lipetsk region
- Moto: zx-10r `08
Has anyone studied the manual? It's leaking from the corner, but I'm afraid to overtighten it
no amount of stretching will help. you need to change the gasket and 4 spark plug gaskets
Pulling any motorcycle from the center to the edges 10 newtons
#3 RomaZX12R
Members 29 posts
- Gender: Man
- Country Russia
- City: Petrozavodsk
- Moto: ZX12R 2000, ZX14 2008
Remove the cover and apply VICTOR REINZ sealant to the gasket, it won’t leak
#4 danilzzr400
Members 141 posts
- Gender: Man
- Country Russia
- City: Altai Territory, Biysk
- Moto: ZX-12R 2001
I also have oil leaking from the edge, I think I won’t limit myself to pulling, I need to remove and change the gasket, because... She's apparently already dried out.
#5 Leva089
Members 239 posts
- Gender: Man
- Country Russia
- City: NefteSkvazhinsk
- Motorcycle: ZX-9R 95 ZX-12R 02Y.
I installed a new gasket, drove 500 km and it leaked on the left side, coated it with regular sealant, it was enough for 100 km. In the end I bought a VICTOR REINZ, drove 1600 km, does not leak anywhere. I advise you to watch on YouTube how to distinguish the original sealant from a fake!
Duende likes this.
#6 Udav81
Members 120 messages
- Gender: Man
- Country Russia
- Moscow city
- Moto: zzr1400
I installed a new gasket, drove 500 km and it leaked on the left side, coated it with regular sealant, it was enough for 100 km. In the end I bought a VICTOR REINZ, drove 1600 km, does not leak anywhere. I advise you to watch on YouTube how to distinguish the original sealant from a fake!
Thanks everyone! I'm hitting the internet
Leva089 likes this
How to change the valve cover gasket yourself
Replacing the valve cover gasket is a simple procedure that can be done in a garage environment with a minimum of required tools. In this case, certain recommendations must be followed. The general replacement process involves the following steps:
Purchase a new gasket, degreaser, and valve cover sealant. When choosing a sealant, you need to take into account that the composition must retain its properties under high heating conditions and also withstand temperature changes. The next step is to disconnect all the pipes and other elements from the cover, after which you need to unscrew the bolts securing the cover
Please note that some internal combustion engines also have special rubber rings for the bolts, which may fall into the cylinder head when removed. After the valve cover has been removed, the connecting surfaces of the cover and cylinder head should be cleaned of sealant residues and degreased.
Then sealant is applied to the new gasket on both sides, after which the element is installed on the engine. Next, the valve cover is tightened with bolts.
As you can see, no difficulties arise during the replacement process. However, after installing a new gasket, you should be prepared for the fact that in some cases oil may begin to flow heavily at the joint. The leak may be even worse than before the replacement. In such a situation, engine oil leaks for the following reasons:
- a low quality gasket is installed or the product is defective;
- There is uneven tightening of the cover bolts. This leads to the fact that the cover is skewed after installation;
- the wrong sealant was used or the sealant was applied unevenly;
To obtain more accurate information, it is advisable to separately study the issue on specialized auto forums, consult with experienced professionals, etc. As a result, it is possible to accurately determine which valve cover gasket number to use during the selection process. Regarding tightening, it is recommended to tighten the cover bolts with a torque wrench to the required torque and in the correct sequence. This information should be found in the technical manual for the repair and operation of a specific internal combustion engine.
Why are guide bushings needed?
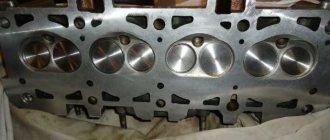
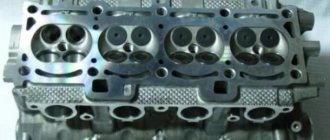
Before installing the cylinder head, perform the following steps: clean the threaded holes, as well as all holes for the bushings (photo 1). Each bushing is installed in place, and only then a gasket is placed on top.
Metal parts adjacent to the gasket must be degreased. We looked at the cylinder head tightening diagram, but the cylinder head itself must be installed correctly:
- We place the cylinder head on the cylinder block;
- By moving the part in different directions, we ensure that the bushings fit into the recesses.
After “step 2” the screws can be tightened.
Sealant
No sealing compounds are used when installing the gasket! Solidol, CIATIM and other lubricants are not even needed. The main thing is that the metal must be degreased. And the cylinder head gasket must be new.
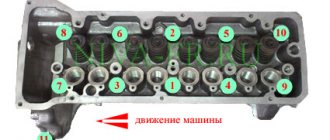
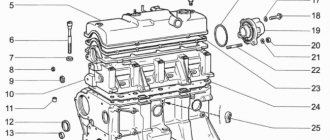
Cylinder head cover and tightening order of its bolts
The metal cover installed on the cylinder head must not allow air to pass through. At points of contact with other parts, tightness must also be maintained. Therefore, sealant is applied to the edge of the lid. An example is shown in the photo.
Here you need to use materials: Loctite-574, ANACROL, etc. The screws on the cover are tightened with an “8” key.
Recommended screw tightening torque
The recommended screw tightening torque is only 3-4 N*m. Don't be surprised: the sealant will do its job. You just need to let it dry after putting the cover in place.
You can unscrew the screws in any order. Their number is 15 or 14. When installing, it is better to follow the sequence shown below.
There is usually no need to replace the screws - the load is too small. We wish you success.
Common Misconceptions
If the bolts are pulled out too much, they are tightened in four steps. At “step 2” the tightening torque will be 70-85 N*m. All of these are common misconceptions that do not apply to 16-valve internal combustion engines.
All steps in one video: replacing the cylinder head gasket
If you find an error, please select a piece of text and press Ctrl+Enter.
| Images |
| My images |
| Upload images |
| All images |
| To the page. |
| Page 1 of 2 | 1 | 2 | > |
Hello everyone, I have one question. In what sequence and with what force should the valve cover bolts be tightened after replacing the spark plug well gaskets? I think it’s not difficult to change them. Otherwise, oil floats at the bottom of the well and the spark plug is all covered in oil, and even a little comes out
dreamcat87: Part numbers for spark plug well and valve cover gaskets:
CU2W ATMO SOHC gasket MD310913 (1035A914) O-rings: MD198128 * 4 pcs, there is a good substitute MUSASHI TPF600
CU2W TURBO gasket MD310913 (1035A914), from 2004.10 MD340535 Rings: MD186785 *4 pieces
CU4W 4G64 GDI gasket MD348283 Instead of rings, one gasket between the valve cover plates: MD348282
Cu4W 4G64 MPI gasket MD310913 (1035A914), from 2004.10 MD340535 Rings: MD186785 *4 pieces
CU5W 4G69 gasket MN137117 Rings: MD198128 * 4 pcs, there is a good substitute MUSASHI TPF600
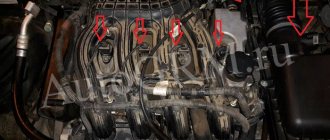
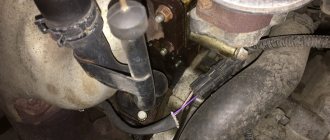
The Chevrolet Lacetti, a popular car in Russia, which has an F14D3 or F16D3, 1.4 or 1.6 liter engine under the hood, has a chronic disease. This is an oil leak from the valve cover gasket.
There are several reasons for this:
- The cover is made of polymer material and has a different temperature expansion coefficient with the aluminum cylinder head;
- Metal bushings for the cover fastening bolts protrude beyond the plane of the mating surface and do not allow the gasket to be pressed more tightly to the block head;
- The original cover gasket is poorly executed; it is too thin and narrow.
All these factors lead to the fact that after 40 - 50 thousand km. mileage, engine oil begins to ooze from under the cap. This is especially true for spark plug wells, as leaking oil accumulates there.
As a result, the spark plugs float in the engine oil, there is no great harm from this, but there is no benefit either. In addition, oil attracts dust from the engine compartment.
The surface of the spark plugs becomes dirty and conductive paths appear, along which high voltage from the electrodes partially “drains” onto the body. The efficiency of the ignition system decreases.
Types, design and characteristics of valve cover gaskets
Valve cover with gasket and their place in the power unit
Regardless of the type, all valve cover gaskets have a fundamentally identical design. This is a flat elastic part that follows the shape of the plane of contact of the cover to the cylinder head, and has holes for fasteners and other parts. The gasket is placed under the cover and, due to its elasticity, seals the gap between the cover and the cylinder head (filling micro-irregularities and compensating for small deviations of their mating surfaces from the plane), ensuring its sealing.
In this case, gaskets can have different designs:
- Whole (non-breaking) - an ring gasket or a gasket of a more complex shape (for example, under the covers of engines with two camshafts on the cylinder head) without breaks, which is simply installed under the cover;
- Composite - a gasket with gaps and inserts for sealing the camshaft inlet or other parts;
- Complete - in addition to the main gasket, the kit may include additional ring seals for spark plug wells and other holes in the cover.
Valve cover gaskets can be divided into several types according to the material of manufacture and applicability with different types of cylinder head.
Depending on the material used to make the gaskets, there are:
- Rubber;
- Rubber cork;
- Paronite;
- Cardboard.
The first type of product is made on the basis of heat-resistant and oil- and petrol-resistant rubber, which is modified with the help of additives and subsequent vulcanization.
Valve cover rubber gasket
The rubber gasket is made from various types of rubber; it is the most elastic, however, due to the shortcomings of the manufacturing material, it can significantly change its characteristics when the temperature changes (soften at high temperatures, become less elastic in the cold) and generally has less durability.
Rubber cork valve cover gasket
Rubber cork gaskets are made from rubber with added granulated cork or other porous fillers. This material provides a high degree of sealing and vibration isolation, however, gaskets made from it are very demanding on the quality of installation and installation of the cover; they often require additional treatment with liquid sealant and have a limited service life.
Paronite gaskets are made from paronite, a rubber-based material with various mineral additives, which is subsequently molded and vulcanized. Paronite can be asbestos or non-asbestos, but today manufacturers are abandoning the use of asbestos in favor of safer materials. Also, paronite gaskets can be ordinary unreinforced or reinforced with steel wire, thin perforated sheet metal, etc. It is paronite cylinder head cover gaskets that are most widely used today due to their high reliability, resistance to negative influences and good sealing qualities.
Cardboard gaskets are made from special grades of thick paper that have been processed to become resistant to oils, gasoline, water and other negative influences. These gaskets are the cheapest, but they are the least reliable, so today they are used on the simplest engines.
Based on their application, valve cover gaskets can be divided into two groups:
- For common cylinder heads - in in-line and V-shaped engines with a head and cover common to all or one row of cylinders;
- For separate cylinder heads - in engines with individual heads and covers for each cylinder.
Structurally, the gaskets for common and separate heads do not differ; they only have different sizes for the corresponding covers.
Cylinder head cover gaskets are manufactured according to automaker standards, and they can also comply with domestic standards GOST 481-80, GOST 15180-86 and others.
Review of sealants by popularity
Knowing the most popular sealants for the valve cover, you don’t have to worry about choosing and buy a quality one. Remember that such a trifle affects the tightness of the internal combustion engine. Usually, drivers who have used very bad or very good products leave reviews.
So, what are the best valve cover sealants:
- DoneDeal.
- ABRO 11-AB.
- Victor Reinz.
- Dirco.
- Permatex Anaerobic Gasket Maker.
- CYCLO HI-Temp C-952.
- Curil.
- MANNOL 9914 Gasket maker RED.
DoneDeal
DoneDeal (Don Dial) is a black heat-resistant automotive sealant. Made in the USA. It has good performance characteristics, temperature range from -70 to + 345 degrees. It has low volatility, that is, it does not evaporate and is not blown up by air flow, so it can be used in engines with oxygen sensors. The properties of Don Dial sealant protect against the effects of oils, antifreeze, antifreeze, water, and brake fluid. The cost for 2018 is 300 rubles.
ABRO 11-AB
ABRO 11-AB (ABRO 11 AB) - this sealant has good qualities and is not a high price. Just like the previous option, it has a wide range of applications for car repairs.
Types, design and characteristics of valve cover gaskets
Valve cover with gasket and their place in the power unit
Regardless of the type, all valve cover gaskets have a fundamentally identical design. This is a flat elastic part that follows the shape of the plane of contact of the cover to the cylinder head, and has holes for fasteners and other parts. The gasket is placed under the cover and, due to its elasticity, seals the gap between the cover and the cylinder head (filling micro-irregularities and compensating for small deviations of their mating surfaces from the plane), ensuring its sealing.
In this case, gaskets can have different designs:
- Whole (non-breaking) - an ring gasket or a gasket of a more complex shape (for example, under the covers of engines with two camshafts on the cylinder head) without breaks, which is simply installed under the cover;
- Composite - a gasket with gaps and inserts for sealing the camshaft inlet or other parts;
- Complete - in addition to the main gasket, the kit may include additional ring seals for spark plug wells and other holes in the cover.
Valve cover gaskets can be divided into several types according to the material of manufacture and applicability with different types of cylinder head.
Depending on the material used to make the gaskets, there are:
- Rubber;
- Rubber cork;
- Paronite;
- Cardboard.
The first type of product is made on the basis of heat-resistant and oil- and petrol-resistant rubber, which is modified with the help of additives and subsequent vulcanization.
Valve cover rubber gasket
The rubber gasket is made from various types of rubber; it is the most elastic, however, due to the shortcomings of the manufacturing material, it can significantly change its characteristics when the temperature changes (soften at high temperatures, become less elastic in the cold) and generally has less durability.
Rubber cork valve cover gasket
Rubber cork gaskets are made from rubber with added granulated cork or other porous fillers. This material provides a high degree of sealing and vibration isolation, however, gaskets made from it are very demanding on the quality of installation and installation of the cover; they often require additional treatment with liquid sealant and have a limited service life.
Paronite gaskets are made from paronite, a rubber-based material with various mineral additives, which is subsequently molded and vulcanized. Paronite can be asbestos or non-asbestos, but today manufacturers are abandoning the use of asbestos in favor of safer materials. Also, paronite gaskets can be ordinary unreinforced or reinforced with steel wire, thin perforated sheet metal, etc. It is paronite cylinder head cover gaskets that are most widely used today due to their high reliability, resistance to negative influences and good sealing qualities.
Cardboard gaskets are made from special grades of thick paper that have been processed to become resistant to oils, gasoline, water and other negative influences. These gaskets are the cheapest, but they are the least reliable, so today they are used on the simplest engines.
Based on their application, valve cover gaskets can be divided into two groups:
- For common cylinder heads - in in-line and V-shaped engines with a head and cover common to all or one row of cylinders;
- For separate cylinder heads - in engines with individual heads and covers for each cylinder.
Structurally, the gaskets for common and separate heads do not differ; they only have different sizes for the corresponding covers.
Cylinder head cover gaskets are manufactured according to automaker standards, and they can also comply with domestic standards GOST 481-80, GOST 15180-86 and others.
Advantages of a 16-valve engine
The VAZ 2112 with 16 engine valves has a number of advantages over cars of the same brand, but with fewer valves. Its main advantage is the ability to achieve maximum engine power, regardless of the type of the latter. (see picture).
- VAZ 2112 with a volume of 1500 cubic cm, has 77 horsepower.
- A VAZ 2112 of the same volume can have a power of up to 90 horsepower.
This difference is possible due to the fact that in the second case the filling of the cylinders with the warm-air mixture is much higher.
In addition, the advantages of the 16-valve engine:
Better performance of the cooling system and, as a result, greater strength of the unit. Possibility of increasing engine knock resistance
This is especially important if low quality fuel is used. With 16 valves, the intake and exhaust tracts are located on opposite sides of the cylinder head, which facilitates their installation, repair, etc.
Making a torque wrench with your own hands
If it is impossible to purchase a torque wrench, then it is possible to make one yourself at home. To do this, you need a meter wrench or extension cord and a household spring dynamometer (steelyard or scales).
The force applied perpendicular to the meter wrench is measured by the device. This makes it possible to approximately control the tightening torque.
If a meter-long lever creates inconvenience, you can work with a shorter lever, but the force is then calculated using the formula 1 1/L=H, L is the length of the key, N is the number of newtons. One newton equals 102 grams.
Using a homemade torque wrench does not provide absolutely accurate measurements. Therefore, if you have the opportunity to purchase or rent a real torque wrench, it is better to take advantage of the chance.