Minimum and maximum coolant volume
One of the main questions of car owners is: how many liters of antifreeze should I fill? According to the official technical documentation for Russian-made Lada Priora cars, the required volume of antifreeze is 7.84 liters. For full operation of the power unit, you can fill 6 liters each; this option is suitable for the winter period. However, it is best not to deviate from the regulations and fill in the required amount of liquid so that no problems arise.
Each antifreeze is divided into classifications, and it can be distinguished even by color if there is no label, for example. So, in our country, red antifreeze is predominantly poured - the so-called carboxylate. Regardless of the type, it is important to know how many liters of antifreeze to fill and follow this rule.
How to change the valve cover gasket on a VAZ 2114: when is it necessary and how to do it
Any car enthusiast makes sure that his car is in perfect condition. If there are any problems with transport, they must be resolved promptly. So, if you see that there is a leak between the valve cover and the engine block, then you should suspect that the cover gasket is leaky.
Such an element does not have a global function in the operation of the system. But if problems arise with the gasket, then you should not turn a blind eye to them, despite the fact that the motor will work properly.
The faulty part must be replaced, otherwise oil will leak from under it. This point can cause a number of problems. So the valve cover gasket of a VAZ 2114 can be replaced independently without the involvement of specialists. Some craftsmen are of the opinion that the gasket needs to be changed every time the cover is removed. This point must be taken into account when carrying out various works.
Mixing liquids
The type of coolant is indicated on the packaging. The letter G with a two-digit number and pluses indicates the type of antifreeze, the letters TL indicate antifreeze.
Under no circumstances should you mix antifreeze and antifreeze.
Antifreezes G11 and G12 have different additives: in G11 they create a protective film, and in G12 they eliminate rust. It is unknown how additives will behave when interacting, so mixing liquids of these categories is not recommended.
G11 and G13 contain different base alcohols (ethylene glycol and polypropylene glycol, respectively), so they cannot be mixed categorically.
Antifreezes of classes G12, G12+ and G12++ are made on the basis of ethylene glycol, they contain both organic and inorganic additives of the same nature, so mixing them is permissible.
Coolant compatibility is shown in the table below.
What do you need to know about the motor?
Before the valve cover of the VAZ 2114 is removed and the gasket is replaced, it is worth talking about the features of the engine. If you don’t know anything about design features, then the best solution would be to turn to specialists. Remember that to carry out such work you will need a certain tool.
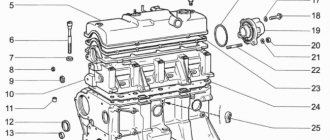
Diagram of internal combustion engine components
| № | Detail number | Part name |
| 1 | 2108-1003298 | screw |
| 2 | 2108-1003278-01 | Washer |
| 3 | 2108-1003277-01 | Sleeve |
| 3 | 2108-1003277-02 | Sleeve |
| 4 | 2108-1003274 | Cover pin |
| 5 | 2111-1003260 | Cylinder head cover |
| 6 | 2108-1003271 | Bolt M12x1.25x135 |
| 7 | 2108-1003265 | Washer |
| 8 | 14328201 | Plug 10 cup |
| 9 | 14329101 | Plug 30 cup |
| 10 | 1118-1003011 | Cylinder head |
| 11 | 2101-1002042 | Sleeve |
| 12 | 14329201 | Plug 36 cup |
| 13 | 10158601 | Plug 16 spherical |
| 14 | 11183-1002011-10 | Cylinder block |
| 15 | 14234330 | Bolt M10x1.25x65 |
| 16 | 2108-1003284-10 | Ring sealing |
| 17 | 2111-1003284 | Ring sealing |
| 18 | 2111-1003286 | Bolt |
| 19 | 2111-1003288-10 | Stub |
| 20 | 10725911 | Nut M6 low |
| 21 | 11197773 | Conical spring washer 6 |
| 22 | 13541221 | Hairpin M6x22 |
| 23 | 2108-1003270-10 | Cover gasket |
| 23 | 2108-1003270-11 | Cylinder head cover gasket |
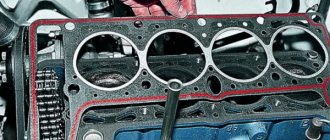
| 24 | 21083-1003020-10 | Head gasket |
| 24 | 21083-1003020-11 | Head gasket |
| 25 | 2112-3855020 | Knock sensor |
| 25 | 2112-3855020-01 | Knock sensor |
| 25 | 2112-3855020-02 | Knock sensor |
| 25 | 2112-3855020-03 | Knock sensor |
| 26 | 2101-1002040 | Sleeve |
In particular, a car enthusiast needs to have on hand the following details:
- ratchet with extension;
- head at 10;
- screwdriver with Phillips head.
Why do you need a gasket?
It is clear that without such a gasket the car will work as before. But you need to understand that it plays a certain role, even if it does not affect the technical features of the car. It is important that when a leak occurs, a number of serious problems can arise.
The gasket has a certain service life. It must be promptly replaced as it wears out.
If we consider the main task of this part, then it is worth saying that it is to ensure the tightness of the connection. In order for the connection between the valve cover and the engine part to be tight, a gasket is needed. You don’t need any special skills to find the cap, because it has a neck for filling engine oil.
Choosing coolant for Lada Priora. What does AvtoVAZ recommend?
AvtoVAZ recommends filling the Priora with factory fluid and not mixing it with antifreeze and antifreeze of other brands.
Approved coolant types include:
- OZH-K Tosol-TS
- OZh-40 Tosol-TS
- OZh-65 Tosol-TS
- Antifreeze G-48
- Felix Carbox G12
- Cool Stream Standard
- Cool Stream Premium
- G-Energy Antefreeze
- Antifreeze Sintec, etc.
A complete list of recommended coolants can be found in the operating instructions for the Lada Priora car.
When to replace?
It is worth figuring out exactly when it is necessary to replace the valve cover gasket on a VAZ 2114. The plant tries to use only high-quality gaskets, which is why the initial part lasts for a long time. After a certain period of time, parts lose their elasticity and may harden. This is why cracks and leaks can form.
Even a small leak can cause dirt and dust to enter the motor. Many car enthusiasts change the part when changing the oil. This is an excellent solution to the problem, as leaks can be completely eliminated.
Cases when it is worth replacing include:
- We noticed a clear oil leak at the junction.
- The motor is undergoing routine repairs, in which case a replacement can be performed.
- Carrying out technical inspection.
- Removing the cover.
Design features of spark plugs
A seemingly simple detail has many nuances. Let's list the main ones:
- The heat value characterizes the rate of heat transfer from the electrodes to the spark plug skirt. During operation, the spark plug must be heated to such a temperature that the carbon deposits on it oxidize without having time to build up, but overheating is also dangerous for it: glow ignition may occur, and the electrodes themselves will begin to rapidly deteriorate. The problem is that the heat load on the spark plug itself is uneven - when driving at low speeds, the heating is much less than when driving with the pedal to the floor. Candles with a standard heat rating in both of these cases will operate at the extreme point of the optimal mode - under- and overheat, respectively.
- The spark gap depends primarily on the power of the standard ignition system and the maximum pressure in the cylinder at the end of the compression stroke: it must be such as to ensure reliable spark breakdown even at low voltage in the network (cranking with a starter on a dead battery). And the difference in this case is obvious: usually the transformation coefficient of the ignition coils is about 2000, that is, when the generator is running, they can produce up to 28 kilovolts, but when starting up - only 14! Consequently, the purchased set of spark plugs must have exactly the same gap as set by the car manufacturer: an increased one means the risk of misfire (but within the capabilities of the coil it will provide a more powerful spark that ignites the mixture better), a reduced one guarantees the possibility of starting with a dead battery, but is fraught with interruptions already from - to reduce spark energy.
- The sticking out of the electrodes also means a lot for the performance of the spark plug in a particular engine. For example, on eight-valve engines, where the spark plug is located on the side of the combustion chamber, increasing the offset optimizes the ignition of the mixture: the area adjacent to the walls of the combustion chamber is less ventilated, while moving the electrodes further ensures that there will be a high-quality, easily ignitable mixture in the spark gap. For VAZ eight-valve engines, where the ventilation of the combustion chamber is structurally deteriorated (the intake and exhaust channels are located in the same direction, and not opposite each other), this is quite sensitive. Spark plugs with electrodes recessed inside are used, as a rule, on multi-valve engines with a minimum volume of the combustion chamber, otherwise they may collide with the valves or piston.
- The number of electrodes in real operation is fundamentally small. Multi-electrode spark plugs theoretically have an increased service life - when erosion destroys one of the side electrodes, a spark begins to strike the other (unlike a common misconception, a spark does not occur simultaneously between several electrodes). In practice, the spark usually “floats” (which is why it seems that there are several of them) - under conditions of poor distribution of the mixture throughout the cylinder, the spark can move from the working area to the “shaded” area, that is, contaminated with residual exhaust gases. As a result, instead of improving the service life, we will get a deterioration in engine performance, which, again, is fundamental for the VAZ eight-valve engine, which already idles disgustingly with the lean mixture prescribed by current economic standards.
Video: Testing spark plugs on a bench.
Something else useful for you:
How to replace?
Domestic cars are not perfect; over time, you may notice that oil is leaking from under the gasket. In this case, it is simply necessary to make a replacement. Of course, you can try to tighten the bolts more tightly, but this is unlikely to help solve the problem. If you are wondering how to change the valve cover gasket on a VAZ 2114, then you should proceed sequentially. Anyone can cope with such a task as replacing the valve cover gasket 2114.
The sequence of your actions should be as follows:
- First you need to loosen the clamps and disconnect the hoses.
- The next step is to remove the locking plate and remove the end of the cable.
- You will need to unscrew the bolts that allow you to tighten the cable bracket.
- You will see two nuts that will also need to be unscrewed and removed, as well as the rubber bands that are used for the seal.
- The valve cover can be removed.
- The old part is removed and the new one is installed.
When the cover is removed, it is worth cleaning the oil separator screens. This manipulation can be done by unscrewing the bolt and removing the cover.
My review
Unfortunately, I do not have any photographs or video material from testing such candles. But I had experience. FOR a working VAZ 2111, multi-electrode options (three contacts) were purchased from the company BRISK, the name is EXTRA, if my memory serves me correctly. The price of the issue is approximately 180 - 200 rubles - a piece, they did not buy expensive NGK, for our old working VAZ, this is too much. The car traveled with them for about 40,000 kilometers, then another unit took it and I could not track it. According to the driver, starting in cold weather has improved (not even with a new battery), throttle response has increased slightly, consumption has dropped, slightly, but it has dropped - according to the on-board computer, this figure is approximately 0.3 - 0.4 liters, which is approximately 4% savings. After 20,000 kilometers, we unscrewed a couple of things and looked at what happened to them and you know, everything was in order, I know the mileage is small, but the first impressions were already formed. Therefore, they really have an effect. Also watch the video I made just for you, I found a worn version from BERU.
Self-replacement - what needs to be taken into account?
The replacement process is considered quite simple, but you need to understand that it is not always possible to carry out the work smoothly.
That is why when carrying out work you should follow simple tips that will help you avoid mistakes:
- When removing the lid, you should wash it in turpentine.
- The optimal solution would be to use high-quality gaskets.
- All parts used must be clean; when carrying out work, experts advise wiping the edges of parts to remove any existing oil.
- During installation, you can use a sealant; it is applied to the joints.
- After the replacement is completed, you need to check the oil level.
- To check the system, you need to start the car; carry out a second inspection after making the first trip.
- The groove under the gasket should be cleaned as thoroughly as possible.
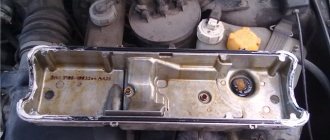
Valve cover replacement process
Valve cover removed from a VAZ-2114 engine
So, in order to replace the valve cover gasket on a car, you will need certain tools. What exactly is needed? Let's consider this question: a ratchet with an extension, a 10-mm socket, a screwdriver with a Phillips head.
Now that everything is ready, we buy a new gasket from the list recommended below and we can get to work.
Don't forget about the new sealant.
Let's consider the sequential stage of performing replacement operations:
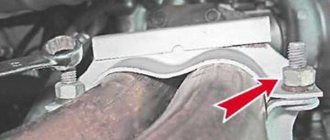
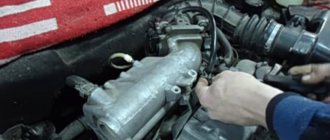
- Loosen the clamps and remove the hoses shown below.
Shows which hoses need to be removed
- After removing the locking plate, disconnect the accelerator cable.
Remove the locking plate and dismantle the throttle cable
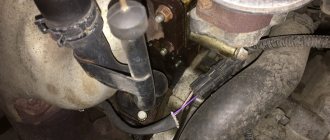
- Unscrew the mounting bolts securing the accelerator cable bracket to the receiver.
The process of dismantling the accelerator cable bracket
- Unscrew the nuts securing the valve cover.
Unscrew the valve cover mounting bolts
- We remove the rubber seals.
When the nuts are unscrewed, it is necessary to remove the seals
- Remove the valve cover upwards.
Pull the lid up
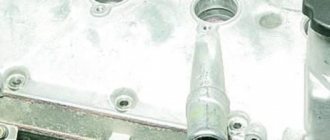
- Now you need to clean the oil separator screens. To complete the process, you need to unscrew the valve cover.
Unscrew the oil separator fasteners
Removing the oil separator cover
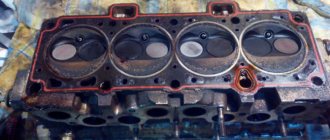
Oil separator screens that need to be cleaned If the screens are dirty, they need to be washed.
- If the nets are dirty, they need to be washed.
During the cleaning process
- We install a new gasket. When performing the process, we use a sealant.
Applying sealant
- If everything is tightened correctly, the gasket will fit perfectly and prevent oil leakage.
Place the gasket on the sealant
- We carry out the assembly in the reverse order.
Choosing spark plugs for VAZ
Let's talk about spark plugs using a specific example - the 16-valve VAZ-2110 engine, which is equipped from the factory with A17DVRM spark plugs from the Engels plant. The same plant, by the way, produces original spark plugs for other Russian conveyors: the “EZ” marking can be seen on Renault Original spark plugs, for example. For convenience, we will focus on these candles.
EZ A17DVRM
The main advantage of these spark plugs is the consistency of quality: it is difficult to find large differences in resistance or spark gap size in the original set. It’s not for nothing that we mentioned the word “original” - alas, the market is flooded with either fakes or rejects going on sale. The spark plugs have a good reserve of stopping sparking; with a standard ignition system, they can withstand cranking when the voltage drops to 6V without stopping sparking. They operate stably even at maximum load conditions - misfires, which can be “caught” by a sensitive gas analyzer, are minimal.
As for the resource, they answer their task - to work from maintenance to maintenance - with confidence. Considering their low price and prevalence, they are clearly worthy of recommendation.
EZ T17DVRM
Three-electrode version of the already familiar A17DVRM. The theoretical gain in resource also brought its own disadvantage: the parameters of the spark plugs “float” more, and this is, first of all, an unstable gap, hence some deterioration in motor characteristics. But it should be noted that this deterioration can only be “caught” on a measuring stand; in real operation, it cannot be said that three-electrode spark plugs from Engels will be worse than single-electrode spark plugs.
Denso W20EPR-U11
Excellent candles from one of the world leaders in their production: high and stable manufacturing quality, reliable operation in any mode and a good service life. The spark plugs confidently withstand voltage drops at startup down to 6.5 V (unexpectedly losing to domestic ones!), and misfires with them are minimal.
Their design uses the same solution as the NGK V-Line series, but exactly the opposite: the groove is stamped into the side electrode. This is definitely more profitable in terms of production, since there is no need to strictly orient the side electrode relative to the central one, but there is obviously less practical benefit from such a design.
Brisk LR15YCY-1
Plugs with an increased reach of the central electrode, as expected, did not show an increase in motor performance on a 16-valve engine: this solution would be more “workable” on an eight-valve engine. By all indicators, this is a strong “middle peasant”, but the price is significantly higher than that of competitors with the same qualities. Let us only note the good result for starting on a dead battery: 6.2V is an excellent result... but the original spark plugs from Engels are cheaper and, oddly enough, better than the Czech ones.
NGK BPR6ES-11
The company's marketers clearly made a mistake in classifying these spark plugs as the V-Line series: their central electrode does not have a groove. Let’s say right away: the original kit is a strong “average” product that doesn’t stand out in any way, but doesn’t fail the tests either. I definitely don’t like the noticeable roughness of the workmanship - even the Made in France marking is always printed unevenly, and the side electrode is usually soldered unevenly. One gets the impression that the manufacturing technology was deliberately cruder for the sake of low cost, but these candles could have been better.
Analogues (manufacturers)
Valve cover gasket made by Goetze
Of course, the manufacturer and many automotive experts recommend installing the original valve cover gasket, but, as practice shows, substitutes are often of higher quality and have a much longer service life.
So, let's look at which analogues of the original part are recommended for installation on a car:
| Manufacturer's name | Catalog number | Cost in rubles |
| Glaser | X08964-00 | 300 |
| Goetze | 50-025881-00 | 750 |
| Ajusa | 56021200 | 1000 |
| Trialli | GZ 101 7022 | 1500 |
As you can see, the cost of alternative gaskets is quite high, but as practice has shown, the service life of the parts is twice as long as the original.
Valve cover gasket made by Elring
Expansion tank device
The manufacturer installs expansion tanks produced by Plastik LLC on the Lada Priora car. They are made of translucent white plastic. A scale showing the coolant level must be applied to the front wall of the tank.
The Max and Min marks show the level of antifreeze in the tank
The tank is closed with a lid, which simultaneously measures the antifreeze pressure in the cooling system. The lid is located on the neck at the top of the tank. It is made of plastic and, for its part, reliably seals the cooling system.
Few people know, but a pair of valves are built into the tank lid. Each of them operates under certain conditions, which allows you to compensate for the amount of coolant at the moment it boils or cools.
Expansion tanks made in Russia are distinguished by their strength and durability. Their cost depends on the design features of the case (from 300 rubles and above).
Lada Priora cars are equipped with the simplest domestic coolant tanks
Reasons for gasket failure
When all the processes have been sorted out and the choice of valve cover gasket has been decided, it is necessary to consider the reasons for the failure of this element:
- Wear. Perhaps the most common reason is that during use this element tends to crack because it is constantly exposed to hot oil.
- Stretching. Constantly high temperature negatively affects the rubber product, which loses its physical properties and stretches, which entails a loose connection and the passage of lubricant.
- Oil streams. Occurs due to gasket breakdown. This usually happens after the engine overheats severely.
Oil Creek
- Pressure. Excessively high pressure can squeeze the gasket out of its seat, which will cause oil to flow like a river.
Consequences of untimely replacement
Dirty valve cover and filter elements
There are not many consequences, but they are quite compelling to change the gasket in time.
- Firstly, this is directly related to oil leakage, which reduces the volume in the engine. Even if the loss is insignificant, it may just be enough for the internal parts of the power unit to wear out faster.
- Secondly, air constantly gets under the valve cover, which can affect the quality of the air-fuel mixture and the engine will begin to “eat” a sufficient amount of fuel.
- Thirdly, dirt and foreign objects, as well as water during winter and rainy periods, can enter through the resulting cracks. This can negatively affect the operation of the power unit, cylinder head and other elements, as well as affect the performance of the entire system as a whole.
- Fourthly, leaked oil contaminates the outer part of the block, onto which dirt clings. It can also affect the operation of the power unit and other elements.
How to replace the cylinder head cover gasket on a VAZ 2114
Removal procedure:
Remove the decorative trim from engine 11183 (1.6i)
We disconnect the drive cable from the throttle valve and, together with the mounting bracket, move it towards the radiator
Using a Phillips screwdriver, loosen the clamps securing the three hoses of the crankcase ventilation system. Remove the hoses from the cylinder head cover pipes.
Using a 10 mm socket wrench, unscrew the two nuts securing the cylinder head cover
Remove the washer and rubber bushing from both studs.
Remove the cover.
Remove the gasket from the cover.
Flushing
Unscrew the oil filler plug.
Using a 10 mm socket wrench, unscrew the two bolts securing the oil separator housing.
We remove the body.
Remove the oil separator screens.
We wash the removed parts in kerosene, wipe with a rag and blow with compressed air (from a tire pump).
We assemble the oil separator in reverse order.