The clutch in a car serves as the connector between the engine and transmission. This unit takes on all the load that occurs when changing gears. Accordingly, the part can rightfully be considered a consumable item, because car owners regularly face the need to replace it or schedule maintenance.
It is almost impossible to influence the degree of wear of this unit. Therefore, after the clutch has exhausted its service life, it must be replaced partially or completely (in case of serious malfunctions).
Frequency and signs of replacement
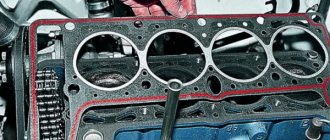
There is no specific time frame for replacing the cylinder head gasket on the Lada Kalina. Over time, it can become unusable under the influence of various factors. The gasket can break through in different places and, depending on the location of the crack, the signs of damage will be different. The symptoms will be the same for both 8-valve and 16-valve engines.
Symptoms of gasket damage:
- When the gasket breaks along the side of the cylinder circumference, gases begin to escape outward. At the same time, the noise level of the VAZ Kalina engine increases sharply, which will be immediately noticeable to the driver.
- A hole between the cylinders disrupts the operating mode and the engine begins to operate unevenly and triple.
- Destruction of the gasket with a rupture entering the coolant supply channels. At the same time, gases begin to enter the cooling system. One of the external signs of such a problem will be a decrease in the fluid level and the appearance of white steam in the exhaust gases. Gas bubbles may appear in the expansion tank. Another sign is the appearance of an emulsion in the oil, accompanied by an increase in the level of lubricant in the crankcase. Oil can also go into the cooling system, which is easy to detect by its presence on the surface of the liquid in the expansion tank.
- Another indirect symptom of a gasket burnout is the appearance of stains or leaks of oil or coolant on the parting line of parts and on the side surface of the engine crankcase.
Reasons for replacing stabilizer struts
It’s not worth changing such a unit just like that, without objective reasons. Still, it costs some money and has its own resource of suitability. As long as the car behaves well, there is no point in spending extra money. But if characteristic signs of their malfunction appear, do not delay repairs.
There are several reasons for changing them:
- Characteristic knocking noises appeared in the suspension;
- There is a slight vibration feedback on the steering wheel, which worsens the process of driving and makes it more difficult;
- The front of the car wobbles a little;
- The wheels pull slightly to the side when driving straight.
If you discover such malfunctions, be sure to replace the stabilizer links as quickly as possible.
How long the new elements will last depends on two factors:
- Quality of the purchased part;
- Conditions of the roads on which you primarily drive your vehicle.
We'll give you some parting advice. Many who go to a service station to replace stabilizer bars send the car, on the recommendation of a specialist, to check the wheel alignment. In fact, this procedure is completely unnecessary, since changing the struts does not in any way affect the angle of the wheels on your car. This is another attempt to lure more money out of an inexperienced client. Be carefull.
Do-it-yourself replacement of the internal combustion engine valve cover gasket
If we don’t talk about a specific car model, the gasket is changed as follows.
First of all, I disconnect all the hoses and pipes that are connected directly to the valve cover. Next, I unscrew the gas pedal drive cable. Then I unscrew the bolts and remove the cover. Then I remove the old gasket.
In order for the sealing element to work effectively and to avoid leaks in the future, it is important to thoroughly clean the surfaces of oil. You also need to thoroughly degrease both surfaces - both the cover and the cylinder head. Gasoline or carburetor cleaning fluid is suitable for degreasing.
Next, you can install the cylinder head cover and tighten the bolts. Here it is better to use a torque wrench - it is important not to overtighten.
Processing the saddle after installation
For the saddle to work properly, it must be chamfered. Ideally this is done on a lathe. But you can use the already known cutter and drill, but inaccuracies in the work are possible. Three edges are cut - outer, inner and in the center, for contacting the valve with it. After this, we can consider that the work is completed. The valves should be ground in and the cylinder head assembly should begin.
Many people are interested in the question of how much it costs to replace a VAZ valve seat. If we consider the option of only paying for the work, then replacing one element will cost you 500 – 700 rubles.
Select the vehicle modification to search for the valve cover gasket
Engine: volume - 1.6 liters, power - 82 hp, type - petrol, model - VAZ-11183. Drive: front. Year of manufacture: 2011-present time
Engine: volume - 1.6 liters, power - 87 hp, type - petrol, model - VAZ-11186. Drive: front. Year of manufacture: 2011-present time
Engine: volume - 1.6 liters, power - 98 hp, type - petrol, model - VAZ-21126. Drive: front. Year of manufacture: 2011-present time
Engine: volume - 1.6 liters, power - 106 hp, type - petrol, model - VAZ-21127. Drive: front. Year of release: 2013-present time
In the next step, for an expanded selection, you can enter the vehicle's Vin code to go to illustrated catalogs, where you can find the layout of parts down to the bolt and duplicates that are not in the catalog of analogues.
- Description
- Reviews (0)
- Question answer
Valve cover gasket for Lada Granta / Kalina-2 / Priora, Datsun for 8-cl engines. White silicone.
Rear axle axle shaft of a VAZ 2107 - removal and installation
We replace the axle shaft with bearing on a VAZ 2107 when it is deformed or the bearing is severely worn, which is expressed in noticeable axial play of the suspended wheel. The axle shaft seal must be replaced if oil is detected in the rear wheel brake mechanism, as well as in any case when replacing the axle shaft.
Removing the rear axle axle shaft from a VAZ 2107 1. Place the VAZ 2107 on an inspection hole or overpass (see “Preparation of the VAZ 2107 for maintenance and repair”). 2. Remove the brake drum (see “Rear wheel brake pads - replacement”). 3. Using a jack, we additionally lift the rear axle on the side of the axle shaft being replaced to prevent oil from leaking out of the beam. 4. Rotate the axle shaft until the large diameter holes in its flange coincide with the two nuts securing the brake shield. 5. Using a 17 mm socket wrench with an extension, unscrew the nuts and remove the spring washers.
Similarly, unscrew the remaining two nuts.
6. It is more convenient to remove the axle shaft from a VAZ 2107 with a special puller, but if it is not available, you can use the removed wheel. We secure it with two bolts with the outer side to the axle shaft flange, but do not fully tighten the bolts to ensure the inertia force of the wheel. With a sharp movement towards ourselves, we pull out the axle bearing from the flange of the rear axle beam.
7. After unscrewing the bolts, remove the wheel and take out the axle shaft. There is a rubber O-ring between the beam flange and the brake shield, do not lose it.
8. Using sliding pliers or another suitable tool, remove the axle shaft seal from the hole in the beam flange.
Installing the rear axle axle oil seal on a VAZ 2107 1. Before installing a new oil seal, apply grease to its seating surface and working edge. 2. Install the axle shaft oil seal into the hole in the beam flange (with the spring inside the beam) and with light blows of a hammer, press the axle shaft oil seal through a bushing of suitable diameter.
3. Install the axle shaft and other parts in the reverse order of their removal. When doing this, be careful not to damage the oil seal with the splined end of the axle shaft. 4. We check the oil level in the rear axle on a VAZ 2107 car, add oil if necessary (see “Rear axle of a VAZ 2107 car - checking the level and changing the oil”).
Preparing to remove valves
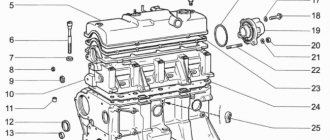
We will make a replacement on this engine (21120)
However, on a VAZ-2112 engine it is easier to replace valves by dismantling the cylinder head: to press in new guides, the cylinder head plate would have to be heated. It's best to leave the valve guides in place. But then you will have to remove different equipment:
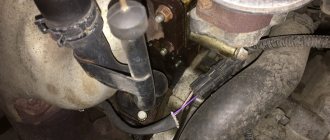
- There is a connector under the fuel pump hatch (photos 1 and 2). Turn it off so that the fuel pump stops pumping;
- Start the engine and let it stall;
- Remove the air filter: loosen clamps 1 and 2 and disconnect connector 3 (photo 3). Then use a 10mm wrench to unscrew the screw (photo 4).
All actions are illustrated by one photo.
Lowered the pressure, almost removed the filter
Remove the plastic filter housing along with the supply hose.
Disassembling the timing mechanism
Our goal is to remove both camshafts. On the VAZ-2112 engine, valve replacement can be performed even without removing the cylinder head. But the shafts will interfere in any case. Procedure:
- The negative terminal is disconnected from the battery;
- Remove the wires from the spark plugs, then disconnect them from the coils;
- The ignition module must also be removed (photo 2), and the crankcase ventilation hose must also be removed (photo 3);
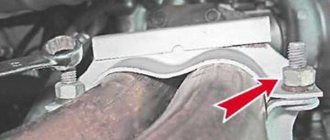
- The bracket fixing the injector wiring is screwed to the cylinder head cover (photo 3). Remove it! The same is done with the bracket of the second harness (DPZ and IAC);
- It will be necessary to remove the receiver (photo 4). And the intake manifold holes are covered with fabric.
Execution technology
The work is complex, but if you have the necessary skills, it can be done in a garage.
There are several ways to remove the saddle. A quick, but not very correct method is to weld the valve onto the seat and then knock it out. The valve is ground to the size of the seat, inserted into it and scalded. Until the metal had time to cool. The saddle must be knocked out with a hammer. The entire structure should come out without any problems. But remember that welding heats up the metal, which can cause deformation of the head. By knocking it out, you can damage the seat under the saddle, which will entail additional work on processing the cylinder head. It is best to use a lathe. This way you can grind the saddle to such a size that it becomes like foil and can be easily taken out. If you don’t have a machine, you can use a drill and a cutter attachment. Stitching is carried out on one side until the tension weakens. The saddle can now be reached by hand.
The ideal option for installing a new seat is nitrogen, in which the seats should be pre-cooled. The fact is that their dimensions are slightly larger than the holes, and due to cooling the outer diameter decreases. Naturally, nitrogen in the garage is very rare. Then remember the properties of metal to expand and contract. The saddle is simply placed in the freezer for a couple of hours, and the hole is heated with a burner.
If during installation it will be necessary to apply force, it is recommended to take a block suitable for the diameter of the seat and use it to press it.
Replacing valves (tool)
On cars with an eight-valve engine, valve replacement can be done on your own if you have certain skills in this matter, as well as special tools. To work you will need:
- A tool with which you can remove crackers from the valve (desiccant).
- Remover for caps that remove oil. The choice of oil for the 8-valve Lada Kalina engine must be taken care of in advance.
- Head at “13” and knob.
The process of replacing valves on an 8-valve valve
The process of replacing valves on all engines with eight valves is almost identical. Subsequence:
The cover was removed and the camshaft was visible.
We got to the cylinder block
In the case when an old valve is installed, it must be thoroughly cleaned of carbon deposits. If the valve is new, then it must be ground in so that fuel or air does not escape from the combustion chamber.
Setting the valve clearance
The process must be carried out on a cold engine with the valve covers removed. To do this, it must be dismantled by unscrewing the fastening bolts. Then you need to remove the cover that covers the timing belt. There is no need to touch the alternator belt.
Remove the timing cover, then remove the spark plugs for convenience
The spark plugs are turned out so that the engine can be cranked more easily. The oil is also completely removed from the head to make work easier. You can use a syringe for this. If the camshaft has worn cams, it should be completely replaced. A device that recesses the valve is screwed into the place where the cover is attached. Use a wrench to turn the crankshaft until the marks on the pulley match the marks on the belt cover. After this, you still need to turn the crankshaft three teeth. In this case, the piston will reach its dead center. There is no need to change the oil after this procedure.
This checks the valve clearance
First you need to check the clearance on the first and then on the third cam. The probe should have a size between 0.2 and 0.35 mm. If the move is large, then you need to change the washer. If all the work is done correctly and using a special tool, then there will be no difficulties in the process. All remaining valves are regulated according to this principle.
The video below describes the process of adjusting the valves; the basic principle is the same, since the Kalina and Samara engines are of the same family.
Nuances of the work
Following all the recommendations from the automaker's manual does not guarantee that everything is done simply and quickly. Not every car owner has the opportunity to drive the car onto a pit or overpass. A lift is perfect for carrying out work, but not everyone has one either.
When you contact any service, the replacement will be made within a couple of hours, but for such a service you will need to pay a considerable amount. It may take a whole day to do the work yourself. Maybe more if you don't have experience in car repairs.
Most of the time is spent on disassembly and assembly. The operation to replace the node will take you no more than half an hour. Later in the article we will look at the process of replacing a clutch without a pit/lift.
Engines "Lada Kalina"
Machines of this type are equipped with several types of engines. Each of them has its positive and negative sides. The first Lada Kalina produced by AvtoVAZ was equipped with an engine with eight valves. Its working volume was 1.6 liters. Then the car began to be produced with an engine with 16 valves, with a slightly smaller volume, only 1.4 liters. The most expensive model of the Kalina, which is a sports type, is equipped with an engine from the Priora, which has 16 valves and a volume of 1.6 liters. Three years ago, the brainchild of VAZ began to be equipped with a new engine. It, like the first engine, has 8 valves and a volume of 1.6 liters, but differs from its “brothers” in that it has a lighter piston system. As a result of this change, power increased and the engine began to behave more responsively. Today, this engine is mainly installed on the Grant, which replaced the Kalina Sedan. Perhaps in the future every Lada Kalina will be equipped with such an engine.
Purpose of the windshield and rear glass
Glass is a transparent shield that is mounted in front of the car and protects passengers from air flow while driving. Additionally, this element affects aerodynamics and the final drag coefficient.
Front and rear windows increase torsional rigidity and retain heat in the cabin.
There are types:
- multilayer;
- hardened
A shield with several layers is called triplex and is installed in the front of the car. A transparent film is glued between the layers of the part, which firmly holds large particles in the event of an accident or a large object. The multi-layer shield ensures the safety of passengers and the driver, eliminating serious injuries from fragments.
The hardened part consists of one layer. It is used for side arrangement and rear shield. The temperature effect increases the strength of the part and prevents the formation of large fragments in the event of an accident. After hardening, high-quality parts are broken into small particles with rounded edges that are not capable of causing injury. You can strengthen the rear panel using a tint film, which will hold the fragments in case of complete cracking.
The evenness and transparency of the glass surface ensure the safety of the driver while driving, and models with protection from ultraviolet rays prevent the interior from quickly heating up in countries with hot climates.
Valve cover gasket: purpose and causes of failure
After the driver lifts the hood and looks into the engine compartment, the valve cover is the first element to look at.
This cover is designed to seal the timing belt, which is located in the cylinder head. This element also has an oil filler neck for pouring oil into the internal combustion engine. The cover is usually attached to the cylinder head with bolts. Removing the cover allows you to get to some elements of the timing mechanism without having to remove the cylinder head. The cover is attached to the head through a sealing gasket. However, it should be noted that oil leakage through the valve cover gasket leads not only to increased lubricant consumption, but also to severe external contamination of the engine, which requires periodic cleaning of the internal combustion engine. Moreover, heavy oil leakage through the valve cover gasket on many engines means that oil gets into the spark plug wells, spark plugs become dirty, etc.
The gasket itself is a rubber product, which allows the element to operate under conditions of constant temperature changes and not lose its properties as a result of constant contact with engine oil. In this case, sooner or later the rubber dries out and becomes hard, and the gasket material cracks. For this reason, oil begins to gradually leak through the gasket, contaminating the engine compartment and the outside of the power unit.
During vehicle operation, replacing the valve cover gasket is a standard procedure that has to be carried out quite often on some internal combustion engines. The valve cover gasket is usually replaced in the following cases:
- an oil leak has appeared or oil leaks have become too intense;
- when the engine or timing belt is repaired, that is, the valve cover is removed;
In other words, you can change the valve cover gasket both when subtle signs of leakage are detected, and during repair work that involves disassembling the internal combustion engine, removing the cylinder head, etc. Let us add that some car enthusiasts change the gasket every 15-30 thousand kilometers traveled, regardless of whether there is a leak or not. This is quite justified considering how much a valve cover gasket costs, it allows you to always keep the power unit clean, and also makes it possible to assess the condition of individual timing elements after removing the cover to replace the gasket.
Before starting work
Almost every car owner is interested in the question: is it possible to perform a replacement without dismantling the gearbox? You are unlikely to find a definite answer, but the procedure is quite feasible.
First of all, find several large stumps up to 40 cm high, and also get a few additional bars. To prevent the car from simply falling during the work, take care to install a pair of regular wheels under the car.
Whether to remove the gearbox or not - you will have to answer this question specifically. Because if you act carelessly, the gearbox may simply fall to the ground, and lifting it from under the car will be very problematic.
Initially, disconnect the battery so that the machine's electrical system is de-energized. You can then proceed to the process shown in the following list:
- Remove the wheels and move them away from the car.
- Remove the steering ends and free the racks.
- Unscrew the ball joint mounting bolts.
- Remove the engine protection using the cable.
- The next step is to drain the oil from the box.
- Loosen the rocker nut and remove it.
- Unscrew the nuts on the two pillows.
- Place a jack or other support under the engine.
- Disable the reverse sensor.
- Disconnect the wires from the starter, unscrew the nuts and dismantle it.
- Unscrew the nuts on the flywheel guard and fork.
- In this step, remove the CV joint on the right side. The left side should not be dismantled.
- Unscrew the fixing bolts to the gearbox block.
- In the last step, unscrew the nuts that are located above the right CV joint.
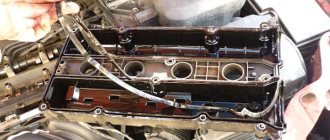
How to remove the valve cover and replace the gasket on a VAZ 2110-2112 8-cl.
So, the first thing you need to do is open the hood of the car and, using a 10mm socket, unscrew the two bolts securing the throttle cable bar, as is clearly shown in the photo below.
Take it to the side and secure it so that it does not interfere with us in the future.
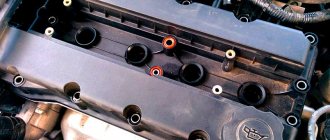
Then, using a Phillips screwdriver, unscrew all the clamp screws on the hoses that fit the valve cover. In the photo below they are all marked with arrows:
And remove all three pipes:
When you have completed this step, you next need to unscrew the two nuts securing the valve cover to the cylinder head body.
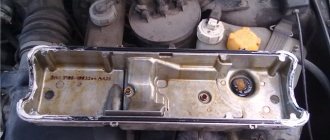
And only after this, carefully remove the valve cover, lifting it up without sudden movements.
Now as for replacing the gasket. It is installed in the groove of the cover from the inside. We pry it with our fingers or a thin object and pull it out. This procedure is clearly shown in the picture below.
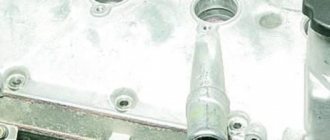
After this, we wipe the surface of the cylinder head and the groove of the cover dry, install a new gasket and you can put everything back in place.
Also, it is worth paying attention to the integrity of the rubber seals under the cover fastening nuts:
Typically, such rubber bands are sold complete with a gasket. The price of such a kit is about 120 rubles for VAZ 2110-2112 with 8-valve engines. After installation, we connect everything in place.
Reasons why you need to change the shock absorber struts of a VAZ 2110
- Knock in the suspension.
- A slight vibration feedback to the steering wheel, which impairs vehicle controllability.
- The appearance of rocking of the front of the car.
- A slight deviation of the wheels from straight-line movement.
If the driver detects such deviations, an urgent replacement of the VAZ 2110 stabilizer strut is needed. The durability of the struts depends on the quality of the road surface and the manufacturer. The price of quality products is slightly higher than that offered by less popular manufacturers of structures.
Tip: There is no need to check the wheel alignment after replacing the shock absorber struts; they do not have any effect on the wheel alignment angles.
Replacing the valve cover gasket of a VAZ 2108, 2109, 21099 engine
We will replace the valve cover gasket of the engine block head 21083 (2108, 21081) of VAZ 2108, 21081, 21083, 2109, 21091, 21093, 21099.
Such work will have to be done, for example, if there is an oil leak under the cover. It is also recommended to do this every time you remove the valve cover while repairing the car engine.
Necessary tools, accessories and spare parts
— New valve cover gasket for engine 21083 (21081, 2108)
— Key or head at “10”
Preparatory work
— Remove the car engine air filter housing
When is it necessary to replace the stabilizer strut of a VAZ 2110
General view of the stabilizer strut of the VAZ 2110
An important component of the chassis of the VAZ 2110 car is the suspension. This is an independent design with hydraulic shock absorbers and cylindrical springs. In addition, the unit is equipped with braces, wishbones and a stabilizer bar. Shock absorbers dampen vehicle vibrations when a wheel gets into potholes on the road. The direct connection of the VAZ 2110 car with the road is provided by the wheels. They change the direction of movement of the car, support the entire mass of the car, absorb shocks and some impacts from defects in the road surface. Each suspension unit performs its own specific functions and is responsible for safety when driving a car. Directly ensuring safety, and only then comfort, is carried out on the VAZ 2110 by the stabilizer strut and the stabilizer itself. This article will help you on how to replace VAZ 2110 struts in a unit with your own hands.
VAZ 2115 crankshaft pulley
Dismantling the crankshaft on a VAZ-2114 may be required in the following cases:
- The reason that comes first most often is the replacement of the timing belt and other work that is somehow related to the gas distribution mechanism. Work should be carried out in accordance with the regulations, or if the mechanism fails.
- Another reason for dismantling is the failure of the crankshaft oil seals. They are changed when oil leaks occur in the places where they are installed.
Pulley fastening
On all VAZ-2114 vehicles without exception, the crankshaft pulley is fixed using a massive bolt, which can cause problems when removed.
A curved spanner wrench is good for fixing.
- First of all, this is due to its location, since it is difficult to securely and securely fasten the key or socket head.
- Secondly, even if you managed to position the key correctly, you will have to make every effort to dismantle it. This is due to the fact that at the factory it is tightened as tightly as possible in order to avoid the facts of self-unwinding. Also, the right-hand thread may not be the best for unscrewing it, which during operation only screws the pulley in tighter and causes the part to stick.
Tool for getting the job done
To make the work easier, you need to prepare the following tool:
- Jack.
- Wheel chocks.
- Pry bar and flat blade screwdrivers.
- A set of keys.
- Socket heads and extension.
Step-by-step procedure for removing the crankshaft pulley on a VAZ-2114
Before you begin dismantling the crankshaft pulley, you need to unscrew some components and parts on the VAZ-2114.
- First of all, we park the car and ensure it is stationary.
Axle shaft seal VAZ 2107 number
Dear visitors of the “Cars” website! We will be very grateful for your comments on the video clip “Axle seal VAZ 2107 number”; registration is not required for this. We also ask you to let us know if you have any problems playing the video.
tormoza nado bylo pomyt benzinom i kistockoi :
There are a lot of similar videos, they are not interesting. I watched the video from Oleg, it was very interesting and I became interested in repairing the car myself:
Is there one seal or on both sides?
It’s obvious that this is not the first time you’ve changed the oil seal... but damn, was it really difficult to tap the mudguards and knock the snow off the arch? It’s not pleasant to sit in this melted puddle of shit and dig in the dirt... It’s better to hammer the oil seal into the seat with a pipe of the same diameter as it, otherwise it may not press evenly. I don’t know how, but I wipe the seat seat dry and lubricate it with sealant.
With this amount of oil, this wheel will not slow down all winter and all spring. During emergency braking on a winter surface without the clutch depressed, due to the non-braking of one wheel, it can spin through the differential so much that before you have time to react, it will turn 180 degrees, and depending on your luck.
very useful video, everything is accessible and clearly explained and shown
I unscrewed these 4 bolts, but the axle shaft cannot be removed
The brake drums are stuck, can you tell me how to remove them?
Doesn't look like butter. It looks like a brake. By the way, my oil seal cracked and everything was covered in oil. It slows down with oil, and how. The pads stick. The wheel blocked at the slightest braking, although I thoroughly wiped off all the oil with a rag from both the pads and the drum. I had to take it apart and wash it again. I came across some acetone soap.
Hello, can you show me how to replace the front oil seal on the third engine?
But it was impossible to remove the mess from the fender liner... everything flows straight onto your hands and onto the pads... I never do that... to pick around in the dirt...
but a rubber band is still needed, like a seal before putting the axle shaft back
They say that before you remove the axle shaft, you need to set the marks so that you can put it back exactly as it was, otherwise there will be vibration. Any opinions???
Thank you
Excellent video, but at the end, when tightening the wheel bolts... we pull all the way, I’ve already changed two axle shafts, it seems like I’m not strong, but the thread breaks right away. And I can’t even count how many bolts I’ve torn off in 10 years... I wish I had a Dino key a long time ago bought it So pull it carefully
after replacement, oil still continues to flow, everything was pressed in exactly, the assumption is that there is a gap in the cavity where the oil seal was pressed in. How to solve this problem? maybe someone knows
bit nado rovnomerno, inache budet tech , kak na video
Why didn’t I wash everything from oil there and put a drum in?
Handsome man. I'll go try it myself. In the service they want 1000 for work:
try hammering it in with a mallet, it’s better and easier, you can hit the top of a pointed mallet with a hammer. verified