When should you change the gasket?
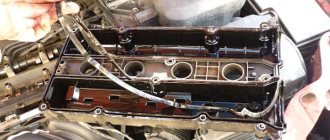
Every engine has a valve cover that is attached to the cylinder head with several bolts. Between the cover and the head there is a rubber gasket that can withstand sudden temperature changes and exposure to technical fluids. Over time, the gasket wears out - its elasticity decreases and small cracks appear. As a result, oil begins to leak into the engine compartment, after which dust and dirt adhere to the spots.
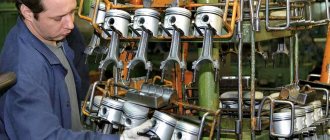
Installing the cylinder block cover on a car engine
To avoid the appearance of stubborn stains, you need to change the gasket in a timely manner and monitor the condition of the engine as a whole. It is usually recommended to do this after 7,000–15,000 km, which virtually eliminates oil leaks and prevents problems with the engine and timing belt. There are other situations in which it is necessary to change the rubber gasket (usually together with repair of the cylinder head (cylinder head)):
- Burnout between combustion chambers. Occurs due to weak contact pressure due to improper tightening of bolts or overheating of the engine. Signs: a violation of the cold start of the internal combustion engine, instability of the warmed-up engine.
- Penetration of exhaust gases into the cooling system and heating of antifreeze. Signs: air bubbles in the expansion tank, white exhaust, frequent turning on of the cooling fans.
- Oil getting into the cooling system. Signs: traces of oil in the expansion tank, under the radiator cap.
- Loss of gasket tightness. Appears when it is installed incorrectly or temporarily worn out. Signs: oil stains on the engine.
In addition, the rubber gasket must be replaced during any repair of the cylinder head, engine, or during maintenance of the timing belt. During installation, sealants are used to improve insulation and enhance the service life of the seal.
Where is the mistake?
Firstly
, remember: “silicone sealant will never replace the standard gasket.” The thickness of the gasket provided by the manufacturer neutralizes vibrations and compensates for the expansion of mating parts.
Yes, it is recommended to use it as an additional seal or fixation, but not as a substitute. There are special sealants that act as gaskets, but they have a completely different consistency and properties!
Secondly
, a thick layer is squeezed inward, where it is subject to temperature influence, contact with oil, which can contain not only gasoline (when there are problems with the engine), but also often various kinds of auto chemicals that car owners pour in in the hope of “treating” the engine. As a result, it breaks down and clogs the oil channels!
Third mistake
, you can’t rush to assemble it right away, the sealant needs time to polymerize. Assembly after application should occur no earlier than 10 minutes, and starting the engine no earlier than an hour later, or even later. Well, of course, a torque wrench should be an integral tool during assembly!
Source
Main types of cylinder head gaskets
The following types of gaskets are used for internal combustion engines:
- Asbestos. Elastic, elastic, withstands elevated temperatures to high limits. To increase strength, they are often reinforced with metal rings. They are inexpensive, but have a number of disadvantages: they do not tolerate vibration, wear out quickly and deteriorate their sealing properties as they work.
- Non-asbestos. They are used more often than the previous ones, but their price is much more expensive. More resistant to various types of damage, deformation, vibration, and designed for long-term operation.
- Metal and bimetallic. They are made of several layers of metal, or additionally contain a sealing elastomer. They are considered the most popular and are widely used in modern cars.
Why are guide bushings needed?
Before installing the cylinder head, perform the following steps: clean the threaded holes, as well as all holes for the bushings (photo 1). Each bushing is installed in place, and only then a gasket is placed on top.
Metal parts adjacent to the gasket must be degreased. We looked at the cylinder head tightening diagram, but the cylinder head itself must be installed correctly:
- We place the cylinder head on the cylinder block;
- By moving the part in different directions, we ensure that the bushings fit into the recesses.
After “step 2” the screws can be tightened.
Sealant
No sealing compounds are used when installing the gasket! Solidol, CIATIM and other lubricants are not even needed. The main thing is that the metal must be degreased. And the cylinder head gasket must be new.
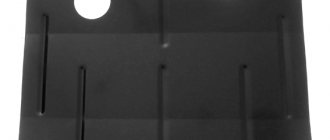
Cylinder head cover and tightening order of its bolts
The metal cover installed on the cylinder head must not allow air to pass through. At points of contact with other parts, tightness must also be maintained. Therefore, sealant is applied to the edge of the lid. An example is shown in the photo.
Here you need to use materials: Loctite-574, ANACROL, etc. The screws on the cover are tightened with an “8” key.
Recommended screw tightening torque
The recommended screw tightening torque is only 3-4 N*m. Don't be surprised: the sealant will do its job. You just need to let it dry after putting the cover in place.
You can unscrew the screws in any order. Their number is 15 or 14. When installing, it is better to follow the sequence shown below.
There is usually no need to replace the screws - the load is too small. We wish you success.
Common Misconceptions
If the bolts are pulled out too much, they are tightened in four steps. At “step 2” the tightening torque will be 70-85 N*m. All of these are common misconceptions that do not apply to 16-valve internal combustion engines.
All steps in one video: replacing the cylinder head gasket
If you find an error, please select a piece of text and press Ctrl+Enter.
Source
Types of sealants
To seal the valve cover, only special means are used - ordinary sealants will not last long here. They are also different in composition and properties:
- Anaerobic. The products are based on the synthetic polymer dimethyl acrylate. Solidification requires anaerobic conditions, that is, the absence of oxygen. Working with such compositions is comfortable for the master - they can be applied slowly, in a convenient manner. Remains of the product that have come out beyond the seam must be removed immediately - they will still remain semi-liquid and can get into the internal combustion engine.
- Silicone. Silicone-based compounds are most often used to seal valve covers and other vehicle components. They are made on the basis of organosilicon compounds and harden under the influence of moisture from the air. In order to properly fasten the parts, after application they need to be connected to each other not immediately, but after 5–15 minutes (this is how long the sealant needs to start setting). Silicone compounds tolerate less precise application than anaerobic ones. They can seal fairly large cracks and gaps. Another advantage is the chemical inertness of silicone: it does not spoil rubber or any other material, since it does not react with it. To seal the valve cover, it is best to buy a product that is 100% silicone and has no other additives.
- Polyurethane. They are characterized by a high degree of adhesion to metal, rubber and other materials. Can be used to fasten parts and seal them. Durable, elastic, long lasting, available in different colors, which makes application and subsequent removal easier.
Silicone gasket sealant for car engine
A high-quality sealant can withstand heat and high pressure, so it is well suited for internal combustion engines. A product of dubious origin can simply dissolve in the oil, clog the timing mechanism and cause a breakdown.
The procedure and torque for tightening the cylinder head on a VAZ-2112 with 16 valves: tightening the cylinder head bolts
VAZ cars of the 2112 family were produced with two 16-valve valves: 21120 and 21124. The cylinder head of these engines has different intake ports.
In theory, there are no other differences. And therefore, the tightening torque of the bolts on the VAZ-2112 cylinder head will be the same if we talk about any 16-valve internal combustion engine. Tightening is performed in three steps, although repair books give another option (it is for 8-valve engines). The following video shows how the cylinder head is installed in 5 minutes:
Installation and dismantling procedure
The part called the cylinder head is attached to the cylinder block with 10 screws. They are unscrewed with a 10mm socket wrench. The procedure for dismantling the cylinder head is shown in the first photo.
The standard screw length is 93 mm. If the screw has been pulled out to at least 95 mm, it is replaced with a new one (AvtoVAZ requirement).
During installation, a different scheme is used (photo 2). Each screw is lubricated with machine oil, otherwise the efforts will be reduced to nothing.
Tightening torque for cylinder head cover bolts
For VAZ-2112, the cylinder head tightening torque is standardized:
- First pass – the force is 20 N*m;
- Each screw is turned 90 degrees to the right;
- Wait 20 minutes, then turn the screws another 90 degrees.
At first the effort is very small. But at “step 3” it will be difficult to cope with the work. Use the lever.
Valve cover sealant requirements
The main characteristic that a sealant must have is heat resistance. A good product should work at elevated temperatures, and the more heat it can withstand, the better. Other requirements for sealants:
- Resistance to chemicals and petrochemicals. The sealant should not deteriorate from aggressive compounds: transmission and engine oils, brake fluid, solvents, antifreeze.
- Tolerance of vibration, mechanical loads, low temperatures. If the strength and elasticity are insufficient, the seam will quickly crumble. The sealant must be frost-resistant, because it will also work in winter when the car is in the garage.
- Ease of application. Sealing the valve cover is quite difficult, so the packaging of the product must be as comfortable as possible for work. Small cans have proven to be the best for application, while hard tubes like toothpaste, on the contrary, are inconvenient.
- Optimal volume. If you only have to seal the valve cover, a minimal amount of sealant will be used, and there is no point in buying a large package of the product.
You also need to monitor the expiration date - it must be normal, otherwise the sealing properties may decrease.
Criterias of choice
The fundamental criteria for purchasing a good sealant are the composition of the product, its properties and purpose. For liquid sealants, resistance to liquids and high temperatures is of greatest importance. The best sealants for engines do not lose their properties when heated to +360°C.
For other engine compartment elements, a heat resistance of +200 °C will be sufficient. Other selection criteria include:
- Volume of composition, shape of packaging and method of application.
- Time for the product to completely harden.
- Performance characteristics - in addition to resistance to high temperatures, resistance to temperature changes is taken into account. The higher the temperature a substance can withstand, the better.
- Resistant to liquids. In a car, in addition to water, the sealant can be affected by aggressive chemicals. Resistance to most of them is an indicator of a good product.
- Resistance to vibrations accompanying machine operation. Weak sealants break down and spill out during vehicle operation.
- Best before date.
Choosing a sealant to service car components has one difficulty - the abundance of available products. Therefore, even at the stage of planning technical work, you need to consider suitable brands and settle on a sealant that meets even the strictest requirements. Then the repair will be easy and successful, and the result will last for a long time.
Review of popular sealants
To purchase a truly high-quality composition, you should pay attention to trusted brands, which are presented in most automobile stores.
Black Heat Resistant DoneDeal
This sealant is produced in the USA and easily withstands operation at -70...+345 degrees. It does not deteriorate from the action of any automotive chemicals, does not evaporate and does not shrink over time, is not afraid of water, and does not swell with air flow. The product is suitable for any engines, including those with oxygen sensors. In addition to the valve cover, the sealant can be used for engine oil pans, gearboxes, thermostat housings, cooling system pumps, and intake manifolds. Other advantages of the composition:
- tolerates vibration and shock loads;
- copes with sudden temperature changes;
- does not provoke corrosion;
- does not crumble, does not crack.
ABRO 11 AB
This sealant is also produced in the USA, has a low price and excellent quality. Used when installing any gaskets, including when replacing the valve cover. It is considered a universal automotive sealing compound.
Properties of the sealant:
- maximum permissible heating - up to +343 degrees;
- resistance to antifreeze, oils, lubricants, water, brake fluid, antifreeze;
- tolerance of any loads, vibrations, shifts due to high elasticity;
- Possibility of applying a thin layer due to the convenient spout.
Victor Reinz
Another popular universal sealant for cars is based on solvent-free polyurethane. It is available in two variations - “Reinzoplast” and “Reinzosil”; to seal the valve cover you need to use the first one (blue). The sealant can withstand changes within –50...+300 degrees, and is resistant to auto chemicals and aggressive substances. Dries quickly: a thin layer sets in just 15 minutes, and you can install a gasket on it, and you can start the car after another 30 minutes.
Dirko
Dirko sealant from Elring is available in the following modifications:
- Dirko HT. Designed for use at –50…+250 degrees, produced in 70 ml tubes. Resistant to aggressive substances and mechanical stress.
- Dirko S Profi Press HT. Works at -50...+220 degrees, usually used by professionals, since it is presented in 200 g bottles. Elastic, does not crumble, does not deteriorate from vibration.
- Dirko Spezial-Silicon. Less resistant to elevated temperatures (operated at –50...+180 degrees), but still used for sealing crankcase covers and pans.
When working with valve cover gaskets, it is best to choose the third option of sealant in gray packaging, because it is famous for its high ductility and does not deteriorate even when applied to moving parts. After drying, the finished seam can easily withstand heavy loads and is resistant to petrochemicals and other aggressive liquids and gases. The product does not require any waiting time before applying the rubber gasket. But all three sealants can be used to seal the valve cover.
Anaerobic composition Permatex Anaerobic Gasket Maker
Permatex sealant belongs to the anaerobic category - it hardens in an airless environment. It is very thick and quickly compacts during vulcanization, forming a strong elastic connection that is resistant to mechanical stress and vibration. The sealed seam does not deteriorate from the influence of aggressive chemicals, is not afraid of temperature changes, and can be used in winter. Sold in small convenient tubes of 50 ml.
CYCLO HI Temp C 952
Silicone auto sealant quickly seals, glues, provides complete waterproofness, and isolates the gasket from the action of petrochemicals. Maintains flexibility and elasticity throughout its entire service life. Instantly forms tight gaskets on engine parts of any type. Contains no additives, only pure 100% silicone. But it is very rarely found on sale.
Curil
A product with the same name is also produced by Elring in two versions:
- Curil K2. It is used at –40...+200 degrees, presented in a tube weighing 75 g with a dispenser. Can seal surfaces with a gap of less than 0.1 mm. Solidifies as a result of solvent evaporation. In addition to repairing the valve cover, it is designed to work with the fuel and oil pump, injection system, steering mechanism and other machine components.
- Curil temperature. Withstands changes within -40...+250 degrees, produced in similar packaging. Made on the basis of synthetic resins, it does not deteriorate from weak acids, alkalis, water, salts, oils, gasoline and diesel fuel.
Both products are excellent for repairing internal combustion engines. After application, you need to wait about 5 minutes, and only then install the gasket. It is recommended to apply a thin layer of sealant (less than a millimeter).
MANNOL 9914 Gasket maker RED
This silicone sealant works at -50...+300 degrees, is resistant to sudden temperature changes, as well as to the action of aggressive substances and petrochemicals. It vulcanizes to the state of plastic rubber at room temperature under the influence of water vapor from the air. Creates a reliable gasket that does not crack, shrink, or move during service.
Other popular brands
There are other compounds in stores that can be used with the valve cover to seal it:
- Loctite 574. An anaerobic compound that hardens at room temperature to form a durable gasket. It is used most often in internal combustion engines, as well as in other units where the surfaces adjoin without a large gap. Heat resistant, not destroyed by oil.
- Hi-Gear 9041. Sealant based on metal-ceramic additives, used for valve covers, eliminating leaks in the cooling system, eliminating cracks in cast iron or aluminum blocks. Can work under pressure, constant temperature changes, and vibration.
- Anaerobic adhesive for threaded connections. Widely used in installation, assembly, and repair of automotive and other equipment. Guarantees protection against corrosion, eliminates leaks, strengthens threads, and withstands changes within the range of –60…+230 degrees.
- Hylomar M. Effectively seals various automotive components, made on the basis of urethane, which retains elasticity during operation even at extreme temperatures (at –50...+250 degrees). Ideally aligns joints, is not afraid of fuel combustion products, and does not deteriorate from water, oil, lubricants, or kerosene.
Option for eliminating leakage through glass seals PERMATEX 81730
Used for sealing auto glass. Made on a silicone basis, it has a wide range of operating temperatures: from –65 to 232°C. Recommended for sealing headlights. Suitable for PTF and headlights with halogen lamps, which get very hot during operation. Can also be used for car windows, including the windshield.
PERMATEX 81730 is completely transparent, after hardening its layer is almost invisible. Sold in tubes of 42 g. It has capillary permeability, flowing into the smallest crevices. After drying, it completely blocks the possibility of wind blowing and water flowing through the seals of car windows, sunroofs, and lighting fixtures.
The use of the substance is simple. It is enough to clean and degrease the surface to be sealed and carefully apply the substance. Excess and drops are removed with a clean napkin or rag. Hardening time – 1 hour. The package sells for 180–250 rubles.
Pros:
- ease of application;
- dries in 1 hour;
- inexpensive;
- flows well into cracks;
- operating temperatures from –65 to 232°C.
Minuses:
How to use valve cover sealant?
Exact information about the procedure for using the composition is indicated on the packaging; different products have their own characteristics and specific application. Sealants of various brands completely harden within a certain period of time: for some, 15–30 minutes are enough, for others, several hours are needed for complete polymerization. You cannot start the car until this time has expired, otherwise the composition will not dry out and gain strength.
Preparation and installation of the cylinder head gasket
First you need to make sure that the surface is smooth, the cylinder block is not damaged, and has no cracks. Before installation of the gasket, all technological holes are cleaned and blown with compressed air to remove dirt and dust. The surface is degreased with a solvent suitable for the car. If there are dense contaminants, they can be removed with sandpaper or a wire brush.
Next, a small amount of sealant is applied. If there is a lot of compound, it will get into the engine when tightened. The sealant is squeezed into the groove of the cover, smeared, and after about 10 minutes the rubber gasket is installed. The bolts are tightened with a torque wrench in a certain sequence (first a preliminary tightening is done, then a full tightening).
When replacing a gasket, sealant is a necessary tool that seriously improves the quality of the repair. It is especially needed if a non-original part is used, which may not fit tightly to the surface. In any case, the sealing compound provides a 100% guarantee of reliable service for the unit if all work on its application was carried out correctly.
The best option for car windows and headlights Done Deal DD6754
Products of a company from the USA that produces sealants that are distinguished by quality and affordable prices. The Done Deal DD6754 product is intended for auto glass repair. It is produced in tubes of 85 g. The base is silicone, a colorless substance, has a refractive index close to glass. All that is required is to degrease the crack and carefully apply glue. It will numb the cavity on its own.
If the damage is minor, then after repair there is a chance that the crack will not be visible at all. The film appears within 30 minutes. Complete hardening takes 12 hours. You can speed it up by drying with an industrial hair dryer.
The main property of this sealant is a wide range of operating temperatures: from – 65°C to 205°C. Therefore, if analogues can be used for ordinary car glass, then Done Deal DD6754 is better used for headlights. The sealant easily withstands even heat from halogen lamps. The price of a tube is 440–580 rubles.
Pros:
- easy to use;
- wide temperature range;
- headlights can be repaired;
- transparent;
- allows you to save on repairs at car services.
Minuses:
Application area
The above sealants are used not only for automatic transmission pans. They are used to glue cracks and joints in pipes, sinks, and seams in the floor. Silicone sealants have excellent UV resistance. They prevent the penetration of mold and mildew.
Pan sealant prevents the penetration of dust and moisture into the automatic transmission. The oil retains its properties longer. Gaskets under sealant from Victor Reinz and other well-known companies, for example, Permatex, Done Deal remain resistant to the influence of aggressive environments during the cold season. The salts that are sprinkled on the asphalt during icy conditions cannot penetrate the automatic transmission, and the metal along the edges of the pan, where it comes into contact with the sealant, does not rust. The service life of the pallet is increased.
Reliability of the Skoda Rapid automatic and the transmission used
Removing the valve covers on the 21120 16v 1.5 engine
Briefly, the sequence looks like this: remove the filter box and the plastic trim, disconnect the wires and unscrew the ignition module. The key must be turned to position “0”.
Removing the air filter box
To remove the filter, loosen clamps 1 and 2, and then disconnect connector 3. Pipes 1 and 2 are removed from the box. Use a 10mm wrench to unscrew the screw on the body, then remove the box from its mountings.
To disconnect high-voltage cables, you need to pull the caps out of the wells. The cables are also disconnected from the ignition module. It is pressed to the valve cover with three 10mm nuts.
We figured out the ignition module
Don't forget to disconnect the low-voltage connector and dismantle the module. If you do not unscrew the module, you will not be able to remove the valve cover on a VAZ-2112.
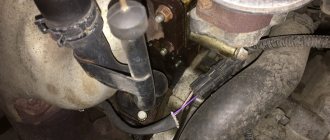
The part called “receiver”
First of all, you need to remove the throttle assembly: unscrew the cap on the antifreeze tank, disconnect the TPS and IAC connectors, unscrew the two fastening nuts (wrench “13”). It is also advisable to disconnect the negative terminal from the battery.
What to do before removing the receiver
Using a 10mm wrench, unscrew the cable mounting bracket from the receiver. All that remains is to remove the throttle assembly: the operation is carried out so that the assembly remains above the expansion tank. The assembly itself is finally attached to the body partition.
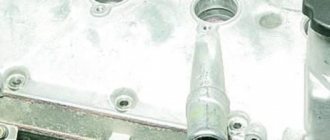
On motor 21120 we remove the receiver, that is, the upper part of the intake module:
- The ignition wires come out of brackets 1 and 2. Then, loosening the clamp, you need to disconnect the brake system hose.
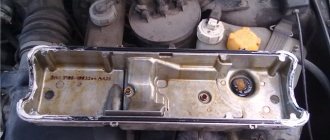
What needs to be disconnected from the receiver
The crankcase ventilation hose is disconnected from the cylinder head cover.
The final touch before dismantling
In the photo, the intake manifold holes are closed with plugs. The filler plug is screwed in.