What is the function of the gasket?
As soon as the cuff loses its properties, the motor starts to leak. The gasket ensures complete tightness of the lid and neck for filling the lubricant.
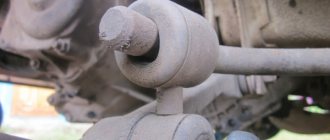
The element is located under the valve mechanism cover and is attached with it using bolts and nuts. The cuff is made of a special type of rubber that does not lose its characteristics for a long time when heated. Then the quality of the material gradually deteriorates, the part loses its elasticity and is unable to hold oil under pressure. You have to shoot and think what to do next.
Types of parts
Before changing the valve cover gasket, it is worth considering that there are several options for parts, but they all perform the same functions and differ only slightly. The shape of the part follows the plane of the surface. It fills the main irregularities and compensates for deviations that appear between different parts.
The cylinder head cover gasket has different design types:
- non-breaking - available in the form of a ring;
- complete - in addition to the main element there are seals for existing holes;
- composite - made of a gasket and several inserts for sealing.
Also, before replacing the valve fluid gasket, it is worth studying the materials:
- Rubber. This type is more popular than the others and is created from several types of material. It becomes softer when warming and hardens when cold.
- Paronitis. The parts are made from rubber, but minerals are added, which are molded and vulcanized. Non-asbestos paronite is supplemented with steel wire to give reliability to the product. Such parts partially act as sealants and do not change shape from external factors.
- Cardboard. They are made from paper that is protected from water, oil and gasoline. Such gaskets are rarely used because they are considered unreliable and are found on domestic cars.
- Rubber with cork. Here a light filler or cork is added in granular form. This increases the degree of sealing and compensates for vibration when the machine moves.
Before changing the valve cover gasket, it is recommended to determine the material of the new part. Craftsmen at service stations install rubber products, sometimes products interspersed with paronite or cork.
When is replacement needed?
New sealing rubber is inexpensive. Therefore, during active use of the machine, it is worth changing it as often as possible. Here's when to do it:
- during engine overhaul;
- if traces of oil are found in the engine compartment or under the car;
- during repair/maintenance of the timing system;
- when changing the oil in the system - upon reaching 15–20 thousand mileage.
Self-replacement - what needs to be taken into account?
The replacement process is considered quite simple, but you need to understand that it is not always possible to carry out the work smoothly.
That is why when carrying out work you should follow simple tips that will help you avoid mistakes:
- When removing the lid, you should wash it in turpentine.
- The optimal solution would be to use high-quality gaskets.
- All parts used must be clean; when carrying out work, experts advise wiping the edges of parts to remove any existing oil.
- During installation, you can use a sealant; it is applied to the joints.
- After the replacement is completed, you need to check the oil level.
- To check the system, you need to start the car; carry out a second inspection after making the first trip.
- The groove under the gasket should be cleaned as thoroughly as possible.
Which one to choose
There are a lot of products on sale from different manufacturers. There are original components and replacements. Original cuffs are a priori better. They provide tightness longer, but cost several times more.
On the other hand, the quality of some analogues can also be excellent. A lot depends on the brand. For example, the Viktor Reinz brand is a worthy analogue. Reinz gaskets are equipped with special thickenings (or protrusions) so that when tightening, not the entire surface of the seal is pressed in, but only the profile. This ensures the reliability of the product; the rubber can withstand temperature changes longer.
Analogue products from Viktor Reinz are very popular. They are installed on Lacetti, Duster, Almera. They cost less than the originals but last longer.
Typical mistakes when replacing gaskets
The seemingly simple procedure for replacing the elastic gasket sometimes causes difficulties for some car owners. After installing a new gasket, the oil leak not only does not stop, but even increases. Errors can be different, but the most common ones are:
- Use of poor quality gasket;
- uneven application or use of rough (old) sealant;
- uneven tightening of the cover bolts and, accordingly, its distortion.
Before you begin repair work, you should definitely find a diagram for tightening the cover fasteners in your car’s operating manual (the so-called “manual”) and follow it exactly. In this case, the tightening force should be monitored using a torque wrench.
How to Replace a Valve Cover Gasket
Unfortunately, car enthusiasts often make irreparable mistakes when replacing them themselves, which reduces the service life of the part. They watch the video, try to repeat the master’s actions, but nothing works.
The first thing you need to prepare is a high-quality new cuff with the required catalog number, suitable for the size of the engine. It is also important to prepare a special type of sealant, preferably Permatex.
The replacement procedure is as follows:
- The battery must be de-energized, and the wire ends from the spark plugs must be removed.
- Disconnect all attachments from the valve cover.
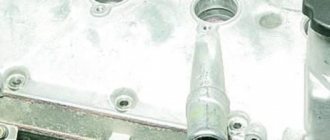
- Unscrew the cover bolts and remove it.
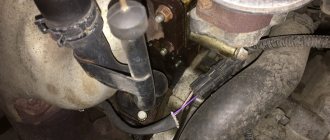
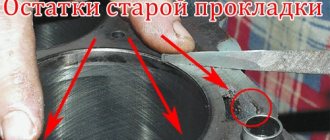
- Remove the worn seal from the sinuses.
- Thoroughly degrease the working surface, including the mating surface of the head.
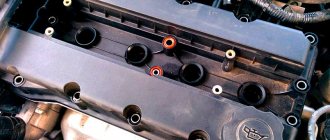
- Apply sealant and install a new gasket in the groove.
- Tighten the cover using a torque of 10 Nm.
Without experience and knowledge, it is better not to touch the mechanism. The slightest mistake can lead to depressurization of the gap and oil leakage from the engine.
Changing the gasket in a garage
Having a desire to maintain your car, as well as a set of simple tools, you can very quickly change the gaskets yourself. Among the consumables, you need to get a new gasket, a good high-temperature engine sealant and a degreaser (solvent, gasoline, anti-silicone, etc.).
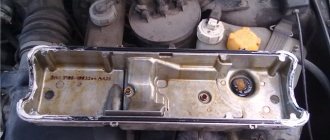
The gasket can be removed very easily. To do this, you need to remove the air cleaner housing and unscrew the mounting bolts around the perimeter. If the cover is burdened with additional devices (attachments), they should also be removed. The old gasket is immediately thrown away and is not left for a rainy day. The contact point between the cylinder head and the cover is cleaned of old sealant and degreased. The gasket, lubricated on both sides with sealant, is placed in place and covered with a lid. Assembly occurs in reverse order.
If not changed in a timely manner
On some foreign cars (such as Lacetti), gasket failure is a chronic disease. The original standard part can withstand no more than 70–80 thousand kilometers. During active use of the car, it breaks down even before the mileage of 40 thousand km.
Changing the gasket on time is extremely important. If you don't do this, there will be many unpleasant surprises:
- the entire valve group of the engine will be subjected to a powerful attack of dirt and dust, which will penetrate inside without obstacles;
- severe oil leakage will begin, and a lack of lubrication will have an extremely negative effect on the service life of the piston group and valves;
- oil will get on sensors, spark plug wells, wires, and other mechanisms in the engine compartment - the risk of fire will increase;
- cooling of the power plant will become worse.
Change the gasket as soon as it stops doing its job. If you choose a low-quality product or make a mistake during replacement, oil leaks will appear again within a few days after replacement.
Tips for quality work
Not in all cases, motorists are able to carry out the procedure without problems. Sometimes an oil leak forms almost immediately after several kilometers of driving. There may be several most popular reasons for this:
- use of low-quality gaskets;
- insufficient amount of sealant used, careless application of it to the surface;
- misalignment of the cover caused by improper tightening of the fasteners.
You need to know that for cars there are diagrams for tightening the bolts on the covers, which can be found in the car’s operating instructions.
The replacement must be carried out when the engine has cooled down so that thermal expansion does not negatively affect the performance result.
To work with fasteners, you usually need a 10mm wrench. After unscrewing all the bolts, you must thoroughly rinse the parts to remove any remaining grease or old sealant.
Application of sealant
It is advisable to tighten the bolts using a torque wrench. If there is no scheme according to which the operation is carried out, then it can be found on the official website of the manufacturer. In any case, the fasteners are tightened from the middle to the edges.
What do you need to know about the motor?
Before the valve cover of the VAZ 2114 is removed and the gasket is replaced, it is worth talking about the features of the engine. If you don’t know anything about design features, then the best solution would be to turn to specialists. Remember that to carry out such work you will need a certain tool.
ICE device
| № | Detail number | Part name |
| 1 | 2108-1003298 | screw |
| 2 | 2108-1003278-01 | Washer |
| 3 | 2108-1003277-01 | Sleeve |
| 3 | 2108-1003277-02 | Sleeve |
| 4 | 2108-1003274 | Cover pin |
| 5 | 2111-1003260 | Cylinder head cover |
| 6 | 2108-1003271 | Bolt M12x1.25x135 |
| 7 | 2108-1003265 | Washer |
| 8 | 14328201 | Plug 10 cup |
| 9 | 14329101 | Plug 30 cup |
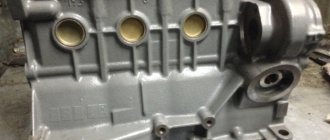
| 10 | 1118-1003011 | Cylinder head |
| 11 | 2101-1002042 | Sleeve |
| 12 | 14329201 | Plug 36 cup |
| 13 | 10158601 | Plug 16 spherical |
| 14 | 11183-1002011-10 | Cylinder block |
| 15 | 14234330 | Bolt M10x1.25x65 |
| 16 | 2108-1003284-10 | Ring sealing |
| 17 | 2111-1003284 | Ring sealing |
| 18 | 2111-1003286 | Bolt |
| 19 | 2111-1003288-10 | Stub |
| 20 | 10725911 | Nut M6 low |
| 21 | 11197773 | Conical spring washer 6 |
| 22 | 13541221 | Hairpin M6x22 |
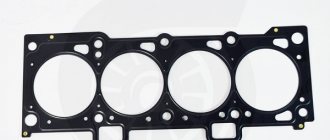
| 23 | 2108-1003270-10 | Cover gasket |
| 23 | 2108-1003270-11 | Cylinder head cover gasket |
| 24 | 21083-1003020-10 | Head gasket |
| 24 | 21083-1003020-11 | Head gasket |
| 25 | 2112-3855020 | Knock sensor |
| 25 | 2112-3855020-01 | Knock sensor |
| 25 | 2112-3855020-02 | Knock sensor |
| 25 | 2112-3855020-03 | Knock sensor |
| 26 | 2101-1002040 | Sleeve |
In particular, a car enthusiast needs to have on hand the following details:
- ratchet with extension;
- head at 10;
- screwdriver with Phillips head.
Diagnosis of gasket condition on a Chevrolet Lacetti
The service life of the valve cover gasket on a Chevrolet Lacetti, as a rule, barely reaches 15–20 thousand.
An oil leak can occur as a result of engine overheating , then the cover becomes deformed and loses its seal. This is rare, but mostly oil oozes from under the cap and penetrates into the spark plug wells simply due to the gasket losing its elasticity and the sealant losing its properties.
Oil leakage occurs as a result of loss of elasticity of the valve cover gasket.
At the first appearance of traces of oil, and even more so when oil appears in the spark plug wells, you should not wait, but look for a new gasket as soon as possible.
Huge variety of articles
The market offers about a dozen gaskets for the cover of Lacetti engines; they are the same for 1.4 and 1.6-liter engines .
The original GM gasket bears article number GM96 353 002. It has a simple square profile, lasts quite a long time, but costs about 450 rubles.
There is a very inexpensive analogue of Parts Mall with the same index at a price of about 180–200 rubles . Many people prefer the Victor Reinz 155345601 . Its price is approximately 600 rubles , the gasket has a T-shaped profile and works no worse than the factory one. It is not recommended to buy cheap analogues, since they harden quickly, even a good sealant will not save you.
Valve cover gasket GM 96 353 002.
Let's move on to the cylinder block
We remove the pallet. Rotating the crankshaft as it is convenient for us, unscrew two bolts on each connecting rod cap. We use a TORX E10 head for this.
We take out the pistons along with the connecting rods. To do this, use the wooden handle of a hammer to press the connecting rod from below and lightly tap it to knock it up. We remove the old liners and buy new ones of the same size according to the markings on them. Here is another stone in AvtoVAZ’s garden, the owner has never climbed into the car from the interior or into the engine, but three pistons were of group “B” and one was “C”. It turns out that at the factory they re-sharpened one cylinder a little and simply put an enlarged piston there, no words. There are no options, we take group “C”, don’t sharpen the engine because of this. We will not touch the main liners either.