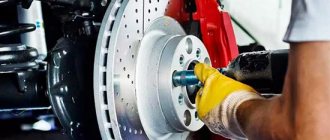
If you notice that the stopping distance of your car deviates from the norm, this means that the brake system is worn out and requires thorough attention. All thoughts should be focused on solving the question of how to change brake discs on a VAZ 21099 and check the pads. Let us remember that the brake disc is a metal structure made in the shape of a circle and installed on the front axle. The disc actively takes part in the braking process and tends to wear out after a certain period of time. If we talk specifically about VAZs, then most often they have only two brake discs on the front axle, but the rear of the car has drum brakes, other manipulations are carried out with them, the procedure is not the same as changing brake discs on a VAZ 21099. This factory equipment is well thought out initially, and in principle functions reliably.
VAZ 21099
Replacing brake discs on a VAZ 2109
Brake discs provide braking to the front wheels when the vehicle is moving. The effectiveness of braking, and, consequently, safety on the road depends on their condition. Brake discs on a VAZ 2109 are replaced in the following cases:
- The thickness has reached the maximum permissible minimum value - 10.8 mm. At the same time, the thickness must be controlled in two places. If the wear is uneven, then replacement is carried out in any case.
- The disc has deep scratches or chips.
Such noticeable defects on the brake disc occur as a result of using low-quality brake pads or careless driving on uneven road surfaces.
Using such a brake disc will inevitably lead to its breakdown and sudden braking at speed, or, at best, to a deterioration in braking properties.
Small scratches on the brake disc can be removed using special equipment. However, not every driver can afford such devices. In this case, the brake disc must be replaced.
Procedure.
- Place the car on a completely flat surface and install wheel chocks under the rear wheels on the front and rear sides.
- Engage first gear and prevent any movement of the vehicle in the horizontal plane.
- Loosen the wheel bolts on the side where you plan to replace the brake disc and jack up the car.
- Completely unscrew the wheel bolts and remove the wheel. Mount your car on special supports to increase safety.
- Now unscrew the two bolts that secure the caliper to the steering knuckle and remove the brake caliper. To make the task easier, rock the caliper back and forth to loosen the pads. Attention! When dismantling the caliper, do not unscrew the brake hoses, as this can cause a very sharp leak of brake fluid.
- As soon as you remove the caliper, hang it with a wire on any suspension element so that it does not interfere with the work. This will also prevent possible damage to the brake hose.
- Using a dry cloth, wipe the brake disc to remove dirt and other debris.
- Use a lubricant such as WD-40 to treat the joint between the brake disc and hub, as well as the guides. Wait approximately 5 minutes and proceed to remove the brake disc.
- Unscrew the 2 guides from the brake disc and try to remove it by hand. If this fails, then take a rubber hammer and knock it off the hub with gentle blows along the entire circumference of the disk. Attention! Be careful not to hit too hard, as the disc may break and accidentally injure you from the fragments!
- Install the new brake disc, insert the guides and tighten them. They should be tightened evenly and equally so as not to spoil the threads and not to disrupt the uniform wear of the disk in the future.
- Reinstall the caliper, replace the brake pads if possible and necessary, and screw the caliper to the steering knuckle.
- Install the wheel and tighten the wheel bolts.
- Remove the special supports and lower the vehicle.
- Don't forget to tighten the wheel bolts completely! Many novice drivers often forget this significant detail and get into an accident. Be extremely careful!
That's all! As you understand, replacing brake discs on a VAZ 2109 does not require special knowledge and skills. The most important thing is a minimum of knowledge and the availability of the necessary set of tools. Good luck on the roads!
Source: lada-na-remont.ru
Features of TC
Brake pads (TC) installed on the VAZ 2109 have their own features and characteristics, which you should know about before purchasing new parts.
- The base of the block is made of fairly durable metal.
- A friction lining is glued on top of the base using special glue under the influence of a temperature of 100 degrees Celsius.
- The rear brakes include 4 pads. The body and base are stamped from sheet metal and then welded.
- The roughness on the surface of the pads, necessary to speed up the grinding in of the brake pads, is achieved through special processing.
- Efficiency during control braking from 80 km/h - 320 Nm. The pressure inside the brake system is 40 bar. The pads are cold.
- All elements of the brake system are made in accordance with strict international standards and requirements.
- The service life of a vehicle directly depends on driving style, road conditions and a number of external factors.
The operating manual states that the service life of the TC on the VAZ 2109 is within 70-90 thousand kilometers. But in practice this period is somewhat shorter.
Rear TC kit
Golden rules
There are four golden rules that must be strictly adhered to when replacing front and rear TCs.
- When cleaning brakes, never use mineral solvents such as diesel fuel, gasoline, etc.
- When replacing pads at the rear or front, both should be changed at once.
- You cannot swap front and rear TCs, as well as left and right, and vice versa. Otherwise, braking will be uneven.
- If there is a maximum level of brake fluid in the reservoir (MAX mark), part of the brake fluid must be pumped out.
Taking into account all these rules, you can begin to replace the TC.
Repair of the brake system, instructions for replacing the disc and brake caliper of the Lada 2108 with your own hands, troubleshooting the rear brake mechanism of the VAZ 21099, VAZ 2108, VAZ 2109. Operation and repair of the brake system of the Lada 2108. Checking the brake drive of the Lada 2109. Maintenance of the front and rear brake mechanisms Lada 21099.
Warnings
Loosen and tighten the wheel bolts only on a Lada Samara car standing on the ground. The tightening torque of the bolts is 65–95 N m (6.5–9.5 kgf m).
The use of gasoline, diesel fuel or any other mineral solvents for cleaning brakes is unacceptable.
When installing old pads, replacing the front and rear pads with each other, as well as between the left and right wheels, is unacceptable. This may result in uneven braking.
Brake pad sets for VAZ 2109, VAZ 21099, VAZ 2108, Lada Samara must be replaced simultaneously on both sides of the car.
Replacing the front brake disc of a VAZ 2109 on your own
Front brake disc
If braking noticeably worsens while driving, it is recommended that you conduct a detailed inspection of the entire braking system. Knocking noise in the front suspension can also tell a lot about the condition of the car. This type of problem can be caused by worn brake discs. As a rule, the degree of wear is checked only by visual assessment. Replacing the front brake disc of a VAZ 2109 is recommended when significant wear is observed. It is noteworthy that replacing the front brake disc on a VAZ 2109 can be easily done on your own. The presence of cracks and damage may also be the cause. Changing the front braking mechanism is not so difficult, so if you have competent instructions, the work will be completed successfully.
Replacing the front brake discs of a VAZ 2109
The thickness of the non-vented disc should be approximately 10.8 mm, while the thickness of the vented part should be a minimum of 17.8 mm. Change brake pads and discs if the indicators are less than normal. It must be taken into account that the axial runout of the surface should be less than 0.15 mm.
Note! If there are scuffs and deep scratches on the discs, braking efficiency will be significantly reduced due to greater wear of the pads. In this case, an urgent replacement of the rear discs or a change in the front braking mechanisms will be required.
Now you can get qualified assistance in grinding discs at a service station. Experts must take into account acceptable standards. The groove is made to the same depth on both sides.
Final operations
The assembled assembly must be checked for acceptable runout. To do this, a micrometer is mounted on the stationary part, and the disk is rotated. Each car model has an acceptable runout value. The indicator can usually be found in the car manual.
For high-quality brake discs, the runout should not be more than 0.05 mm.
Having installed the wheel in place, we lower the raised car with a jack. We press the brake several times from inside the car. At this time, the pads are in contact with the disc. If necessary, the brakes are bled or the parking brake is adjusted.
Helpful information
Replacing front brake discs on a VAZ 2109
- The classic 16-valve package includes R14 brake discs.
- The 8-valve kit includes R13 brake discs.
- It is unacceptable to install R14 brake discs on machine discs of 13th radius.
To replace front brake discs quickly and correctly, you need to be able to distinguish between the types of automotive components in question. Thus, they distinguish:
- collapsible disks;
- elements with grooves and perforations;
- disks with special gas outlets;
- ventilated elements.
When is it time to replace the front brake discs?
VAZ 2109 front brake discs
The front braking mechanisms on the VAZ 2109 are replaced in case of mechanical damage or when the working part of the disc wears out (thickness is less than the norm of 10.8 mm).
Note! Further use of a worn disc or element with cracks is strictly prohibited.
If there are minor scratches or abrasions on the functional surface, they can be removed by grinding the disc using specialized equipment in a workshop. If this is not possible, or the damage is so significant, you cannot do without replacing the part.
Replacing brake discs
Replacing brake discs VAZ 2109
Of course, you should always follow the advice from the car manufacturers. It should also be noted that the degree of wear of brake discs will directly depend on the driving style and operating conditions of the vehicle. If the driver prefers fast driving, then the discs will need to be replaced after 70 thousand kilometers.
Note! Even a less-than-professional driver can replace the front brake disc.
Replacing brake discs on a VAZ 2109
Signs of wear on parts
The mileage range from 20 to 45 thousand km is too large to be guided by these figures. But it is useful to know about it for those motorists who do not have the time or opportunity to independently care for their car. If the mileage has exceeded 40 thousand km, then the front brake pads will inevitably need to be replaced, since your safety depends on them.
It will be useful for the same motorists to know that the appearance of extraneous sounds when pressing the brake pedal (creaking, grinding) indicates the final wear of the brake linings of the VAZ-21099. In such a situation, they should be replaced immediately. There are other signs that can be detected during a visual inspection, which is recommended to be carried out every 15 thousand km:
The last 3 signs do not directly indicate wear of the linings; we are talking about a more global problem with the brake system. But to diagnose it, you will still have to remove the brake pads, and at the same time you will need to change them. Liquid leaks indicate that the rubber sealing rings and boots in the cylinders have become loose. Worn calipers that make knocking noises most often need to be replaced. The next decision is up to you: fix these breakdowns yourself or go to a car service center.
Practice shows that new friction linings can also produce squeaks; the reasons for the phenomenon are unknown. Confirmed fact: the squeaking noise can disappear even if the brake pads are replaced with products from the same manufacturer purchased from another store.
Replacing a brake disc on a VAZ 2108, VAZ 2109, VAZ 21099
Welcome! Brake disc - it is made in the shape of a circle, when braking, the brake disc heats up from 350-750 degrees Celsius, maybe more if the car is constantly braking and all this happens in extreme heat and on strong brake pads, but still, over time, the disc wears out just like any other part and there is a need to change it, this must be done, otherwise the car’s brakes will get worse and worse every day.
Note! To replace the disc, you need to stock up on: Be sure to have a set of wrenches, some kind of lubricant like WD-40 or itself, as well as a metal ruler or something else like it, because you won’t be able to determine the thickness of the old brake disc by eye , and the disk needs to be replaced only if its thickness has become less than 10.8 mm. In addition to these devices, you also need to take a hammer (Preferably rubber) and a needle file (The needle file is taken if your disk turns out to be normal, and you will install it again on its place, but more on that later)!
Summary:
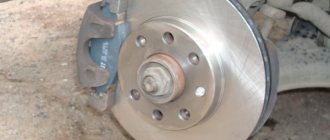
Where is the brake disc located? On our cars there are only two discs, both of them are located in the front part of the car, while drum brakes are installed at the rear; many car owners are confused by the fact that disc brakes are not installed on the rear part of the car; in fact, the car would actually stop faster, but replacing the discs would be a pain. more expensive, so the engineers working at VAZ decided not to use discs on the rear wheels and leave them only on the front wheels; for a more detailed location of the brake discs, see the photo below, which shows only one disc and it is indicated by an arrow:
When should you replace a brake disc? Firstly, when something happens to the disk and thereby it becomes unusable, the first thing you will begin to feel is that the car will stop worse, and secondly, there may be a noticeable beat when braking in the front part (Usually in this case it beats the brake disc is too worn), and the disc needs to be changed if various kinds of defects begin to appear on it, for example, cracks, deep chips, etc., by the way, some small defects can be removed in a car repair shop, now some car repair shops are engaged in sharpening the disc in this In this case, the excess (Defective) layer of metal on the brake disc is erased and instead of the defective layer, a new one remains and the disc is subject to further use (This procedure can only be carried out on a thick disc, if you want to find out why, read the “Note!” section below)
Note! Under no circumstances should you operate a car if the thickness of the brake disc has become less than 10.8 mm, you are only allowed to go to a car repair shop or garage and change the disc to a new one, because when the thickness of the disc becomes small, it becomes much more susceptible to the fact that on it the body will soon begin to crack, etc., in connection with this, the disk may simply not withstand the load and thereby burst, thereby the brakes on the wheel where you had the disk will completely disappear.
Preparatory operations
You can dismantle the old disk and install a new one yourself, even in a garage. You will first need to buy wheels suitable for your specific car model. This must be done carefully, since sometimes even the year of manufacture of the same car affects the parts being installed.
It is worth choosing a specific manufacturer of these spare parts based on your driving style. The required characteristics for a driver who uses an active style with frequent use of the brake pedal or for a driver who spends most of his time on a country road will be different.
It is customary to divide TDs into classic (standard) and sports (reinforced):
- The classic design uses malleable cast iron, machined to the desired dimensions. Non-ventilated and ventilated specimens are available. In the first case, the basis is a single disc, next to which a caliper with brake pads is installed. In the second case, a dual system of disks separated by ribs is used. Due to the entry of air between them, the unit is ventilated. Popular brands that manufacture these parts are ATE, Zimmerman, Bosh.
- In the production of reinforced discs, more durable grades of cast iron or high-alloy stainless steel are used. These elements provide longer service life under increased loads while driving. Well-known brands in this area offer more expensive products. Most often in auto stores you can find brands such as Brembo, DBA, EBC.
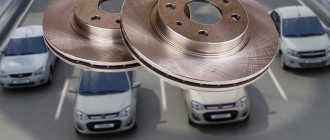
Brake discs must be replaced in pairs on both sides of the axle.
This will ensure proper operation of the entire braking system. Even if one of the sides is in satisfactory condition after visual inspection, and the other is significantly worn, it is recommended to replace both disks. If dismantling work is carried out on one side, then the discrepancy will lead to loss of directional stability. The rule applies to both the front and rear axles.
To carry out installation and dismantling work you will need the following tools:
- car jack (mechanical, hydraulic, pneumatic);
- clamp;
- a hammer with a wooden handle (a rubber or wooden mallet is allowed), in some cases a reverse hammer is used;
- a set of wrenches and screwdrivers;
- rust treatment fluids (WD-40 or analogues);
- brake fluid, if bleeding of the brakes is required;
- clean rags and personal protective equipment (work gloves, safety glasses, etc.);
- metal brush or power tool with a special attachment;
- torque wrench.
If the operation is carried out on all wheels, then it is customary to change the disks one by one on each axle.
How to replace a brake disc on a VAZ 2108-VAZ 21099?
Removal: 1) To replace the disk, you will first need to remove the wheel from the car and place either wheel chocks or bricks under the rear wheels, or simply put the car on the handbrake so that it does not roll away anywhere. (For information on how to remove a wheel, see the article entitled: “Replacing wheels on a car”)
Note! When the wheel is removed, use a ruler to check the thickness of the disk; if it is below 10.8 mm, then the disk needs to be replaced, but if it is not much higher, for example, 12.0 mm, then in this case it is up to you to change or not change the disk you, but in such a situation it won’t take a very long time to reach the critical point! (Be sure to check the thickness of the disk in at least three places)
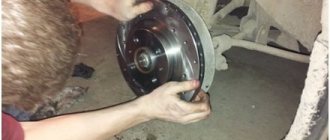
2) Now look under the caliper, at the back you will see (Indicated by arrows) two bolts that will attach it to the steering knuckle, so you will need to completely unscrew these bolts and thereby remove the brake caliper from the car, without removing it you can remove it yourself disk from the car.
Note! When the bolts that hold the caliper are unscrewed and the caliper itself is removed, the first thing you will see is that some kind of hose is connected to the caliper and thus you will not be able to completely remove the caliper, so you don’t need to unscrew this hose and completely remove the brake caliper from the car, you just find a rag or some kind of wire in your garage or car and use it to hook the caliper behind the telescopic strut spring, as shown in the small picture above!
3) After this operation, you will need to take WD-40 lubricant or something similar and apply it to the guide pins (Indicated by red arrows), and to the part where the disc itself connects to the hub (The place where the brake disc connects with hub, indicated by four blue arrows).
Note! This lubricant is applied only to unscrew the guide pins and it was much easier to remove the disc itself from the hub, because from time to time rust forms in all places in the car, especially what starts to rust first is what is below and has at least some kind of contact with road dirt, and what has contact (Especially in winter) with road dirt? Of course, this is the bottom of the car and the brake system, so you need to lubricate all these places with lubrication, which are indicated by arrows in the photo above!
4) So, when you lubricate the guide pins with grease, pick up a wrench or an extension with a socket head and completely unscrew both of these pins and then put them aside in some kind of box so that they don’t get lost, or put them in the car.
5) And at the end of the operation, grab the disc with both hands and try to pull it from the car, but essentially this method is pointless, so if you have a rubber hammer or something similar (In principle, a regular hammer will do, only for them you need to hit it more carefully without breaking the disc itself), take it in your hands and twist the brake disc in a circle, hit the hammer on the back side of the disc in different places so that it first comes off the hub a little in one part, then a little in another and so on, this is how you remove the disc from the car.
Note! There is no need to hammer with all your might just one place on the discs, it will be pointless, so be sure to twist it!
Installation: Install the new disk in its place in the reverse order of removal.
Note! If you reinstall the old disk, pay attention to the fact that a bead has formed on its edges; you will need to remove this bead with a file and thereby make the disk even!
Additional video: For more information on how to replace a disk on a car, see the video posted below:
Source: vaz-russia.com
Brake discs for VAZ 2109
The VAZ 2109 has disc front brakes and drums on the rear axle. During operation, consumables wear out, so they need periodic replacement. You can install new disks yourself, following the car manufacturer's recommendations for installation and product selection.
Original brake discs for VAZ 2109 and 21099 have article number 2108-3501070. Their price is more than 1100 rubles. The discs are unventilated, so they often overheat with an active driving style. Because of this, the intensity of stopping the car is reduced, and there is also a risk of boiling of the fuel fluid and warping of the brake system elements.
The automaker does not require periodic replacement of original discs depending on the mileage. The service life of consumables is determined by their permissible thickness, which is 10.8 mm. When wear reaches the limit, further operation of the vehicle is not recommended, as there is a risk of brake failure due to disc damage.
Wanting to get rid of the shortcomings of non-ventilated consumables, car owners install products with catalog number 2110-3501070. The discs are not completely interchangeable, so the brake system needs to be modified with the installation of parts from older generations of VAZ. The ventilated consumable allows you to overcome long descents and perform intense braking without the fear of overheating the pads and discs.
see also
How to check your car brakes
- 1 0 734
Brake cleaner
- 4 2 18k
Which brake discs are better?
- 181 3 82k
Brakes jerkily
- 70 0 77k
How to eliminate braking after releasing the brakes?
- 0 2 2k
The VAZ 2109, popularly simply “nine”, can be safely called a cult car that came to us from 1986.
and still travels on the roads. Cars, as a rule, have a decent mileage and, like it or not, problems appear. One of the significant troubles is the deterioration of braking. This problem may be caused by a worn or damaged brake disc. Non-ventilated brake discs R13 were installed from the factory:
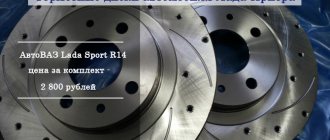
- 2108-3501070 - front brake disc, non-ventilated, cost from 898 rubles.
Brake disc Ate 24031201251
Brake discs are installed only on the front axle. At the time the VAZ 2109 was created, these were absolutely normal wheels, but time passes and technology does not stand still. Due to the lack of ventilation, such disks overheat very strongly and quickly . As a result of overheating, the brakes begin to slip, the brake fluid overheats, as a result the pedal goes down, and even if the brakes do not disappear completely, the braking distance increases greatly.
Simply put, such discs are obsolete. Today it is desirable to install ventilated disks and the easiest option is to install disks:
- 2110-3501070 — front brake disc, ventilated, cost from 3,758 rubles.
However, it is not possible to simply change it, because... the disc is thicker than usual, the protective casing, brackets and palms will need to be replaced. Ventilated discs are many times better than standard ones; you don’t need to be an expert to feel the dramatic improvement in braking reliability and comfort . Thanks to ventilation, the discs heat up less and cool faster, which increases the reliability of the brakes.
Along with the originals, you can select analogues. We will not consider the whole variety of little-known brands, but will focus on the most popular ones.
- Bosch 0986479R61 Brake disc, cost from 801 rubles.
- Bosch 0986479082 Ventilated brake disc, cost from 943 rubles.
Good, durable discs provide predictable braking. Bosch discs are difficult to overheat. The main disadvantage is that Bosch employs dozens of factories and there is a possibility of defects, so you need to carefully inspect the discs when purchasing and ask about the country of manufacture.
- Ferodo DDF215 Brake disc, price from 971 rubles.
- Ferodo DDF1142 Ventilated front brake disc, cost from 975 rubles.
Ferodo brakes softly and clearly. No hint of creaking. Compared to the original, the brakes are noticeably better, the wheels do not lock . Reasonable price and availability make these discs a good alternative to the original ones.
- Ate 24.0312-0125.1 Brake disc, “PowerDisc”, cost from 1280 rubles.
- Ate 24.0120-0186.1 Ventilated brake disc, cost from 1626 rubles.
At first glance it may seem a little expensive. And indeed, Ate discs are more expensive than the original ones, but you won’t regret the money spent. The car stops noticeably better, the discs are not prone to overheating and deformation. The discs have an impressive service life and also provide high quality and reliable brakes throughout its entire duration. You'll have confidence in your brakes when you choose Ate brake discs.
The VAZ 2109 is designed for R13 wheels, but you can also install R14 from the VAZ 2110, for this you will need to replace the protective cover, brackets and “palms”. And, of course, you must have R14 wheels installed. After such a replacement, you will be able to use any wheels from the VAZ 2110.
Prices are indicated for Moscow and the region as of winter 2016.
Required tools and materials for replacing front discs
In order for the replacement of front brake discs on a VAZ 2109 to be successful, you must first prepare the tools and materials from the list below.
Table - Tools and materials required to replace front discs
| Tools and materials | Note |
| Socket wrench | “at 17” |
| Spanner | “on 7”, “on 17” |
| Hammer | Medium or large sizes for knocking the brake disc out of place |
| Spacer | Made from wood, durable plastic or soft metal |
| Wire brush | For cleaning work surfaces from dirt |
| Penetrating lubricant | Under the influence of temperature and the influence of an aggressive environment, sticking of the threaded connections of the brake mechanism occurs. Therefore, to replace the disk, it is necessary to generously spray the detachable connections with penetrating lubricant. |
| Balloon wrench | To remove the front wheels |
| Jack | To lift the car |
| Copper grease | To reduce the risk of the brake disc sticking to the hub and facilitate the subsequent replacement of consumables. Also performs minor anti-corrosion functions. |
Advice from the experts
When dismantling VAZ 21099 brake discs, you need to handle the working surface very carefully. It is prohibited to oil it, there should not be the slightest damage. Any oil that accidentally gets in can be removed with a clean rag pre-moistened with thinner (white spirit).
Perforated parts are allowed to be installed in vehicles. They differ from standard ones by high heat removal from the working surface area. The result is stronger and more reliable braking.
Replacing front discs on a VAZ 2109
Replacing the front brake disc on a VAZ 2109 is carried out according to the step-by-step instructions below.
- Secure the car by braking it with the handbrake and placing shoes under the rear axle.
- Remove the front wheel.
- Unscrew the caliper fasteners.
- Remove the caliper.
- Unscrew the fixing disk guide pins.
- Pull the disc towards you. If dismantling fails as a result of sticking, it is necessary to strike the disk through the spacer, turning it periodically. If reuse of the consumable is not expected, you can hit it directly with a hammer.
- Removing a disk stuck to a seat
- Clean the footprint and install a new disk.
- Reassemble everything in the reverse order of removal.
- Check the operation of the brake system. Decreased machine stopping efficiency is normal. After installing a new disc, it takes time to grind it into the pads. During break-in, the braking force is less than nominal, so the stopping intensity decreases.
Review of rear brakes on the VAZ 2109
As standard, the rear axle of the VAZ 2109 has drum brakes. They do not use disks. Therefore, there are no original discs or their analogues for the original rear brake system of the VAZ 2109.
Wanting to improve braking efficiency and the aesthetic appearance of their car, owners independently install disc brakes on the rear axle. This action is illegal in most cases.
At the same time, due to improper installation, very often there is a deterioration in the car’s handling, lack of braking control, the car skidding or being thrown out of its lane. The main reasons not to replace drum brakes with disc brakes are:
- The need to adjust the braking forces. If they are distributed incorrectly, the rear wheels jam. Braking becomes uneven, the car constantly skids.
- Problems with technical inspection. Self-installation of discs on the rear axle is illegal to make design changes to the brake mechanisms. Therefore, MOT may be denied.
- Problems on the road. The traffic police do not particularly control the rear brake mechanisms, but if discs are found there, it is even possible to evacuate the car.
- Problems with the handbrake. Installing a disc mechanism requires removing the elements of the standard parking brake.
Source: zapchasti.expert
Methods for selecting new parts
When you plan to install new VAZ-2109 brake pads, you need to buy and replace a complete set, 4 pcs.
Partial replacement will lead to uneven braking of the front part of the car, which will cause the car to drift away from a straight path on a dry road, and will lead to a skid on a wet road.
Below is a list of recommendations on which brake linings should be chosen in a store during a visual inspection of the products:
- With a flat plane adjacent to the working part of the disk. Small indentations and chips at the ends are allowed, the size of which does not exceed 1% of the area of the entire working surface.
- Products with a uniform surface, without obvious foreign impurities.
- No friction material cracks.
- The material should not peel off from the base.
- Products in high-quality packaging, accompanied by instructions for use.
It is quite difficult to figure out which pads are better by manufacturer due to the large number of the latter.
But there are brands whose products have been tested by VAZ-2109 users and can be recommended for use: