Replacing gaskets in the main power unit takes a lot of time and effort, since, as a rule, it is necessary to dismantle most of the parts. This process is not considered easy, and not every motorist can do it. Replacing the cylinder head gasket on a 16-valve VAZ-2112 engine is more difficult than on an 8-valve engine.
Video about replacing the cylinder head gasket on a VAZ-2112 16V below:
The video shows the process of replacing the head gasket of a VAZ-2112, and also contains basic recommendations and nuances.
Cylinder block and connecting rod-piston group (SHPG)
This is the main part of the engine in which the energy of burned fuel is converted into mechanical energy. It consists of a cylinder block, pistons, connecting rods, connecting pins of support bearings, a crankshaft and half rings that limit the displacement of the latter relative to its axis.
The VAZ 21124 engine with 16 valves is equipped with a “high” block 11193, which received its nickname due to its size. It is cast from cast iron, and then it is machined to accommodate the cylinders. Its height is 197 millimeters (from the axis of rotation of the crankshaft to the top edge). It is 2.2 mm higher than the cylinder block used in the 21120 engine. This increase allowed the displacement to be increased to 1.6 liters without increasing the cylinder diameter. The block is also distinguished by a reduced size of the holes for the cylinder head mounting bolts.
The crankshaft (catalog number - 11183 -1005016), like the block, is cast from cast iron. The journals (points of contact with other parts) are polished and holes are drilled in them to lubricate the support and connecting rod bearings. To reduce vibration from rotation, 8 counterweights are installed on the shaft, shaped like half a disk.
The connecting rods are forged from steel and consist of two heads - upper and lower. At the top there is a bushing made of steel-bronze alloy for attaching the piston. Liners (sliding bearings) are pressed into the lower one. The connecting rod is attached to the crankshaft using a cover and 2 bolts.
The pistons installed in the VAZ 21124 16 valve engine were developed specifically for it. They are cast from aluminum, and at their end there are 3 grooves for installing 2 compression rings and one oil scraper ring. There are 4 recesses 5.5 millimeters deep on the piston bottom (the side in contact with the valves)
This measure adds another important property to the engine - the safety of the valves in the event of a timing belt break or improper installation. For this modification, the owners call the motor “plugless”
The pistons are cooled using oil nozzles installed in the main bearing supports.
Severe wear of this part of the engine leads to a severe deterioration in the performance of the VAZ 21124 engine, up to the impossibility of starting.
Engine 2112 characteristics
Years of production - (1997 - 2004) Cylinder block material - cast iron Power system - injector Type - in-line Number of cylinders - 4 Valves per cylinder - 4 Piston stroke - 71mm Cylinder diameter - 82mm Compression ratio - 10.5 Engine displacement 2112 - 1499 cm cube Engine power 2112 – 93 hp. /5600 rpm Torque - 128 Nm / 3700 rpm Fuel - AI95 Fuel consumption - city 8.8 l. | track 5.5 l. | mixed 7.2 l/100 km Oil consumption - 50 g/1000 km Weight of the VAZ 2112 engine - 127 kg Overall dimensions of the 2112 engine (LxWxH), mm - Oil for the VAZ 2112 engine: 5W-30 5W-40 10W-40 15W40 How much oil in engine 2112: 3.5 l. When replacing, pour 3.2 liters.
Resource: 1. According to the plant – 150 thousand km 2. In practice – 250 thousand km
TUNING Potential – 400+ hp. Without loss of resource - up to 120 hp.
The engine was installed on: VAZ 21103 VAZ 2111 VAZ 2112
How to find out if the cylinder head gasket is blown
The greatest difficulty for many car owners is to determine that the cylinder head gasket is the cause of the problem.
To check, follow these steps:
Start the engine and inspect it
Pay attention to the presence of smoke from the gap between the head and the cylinder block itself. During operation there should be no ringing or other suspicious noises that have not previously been observed. Inspect the expansion tank of the cooling system, the container for filling the lubricant and the radiator cap for the appearance of a reddish emulsion
If the lubricant gets into the antifreeze, traces of the emulsion can be seen on the cap of the expansion tank and radiator tank. Check compression in different cylinders. Its sharp decrease may indicate a broken gasket; also read why different compression occurs in the cylinders. Start the engine, let it run and look at the condition of the exhaust gases. The appearance of thick white smoke often indicates damage to the element in question. Pay attention to the smell of smoke. If you use antifreeze in the cooling system, it will be slightly sweet. Check the fluid level in the expansion tank. Its decrease indicates a problem. Measure the engine oil level. If antifreeze gets into the lubrication system, you may notice a rise in the level above the MAX mark. Open the radiator/expansion tank cap and check the coolant for gas emissions. For diagnostics, you can use a rubber glove or bag (we will discuss this in detail later).
Additionally, pay attention to the signs of a broken gasket, which were mentioned at the beginning of the article.
Frequency and reasons for replacement
According to official regulations, the cylinder head gasket of a VAZ 2112 engine can last 200 thousand kilometers. Usually, after traveling such a mileage, the service life of the seal is exhausted.
For what reasons may it be necessary to replace it:
- Natural wear and tear. Any part or machine assembly has a certain service life. Natural wear and tear cannot be avoided.
- Damage to the cylinder head, deformation or deflection. This may cause the gasket to break and hot coolant to get onto its surface.
- Boiling of the power unit. Regular driving of a car with an overheated engine will cause damage to the sealing element.
Head seal damage
Signs of replacement
By what “symptoms” can you understand that it’s time to change the BC head gasket:
- Leakage of motor fluid or coolant at the junction of the head connection with the block itself. If you see oil stains at the point of contact between the cylinder head and the cylinder head, diagnose the condition of the power unit.
- White smoke comes out of the exhaust pipe of the car, almost steam, uncharacteristic of exhaust gases. This indicates that coolant has entered the engine cylinders.
- The presence of foam in the area of the neck of the expansion tank in the engine compartment of the car. The substance foams as a result of exhaust gases entering the cooling system through a broken seal.
- The presence of greasy oily spots in the antifreeze, which indicates a poor connection and lack of tightness.
- A white coating has appeared on the engine fluid level dipstick. This indicates that refrigerant has entered the lubricant. This is usually the result of a damaged gasket.
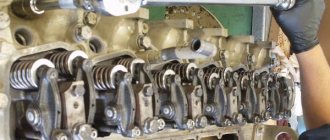
Cleaning valve channels
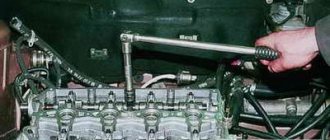
To remove any valve, you will need to remove the camshaft. All screws on the bearing housing must be unscrewed evenly and tightened with a force of 10 N*m. The hydraulic compensator can be removed with a magnet, and then the valve is desiccated by compressing the spring with a puller (see photo).
How to remove the valve
There may be carbon deposits in the valve channels. It is cleared:
- Flat screwdriver;
- Sanding felt.
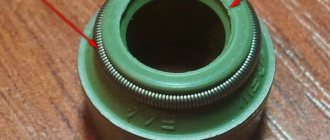
Grinding is carried out as follows: a rubber pipe is placed on the valve, a paste with diamond chips is applied (one drop), then the valve is pressed into the channel and scrolled. It will also be possible to change the valve stem seals (2112-1007026). You can’t do this without a special puller.
Cap puller
On any car, including the VAZ-2112, cylinder head repair comes down to cleaning and checking, as well as correcting geometry defects. In the latter case we are talking about milling. The presence of cracks and chips is a reason for replacement, not repair.
A small photo report
A burnt valve is immediately visible.
One valve burned out in cylinder 2
Carbon deposits were found in each valve channel.
Carbon layer in the cylinder head channels
Repair: cleaning all channels, replacing the valve with lapping. Direct repair of the VAZ 2112 cylinder head will require several operations that require some special equipment. Of course, this is not possible at home, and car enthusiasts simply replace worn parts. Next, we will consider the process of repairing the block head, as well as some of the nuances associated with this work.
Stages of block head repair
Before proceeding directly to the cylinder head repair process, it is worth noting that the head must be completely disassembled and all the necessary spare parts purchased. Let's consider the process of complete overhaul of the cylinder head.
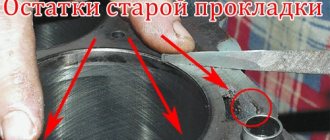
Washing and crimping
The process of washing automobile spare parts with hot kerosene
In order to wash the head, it must be completely disassembled, that is, all parts that can be easily removed must be dismantled. For a complete wash you need 12 liters of hot kerosene. At car services, this is done using a sprayer that supplies liquid under pressure. This way, all the dirt and remaining metal shavings are washed away. The washing is carried out until the cylinder head is completely clean.
The process of crimping the cylinder head
Crimping is a process in which the integrity of a part is checked. Pressure testing can be carried out in two ways, which are basically similar. The first is to close all the cracks and fill the part with water. If there is water leaking or leaking somewhere, then the integrity has been compromised and repairs are necessary. The second method is to close all the cracks and immerse the head in an aqueous solution. It will be immediately obvious where the part is depressurized. If the integrity of the head is damaged, it must be restored.
Removing saddles
Before moving on to the rest of the overhaul steps, the valve seats must be removed. In the best case, they will easily be knocked out of their seat, and if not, then you will have to use Russian ingenuity.
The valve is welded to the seat and knocked out of the seat
So, what to do if the valve seats do not come out? The solution is simple. It is necessary to weld a tube to them so that the working end passes through the channel of the guide sleeve and knock it out until the seat comes off the mounting mount. Of course, cracks may form on the seat ring or a piece may break off. After completing the procedure, it is necessary to inspect the place and, if necessary, weld it with argon welding.
Features of tightening fasteners
Even a non-professional can handle this work. It is important to follow two rules - the tightening torque and the sequence of working with fasteners. The tightening torque on engines with 8 and 16 valves is no different, while the sequence is different. Pay attention to the diagrams below; numbers indicate the order of tightening the bolts.
It is necessary to pay attention to the cylinder block:
- if during operation the bolts become loose due to vibration (the malfunction is detected by leakage of the gasket);
- after dismantling the cylinder head and installation;
- if the iron gasket is replaced;
- during tuning of the cylinder block.
Before work, take the instructions from your Priora to understand which engine is installed in the car.
Camshaft replacement process
Camshafts with gears and fasteners
In order to install camshafts on the VAZ-2112 16 valves, they must first be dismantled. Like any spare part, they are installed in the reverse order from disassembly.
So, let's look at the step-by-step process of removing and installing the intake and exhaust camshaft.
Removing camshafts
- To begin with, as with any repair operations, it is necessary to remove the “minus terminal” from the battery.
- Remove the timing belt cover.
After unscrewing the mounting bolts indicated in the diagram, remove the timing cover
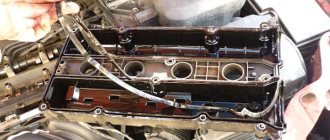
Unscrew the fastening nuts and remove the valve cover.
Disconnect the emergency oil pressure sensor
Scheme for dismantling and tightening the camshaft bearing housing bolts
You need to be careful with the camshaft plugs; if you install them incorrectly, oil will leak out. If you don’t notice it in time, you’ll shorten the engine’s lifespan or end up in need of a major overhaul.
Remove the two rear cylinder head plugs
We remove the camshafts from their seats
Remove the seals from the camshaft. If it does not come off, carefully cut it or pry it off with a screwdriver.
Installation of camshafts
Now that everything is removed, you can proceed to installing new camshafts on the car:
- Lubricate the cams and shaft support journals with engine oil.
Lubricate the camshaft journals and cams with engine oil.
The intake camshaft is shown on the left and the exhaust camshaft on the right.
How to apply sealant to the camshaft bearing housing cover
We press new oil seals onto the camshafts
Choice
Original catalog numbers: inlet - 2112-1006015, outlet - 2112-1006014. Each camshaft costs an average of about 3,000 rubles.
Nuances
When installing the bearing housing and cylinder head, do not apply sealant that contains silicone. This is due to the fact that the motor heats up, and accordingly the sealant heats up, which releases vapors that can get into the cylinders and further through the system. You should use a sealant whose instructions or packaging indicate that it is safe for the oxygen sensor.
Step-by-step replacement of a worn part
As mentioned earlier, you can replace the gaskets in the VAZ-2112 of 16 valves yourself if you do all the work in stages:
- Disconnect the terminal from the car battery.
- Drain the coolant into a prepared container.
- If you need to carry out repairs on a car that has just been in operation, then the pressure in the fuel system must be relieved. To carry out this manipulation, it is necessary to disconnect the wires that go to the fuel pump from all connecting wires of the machine.
- The exhaust pipe is disconnected from the manifold.
- Proceed to remove the thermostat.
- As soon as the connecting fasteners of the thermostat are unscrewed, the part should be redirected to the side to make it convenient to dismantle the non-separable head, since only the gaskets of the 16 VAZ-2112 valves need to be replaced.
- The bearing housing and fuel system frame must be removed along with the cylinder head.
- The sensors that indicate the oil pressure level are removed from their permanent location.
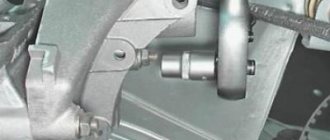
- Using a key, unscrew the fasteners that secure the timing belt and remove the tension roller.
- Using an additional tool, it is necessary to fix the toothed pulley so that it cannot change its position, then the fastening element is removed and removed along with the connecting washer.
- The pulley is removed from the camshaft using two reliable screwdrivers.
- The fasteners that secure the temperature sensor and the system responsible for cooling are unscrewed.
- The last stage of the process of replacing the cylinder head gasket in a 16-valve VAZ-2112 engine is to remove all the unscrewed bolts along with washers from the unit, and along with the unit you also get a burnt gasket, which must be replaced immediately.
Possible consequences
Leakage of lubricant through the oil seal is not dangerous only for the time being:
- Don’t forget about the dangers to the engine of oil leakage from the lubrication system: firstly, increased wear due to the parts running dry, and secondly, oil consumption for topping up, the price of which is also a pretty penny
- The timing belt can jump over a pulley tooth and even several teeth at once, all due to oil getting on the belt teeth caused by leaking camshaft oil seal, which causes an oil film to form on the timing belt
- If lubricant gets in (lubricant is a chemical), the belt begins to spread and can break under load at full speed of the car, you can imagine the consequences
- Therefore, if even minor oil stains are detected on the timing belt casing, it is necessary to immediately determine the cause of the stain.
A little about what an oil seal is in general:
An oil seal is a rubber-metal cuff that serves to seal the rotating parts of units and prevents liquids (lubricants) from leaking out of them. The name “seal” comes from ancient cars, where instead of a cuff, felt lubricated with lard (grease) was used. The cuff has a special edge, which when rotated creates a turbulence that prevents lubricant from flowing out of the unit. It is important not to confuse the direction of rotation (there are left and right cuffs), otherwise a new ideally installed cuff will leak
This is interesting: How to close the starter directly on a VAZ-2114 - photo and video
Which gasket material is better?
Gaskets made of different materials
When replacing a gasket, many car owners have a reasonable question: which gasket is better - metal or paronite? Each of these materials has its own advantages and disadvantages. At the same time, you need to understand that if the manufacturer recommends using gaskets made of a certain material, then you must adhere to these requirements.
As a rule, a metal gasket is stronger than its paronite counterpart. Therefore, it is advisable to install it on powerful turbocharged or forced engines. If you do not plan to tune the engine of your car, but simply operate it in a gentle mode, then the choice of material does not matter much to you. Accordingly, a paronite gasket is quite suitable. Moreover, this material is more flexible and is able to adhere more tightly to work surfaces.
Also, when choosing, it is necessary to take into account that the material from which the gasket is made does not have a primary impact on its service life. A much more important indicator is how the gasket was installed. The fact is that there are very thin walls between the individual groups of holes. Therefore, if the gasket is not installed exactly in the seat, then there is a high probability of burnout even in the strongest material.
The most obvious sign that the gasket was installed incorrectly is its rapid failure. Also, if you installed it incorrectly, the car may simply not start. In diesel engines, the knocking of the pistons may also be heard. This happens because the piston touches the edge of the gasket.
Conclusion
If you have a broken cylinder head gasket, then it is not advisable to drive a faulty car. Therefore, we recommend that if you discover a gasket pierced, replace it immediately
In addition, it is important not only to detect the very fact that it is broken, but also the reason for this. In particular, why the engine overheats or other malfunctions occur
During the replacement process, monitor the torque on the mounting bolts. Timely replacement of the cylinder head gasket will save you from large financial expenses on repairing more expensive components. The longer you drive a car with a blown cylinder head gasket, the more likely it is that other, more expensive and important engine components will fail.
1) Don’t drive far and don’t drive
You can overheat the engine. Repairs will cost a pretty penny
You can’t kill the engine, if the gasket is blown, then firstly, antifreeze can go into the oil pan, and secondly, gases can go into the cooling system, which will lead to overheating of the engine, the cylinder head or block may burst,
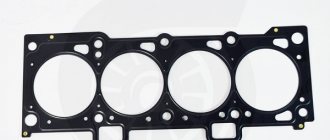
A car engine has two important parts: the cylinder block and the cylinder head (cylinder head). And their connection to each other is sealed with a cylinder head gasket. Its main task is to seal combustion chambers and channels through which antifreeze circulates. When the cylinder head gasket is punctured, problems appear in the engine, which we will discuss in this article.
Cylinder head gaskets are usually made of thin sheet metal or reinforced paronite with metal edging for the combustion chamber holes. The walls between some of the holes in the gasket are quite thin, so the slightest mistake during installation or replacement will lead to their rapid burnout.
The easiest way to check if the cylinder head gasket is blown is shown in the video at the bottom of the page.
The main guarantee of the durability of the cylinder head gasket is the ideal contact plane between the head and the cylinder block. Adjacent surfaces must be clean, free of holes and roughness.
The second important point for extending the life of the gasket will be to follow a certain order of tightening the cylinder head bolts. For this, motor manufacturers, as well as gasket manufacturers, provide a diagram for screwing in fasteners indicating the tightening torque.
Engine lubrication system design
Let's look at the purpose and operation of individual nodes.
- The oil pump builds up pressure in the lines, with its help the liquid enters the oil filter from the sump, and is distributed throughout the system in a purified form. The pump is connected to the engine crankshaft and runs immediately after starting.
- Drain hole for draining the crankcase when changing the oil.
- The oil intake is a socket through which liquid is sucked into the pump. Located in the lower part of the crankcase to prevent oil starvation when the level drops.
- The bypass valve returns lubricant to the oil pan if the passage of a dirty filter interferes with normal circulation.
- Spray points on working units (original nozzles for creating oil mist). When the spray points become clogged, the lubrication regime is disrupted, so there should be no insoluble debris in the liquid (it remains in the filter cartridge).
- Oil line. It can be made in the form of tubes or special channels in the engine housing. Slag deposits interfere with the patency of the channels, so detergent additives are added to the lubricant.
- Filler neck (shown conditionally). It is used to top up or replace fluid.
- Oil radiator valve (tap). In summer it opens for additional cooling.
- Lubricant cooling radiator. Not present in all car models.
- Oil filter. It is a metal cylinder that can withstand high pressure. Inside there is a filter cartridge made of special paper or synthetic materials.
To monitor the state of the system, a number of sensors are integrated into it:
- temperature;
- pressure;
- in some designs - level;
- filter cleanliness (the same pressure sensor, only located directly on the flange of the filter element).
During normal operation, the engine maintains constant pressure. Malfunction of the system leads to a sharp increase in wear, temperature of parts, and engine jamming.
Please note As can be seen from the operating diagram, replacing oil with “magic” additives, which supposedly allow you to work “dry”, cannot provide all the functionality of the fluid. Therefore, you should not experiment with such chemistry
Meet the model
With the new engine, the unit was given the name VAZ 21124, this car intensively fights against the ecology of the external environment. In addition to everything, when the car starts, the traction at the bottom has become noticeable, and the engine now runs calmer, without large jumps. We often hear questions from owners of 16-valve engines: “What needs to be done to prevent the valves from bending in the piston?” In Veil 21124, this task will not exist for you, in the bottom of the piston there are holes and sports shafts that keep the rise of the piston under control, and don’t let the knocking and noise of the VAZ 21124 engine frighten you, this is its normal environment.
Is it possible to drive with a broken cylinder head gasket?
Car owners often ask whether it is possible to drive with a broken cylinder head gasket. It is not always possible to immediately fix the problem, for example, when the malfunction occurs on the road or far from a service station.
Experts say that it is impossible to travel in such a situation. This is especially true if antifreeze gets into the oil or vice versa. The only way out is to move only in tow. If you ignore this requirement and drive even 200-300 km, the engine may need to be overhauled.
In a situation where oil and antifreeze do not mix, driving a short distance is allowed. Here we are talking about minor damage, but it is necessary to monitor the engine temperature and coolant level. After all, if the gasket is punctured from the inside, then there is a high risk of damage to the valves and pistons as a result of antifreeze getting into the cylinders.
Recommendations regarding cylinder head assembly
Before you begin assembling all components, you should remove any contamination that could remain due to burnt consumables. There should be no oil stains or other stains on the threads. New gaskets are installed in such a position that their outer part is directed towards the bushings.
Before installing the cylinder head in a permanent place, you should carefully check the correspondence of all marks relative to the shafts. All bolts must be tightened firmly and securely; for this, a tool of suitable size and shape must be used.
Installation and dismantling procedure
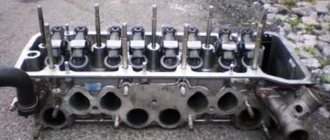
The part called the cylinder head is attached to the cylinder block with 10 screws. They are unscrewed with a 10mm socket wrench. The procedure for dismantling the cylinder head is shown in the first photo.
Reversal sequence (1-10)
The standard screw length is 93 mm. If the screw has been pulled out to at least 95 mm, it is replaced with a new one (AvtoVAZ requirement).
During installation, a different scheme is used (photo 2). Each screw is lubricated with machine oil, otherwise the efforts will be reduced to nothing.
The order of tightening the head is indicated in this photo
Tightening torque for cylinder head cover bolts
For VAZ-2112, the cylinder head tightening torque is standardized:
- First pass – the force is 20 N*m;
- Each screw is turned 90 degrees to the right;
- Wait 20 minutes, then turn the screws another 90 degrees.
At first the effort is very small. But at “step 3” it will be difficult to cope with the work. Use the lever.
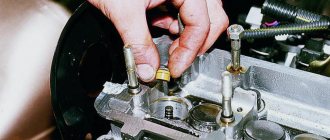
Why are guide bushings needed?
Before installing the cylinder head, perform the following steps: clean the threaded holes, as well as all holes for the bushings (photo 1). Each bushing is installed in place, and only then a gasket is placed on top.
Everything is ready to install the cylinder head
Metal parts adjacent to the gasket must be degreased. We looked at the cylinder head tightening diagram, but the cylinder head itself must be installed correctly:
- We place the cylinder head on the cylinder block;
- By moving the part in different directions, we ensure that the bushings fit into the recesses.
After “step 2” the screws can be tightened.
Sealant
No sealing compounds are used when installing the gasket! Solidol, CIATIM and other lubricants are not even needed. The main thing is that the metal must be degreased. And the cylinder head gasket must be new.
Hi all.
Last fall I noticed drops of oil in cylinder 4 and leaks around the entire perimeter of the valve cover.
I've been through the winter and it's time to fix the problem. I change everything together as usual. What we need:
1) Anaerobic sealant “Locktite” 20 ml - 150r2) Camshaft oil seal BRT (cat. number 21080-1005034-00) 2 pcs. - 240r per pair 3) Camshaft plugs 2 pieces (cat. number 21120-1003290-00) - 100r pair4) Crankcase ventilation pipes for engine 21126 (21126-1014240-00 (E-gas) - thin long, 21124-1014058-00 upper small, 21120-1014056-00) lower large - 3 pieces - 250r set5) Filter “ Knecht” KL23of - 150r6) Carburetor cleaner - 150r7) Intake manifold and throttle gaskets - 150r set BRT8) Oil dipstick seal (cat number 21120-1009078-00) - 30r9) Torque wrench
I don’t see any point in describing the entire process of disassembling the valve cover. There are plenty of manuals, I’ll only focus on the moments that cause difficulties
Remove the decorative cover
We remove all wires, ventilation hoses, and throttle. The receiver is secured with 2 bolts and 3 nuts. The nuts with the left bolt unscrew easily, you can crawl up. But there is a problem with the right bolt; the generator does not work.
I have a car with air conditioning, the pipes are in the way. There are two bolts near the gene; we remove them (the bolts are visible in the photo). When you remove the intake manifold, you need to bend the tubes, don’t be afraid to bend them, there are rubber inserts. Remove the generator belt, unscrew the top fastening and carefully move the gene towards the radiator with a pry bar.
Many motorists have heard that it is necessary to correctly tighten the threaded connections on the 16-valve VAZ-2112 engine, but they have never done it themselves. Thus, the tightening torque is determined by the manufacturer and is indicated in the service repair manuals.
Video about installing camshafts and split gears on a 16 valve engine
Dismantling the cylinder head
First of all, to get to the cylinder head, you need to remove the cylinder head cover. For different 16-valve engines, this operation is different, and the cover part numbers also look different: 2112-1003260 (-10) and 21124-1003260.
Engine cover VAZ-21124 (1.6 l)
You will also need to remove the timing belt - there are no differences between different engines.
Let's look at how the exhaust manifold can be detached from the cylinder head. On engine 21120:
- Remove the exhaust pipe of the muffler: unscrew two nuts 1 (key “13”), remove the clamping bar, unscrew six nuts 2 (key “14”) and dismantle, not forgetting to turn off the oxygen sensor. The photo shows three of the six nuts.
- Using a “13” wrench, unscrew three nuts 1 to remove screen 4. The bracket holding the hose with antifreeze is moved to the side (two nuts are unscrewed one turn). The screen hides from us 8 nuts that press the manifold to the engine. They are unscrewed and manifold 2 is dismantled.
Now we will talk about engine 21124:
- Disable both oxygen sensors. We unscrew the three nuts securing the protective screen (with a 10mm wrench) and disassemble the bracket by unscrewing the four nuts with a 13mm wrench.
- We disconnect the additional muffler and the exhaust pipe. We also get rid of the bracket holding the hose with antifreeze (see above).
- At the last step, unscrew the 8 “13” nuts holding the manifold to the engine.
Here we believed that the VUT hose was disconnected from the intake module. Finally, the spark plugs are unscrewed on any of the engines (a “16” tubular wrench).
Necessary parts and tools for repair
Troubleshooting the cylinder head begins with the purchase of original parts and various consumables, the list of which is as follows:
- Fuel intake system valve 8 pcs. (art. 21120-1007010).
- Exhaust gas valve 8 pcs. (art. 21120-1007012).
- Set of hydraulic compensators 16 pcs. (art. 21120-1007300).
- Gaskets for valve cover, cylinder head, intake manifold, exhaust manifold (all come as a set art. 21120-1002064-86).
- Bolts securing the cylinder head to the engine crankcase (art. 21120-1003271-018).
- Timing belt (art. 2112-1006040-02RU), timing tension roller (art. KT100507/100513), drive belt for mounted units (art. BP638).
- Engine oil and oil filter.
- Cooling system fluid.
Installation of valves on a VAZ 2112 is carried out using a standard set of tools, as well as several specialized types of keys:
standard set of spanners from 8 to 24 mm; socket sockets in a set from 8 to 27 mm; end internal hexagons; mechanical valve retaining ring remover (depressurizer); torque wrench for tightening the cylinder head and camshaft bolts; paste for grinding valves (set for rough and fine grinding); metalworking cloth gloves to protect hands while working.
The work of replacing 16 valves on a VAZ 2112, the price of which as of this fall is about 50 thousand rubles at AvtoVAZ dealerships (or approximately 35-40 thousand rubles at ordinary car repair shops), is not a very complicated process. You can carry out the work yourself, for which it is enough to purchase the above-described spare parts and the necessary tools.
When is it time to change?
The gasket serves to seal the connection between the head and the cylinder block. There are several types of it:
- Asbestos. The main advantage: minimal shrinkage and excellent recoverability.
- Metal. These are some of the most reliable and high-quality consumables.
New metal cylinder head gasket - Non-asbestos. Used as repair kits. Main advantages: elasticity, heat resistance, elasticity.
The procedure for replacing the cylinder head gasket on a VAZ 2112 16 valves is indicated in the manual, but this is not the main reason. There are a number of signs that determine the need for replacement:
- leakage of engine oil or antifreeze in the connection area;
- white steam present in the exhaust gases indicates that antifreeze has entered the cylinders;
- when exhaust gases enter the cooling system, foam appears at the neck of the expansion tank;
- the presence of oil stains in the coolant indicates a leak in the connection;
- the presence of a white coating on the oil dipstick indicates that there is antifreeze in the engine oil; this may be due to a damaged gasket.
How to change it yourself?
If you read the instructions below, then taking into account all the nuances, you can independently replace the seal on a 16-valve VAZ 2112.
Tools and materials
So, if we change the gasket with our own hands, before performing the task we prepare the following:
- set of spanners;
- fresh engine oil and coolant if consumables are mixed;
- a torque wrench, it will be used to tighten the cylinder head bolts;
- container for collecting waste liquid;
- two screwdrivers - with a Phillips and a flat tip;
- clean rags.
The Basile Fomin channel published a video demonstrating the procedure for replacing the head gasket in a VAZ 2112 engine.
Algorithm of actions
Below we will look at how to remove and install the cylinder head in a VAZ 2112 car to repair the gasket:
The car is driven into a garage with a pit or onto an overpass. You will need easy access to the bottom of the car. Open the hood of the car and turn off the power to the on-board network; to do this, use a wrench to loosen the bolt on the negative terminal of the battery and remove it. The coolant is poured into a pre-prepared container; to do this, the drain plug is unscrewed. If the replacement procedure is performed immediately after a trip, then you should relieve the pressure in the vehicle's fuel line. To do this, press down on the latch and disconnect the cables connected to the fuel pump. Then the intake manifold of the exhaust system is disconnected from the exhaust manifold. The thermostat is being dismantled. To do this, loosen the fastening clamps on the pipes and disconnect them. When the nuts securing the bracket are unscrewed, it must be moved to the side. The cylinder head with camshafts is dismantled. To do this, use a torque wrench to unscrew all the bolts securing the cylinder head. With the head, the housing of the bearing devices and the fuel rail are removed. After this, the engine fluid pressure controller in the power unit, as well as the DPKV, are removed. First, you must disconnect the connectors with wires from these devices. Loosen the tension roller screw and remove the timing belt. The toothed pulley on which the strap is mounted must be secured to prevent it from turning. Unscrew the fixing screw and remove it with the washer. Then, using the prepared screwdrivers, remove the disc from the camshaft. Disconnect all cooling system lines from the car engine, remove the antifreeze temperature controller in the engine. Remove all screws securing the head and washers. The device with the old gasket is removed. The surfaces at the point of contact of the head with the block are cleaned from residual sealing gum and dirt to prevent them from entering the power unit. Clean the threaded holes to remove any remaining coolant and lubricant. A new gasket is being installed along the guide elements. Please note that the hole for the intake of engine fluid must be installed as in the image below. Before installing the BC head, you must make sure that all marks on the shafts match. After installing the cylinder head, the bolts securing it are tightened. The screws are tightened in a certain sequence, as shown in the diagram - first the central parts, then the side ones. The stretching procedure is carried out in several stages. First, all bolts are tightened with a force of 20 Nm. Then the screws must be tightened with a torque wrench to 70-85 Nm
It is important that the moment of force is the same for all bolts. Next, each screw is tightened 90 degrees, and after all the parts are tightened, they must be turned again 90 degrees.
To tighten, be sure to use a torque wrench, since it will not be possible to install the bolts correctly and tighten them without this tool. The procedure for assembling all components and connecting the lines is performed in reverse order. When the installation is completed, the valves are adjusted and the timing belt is tightened.
- Ratchet driver;
- Power wrench;
- Head for eight, ten, thirteen;
- Two open-end wrenches for seventeen;
- Socket wrench for fifteen;
- Powerful magnet;
- Sealant;
- Torque wrench;
- A basin for collecting liquid;
- Slotted and Phillips screwdrivers;
- Open the hood and unscrew the four bolts securing the engine trim. Eight head bolts.
What is this?
What exactly is this gasket?
This is a rubber element that has a certain elasticity. With use and wear, elasticity is lost. This reduces the quality and efficiency of performing the main task of the element - sealing the connection between the cylinder head and the cylinder block.
In order for the engine to work properly and without problems, the gasket must be installed efficiently and reliably. Ignoring its wear will lead to a serious reduction in engine life.
Signs of wear
If your old gasket is worn out, it won't be difficult to determine. There are several characteristic signs of loss of elasticity of a rubber element:
- White steam starts coming out of the exhaust;
- Traces of coolant or engine oil leakage appear at the cylinder head joints;
- Traces of oil appear in the coolant;
- An impressive amount of lubricant accumulates in the pan;
- Foam forms around the filler cap.
To check for the presence of steam in the exhaust gas, you need to remove the cap from the expansion tank with coolant and put the bag on the neck. If after a short period of operation of the power unit the bag inflates quickly, the gasket is worn out and therefore needs to be replaced.
How to properly remove valves
Before you begin, you need to prepare the appropriate tool. In particular, to replace you will need:
- Set of socket and open-end wrenches.
- Torque wrench.
- Spare parts for replacement (new set of valves, gaskets if oil seals need to be replaced, etc.)
- Container for draining antifreeze.
Initially, the machine must be de-energized. This is done by removing the negative terminal from the battery; the next step is to free the cooling system from antifreeze. Drain the coolant into a specially prepared container; releasing pressure in the fuel system. To do this, you need to unscrew the fuel hose fittings. To do this you will need a 17 key; disconnecting the exhaust pipe from the exhaust manifold and dismantling the thermostat; retraction to the side of the bracket. It is held on by several nuts that will need to be unscrewed; removing the cylinder head along with bearings and fuel rail; desiccation. When dismantling the crackers, you must be extremely careful, since they are under high tension on the springs. Therefore, they can simply “shoot” at you; dismantling the valve plate along with the springs
Please note that removing the lower plates may require removing the seal and this also requires a special tool
That's all, actually. The procedure is completed, and then you can begin repair and maintenance work. If you intend to change valves, do not rush to install new ones. Inspect them carefully, because it is quite possible that you will be able to restore them, and they will still serve. At the same time, as a rule, restoration is more often practiced on old cars; on a VAZ-2112 this is not always possible. The reason for this is the quality of old parts, which is considered higher than the current one.
If you do intend to restore a damaged part, it is best to mark the cylinder on which it sat. You should also evaluate the condition of the device guide bushings. After an initial assessment of the condition has been made, repair or maintenance can begin.
Hello) A little about my VAZ 2105 with 16 cells. two-wheel engine. I bought it from a friend with the engine already installed, freshly painted, on 15 chrome wheels. After two years of daily rape of the car, and the final drive into a ditch (I gave it to a friend for a ride(()) with the tearing out of the beam, the car was up for repairs.
Full size before major overhaul I always didn’t like the constant leaking oil from under the oil filler cap and the burning zero filter located above the exhaust manifold. I was surfing the Internet and came across a flat valve cover from Clubturbo.
There on the website they immediately recommended buying an external oil separator as a kit, because... on a standard engine it is located in the cover itself.
Full size External oil separator
Full sizePurchased almost everything you need
Full size We assembled it and started to figure out what the cover, receiver and oil separator would look like
Full size The cover bolts had to be filed
Initially we decided to leave the oil separator here. But. For front-wheel drive cars this might be suitable, but in 16 cl.
the classics would not have come close to it.
Skipping many details of the installation description, here is a photo of what happened. The oil separator is installed on the body, an additional oil sump is installed. The flat valve cover of the clubturbo is poorly made, leaks along the weld seams ((at first I was guilty of a bad gasket between the oil filler nut, but nothing. An oil pressure sensor from the classics was installed. The ignition module was moved to the receiver (they used clamps, I don’t know where to place it) after the previous one failed due to overheating
Full size This is how I ride now. This is my first post, so I apologize in advance if anything is wrong)
Video “Visual instructions for replacement”
You will learn how to change the cylinder head gasket yourself in a VAZ 2112 from a video filmed by the ClubUazFan channel.
Do you have any questions? Specialists and readers of the AUTODVIG website will help you ask a question
Was this article helpful?
Thank you for your opinion!
The article was useful. Please share the information with your friends.
Yes (100.00%)
No
X
Please write what is wrong and leave recommendations on the article
Cancel reply
Rate this article: ( 5 votes, average: 5.00 out of 5)
Discuss the article: