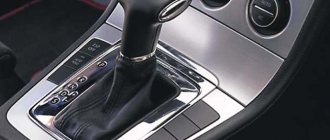
Almost every new car now has an inconspicuous device in the form of a wheel to the left of the steering column. It has several positions and adjusts the headlights. However, few people use this system. Is this option really useless and do sellers take money for it in vain, or does it open up some unknown capabilities of the car that we simply don’t know about?
Photo: Shutterstock.com
How does headlight range control work on a viburnum?
Lada Kalina Cross. LIGHTING CONTROL MODULE AND HEADLIGHT LOW BEAM CORRECTOR
External lighting switch (ELS) 1 (Fig. 34) has three fixed positions (or four in a variant version):
O - When the engine is off, the exterior lighting is off, when the engine is on, the daytime running lights (DRLs) are on;
-side lights combined with DRL are on;
– the side lights and low or high beam headlights are turned on, depending on the position of the light signaling switch (see the section “Light signaling switch”).
– in a variant, in this position, the side lights and low beam headlights turn on and off automatically depending on the state of external lighting. The light sensor is combined with a rain sensor and is located on the windshield behind the rear view mirror. The automatic control system for external lighting (lighting system) allows you to turn on and off the side lights and low beam headlights of the vehicle depending on the level of external light. For example, at dusk, as well as when entering a tunnel or garage.
The lighting system only works when the ignition is on. It must be remembered that when the lighting system is operating, the high beam headlights do not turn on for a long time. To turn on the high beam headlights for a long time, you must first move the PNO switch to the “Low beam headlights” position.
The inclusion of external lighting by the automatic control system does not relieve the driver of responsibility for compliance with safety requirements and traffic regulations.
Switch for low beam headlight control. Before operating the vehicle with the low beams on, make sure that the headlights are in the correct position.
handles 3 of the electric low-beam headlight range control depending on the loading state of the vehicle:
0 – driver or driver + front passenger;
1 – driver + 4 passengers or driver + cargo in the luggage compartment up to 100 kg;
1 1/2 – driver + 4 passengers +
cargo in the luggage compartment up to 50 kg
If necessary, adjust the inclination of the light beam of the low beam headlights by turning the handle to align the handle mark with one of the marks on the scale corresponding to the vehicle loading state.
For modification of LADA Kalina Cross cars:
0 – driver or driver + front passenger;
1 – driver + 4 passengers or driver + cargo in the luggage compartment up to 100 kg, or driver + 4 passengers + cargo in the luggage compartment up to 50 kg.
When installing the electric corrector handle in a position outside the recommended scale markings, asynchronous tilting of the low beam beam of the right and left headlights is possible, which is not a defect. Warning
Correctly adjusting the headlight beam angle reduces glare to oncoming drivers.
To avoid insufficient illumination of the road surface, do not set the handle to the extreme counterclockwise position.
Rear fog lamp switch. To turn on the fog lights, press switch 2 with the low beam on. Pressing the button again turns off the fog lights.
Front fog lamp switch (optional). To turn on the fog lights, press switch key 4 with the side lights on. Pressing the button again turns off the fog lights.
Rice. 34. Lighting control module and low beam headlight corrector
When the vehicle is driven in conditions that require the fog lights or fog lamps to be turned on, with the automatic exterior lighting control system turned on (the exterior lighting switch is in the – option position), the exterior lighting switch must be set to or
In a variant on
The car has the “Light Path” function. With the ignition off, you must open the driver's door. Turn on the high beam by holding the light signaling switch lever in the non-fixed position; after releasing the lever, the low beam headlights will turn on for 40 seconds. After 40 seconds, the low beam headlights will turn off.
When the Light Track function is turned on, it can be turned off by re-enabling the high beam by holding the light signal switch lever in a non-fixed position or by turning on the ignition switch if the function time has not expired.
Installation of headlight range control for VAZ 2114, VAZ 2115, VAZ 2113, Lada Samara 2
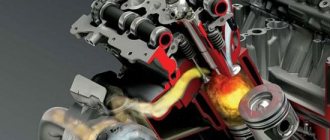
To configure the angle of the headlight beam depending on the load on the frame, a headlight hydraulic corrector is used, consisting of a head cylinder mounted on the device panel and working cylinders mounted on the headlight housings and connected to the main connecting tubes. The cylinders and tubes are filled with a special liquid with a low freezing point and do not communicate with the atmosphere. The hydraulic corrector is non-separable and cannot be repaired. When operating the vehicle, pistons in the cylinders may jam or water may leak from the cylinders or pipes.
A hydraulic corrector that has failed should be purposefully replaced with the most advanced electromechanical headlight corrector (electric headlight corrector).
The electric corrector installation kit consists of a headlight position controller, 2 actuators with O-rings and a connecting wire harness.
We perform the work on a car with a VAZ-2114 device panel.
Inside the car...
...remove the device panel light switch handle.
...and the hydraulic corrector handle.
...remove the lining with the corrector scale.
Using a Phillips screwdriver, unscrew the screw securing the light guide for the scale illumination of the VAZ 2113 corrector...
...and remove the light guide.
Using a 21mm socket, unscrew the nut securing the hydraulic corrector head cylinder.
By pressing on the cylinder rod, we recess it into the hole in the device panel...
and remove the main cylinder from under the panel.
In the engine department, we disconnect the working cylinders of the VAZ 2114 hydraulic corrector from the headlight housings (shown on the right headlight).
By pressing the latch, we turn the hydraulic corrector working cylinder counterclockwise...
...and remove it from the headlight housing.
We cut the tubes with side cutters...
...and remove the right cylinder.
Similarly, we disconnect the working cylinder of the hydraulic corrector from the left headlight (for convenience, you can remove the battery).
...we remove the rubber seal of the hydraulic corrector tubes from the hole in the front panel.
We thread the wiring harness blocks of the VAZ 2115 headlight electric corrector into the seal. We lay the headlight electric corrector wiring harnesses along industrial wiring harnesses.
We insert the electric corrector into the hole in the headlight housing.
We connect the wiring harness block to the right electric corrector.
Similarly, we connect the electric corrector to the left headlight.
In the cabin, we connect the negative wire of the electrical corrector to ground, and the power wire to the wire that supplies voltage to the low beam filament of the headlight lamp (after the fuse).
We connect the electrical corrector wiring harness block to the regulator. We install the regulator in the reverse order of removing the hydraulic corrector head cylinder.
Source: vazclub.com
Malfunctions and why it breaks
- Loss of tightness in tubes, places where they are attached to the cylinders, leaks in the cuffs of the main or working cylinders;
- Jamming of working pistons
The main problem in the system of hydraulic adjustment of the reflector position is depressurization. Since it uses liquid as a working medium, its leaks lead to the fact that pressure is not transmitted from the master cylinder in the car interior to the workers on the headlights. No matter how much you turn the regulator, the position of the light beam will not change.
The second reason is souring of the pistons of the hydraulic corrector cylinders in certain positions. For example, if the piston is “stuck” in the maximally extended position, then the light will shine upward, while in a recessed position it will shine downward. When rotating the handle of the regulator, a lot of tension will be felt and when it is released, it will return to its original position and will not be fixed as necessary.
This happens because the pressure changes as the regulator rotates and the pistons cannot move. When you release the handle, the system tries to return to its initial state, equalize the pressure, the handle returns to the position from which you started turning it.
The listed types of breakdowns are prone only to the hydraulic drive of the corrector. Let the manufacturer claim that it is not repairable, but this is not so. There are examples of self-repair of a hydraulic corrector, which we will discuss in the following articles. In order not to bother with restoring it or replacing it with a new one, it is recommended to install alternative types of headlight range control units.
Video about the device and main breakdowns of the VAZ headlight hydraulic corrector:
Installation and preparation for it
If you have confidence in your own abilities and desire to do this work yourself, the installation algorithm proposed below will greatly simplify the entire process and avoid possible problems.
Installation of the headlight range control must be carried out strictly according to the algorithm
Before starting this work, it is necessary to study the installation and operating instructions in detail, and also disconnect the power supply system of the car for safe work (that is, simply disconnect the battery). Next, you need to test the device for functionality. To do this, apply voltage to the corresponding terminals of the control unit and watch the performance of each of the actuators. The next step is to check the electrical protection of the device. To implement this action, we forcibly confuse the polarity of the supply voltage. In this case, no changes should occur in the position of the headlight level control mechanisms. Then we repeat the testing of the device by forcibly supplying the supply voltage with the correct polarity to the corresponding terminals. After passing this series of tests, the headlight electric corrector can be considered operational.
At the end of the test, we move on to analyzing the design of the headlights. Their housing must provide space for installation of actuators. They usually have special fasteners installed that must be removed before installation work. It is also recommended to visually inspect the headlight components for wear. Particular attention should be paid to gaskets that may have dried out and cracked. If this happens, they must be replaced. Other spare parts, if damage is detected, must also be replaced. Before installing the actuators, it is necessary to clean the surface at the installation site by rinsing with water. Then you need to let everything dry. Then the actuators are installed.
Operation of the electric headlight corrector:
If there are no seats, then it is necessary to replace the lighting system and install a new one, which is already adapted for the installation of an electric headlight corrector.
At the next stage, you need to pay attention to such a document as the headlight electric corrector diagram. It is usually included in the installation and operating instructions. It definitely needs to be studied in detail. All intermediate terminal strips are analyzed. It is imperative to review the locations of their potential installation and select the most suitable option in terms of execution and maintenance.
Next you need to lay the wires. A pair of wires from the control unit goes to one headlight, the second to the other. The power supply must be supplied from the low-beam headlight system. The power supply to the control unit is connected in parallel. There is a lot to be gained from such a solution. Firstly, it saves battery life (in standby mode, this device consumes about 30 mA and can quickly discharge it). The electric corrector is most in demand in this mode, so it is logical to put it into operation during this particular period of time. The second wire with a negative potential is screwed to the vehicle body using any self-tapping screw. It is important that it ensures reliable connection and is resistant to vibration (the quality of the surface of our roads needs no introduction and the car shakes on it quite often, and this, in turn, can lead to the contact becoming disconnected and this system car light control will stop working). All electrical connections are then made. After collecting the electrical circuit diagram, you need to take its paper version one more time and compare it with the result obtained. If everything is correct, they are completely identical, you can apply voltage. To do this, just connect the battery.
Connect the set according to the diagram - this is the key to correct operation
At the final stage, it is necessary to perform a performance test of the assembled circuit. To do this, we send a command to the control unit and look at the movement of the headlights in one and the second direction. If the circuit works like this, then everything is assembled correctly and the work is finished. Otherwise, you need to look for the error and fix it.
Connecting the electrical corrector BUK02-01 to a VAZ-2110
Installation of the BUK02-01 autocorrector on a VAZ-2110 (2111) car is carried out without modifications to standard places. In this case, you must first change the length and adjust the stroke of the rod depending on the specific model:
- VAZ-2110: stroke 2.0 with length 34.0.
- VAZ-2111: stroke 3.63 with length 34.0.
The stroke of the BUK02-01 rod is 7.0 with an offset of 38.8. Therefore, you will have to cut off the rod and reduce its stroke.
To cut the length of the rod, connect power to the drive so that the rod extends to its maximum stroke. First, we cut off part of the rod, then grind it off with a 9 mm file. After this, we glue the sawn-off part back with superglue.
The headlight electric corrector is adjusted in the “0” position, which meets the technical inspection requirements. Each division of the switch allows you to shift the axis of the light flux by 0.06 m, provided that the adjustment stand is installed at a distance of 1.2 m from the car headlights.
Installing auto-corrector
Prices for the purchase and installation of headlight leveling systems at service centers vary, and are not always affordable. Therefore, there is an option to build and install the structure yourself. It is impossible to make a dynamic version of the corrector at home, but it is quite possible to make an electromechanical structure.
This autocorrector works on gearmotors installed in each headlight and control unit, which can be purchased quite freely and inexpensively at any car market. Additionally, you will need wires and fasteners, blocks and terminals, a casing, a soldering iron and insulation.
It is necessary to select components according to the dimensions of the standard corrector and install them in the place provided for this by the manufacturer. To do this, you need to dismantle the broken device.
Installation procedure for automatic headlight leveling:
- Close the tubes in the battery area and drain the liquid contained in them.
- Remove the master cylinder by turning the screwdriver counterclockwise on the clamp holding it in place.
- Remove the control lever from the corrector unit in the car using a spark plug wrench.
- Remove the block, pipelines and plug from the engine shield.
- Prepare electrical wiring to connect the unit and gearmotors. Required elements:
- Multi-core wires with a cross-section of 0.35 m² and a length of 1.65 m – 5 pcs.
- Multi-core wires with a cross-section of 0.35 m² and a length of 2.55 m – 5 pcs.
- Terminals "mother" - 20 pcs.
- Polyvinyl chloride tubes – 2 pcs.
- 5-pin pads – 1 pc.
- 11-pin pads – 2 pcs.
- Thick power wires with a length for a specific car - 2 pcs.
- Cut the wires to the required length, first try them on at the mounting location, and put on protection using talcum powder or powder. On the one hand, unsolder the terminals and insert them into the connection block.
- Pull the wiring through the hole in the engine shield where the pipelines were previously.
- Unsolder the terminals at the other end of the wiring and insert them into the sockets for connecting the gearmotors, having previously insulated the pads.
- Connect power from 2 thick and 4 female terminals, that is, terminal No. 10 + switch No. 64 + rear fog light power supply.
- Connect the ground wire through the free terminal supplied to the ignition relay.
- Install the gearmotors into the standard socket using gaskets and harnesses, with which they are attached to the standard wiring.
- Adjust the corrector to the zero position.
If, however, the autocorrector is purchased separately, then, as a rule, it is equipped with sensors, an electrical control unit, wiring and drive devices, which allows you to easily install the corrector on a specific machine. Car enthusiasts mainly note 2 companies specializing in the production of auto-leveling headlights - Hella and SmartEye.
- Autocorrectors from the German company Hella can be installed on any make of car. There is an option to use the device both in addition to a manual corrector, and as an independent device with the ability to use both manual and automatic modes. With the help of the instructions, installation is quite simple.
- Autocorrectors from SmartEye are an additional option when converting standard electromechanical systems. The principle of operation is only to determine the position of the body to the plane of the road, thereby changing the angle of the headlights.
Automatic headlight leveling is an integral and mandatory component of a vehicle, especially one equipped with xenon lamps. This module solves a number of important driver tasks: traffic safety in the dark and in bad weather, proper lighting when the vehicle is unevenly loaded, smoothing out the negative impact of xenon on drivers of oncoming vehicles, unhindered maintenance. The correct car light is the key to comfort and safety on the roads.
Installing electric headlight corrector
Disassembling and cleaning the electric headlight corrector
Auto headlight range control
Bi-lenses+auto corrector
Replacing the electric corrector motor
How to install electric headlight corrector on a grant
The article will be useful not only to owners of VAZ cars, which are equipped with an unreliable hydraulic corrector from the factory, but also to car enthusiasts who want to install xenon on their car with their own hands. In this case, installing an automatic headlight range control is mandatory.
We recommend that you familiarize yourself with the operating principle of the headlight range control. Understanding the device will help you understand exactly what parts are needed for the system to function properly. Perhaps, after reading the article about the DIY repair of the hydraulic corrector and electric corrector, the idea of finding a breakdown due to which the headlight range control does not work and restoring the standard system will seem more attractive to you.
Selecting and purchasing an installation kit
Minimum installation kit:
- 2 servos;
- Control block;
- switch;
- wiring, connectors of gear motors, control unit.
Nowadays, it is very difficult to find a car that is not equipped with headlight range control from the factory. Therefore, you can assemble all the necessary elements from new or used parts. For many cars, there are unified installation kits on sale (for example, EMKF 11 for VAZ 2110, 2111, 2112).
For installation, you can select parts from another car. The only important parameter is the overhang of the servo rod. Each headlight model has a certain range of adjustment of the reflector angle, so a “non-original” servo drive with a large rod overhang can damage the headlight. In some cases, the extension of the rod can be adjusted by selecting resistors of a certain value, so everything depends on the design features of the control unit.
Unlike a manual corrector, not every car is equipped with a system for automatically adjusting the cut-off line of low beam headlights. By and large, systems are classified according to the type of body position sensor, which allows the autocorrector to automatically change the angle of the headlight unit.
Automatic headlight leveling
Main types of systems:
- using one tilt angle sensor. Similar sensors are used in smartphones to determine the position of the device in space. The sensor is installed on a horizontal surface at the rear of the car. The system is the easiest to install, so it is often included in kits for self-installation of xenon together with a headlight washer. Autocorrectors with an ultrasonic tilt angle sensor, which is installed on a hinged suspension in the rear part of the body, are the best solution among similar systems. If an electric corrector is already installed on your car, then you can implement automatic control by purchasing a kit consisting only of a control unit, a sensor, an adjustment device, the necessary connectors and wires (for example, automatic headlight corrector ALS-1);
- using several ride height sensors based on the Hall effect. The sensor consists of a moving part, in which a permanent magnet is built, and a stationary part - a Hall sensor. One part of the meter is installed on a stationary part of the body, the second is attached to the suspension elements. The change in body position is transmitted to the sensor through the rod. This is exactly the system that cars are equipped with at the factory. If an automatic headlight leveler is installed on your car model in expensive configurations, then most likely there will be ready-made holes in the body for mounting sensors, which greatly simplifies installing the system yourself. If desired, you can install a universal automatic corrector of this type on each car.
Electromechanical system instead of hydraulic corrector
Let's consider installing a standard electromechanical corrector instead of a hydraulic corrector using the example of a VAZ 2110.
- Disconnect the negative terminal of the battery. Remove the headlight hydraulic corrector. The removal procedure is described in detail in the article “Why the headlight range control does not work.”
- Instead of hydraulic corrector actuators, install gearmotors.
- Connect the connectors of the servo drives, lay the wiring along the places where the hydraulic corrector tubes run. The tubes enter the interior through a special seal. After cutting off the tubes, make a hole in it of sufficient diameter for the passage of the wiring harness.
- Instead of the main cylinder of the hydraulic corrector, install an electronic control unit for the electric headlight corrector. Connect the positive wire of the ECU to the pin on which “+” appears after turning on the low beam headlights (in the VAZ 2110 mounting block this is pin 20 of the Ш2 block). The negative terminal can be secured with a bolt terminal to one of the body studs under the instrument panel.
Replacing a hydraulic corrector with an electric corrector
From the name it becomes clear that the electric corrector operates using electricity, that is, it requires connection to a battery.
There is no need to spend a long time looking for reasons for such decisions from the owners of the domestic “ten”, since the electric corrector is reliable and highly efficient. Its breakdown occurs much less frequently compared to a hydraulic corrector.
We recommend: Car service in Lyubertsy
Many owners of the model doubt whether it is possible to make such a replacement and use an electric corrector where a hydraulic unit previously functioned. Of course you can. For this purpose, it is possible to use a standard device or a device borrowed from another car.
The procedure itself requires several successive steps.
- Disconnect the negative cable from the battery.
- Remove the hydraulic corrector cylinder from the headlight, as we described in the previous section.
- Be sure to install a new O-ring during the replacement process.
- Once inside your car, remove the control knob for the hydraulic corrector master cylinder. It is held on by a 21 mm nut.
- The positive wiring harness is connected to the 20th socket of the Ш2 block in the mounting block of your car.
- The minus of the electric corrector is mounted on a body stud. There are several of them and they are located under the dashboard.
- The harness of the new regulator can be laid along the previously used tubes of the old hydraulic corrector.
- The harness pads are connected to the actuators.
- Return the negative cable to the battery and check how the new device works.
The cost of an electric corrector today is about 1-1.5 thousand rubles. Depending on the model you choose, you will have a certain number of adjustment positions. There are at least two of them, but the most common ones include 4, 12 and 15 positions.
Design and principle of operation of the headlight range control
It is worth noting that the operating principle of different types of headlight range control units is approximately the same. At the same time, a distinction is made between automatic and manual settings. In the latter version, the position of the headlights is adjusted using a special regulator installed inside the car, and with the help of its rotation, the driver independently changes the angle of the optics. In the first case, the electronics automatically configure everything itself, depending on the landing of the car.
Manual headlight range control
This headlight range control is installed on many budget cars, so it is familiar to a large number of car enthusiasts. As the name suggests, the corrector is activated directly by the driver. To do this, as a rule, you just need to turn the wheel, or as it is also called, the rotary switch. The electromechanical drive of the headlight range control is most often used, so we will consider it.
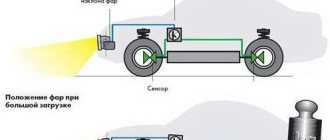
The adjustment wheel usually has digital or graphic markings that indicate the position of the headlights. Adjustments are made by the driver as necessary, depending on the vehicle’s load and changes in its tilt in the longitudinal direction relative to the center of gravity.
Simply put, if three people sat in the back seat, and you had to put four bags of potatoes for your mother-in-law in the trunk, then obviously the back of the car will lower and the front will rise, causing the headlights to shine too high and blind oncoming drivers.
To prevent this from happening, you need to turn the wheel so that the beam of light goes down.
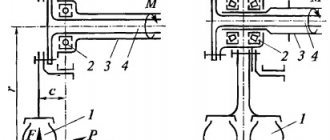
Turning the knob gives the corresponding command to the gear motor, which is needed to turn the headlight to a certain angle. In fact, a gear motor is nothing more than a worm gear, which is necessary to convert the rotational movement of the electric motor (located inside the gear motor) into the translational movement of the rod, which directly acts on the headlight, changing its angle.
Structurally, the headlight is hinged at the top, and the rod with a ball end (resting against a spherical latch) holds the lower edge of the headlight. And it is the back and forth movement of the lower part of the headlight, with the upper attachment point remaining unchanged, that gives the necessary change in the angle of inclination.
A manual headlight leveler is very simple, very reliable and, most importantly, a useful device, but it has one very significant drawback: most drivers forget to use it and blind their colleagues, despite the fact that they have the opportunity not to do so.
Automatic headlight leveling system
Automatic headlight leveling is a more advanced technology because it does not require any action from the driver. The cut-off line is adjusted automatically based on sensor readings.
Automatic headlight leveling can be installed on vehicles equipped with either halogen or xenon headlights. For xenon, this is even necessary, since this type of headlight emits light of very high intensity, and in the absence of auto-corrector, it can pose a serious threat to traffic safety.
As for the design of the headlight auto-corrector, the following elements can be distinguished:
- Control block;
- sensors that measure the vehicle's ground clearance at various points;
- device that adjusts the headlights (actuator).
Typically, the system uses two or three sensors that measure ground clearance. Either one sensor or a pair can be installed at the front. And one sensor is located at the back.
Early systems used potentiometric sensors, but they were not reliable enough, so they have now been replaced by non-contact angle sensors.
The operating principle of these sensors is based on the Hall effect. The mechanism of operation of the sensor is quite simple.
Structurally, the sensor consists of a rotor (moving part), with permanent magnets built into it, and a stator (fixed part), which, in fact, is a Hall sensor.
The sensor is attached to the bottom and is connected to the suspension using a rod. The change in suspension travel is transmitted through the rod to the rotor, which rotates, causing a change in the magnetic flux, which is detected by the Hall sensor.
The magnitude of the change in the magnetic flux is subsequently recalculated by the control unit into the required angle of rotation of the headlights, and the corresponding signal is sent to the actuator. In its work, the control unit takes into account not only the angle of inclination of the vehicle, but also the speed, as well as the nature of the vehicle’s movement.
Replacement procedure
For inexperienced drivers, replacing the corrector often causes difficulties, as evidenced by numerous discussions on VAZ owner forums. And yet, changing the hydraulic corrector is not so difficult. This is done in this order:
- Fastenings. First you need to disconnect all the clamps securing the hydraulic corrector tubes to the body;
- Cabin management. Remove the corrector switch handle located on the panel in the passenger compartment. To do this, just pull it towards you;
- Space for renovation. In the VAZ 2110, repairing the headlight hydraulic corrector is difficult precisely because of the inconvenient location of the hole through which the corrector tubes are threaded. At this stage, the whole process “slows down” for many. To get to the hole, you need to somehow remove the antifreeze reservoir. You just need to clear the “approach” from above so that you can work;
- We take out the cylinder. Further repairs take place from the interior. On the panel you need to sharply pull the switch towards you (pull it off), it will come off. Then unscrew the cylinder using the “22” socket. Open the cover with the fuses located there and, pulling, pull out the cylinder so that it hangs on the hoses;
- We take out the hydraulic corrector. The hydraulic corrector has a latch for the actuator cylinder; you need to press it. Then turn clockwise until it stops (90°) and remove it from the socket. Do the same steps with the other headlight;
- Push it inside the cabin and remove the hydraulic corrector;
- The new corrector is installed in the reverse order;
- Control. Check how the new hydraulic corrector works. Be sure to test whether the new device changes the angle of the headlights. If the repair is successful, then the luminous flux will be optimal and obedient to your adjustments.
Repair of hydraulic corrector for VAZ 2110 headlights
Adjusting the light beam happens quite often, especially when the trunk of the car is heavily loaded; the light shines directly into the eyes of drivers of cars moving towards you. If the reflector has dropped and the adjustment does not work, our instructions will help you repair the headlight hydraulic corrector of the VAZ 2110; the repair will take very little time.
VAZ 2110 headlights Kirzhach - hydrocorrector repair
- Unscrew the headlight fasteners and remove them;
- We disassemble the headlights: carefully remove the glass, then the metal clips (6 pieces);
- Using a knife, clean the glass from the sealant;
- We cut off the convex profile (in the shape of the letter P) on the glass;
- Unscrew the screws (there are 3 of them) from the reverse side;
- Take out the paper reflector;
- Next to the hydraulic corrector hole inside the light housing there is a spring that must be removed;
- We perform the same actions with two plastic rosettes from two “turntables” securing the reflector.
Broken iron latch of hydraulic corrector
Rubber gasket to replace a broken latch
- As a result, there is a high probability that the corrector will be compressed again;
- The correct solution is to improve the fastening by inserting a cotter pin made of solid wire between the petals of the plastic thing.
For the VAZ 2110, the repair of the headlight hydrocorrector has been completed. We assemble the headlights in the reverse order of disassembly. We first clean the old sealant, then apply a new one.
Second repair method
- We cut threads on the adjustment screws (metric 3);
- We screw them into the illuminator itself, then put on the washers;
- We take out the plastic fasteners;
- We put on the bar with the high beam and low beam modules located on it;
- We put a washer on top, a spring washer, and another washer on top of the spring. The use of a lock nut is recommended;
- We twist everything;
- We fix the structure using anaerobic sealant.
The most common problems with headlight range control
Quite often, various troubles and problems arise with such mechanisms. Let's look at why a car headlight range control may not work.
Sensors are considered the most vulnerable point of any modern electronics. This is also inherent in such a device as a headlight range control. Here the sensor, based on the ground clearance, adjusts the headlight range. Car enthusiasts often complain that the headlight range control malfunction indicator lights up on the car’s dashboard. Typically, this occurs due to a break in the bracket that holds the sensor. As a result, the sensor sends incorrect information, and an error appears in the operation of the corrector itself.
Sometimes the problem may lie in the contact connection. Due to frequent souring of contacts, their conductivity also decreases. As a result, similar troubles appear when the corrector stops working normally.
Another problem may also arise that is directly related to the configuration mechanism itself. But this is not some kind of malfunction, but simply the specifics of its operation on individual cars. For example, Kalina's headlight corrector (the downside of which is considered to be a small adjustment angle) works in such a way that the beam of light from the low-beam headlights is excessively lowered down, and this noticeably reduces the lighting efficiency of conventional lamps.
Correct operation of the headlight range control has a positive effect on your safety and the safety of other road users. Therefore, take all problems with this device very seriously.
Prerequisites for hydraulic corrector malfunction, repair
Most often, the corrector stops working during periods of sudden changes in external temperatures, when the rubber seals on the cylinders can crack and leak. Damage to the connecting pipes can also lead to water loss from the system. Whatever the reason, the working cylinders freeze in one position and do not respond to switching.
It will not be possible to repair the hydraulic system itself, because their manufacturer does not provide a similar ability. Therefore, if there is a leak of all-season water, the hydraulic corrector assembly must be replaced with a new one. But there may be a situation where the reflectors stop rotating not because of a malfunction of the corrector. This occurs if the adjustment lever that transmits force to the headlight reflector loses contact with the working cylinder rod. The presence of such a malfunction may be indicated by the fact that one of the reflectors did not turn.
Adjusting the hydraulic corrector rod
In order to remove such damage, it is necessary to return the engagement of the working rod (there is a notch on it) with the spherical end of the adjustment lever. The following actions should be performed:
- Tighten the bolt that regulates the position of the lever fulcrum until it stops.
- Move the reflector to its final lower position.
- Align the lever ball and the rod recess, then unscrew the adjusting bolt to the desired position.
The lever ball slipping out of the stem recess is the only fault that can be corrected. If the tightness of the hydraulic system is violated, the corrector must be changed.
Revision cost
The price of an electric headlight corrector is considerable - the simplest ones can be purchased for 1500-3000 rubles. It is quite possible that it will be easier to install a standard hydraulic corrector on a VAZ, which costs several times less - 300-500 rubles, but its service life is also not very long.
- How to install parking sensors on a VAZ 2110 2111 with your own hands Instructions for installing parking sensors on a ten
- Replacement of antifreeze Lada 2101 (VAZ 2101)
- Adjusting the clutch on a VAZ 2106 How to set the correct clutch pedal travel on a VAZ 2106
- Replacing headlight glass on a VAZ 2110 Photo instructions on how to remove a headlight on a VAZ 2110
DETAILS: Do-it-yourself replacement of the VAZ 2105 cardan shaft crosspiece
Restoring functionality
During operation of this device, breakdowns occur. In such a situation, it is necessary to carry out diagnostics and, based on its results, repair the electric headlight corrector. It is carried out, most often, according to a modular principle. That is, if the actuator of one headlight, for example, fails, it is dismantled and a new one is installed in its place.
Although there are often cases when repairs are carried out on broken parts. This can be done if the driver has sufficiently deep knowledge of radio electronics and can determine the cause of the breakdown on the board, as well as replace the failed part. Or the owner has a good friend who can do this work.
How to find a breakdown
Repair of the VAZ 2110 headlight hydraulic corrector Many people, when headlight adjustment fails, immediately blame the hydraulic corrector for everything and rush to replace it as quickly as possible. But don't rush to conclusions. There may be other causes of the malfunction.
Pay attention to any leaks of working fluid. If they are not there, check the stroke of the rod. To check the stroke of the rod, the actuator cylinders are dismantled
The normal value is between 6.5 and 7.5 millimeters. It is impossible to repair the hydraulic type corrector provided by the factory for the VAZ 2110, since the design of the device is not dismountable. If malfunctions occur, the entire assembly must be replaced, including cylinders and pipes.
Automatic headlight control systems
The automated headlight reflector position corrector does not require driver participation to adjust the cut-off line. The system used with halogen lamps is based only on the position of the body, which is why it is also called static.
- vehicle ride height sensors;
- Control block;
- servo drives (conventional electromechanical gear motors).
Sensor from the kit for installing xenon yourself.
The operating principle is based on the constant reading of the vehicle's ground clearance. For this purpose, non-contact sensors based on the Hall effect are used. Typically, several sensors are installed on load-bearing body elements in the front and rear parts. The meter body contains a stator (moving element) with built-in magnets and a rotor (fixed element), which is a Hall sensor. The stator is connected by a rod to the suspension part, so any change in the position of the part relative to the body is transmitted by the sensor to the control unit. The ECU processes the received information and controls the operation of the gearmotors. Despite the obvious convenience, the automatic corrector is often equipped with a system with the possibility of manual adjustment.
The design can use only one ultrasonic type body position sensor. Most often, this solution is offered as an alternative to standard systems when installing xenon lamps with your own hands.
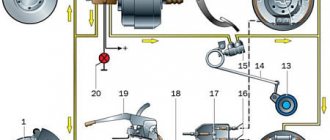
How does a hydraulic corrector work?
By the name of the device, you can understand that its operation is based on hydraulic laws. In other words, the changing pressure of working water in the system leads to mechanical movements of the suitable part. This is true in reality. The entire system for adjusting the direction of light flow consists of the following main components:
- head cylinder;
- connecting tubes;
- working cylinders (on each headlight);
- force transmitting levers.
The device works on this principle. To adjust the position of the reflectors, the driver uses a knob on the dashboard to change the position of the head cylinder rod. The changed pressure sets the fluid in motion, which, in turn, retracts/extends the rod on the working cylinders. The force is transmitted to a lever mounted on an axis, like a swing. The lever mechanism shifts the position of the headlight reflector, changing the direction of the light.
When the hydraulic corrector is working normally, the reflectors should respond to turns of the handle. You can simply check this at night by pointing the headlights at a vertical plane (some wall, for example). If the reflectors remain motionless, this indicates a possible breakdown of the adjustment system.
How to find a breakdown
Repair of the VAZ 2110 headlight hydraulic corrector
Many people, when headlight adjustment fails, immediately blame the hydraulic corrector for everything and rush to replace it as quickly as possible. But don't rush to conclusions. There may be other causes of the malfunction.
Pay attention to any leaks of working fluid. If they are not there, check the stroke of the rod. To check the stroke of the rod, the actuator cylinders are dismantled
The normal value is between 6.5 and 7.5 millimeters. It is impossible to repair the hydraulic type corrector provided by the factory for the VAZ 2110, since the design of the device is not dismountable. If malfunctions occur, the entire assembly must be replaced, including cylinders and pipes.
What is headlight range control?
Types, design and principle of operation of the ignition system For safe movement at night, correct adjustment of the headlights is not enough. After all, as soon as the height of any car suspension changes (due to passengers or cargo transported in the trunk), the trajectory of the light beam changes. Oncoming drivers will be dazzled or the level of road illumination will decrease. In order not to manually adjust the headlight angle every time the vehicle load changed, a special automatic system was invented.
A device designed to maintain a given position of the headlight axis in one vertical plane relative to the angle formed between the axes of the suspension and the floor (and not the road surface) is called a headlight leveler. Regulation occurs based on data from floor level sensors located on the suspensions and the underbody.
There are the following types of headlight correctors:
- Quasi-static;
- Dynamic.
Let's look at each of them in more detail.
Quasi-static headlight range control
Quasi-static correctors have a simpler operating principle. Automation reacts to changes in body tilt due to load or at significant speeds due to air resistance forces. Such changes occur infrequently, so this system is not required to have a high response rate.
Quasi-static headlight range control device:
- Two body position sensors connected to the car axles using special levers;
- Actuators;
- Electronic control unit;
- Duplicate manual light control on the dashboard
Based on data on the body position and driving speed, respectively, obtained from floor level sensors and ABS (anti-lock braking system) sensors, the required tilt is set and the headlights are adjusted. The adjustment is carried out by an actuator based on commands from the electronic control unit.
Dynamic headlight range control
After xenon headlights, which have a higher beam energy and are therefore more dangerous for oncoming drivers, began to become more widespread, more modern and expensive dynamic systems began to be introduced. They differ from quasi-static ones in the speed of response to changes in body tilt. With the help of these systems, the light flux adjusts its direction and is kept at the same level in a fraction of a second
This is very important when driving on uneven roads, braking, accelerating, etc.
The luminous flux is always directed towards the road surface and provides ideal visibility for safe driving. The driver does not even notice the correction; the system instantly reacts to any body sway and corrects the position of the headlights.
As a rule, automatic headlight leveling is a standard system, but you can install it yourself. There is a wide selection on the market from various manufacturers. On cars with active suspension there is no need to install automatic headlight leveling. The auto-correcting cut-off system can be installed on any type and make of car. The automatic system is duplicated by a conventional electromechanical corrector, and you can adjust the required angle directly from the cabin using the control panel.
In order to make automatic headlight levelers more reliable and increase their service life, non-contact sensors for changes in body position are being developed, which will be installed to replace the currently common potentiometers. Changing potentiometers is required by increasingly increasing demands when driving in extreme conditions - weather or road.
Headlight range control in practice
Electric headlight corrector VAZ 2114: purpose and installation
Headlight correctors in a car perform a very important function. When the speed of movement and loading of the vehicle changes, the position of the body changes, the cut-off line shifts, and it must provide better visibility and at the same time not dazzle drivers of vehicles moving towards the meeting.
As a result, in the absence of a corrector, even if your lighting devices are configured according to all requirements, you either interfere with oncoming cars, or there is not enough light for you, because the headlights shine down onto the road.
Therefore, since 1999 in Europe, the presence of a corrector has been an indispensable option for all cars, without exception.