A car spoiler - not all people like it, some people want to remove it and close the holes where it was attached with ordinary plugs, but some people really like this thing and when it becomes deformed, they go and immediately buy a new one, but just how to remove the old one and Not everyone knows how to install a new spoiler in its place, which is why we wrote this article in which we explained in detail the process of replacing this unit.
Note! In order to replace the spoiler with a new one, you will need to stock up on: A wrench of approximately “8” and approximately “10”, a screwdriver, and it is also recommended to stock up on gloves because the spoiler is still dirty and when removing it you can get your hands dirty on it, but if this is not important to you, then in this case you don’t have to use gloves!
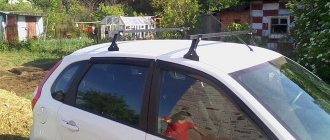
What does a car look like with and without a spoiler?
This question is asked by many car enthusiasts, because it is not clear how the fourteenth car will look, for example, without a spoiler or if a spoiler is installed on it. For a clear example, we took two different cars, but they are almost the same color and have an almost standard look, but only on one The car has a spoiler installed, but the other one does not, so it’s up to you to decide what will be best for your car!
Search principle
To find a fault in any vehicle on-board network system, you should use the method of sequential elimination of elements. The point is to consistently check electrical appliances and sections of the circuit, excluding elements from the list of reasons that could cause a breakdown. To do this, you need to clearly understand the design and operating principle of the system. When troubleshooting, you need to move from the components that require the least effort to check, to the most difficult to diagnose elements.
Electrical diagram
We immediately emphasize that the pinout of connectors and color markings of wires may differ not only between different models of the same automaker, but also among one model of different years of manufacture. Before you start searching for the cause of the breakdown, you need to find an electrical diagram specifically for your car model.
We will consider the principle of operation of brake lights and the troubleshooting algorithm using the example of the VAZ 2101-2102 circuit. The photo shows the general diagram of the vehicle's lighting and light signaling. We need to isolate the components involved in the operation of brake lights.
- 6 – mounting fuse block;
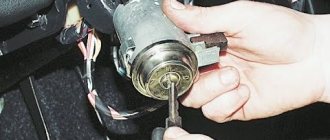
- 13 – brake light switch. It is a non-locking button (returns to its original position after removing the force). Located directly next to the brake pedal. When the brake pedal is released, the contacts of the limit switch are open, no current passes through it. Accordingly, when pressed, the contacts close, allowing flow through the lamps;
- 19 – lamps that light up when you press the brake pedal.
We do not have a diagram of the mounting block, but we know in advance that the brake lights only work when the ignition is on. There is a wire from the mounting block to the brake light limit switch, on which there is a constant + after the ignition is turned on. As soon as the limit switch contacts close, + goes to the brake light bulbs, which are connected in parallel. The “ground” of the rear lights is common and consists of a wire screwed to the car body.
In the diagram we presented, the elements are depicted as close as possible to how they look in reality. Don’t be alarmed if you only find a schematic diagram for your car with symbolic images of the elements. Schematic diagram of external lighting for VAZ 2114, 2115:
- 3 – mounting block;
- 8 – lamps for side lights and brake lights;
- 11 – brake light limit switch;
- K4 – relay for monitoring the serviceability of brake light lamps and side lights.
Spoiler
Spoiler VAZ 2105 DUCKTAIL CAMEL, made of ABS plastic 3 mm thick, installed on double-sided tape, self-tapping screws, rivets. Installing a spoiler gives the car a unique look.
Lip spoiler is universal, black. Made of rubber, resistant to high and low temperatures. Installed with double-sided tape.
Spoiler VAZ 2105 - 2107 DUCKTAIL CATANA STYLE, made of ABS plastic 3 mm thick, installed with double-sided tape, self-tapping screws, rivets. Installing a spoiler gives the car a unique look.
Spoiler 2.0 var No. 1 Lancer X, year (2007, 2008, 2009, 2010, 2011, 2012, 2013, 2014, 2015, 2016, 2017). The trunk lid spoiler is made of ABS Plastic.
Splitter VAZ 2110, 2111, 2112 on stands. Installed on a standard bumper, made of ABS plastic.
Lip spoiler for Skoda octavia a7, made of ABS plastic 3 mm thick. Installed using double-sided tape.
The splitter for the front bumper of Lada Priora 2 is made of ABS plastic. Installed in standard places, the kit includes clips for installing the splitter. Supplied unpainted.
The Lada Vesta lip spoiler is made of ABS plastic, consists of two parts that are glued together, this gives the spoiler rigidity. Installed with double-sided tape or sealant. Spoiler width 60 mm.
The Lada Vesta lip spoiler is made of ABS plastic, consists of two parts that are glued together, this gives the spoiler rigidity. Installed with double-sided tape or sealant. Spoiler width 31 mm.
MCA Team skirt for VAZ 2105, 2107. Made of ABS plastic 2.5 mm thick. Easy to install on the car. Can be installed with rivets, screws or double-sided tape. Can be painted to match the color of the car or installed without painting. Plastic color is black.
Visor for the rear windows of classic VAZ 2101, 2102, 2105, 2106, 2107. Made of ABS plastic 2.5 mm thick. Installing a visor will give your car a unique look.
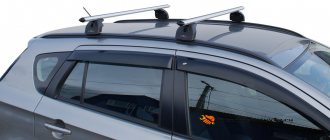
Roof spoiler for VAZ 2102, 2104. Made of 3mm thick ABS plastic, shagreen texture. Attaches with rivets, self-tapping screws, double tape or body sealant. The spoiler is installed on the roof.
Spoiler VAZ 2108, 2109, 2113, 2114 DuckTail, ABS plastic material, 2.5 mm thick. The spoiler is resistant to high and low temperatures.
Spoiler Bench VAZ 2108, 2109, 2113, 2114, ABS plastic material, 2.5 mm thick. The spoiler is resistant to high and low temperatures.
Splitter for the front bumper of VAZ 2113, 2114, 2115, installed on a standard bumper. Made from ABS plastic
Splitter for front bumper, universal. Made of ABS plastic, 2.5 mm thick, which makes it flexible and resistant to low and high temperatures. Gives an individual sporty appearance to the car. Installed with bolts, screws or rivets. Fits well on the Lada Vesta car.
Trim for the front bumper (lip) “Vihur” without holes, shagreen texture, for VAZ 2105, 2107 cars. Made of ABS plastic
The front skirt of Ken&Mary VAZ 2101 - 2107 is made of ABS plastic, 3 mm thick. Installed on rivets, screws, double-sided tape. ABS plastic is resistant to high and low temperatures.
Protection for body kits, universal, made of high-strength rubber with the addition of rubber. Used to protect bumpers, body kits, sills, etc. The color is black with a red edging along the bottom, attached with double-sided tape and glue. Length 2500 mm, width 60 mm. In addition to the main functionality, it gives your car a sporty appearance.
Fault localization
Understanding the operating principle allows you to determine exactly why the brake lights may not light up:
The fuse has blown. In the diagram, the fuses are marked with the letter F (from English - Fuse) and the serial number of the seat in the fuse block, for example, F3;- poor contact at connectors;
- the light bulbs have burned out, but since the lights are connected in parallel, the likelihood that 2 lamps will burn out at once is extremely low;
- poor contact on the negative terminal of the lights. In this case, problems may begin not only with the feet, but also with the lighting of the remaining lamps in the lanterns;
- Damage to the negative track in the lamp board. From the total mass directly to the brake light lamp, the minus goes along a special path on the board. The path may collapse from water or mechanical impact;
- malfunction of the brake light switch, the so-called frog;
- broken wiring, oxidation of contacts.
Troubleshooting algorithm
To detect a fault in the electrical network, you will need a multimeter or a tester, which you can make yourself. Previously, we told you how to use a multimeter, so we won’t focus on that.
The sequence of searching for the cause of the breakdown:
- Check the fuse for the brake light circuit. The location diagram of the fuse links can be found in the repair and operating manual for your car; often the symbol of the protected circuits is located on the back of the cover covering the fuse mounting block. If the installed fuse of the required rating immediately blows, there is a short circuit (short circuit) in the circuit. Please note that the fuse can protect not only the feet, but also other circuits. Installing a fuse with an increased rating is fraught with the risk of a car fire;
- If oxidation is detected on the terminals, clean the contacts mechanically or use an aerosol contact cleaner.
- Having turned on the ignition first and holding the brake pedal depressed, check whether there is power on the positive wire that goes from the limit switch to the rear light connector. If there is power, there is a malfunction in the lights themselves;
- check whether the positive signal is coming from the mounting block to the limit switch. If + comes, but when you press the brake pedal it does not appear on the second terminal of the limit switch, then the problem is in the “frog”;
- If there is no + at the limit switch terminal, examine the circuit up to the mounting block. If the wire is intact and securely fastened in the connectors, then the problem is in the mounting block.
How does a brake light work?
In order to set up a brake light that lights up at the right time on the bumper, you must first understand how the system for supplying information from the brake pedal of the VAZ-2114 works. Without the necessary knowledge, you don’t even need to start doing everything manually, because most likely the driver won’t succeed.
When the driver presses the brake pedal, the brake light comes on. From it, voltage is supplied through all the necessary wiring to the device for dividing the same current, from where it is supplied to the analog input. After this, 14 digital pins are activated thanks to specially tuned pulses.
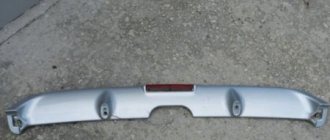
They are connected to the corresponding keys so that the glow power increases if the LED bulbs have 1 Watt, after which the load on the microcontroller is reduced. The output shows that the brake light LEDs of the VAZ-2114 spoiler are connected to a transistor circuit; after all operations they become active.
The power of the LEDs doesn't really matter. It is important to remember that in order for the brake light to be correctly displayed in the spoiler and visible to the driver driving behind, it is not necessary to install high power bulbs; 1 W will be quite enough.
What does it look like?
Large spoilers affect the aerodynamic performance of the car. Thanks to these devices, the car is able to reach high speeds while driving and consume fuel more economically. Motorists often use rear and front spoilers.
The choice depends on the driver's preference and expected result. It is necessary to pay attention to the material from which this part is made. Often, car enthusiasts install a decorative rear spoiler, which only helps to change the appearance, but does not affect the speed and other parameters of the car in any way.
Tuning VAZ 2114
To properly fix the spoiler, it is recommended to adhere to the following sequence of work:
- The length and width of the trunk are measured.
- Make marks with a marker in those places where there will be a fastening connection between the device and the car body.
- After drilling the holes, remove the chips and paint the edges to avoid rust in the future.
- Install the brackets into the hole and secure the fixture using nuts and bolts.
- If using a decorative option, it is perfectly acceptable to use an adhesive instead of drilling.
What to pay attention to
The brake light in the bumper must perform its function as correctly as a regular VAZ-2114 brake light. This kind of tuning can attract attention with its unusual animation. Drivers and other road users may pay more attention to this animation than to the actions of the driver himself in terms of actual braking on the highway. Therefore, not everyone has time to immediately assess the situation and may confuse turning with braking. In this case, a traffic accident may occur.
When you press the brake pedal, all the brake light bulbs should light up at the same time in order to attract the attention of the driver behind as much as possible, and only then you can turn on the necessary animation for visual display. Basically, for drivers, the brake light performs a completely different function.
If the driver makes a turn, he must first slow down before turning in the direction he wants, after which the brake light comes on. For safety, it is recommended to turn on 2 animations at once for at least 2 seconds, so that other drivers understand that the car will first slow down and only then turn. Many people act differently: first they turn on the turn signal, then they brake, so it is not always clear that the driver will brake or turn, because the flashing turn signal is difficult to see on the LEDs, although it is on.
Running turn lights can look more impressive if the animation speeds up towards the end of its action. This gives great elegance to the spoiler, but also adds attention to other road users. With such turn signals, it is clear that the driver is already turning in the right direction and has already finished braking.
As a rule, all these subtleties decorate a car on the road, but many drivers believe that these “things” are a threat to traffic and can lead to a traffic accident.
Recommendations
Correct installation of a high-quality spoiler on a VAZ 2114 will help reduce vehicle air resistance and fuel consumption. If the fixation of the device is not done correctly, then this will not improve the performance of the car, but, on the contrary, will reduce its aerodynamics.
To prevent this from happening, you should familiarize yourself with the recommendations of experts on how to install a spoiler with your own hands:
- If there is no space for installing the device, then there is no need to drill the body. An adhesive sealant is quite suitable. A prerequisite is complete solidification of the substance within 3-4 days;
- to prevent rust, it is recommended to lubricate the joints between the device and the body with machine oil or wax;
Installing a spoiler on a VAZ 2114
- It is better to paint before installation. It is desirable that the color matches the main color of the car or contrasts;
- At the fastening points, if desired, use not a polypropylene seal, but an ordinary piece of vacuum rubber.
Drivers who have doubts about the final result turn to specialized salons, where experienced specialists will do this work quite quickly and efficiently.
Features of this tuning
The brake light in the spoiler has a number of advantages:
- It's stylish, that's why they buy spoilers. Without a spoiler, the VAZ looks like a simple classic car, even a kind of retro, but with a spoiler it looks quite original.
- The spoiler best conveys the stop signal, and you can come up with any animation that attracts attention, but you need to be careful with this.
- The spoiler has a low price, and almost every driver can install it independently.
- The spoiler is installed once for many years, so it is beautiful and profitable.
- The brake light on the spoiler is more visible, so even from a road safety standpoint, the spoiler wins.
Where can I buy?
Any spoiler, both in rough and finished form in body color, can be purchased in a specialized online store. This will not only save money, but also familiarize yourself with detailed technical information and view real photos of the car after such external styling.
You can buy spoilers in color only if the car is garaged or has low mileage. Otherwise, the color difference will be very noticeable. In any other situation, you can purchase a spoiler for painting. Such original products have an excellent degree of preparation, so you can even work with aerosol paints in cans.
Stop lights don't light up
Almost any problem with electronics in a car can be solved in the same way. You need to look for the problem either in the device itself, which is faulty, or in the power supply system to it. The situation is similar with the main reasons for the breakdown of brake lights. If they do not light up, it may be due to one (or several) of the following reasons:
- Problem with the brake light fuse: its oxidation or failure;
- Malfunction of the lamp(s) installed in the brake light;
- Problem with the brake light activation mechanism when pressing the brake pedal;
- Oxidized contacts in the socket for installing the brake light lamp;
- Damage to electrical wiring.
As you can see, among the problems listed above, only one can cause serious problems for the driver if he wants to repair the brake lights himself, and we are talking about wear and tear on the electrical wiring. Modern cars are equipped with dozens of electronic devices, and a worn, torn or improperly clamped wiring harness can cause your brake lights to turn off.
If none of the troubleshooting steps below resolve the problem, it is most likely a wiring issue. In such a situation, you will need to find a detailed plan for the car's electrical wiring and check with a tester for the presence of voltage in the sections, and after finding the problem, solder or replace the wires.
But don’t rush to get a tester, most often the brake lights don’t light up due to much more mundane faults, the elimination of which will be discussed below.
It is advisable to start troubleshooting the brake lights by checking the lamps. To do this, you need to open the trunk and remove the taillights, after which you can get to the brake lights. Depending on the make and model of the car, the method of removing the taillights will vary, and on some cars you can even get to the brake lights without this procedure.
The most reliable way to check whether the cause of the malfunction is burnt out lamps or oxidation of the contacts in the socket for installing them is to replace them with new ones. It is not always possible to determine by eye whether the lamps have burned out or not, so it is better to acquire new light-emitting devices in advance and install them.
If it turns out that no new copies of the required size were found, you can remove the working lamps from the turn signal indicators, side lights or other lighting devices of the car. Try them, and if the problem is solved, then it is enough to buy new lamps and replace them so that the brake lights begin to work as before.
Important: Some car models are designed so that if one brake light fails, the second one turns off automatically. Accordingly, when checking, it is better to screw the lamps into both brake lights to make sure that the problem is not related to their malfunction.
When replacing the lamps does not resolve the problem, you need to make sure that there is no oxidation of the brake light “cartridges”. Also check that the sockets are connected to the vehicle's wiring. If there is any doubt about this, you can disconnect the wiring contacts, clean them with fine-grit sandpaper, lubricate them with electrically conductive grease and reconnect them.
Please note: To check the sockets after performing the above manipulations, use new (removed from other lighting devices) lamps, since it is possible that previously installed lighting devices have become unusable simultaneously with damage to the contacts.
In a car's electrical circuit, a malfunction often occurs due to fuses that may fail. There are several ways to check fuses in a car, including visually or using a multimeter. In this case, there is one “household” method for diagnosing the brake light fuse.
You can make sure that the brake lights are not on due to a failed fuse. To do this, just start the car and press the horn. If the sound is heard, then the fuse is good and the brake light malfunction is due to another reason. If there is no sound, you need to determine from the fuse block diagram which one is responsible for the brake lights and horn, and then replace it.
Typical faults and methods for their elimination
There are many reasons why taillights may fail or partially not work, but the main one is failure of the flexible printed circuit board. This is, in fact, the most sore spot of the rear light devices of the VAZ 2115.
Often, flimsy contact pads that pretend to be light bulb socket contacts fail, although in fact there are no sockets in the flashlights - a plastic ring that fixes the light bulb, a plastic pressure pad (all with latches) and contact pads on the board. It couldn't be simpler, but funnier too.
That's the whole "cartridge"
The service life of such a “cartridge” is six months maximum. Considering that the car was produced for 15 years, then this approach of the developers to the flashlight, the design of which has not changed over all these years, is surprising, to say the least. But the fact is clear.
Converting the board to cartridges
You can, of course, regularly change the flexible board - this is not a problem. But, firstly, the board costs money and, in principle, should not be a consumable item in order to buy it in packages. And, secondly, when someone is dead, for example, you won’t immediately notice “stop”, which means that at any moment we risk getting “in the butt” in the literal sense of the word.
Therefore, it’s better to tinker and do what the VAZ designers should have done a long time ago - replace all this flexible hack with normal cartridges. So, we go to the store, buy three ordinary plastic lamp sockets: one for a single-helix P21W, two for a double-helix P21/5W lamp. They are practically the same in size and appearance.
For modification we will need 3 such cartridges for one flashlight
You will also have to buy a set of four-pin male-female car connectors. The photo below shows only an option, but there are many types of such connectors. In addition, any others for a larger number of contacts will do.
We'll also buy a couple of these connectors
How to disassemble the rear light board? Elementary and without any tools. For speed, you can use an awl, the tip of a knife or a screwdriver, but you can do everything with your bare hands. We press the latch (photo on the left) and pull out the plastic imitation of the cartridge. Everything else will fall apart on its own. We remove all three cartridges.
Disassembling the rear corner light board of a VAZ 2115
We completely disassemble the panel - remove the plastic lamp clamps, remove the flexible board. We mark places for new cartridges, while focusing on the position of the old ones.
Marking seats for cartridges
We remove the mounting posts for old cartridges and everything that interferes with the installation of new cartridges using, for example, a soldering iron. We drill holes of such a diameter that our new cartridges fit in there tightly and do not dangle. If there is no appropriate drill, drill with a smaller diameter, then bore with a round file.
Ready-made seats for cartridges
For the turn signal bulb we use this socket - it takes up less space, but you can put another one - just cut it a little (however, this one also had to be cut a little).
Turn signal holder
We install the cartridges in their places and fix them in any available way. In the photo below they are simply soldered with a soldering iron. Not exactly aesthetically pleasing, but reliable. But this “aesthetics” will still not be visible. We take out the wires of the “turn” cartridge through the hole made.
Installed lamp sockets
All that remains is to solder the connectors: – one – to the light bulbs, the other – to the flashlight power harness, having previously cut off the old one.
Panel with soldered connector
Note! In order to replace the spoiler, you will need to take with you a set of tools, which will include: A flat-head screwdriver or you can also use a knife instead, and you will also need an extension cord with a socket head or a wrench!
What does a car look like with and without a spoiler? Many people are interested in this question, because people always want to transform their car into a more beautiful and eye-catching car, but basically in many cars, the modernization of the car begins with a spoiler, someone removes it and someone still leaves it, but it’s hard to imagine what a car will look like with and without a spoiler installed, that’s why we’ve posted two photographs below that show two different cars, but as you’ve already noticed, they are the same color and the angle from which both photographs were taken is approximately similar, so you can still understand How does the car look better and is it worth removing the spoiler from it or not.
Auto-assistance
In the diagram we presented, the elements are depicted as close as possible to how they look in reality. Don’t be alarmed if you only find a schematic diagram for your car with symbolic images of the elements. Schematic diagram of external lighting for VAZ 2114, 2115:
- 3 – mounting block;
- 8 – lamps for side lights and brake lights;
- 11 – brake light limit switch;
- K4 – relay for monitoring the serviceability of brake light lamps and side lights.
Fault localization Understanding the operating principle allows you to determine exactly why the brake lights may not light up:
Installing a spoiler on a VAZ 2114
To increase the aerodynamics of their car, drivers install special devices - spoilers. With them, the appearance of transport completely changes. Devices are installed at the rear and front. This makes the design modern and attractive.
How to properly install a spoiler on a VAZ 2114? What secrets will help you do this yourself?
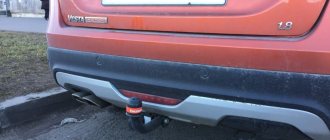
Rear spoiler for VAZ 2114