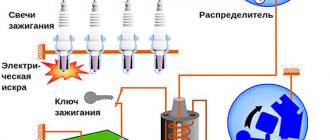
Egnition lock
Removing the “seven” lock
The ignition system on the domestic seven includes two main components - a coil and a module. The lock, in turn, consists of several parts - the switching mechanism itself, as well as the contact circuit. Each of these components is independent in its design, so if one of them breaks, it can be replaced without completely changing the lock. As for repairs, the VAZ 2107 ignition module can be repaired at home if you have all the necessary tools and an idea of how this procedure is performed.
On a carburetor or injector, the functionality of the lock can be determined using a special tester - a multimeter. To check contact ignition, the multimeter probes should be connected to the outputs on the lock one by one, and the output should correspond to one or another position of the key. If the contact group is operational, the multimeter will display a resistance that tends to zero. If the resulting indicator is different, this indicates the need to repair the contact group or replace it. In some cases, such parameters may be due to oxidation or burnt contacts, which can be corrected without replacing the group.
Instructions for setting the ignition
If you strictly followed the instructions, connected all the wires according to the diagram and did not misalign the marks, then the motor will start without problems. To adjust the ignition, you need to ensure stable engine operation, so first warm it up for a few minutes, without letting it stall by pressing the gas pedal.
Adjustments can be made on a warm engine using two methods:
- without the use of special devices - “by ear”;
- fine adjustment using a strobe light.
A strobe is a device with a light bulb that flashes simultaneously with the transmission of a pulse by the Hall sensor. When the switched on strobe is brought to the crankshaft flywheel with the engine running, the position of the notch becomes visible. Hence the possibility of precise adjustment.
This is what a strobe looks like for fine-tuning the ignition
To set up, connect the strobe power supply to the battery, and the thick wire to the high-voltage wire of the spark plug of the 1st cylinder. Loosen the distributor fastening nut and bring the flashing lamp to the pulley. Slowly turn the distributor body until the notch on the pulley aligns with the short notch, then tighten the nut.
Tuning in the traditional way “by ear” is done like this:
- Start the engine and loosen the nut holding the ignition distributor.
- Rotate the distributor smoothly and slowly within 15°. Find the position at which the motor operates most stably.
- Tighten the fastening nut.
When adjusting, turn the distributor by the membrane body
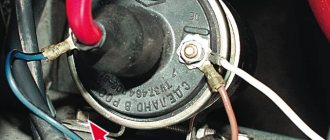
It is quite natural that after installing a contactless ignition system, the engine idle speed will increase to 1100-1200 rpm due to the increased spark power. Set the rate to 850-900 rpm by tightening the idle screw on the carburetor and using the tachometer as a guide. On VAZ 2105-2107 carburetors of the “Ozone” type, this screw is located in the lower section of the unit on the right side and is large in size. The VAZ 2108 carburetors of the Solex type (these were also installed on the “seven”) have a long plastic handle protruding from the right (in the direction of travel). The second screw, which regulates the composition of the air-fuel mixture, cannot be turned.
The arrow shows the idle speed adjustment screw.
Ignition coil
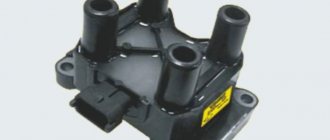
Black short circuit for the "seven"
Any type of ignition, including dual-circuit ignition on a VAZ 2107, cannot work normally without a coil. The main task of this component is to convert low voltage to high voltage. It is the high voltage in the ignition system that will make it possible to break through the air gap between the spark plug and produce the spark necessary to ignite the combustible mixture in the cylinders. To ensure normal ignition performance of an injector equipped with nozzles or a carburetor, a B117A coil is used on the contact system.
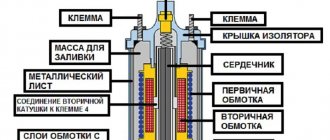
As for the location, the VAZ ignition coil is located in the engine compartment on the left mudguard. It is fixed with two special pins. As for the device itself, it is a regular transformer with a magnetic core. This element consists of an external magnetic conductor, as well as a core, and is equipped with two windings.
The cylindrical body of the device itself is made of durable steel, which protects it from damage. The entire structure is closed from above using a sealed lid made of a special insulating material (the author of the video about the adjustment is the channel Behind the Steel Gates).
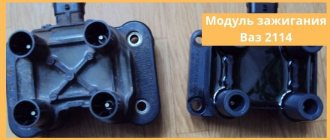
Replacing the ignition module of a VAZ 2107
In case of malfunction, it is better to replace the ignition module with a new one. Repair is possible only if the breakdown is not a break or short circuit of the windings, but a visible violation of any connection. Since all the conductors in the module are aluminum, you will need special solder and flux, as well as certain knowledge from the field of electrical engineering. However, no one can guarantee that the device will work flawlessly. Therefore, it is better to buy a new product that costs about a thousand rubles and be sure that the problem with the ignition module has been solved.
Even an inexperienced car enthusiast can replace the module independently. The only tools you will need is a 5mm hex wrench. The work is performed in the following order:
- Open the hood and disconnect the negative terminal from the battery.
- Remove the air filter housing, find the ignition module and disconnect the high voltage wires and the wiring harness block from it.
- Use a 5mm hex to unscrew the four screws securing the module to its bracket and remove the faulty module.
- We install the new module and secure it with screws. We connect the high-voltage wires and the wire block.
- We connect the terminal to the battery and start the engine. We look at the instrument panel and listen to the sound of the engine. If the Check engine light goes out and the engine runs stably, everything is done correctly.
Display Guide
So, we figured out where the VAZ module and ignition coil are located and what functions they perform, now let’s talk about setting them up. If the system torque is set incorrectly, this will cause increased gasoline consumption, as well as detonation of the power unit (the “fingers” will start knocking). In general, the operation of the motor will be unstable.
To set up the ignition of a VAZ 2107, you need to perform several steps, all of them are described in detail below:
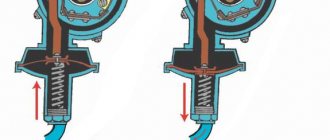
- First, you need to correctly adjust the gap that exists between the interrupter device. To do this, you should dismantle its cover in advance and clean the contact surface. At the same stage, it is necessary to check the connection of the contacts - the elements must come into contact over the entire surface, and not just in certain areas. If the contacts are poorly connected, you should try to bend them slightly. You can also try sharpening the plane a little.
- Having done this, we move on to an important stage. You need to turn the crankshaft until the contacts open as much as possible. Using a feeler gauge, you need to increase the gap to approximately 0.45 mm. It should be noted that during this, the probe between the contacts should move with low resistance.
- The crankshaft rotates until the “ignition timing” mark marked on the pulley itself. Having done this, a voltmeter should be connected to the terminal of the interrupting mechanism; if it is not there, a regular test light can be used. We are talking directly about the breaker terminal, which is connected to the coil. Using a 13mm wrench, you need to slightly loosen the nut securing the breaker to the BC.
- After these steps, you need to turn the key in the lock, but do not start the engine; at the same time, the breaker body must be turned counterclockwise. When you notice that the light has gone out, you need to start turning the housing in a different direction until the light comes on again. If the control light is on, this indicates that the moment of spark transmission through the high-voltage wires has been set. Once the torque has been established, the breaker fixing nut should be tightened until it stops.
As for checking, this is easy to do. When the car is traveling at a speed of 40 km/h, you need to press the gas so that the vehicle quickly gains power. During rapid acceleration, a brief detonation should occur until the car can accelerate to 60 km/h. If this is so, then the moment was set correctly and for some time you can forget about this procedure.
Sorry, there are no surveys available at this time.
Instructions for installing a contactless system
The procedure for replacing a mechanical ignition with an electronic one is divided into the following stages:
- selection and purchase of BSZ;
- preparation of tools;
- removing the old system and installing a new one;
- ignition setting.
If you have not previously had to deal with sparking problems in classic Zhiguli models on your own, then you will have to allocate about 3-4 hours for all the work.
Recommendations for selection
The BSZ factory kit for the VAZ 2107, available for sale, includes the following parts:
- switch with catalog number 36.3734 (also available 3620.3734);
- main ignition distributor, marking - 38.37061;
- high-voltage coil, catalog number - 27.3705;
- wiring harnesses with connectors.
BSZ parts from SOATE company
Note. The marking of the distributor is indicated for cars with engines of 1.5 and 1.6 liters. In modifications of the “Seven” with a 1.3 liter engine, the cylinder block is smaller in height and the ignition distributor shaft is shorter. Its catalog number is 38.3706–01.
There is a similar contactless kit on sale, designed for the Russian SUV VAZ 2121 Niva. In it, the distributor is marked as follows: 3810.3706 or 38.3706–10. You should not buy it for the “classics”, since the element differs in technical parameters, although it looks the same in appearance.
Among the manufacturers producing ready-made electronic ignition kits for older VAZ models, the one that has proven itself to be the best is VAZ, whose production is located in Stary Oskol, Russian Federation. Feedback from owners of “classics” about the company’s products is purely positive.
It is recommended to change the spark plugs and wires along with the ignition.
Advice. When planning to set the BSZ to "seven", at the same time replace the spark plugs (brand - A17DVR) and the high-voltage wires to them. They are not included in the delivery package, but they are very useful for stable and economical operation of the engine with the new spark generation system.
What tools will you need?
To install the electronic unit and other elements of the UPS, you will need simple tools available in the garage of any skilled motorist:
- flathead and Phillips head screwdrivers;
- open-end wrenches sizes 8, 10 and 13 mm;
- ordinary pliers;
- a spark plug wrench equipped with a cardan for convenience;
- hand or electric drill with a drill with a diameter of 3-3.5 mm.
From this set you will need keys, screwdrivers and pliers
Note. Using keys, you unscrew the terminals, distributor fastenings and coils. A drill will be needed to make 2 holes for mounting the switch. In some cars you can find ready-made holes designed for mounting electronics; they are located on the left side member (in the direction of travel of the car).
With a 30 mm wrench you can easily turn the crankshaft
It’s good if you manage to find and borrow a special wrench designed to turn the crankshaft of a VAZ 2107 by grabbing the ratchet nut. Another option is to rotate the crankshaft with a regular 30 mm open-end wrench or by turning the suspended rear wheel with 4th gear engaged.
Work on installing and configuring contactless ignition can be carried out in any convenient place, as long as weather conditions permit. Since you don’t need an inspection hole, a flat and well-lit area will do.
Installation of BSZ on a car
Before installing the electronic ignition, you need to remove the old system from the car, proceeding in this order:
- Lift the hood cover of the "Seven", disconnect the battery from the on-board network and remove the high voltage wires from the spark plugs.
- Remove the spark plugs and turn the crankshaft to bring the piston of cylinder 1 to top dead center (TDC). A long screwdriver inserted into the spark plug well will help you with this. Make sure that the notch on the crankshaft pulley is opposite the first mark on the cylinder block (it is the longest of the three).
- Unlock the metal latches of the ignition distributor cover and remove it along with the wires. To be sure, place a mark on the engine valve cover opposite the moving contact of the slider.
- Disconnect all wires from the distributor and the thin tube that connects it to the fitting on the carburetor. Loosen the nut holding the distributor skirt to the cylinder block and unscrew it. Remove the old distributor, making sure that the gasket is not lost (it is located between it and the block).
- Disconnect the wires from the contacts of the high-voltage coil and remember where they were connected. Unscrew the coil bracket and remove it from the body.
Disconnecting the negative terminal of the battery
Start installing the BSZ by installing an electronic unit equipped with an aluminum mounting plate with holes (it serves as a cooling element for the device). If there are ready-made holes on the left side member, screw the commutator to them with two self-tapping screws. Otherwise, find a free space near the coil, drill holes and secure the control unit.
Spark plug placement
Advice. Do not place the switch under the windshield washer fluid reservoir. If it leaks, it will flood the delicate electronics and the ignition will stop functioning.
To replace the coil, you need to disconnect the wires and remember their pinout
Install the elements of the contactless system in the following sequence:
- Take a new distributor, remove the cover from it and put on the gasket. Install it into the socket on the cylinder block so that the movable contact is opposite the chalk mark drawn on the engine valve cover. Lightly press the distributor skirt with the mounting nut to prevent it from accidentally turning.
- Screw the high voltage coil into the old place (the fastenings are the same). Connect the wires from the ignition switch relay, tachometer and switch to its terminals. The wire coming from contact “1” of the electronic unit is connected to the terminal marked “K” of the coil, and the wire from contact “4” is connected to terminal “B”.
- Having established a gap of 0.8-0.9 mm between the electrodes of the spark plugs, screw them into the holes of the cylinders. Place the cap on the distributor and connect all the high voltage wires, including the central one leading to the coil. Connect the vacuum tube, after which you can start starting the engine and adjusting the timely spark formation.
The notch is placed opposite the long score
Advice. When installing a high-voltage coil, the terminals are swapped, which causes some inconvenience. The issue is solved by loosening the nut of the mounting clamp and turning the coil body 180°, after which it can be put in place.
Stages of ignition installation in photographs
Position of the slider when the marks are aligned
Before setting the marks, you need to remove the distributor cap
Unscrewing the wires of the old distributor
Removing the central high-voltage wire from the coil
When all the wires are removed and the fastening nut is unscrewed, the distributor is removed from the block
After installing the new coil, the wires are connected to the same terminals
High-voltage wires must be connected using the numbers on the cover as a guide.
The switch is attached to the spar with 2 self-tapping screws
Video material on replacing the ignition with an electronic one
Diagnostics and replacement of the ignition coil on the seven
The ignition of the air-fuel mixture in the cylinders is carried out by a spark plug, which requires a high voltage of about 11-20 kV to operate. The current conversion in the ignition system of the VAZ2107 car occurs in a special cylindrical transformer. This device is installed in the engine compartment on the mudguard on the left side and is attached to it with two studs.
The type of coil used on the VAZ2107 is B-117A, it was specially designed for classic cars with a contact ignition system. This device consists of the following parts:
- core;
- external magnetic circuit;
- primary and secondary winding.
The core is a set of plates made of steel of special electrical grades. This part is the basis for coils isolated from each other. The coil has a metal body filled with transformer oil. The cover, made of dielectric, has two contacts for powering the primary coil and one terminal for the high-voltage wire.
Device and connection diagram
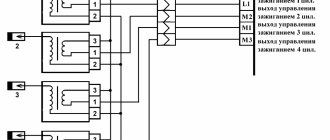
Inside the ignition system module (catalog number 2111-3705010) there are voltage converters and electronic components that distribute pulses based on signals from an external sensor. The elements are connected by jumpers, which are attached with tin-lead solder. The housing is made of dielectric material that does not collapse under the influence of vibrations and temperature changes. The outputs are equipped with contact plates to which mating elements of high-voltage cables are connected.
Connection instructions
- Install the coil onto the cylinder block and secure with screws.
- Connect the plug of the engine wiring harness.
- Connect the outputs of the coil to the spark plugs with high-voltage wires, observing the serial numbers of the cylinders. The numbers are printed on the module body. On the engine, the cylinders are counted from the accessory drive pulley.
- Connect the battery and crank the crankshaft with the starter to start the engine.
PROCEDURE FOR CHECKING IGNITION SYSTEM DEVICES
The main reason for the failure of this device is a wire break in the primary or secondary winding. This ignition system device is checked using a multimeter set to resistance measurement mode. The operation can be performed either directly on the car or after it has been dismantled.
Open the hood of the VAZ2107 car and disconnect the battery. The coil installed on the mudguard in the engine compartment is disconnected from the on-board network and cleaned of contaminants. At the first stage, we check the resistance in the primary winding; its value should be in the range from 3.0 to 3.5 Ohms. We perform the same operation for the secondary winding, acceptable values are from 7.4 to 9.2 kOhm.
REPLACING THE DEVICE
If the indicators do not correspond to the above values, the ignition coil is considered faulty. Such a device must be replaced with a working one, which can be purchased at almost any spare parts store. When purchasing the device, you must inspect it and check the availability of documents: technical passport and certificate.
Removing the ignition coil on a VAZ2107 car is carried out with the battery disconnected. Use a wrench to unscrew the nuts on the contact and mounting studs. The faulty device is removed. A spare part is installed in its place and secured and connected. Now you can connect the battery and start the engine.
Sources
- 7vaz.ru/remont/diagnostika-i-zamena-katushki-zazhiganiya.html
- autocentrum.ru/brands/lada/17209-obzor-sistemy-zazhiganiya-vaz-2107-katushki-i-drugih-elementov-posobie-po-vystavleniyu.html
- drive2.ru/l/487397562748240344/
- 21074.ru/elektrooborudovanie/kak-proverit-modul-zazhiganija-vaz-2107-inzhektor-multimetrom/
- bumper.guru/klassicheskie-modeli-vaz/elektrooborudovanie/zazhiganie/zazhiganie-2107/katushka-zazhiganiya-vaz-2107.html