Examination
If you notice signs of a problem with the ignition coil, or have to deal with a situation where the engine “died,” be sure to check the condition of this element.
As you test, you will be able to determine what caused the coil to fail and how the problems can be corrected.
https://youtube.com/watch?v=Z5cUQhKBZm0
Ignition coil
How to check the device? The instructions are not complicated, even a beginner can handle it.
First, let's check the condition of the unit, and then check for correctness of the resistance of the coil itself.
- If the engine cannot be started, make sure that the coil itself is producing a spark at all. To do this, the central wire is removed from the distributor and a spare spark plug is connected to it.
- Now take the spark plug with pliers and place the metal casing on the breaker or motor.
- If a spark does not appear when the engine starter is turned, there is a malfunction in the ignition system.
- So check the power to the coil, or rather its presence. For this you will need a multimeter. One terminal is connected to contact B on the coil, and the second goes to ground. Turn on the ignition. If there is no voltage, the culprit is the ignition switch.
- You can start the engine in emergency mode. To do this, the plus from the battery is thrown onto contact B of the coil.
If there is voltage but there is no spark, check whether the primary winding is intact. To do this, the side low-voltage wires are disconnected from the coil and resistance measurements are taken with a multimeter. Then the secondary winding is checked.
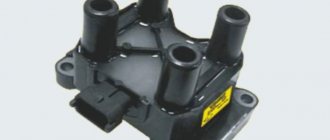
ignition coil
We will tell you about this procedure in more detail.
Multimeter for testing
Checking coil resistance
- Unplug your car. To do this, simply disconnect the negative terminal from the battery.
- Disconnect all wires and leads going to and from the coil.
- Be sure to arm yourself with the necessary tools and a tester. A universal multimeter or ohmmeter will work fine.
- Take measurements on the primary winding. To do this, the tester probes must be connected to the low-voltage terminals located at the edges of the coil. Before doing this, do not forget to clean the terminals from accumulated dirt and traces of oxidation. Surely they formed during the operation of the car.
- Record the data.
- Now the resistance of the secondary winding is checked. To do this, you need to transfer one ohmmeter probe to terminal B of the coil, and the second to the high voltage.
- Note your results.
- The last stage of the test involves measuring the insulation resistance to ground. To do this, you need to connect one terminal of your tester to ground (this is the ignition coil housing), and connect the second one in turn to all three terminals - a pair of low-voltage terminals and one high-voltage one located in the middle of the device. If the coil is working properly, then in all three measurement cases you will get a resistance of at least 50 ohms.
- Check the table against the previously recorded data.
[media= https://www.youtube.com/watch?v=2F4BDExybgs]
| Coil type | Winding | Resistance indicators |
| 3122.3705 | Primary winding | 0.43 ohms +/- 0.04 ohms |
| 8352.12 | 0.42 ohm +/- 0.05 ohm | |
| 3122.3705 | Secondary winding | 4.08 ohms +/- 0.40 ohms |
| 8352.12 | 5.00 ohms +/- 1.00 ohms |
We measure the resistance of the ignition coil
Repair
In fact, the only way to repair a faulty ignition coil on a carburetor or injection VAZ 2109 is to replace the device.
Here you just need to choose which element will replace your old coil.
- MZATE-2. This is a standard coil, which all VAZ 2109s were equipped with from the factory. It costs about 600 rubles and serves well;
- An excellent alternative option, characterized by reliability, durability and operational efficiency. But it costs about 1800-2000 rubles;
- Valeo. Something between the factory and Bosch version, which has good characteristics and positive reviews. Today such a reel costs an average of 1,500 rubles.
The coil is the most important element of the ignition system; if it fails, you can forget about traveling about your business.
How to check an ignition coil: 3 proven methods
Loading …
Troubleshooting the ignition system
Malfunctions of the car’s ignition system are unpleasant because any of them is always accompanied by serious interruptions in the engine’s operation or its complete stop. The main sign of a malfunctioning ignition system is the complete absence or “weak” spark between the electrodes of the spark plugs. What to do if there is no spark, and where to look for it? Read about this and more in our material.
Most often, the spark disappears precisely at the moment when you need to go somewhere
In order not to push the car to the nearest car service center, it is important to understand what the operation of the ignition system depends on, then finding the missing spark will not cause any particular difficulties
At the end of this article, watch the video instructions for finding a spark in the ignition system of VAZ cars.
And below we propose to get acquainted with the algorithm for searching for a missing spark in a car’s ignition system.
Why is there no spark at the spark plugs?
There can be several reasons for the lack of spark at the spark plugs. Most often the culprits of the malfunction are:
- Accumulator battery;
- High voltage wires;
- Ignition coil;
- Distributor;
- Malfunctions in the low voltage circuit.
Also, in the absence of a spark, special attention should be paid to checking the quality of contacts and electrical connections of the ignition system elements. You can check the condition of the contacts simply by rubbing them with your hand.
Carefully inspect the wires and blocks of the ignition system - if dirt, oil or water is found on them, they must be wiped with a dry cloth. After that, try starting the engine, it may start this time.
Checking the battery
A clear sign of problems with the battery is a dull and quiet horn signal. Also, if there are problems with the battery, the indicator lights on the instrument panel usually go out while the starter is rotating. In this case, the reason for the lack of a spark may be poor contact at the terminals or a low battery charge.
- If the terminals are oxidized, they must be cleaned and tightened tightly. In addition, you can use graphite lubricant, which will reliably protect the contacts from oxidation in the future.
- If the battery is discharged, it must be charged using a charger.
For information on how to properly charge a car battery and maintain it, read our battery charging instructions.
Checking high voltage wires
Next, it’s worth inspecting the high-voltage wires: they must have a neat, not “tattered” appearance, without insulation damage, otherwise they will have to be replaced. If the wires are ok, then you can start looking for a spark.
We recommend starting your search for a spark with the spark plug wires. To do this, you need to remove the tip of the spark plug wire from the spark plug and bring it to the “ground” (the nearest unpainted metal part of the body or engine) at a distance of 5-8 mm, after which you need to turn on the starter for a few seconds.
The rotation of the starter should be accompanied by an uninterrupted bright spark of white color with a slight blue tint. If there is no spark, you need to check the ignition coil. A violet, red or yellow spark indicates a malfunction in the ignition system.
It is also worth noting that the spark plugs themselves rarely fail all at the same time. If there is a “spark” in the spark plug wires, you can check any spark plug by unscrewing it from the cylinder head and putting the spark plug wire on it. Touch the metal part of the spark plug to the “ground” of the car, and by rotating the starter, make sure that there is a spark at the electrodes of the spark plug.
It is necessary to change spark plugs within the time limits established by the maintenance regulations for your car (usually every 15-25 thousand km).
You can learn more about the markings and heat ratings of spark plugs from our material at this link.
Checking the ignition coil on VAZ 2108, 2109, 21099 cars
If such malfunctions occur in the operation of the engine of VAZ 2108, 2109, 21099 cars such as the disappearance of a spark or a weak spark, unstable idling, inability to adjust idle speed, difficult starting or impossibility of starting the engine, failures and jerks when starting and in motion, etc., It makes sense to check the functionality of the ignition coil.
Required Tools
- 8 mm spanner or open-end wrench
— a tester (multimeter or similar device) with an ohmmeter mode (preferably also a megohmmeter)
Preparatory work
You can check the ignition coil on VAZ 2108, 2109, 21099 cars without removing it from the car.
- remove the negative terminal from the battery
- disconnect the high-voltage wire from the ignition coil
- disconnect the wires leading to the two terminals of the coil
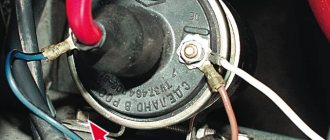
To do this, use an 8 mm wrench to unscrew the nuts securing the wires to terminals “K” and “B”. We disconnect the wires, remembering their position, so as not to confuse them when installing them back.
— Check the serviceability of the primary winding of the ignition coil
Checking the primary winding of the ignition coil of VAZ 2108, 2109, 21099 To do this, connect one tester probe to terminal “B” and the second probe to terminal “K” - the terminal of the primary winding. We turn on the device in ohmmeter mode. The resistance of a serviceable primary winding of the ignition coil should be close to zero (0.4 - 0.5 Ohm). If it is lower, then there is a short circuit, if higher, there is a “break” in the winding.
— Check the serviceability of the secondary (high-voltage) winding of the ignition coil
Checking the secondary winding of the ignition coil of VAZ 2108, 2109, 21099 To do this, connect one tester probe to terminal “B” of the ignition coil, and the second probe to the terminal for the high-voltage wire. We measure resistance. For a working secondary winding it should be 4.5 - 5.5 kOhm.
— Check the insulation resistance to ground
For such a test, it is necessary that the multimeter has a megohmmeter mode (or a separate megohmmeter is needed) and can measure significant resistance.
To do this, we attach one tester probe to terminal “B” of the ignition coil, and press the second probe to its body. The insulation resistance must be very high - 50 mOhm or higher.
If at least one of the three checks shows a malfunction, the ignition coil should be replaced.
Notes and additions
— Ignition coils installed on VAZ 2108, 2109, 21099 cars can be of two types: dry with a closed magnetic circuit (3122.3705) and oil-filled with an open magnetic circuit (8352.12, 027.3705, 27.3705, 27.3707-01, ATE1721). The winding resistances for them are slightly different. Coil 3122.3705 – primary winding 0.43±0.04 Ohm, secondary 4.08±0.4 kOhm. Coils 8352.15, etc. – primary winding 0.42±0.05 Ohm, secondary 5±1 kOhm. Measurements were carried out at +25 degrees.
Twokarburators VK - More information on the topic in our VKontakte group, on Facebook Twokarburators FS, in Odnoklassniki - Twokarburators OK and in Yandex Zen - Twokarburators DZ
— The procedure for connecting high-voltage wires to the distributor cover on VAZ 2108, 2109, 21099 cars
— Malfunctions of the contactless ignition system of VAZ 2108, 2109, 21099 cars
— Malfunctions of the distributor of VAZ 2108, 2109, 21099 cars
— Checking high-voltage wires on VAZ 2108, 2109, 21099 cars
— Setting the ignition timing on the engines of VAZ 2108, 2109, 21099 cars
Comparative test repair
— Checking the ignition coil of the ignition system of carburetor engines of VAZ 2101, 2102, 2103, 2104, 2105, 2106, 2107 cars
Proper short circuit check
First, check the coil winding for short circuits. To do this, you need to connect a multimeter that determines the resistance. Before checking, it is recommended to lubricate the tip of the high-voltage wire with a special lubricant, which can be purchased at any spare parts store for the VAZ 2107, or with technical petroleum jelly.
We disconnect the module from the tips and connect one terminal of the device to the central contact that the coil has, and the other to ground. If the device display shows “infinity”, this means that there is no short circuit - that is, everything is in order
It is worth noting that if, when ringing the circuit, the display indicators did not change (and, for example, the number one was preserved), then this is infinity
Now let's check the primary ignition circuit for an open circuit.
To do this, you will need to install a multimeter to the left and right contacts, which are responsible for the ignition function. With this installation, the ohmmeter should change its readings. Otherwise, it’s not just the coil that needs to be replaced, but the entire device
Please note that the normal value is 3-3.5 ohms
Flooding when there is a spark and the starter is rotating
Experienced motorists are faced with situations when a spark appears, the starter rotates, but the lower part of the spark plugs is filled with gasoline. Do not be deluded by the presence of a fire, since this event can occur irregularly under pressure and can be lost while the engine is running.
The cause of the event appears to be excessive pressure in the cylinders. It will be possible to identify the event and the factors that motivate it by monitoring the car on a stand that simulates a combustion chamber.
We recommend paying attention to the valve timing, because their failure will be the cause of wet electrodes. In injection internal combustion engines, motorists should check the functionality of the bypass valve located on the fuel rail. If its malfunctions are ruled out, you will need to find out the gasoline pressure in the rail, because the manufacturer regulates this parameter
Sharp fluctuations and going beyond the specified interval (larger/smaller sides) can block the start of the internal combustion engine or stimulate flooding of contacts for spark ignition
If its malfunctions are ruled out, you will need to find out the gasoline pressure in the rail, because the manufacturer regulates this parameter. Sharp fluctuations and going beyond the specified interval (larger/smaller sides) can block the start of the internal combustion engine or stimulate flooding of contacts for spark ignition.
Diagnostics will need to be carried out for the sensors of the electronic control system and for the injectors. An example of a failure is when the coolant temperature sensor sends incorrect data. In such a situation, the control unit unreasonably over-enriches the fuel mixture. Much less often, the culprit of incorrect impulses is a failed electronic control unit or a malfunction of its software. In this case, problems will appear not only with the ignition.
Ignition settings
When setting up the ignition, you will need to do the most important thing - install the shafts according to the marks so that the gas distribution functions synchronously with the operation of the piston group. This is the first thing you should do before you start adjusting the ignition. It is worth noting that there should not be any particular difficulties during setup, especially on VAZ 2108-21099 cars. The thing is that the ignition distributor on the engines of these machines can only be installed in one position. Moreover, the ignition switch does not undergo any settings during this procedure, since it does not have any. The distributor body rotates around its axis to make more precise adjustments. And this turns out to be enough. To accurately set the torque, you can use a simple circuit that uses a simple LED as an indicator. The Hall sensor is disconnected from the system, and positive power is supplied to its negative terminal. An LED is switched on between “+” and the signal LED, and a 2 kOhm resistance is connected in series with it to reduce the voltage. But the plus of the Hall sensor is connected to ground. Now all that remains is to slowly rotate the distributor housing. The moment when the diode lights up will be the desired one.
How to replace the ignition module on a VAZ 2108-VAZ 21099
1) The module is not difficult to remove, but there will be problems with checking it, because first of all, special equipment is needed for this, although using a conventional multi-meter you can check the module for functionality (We will describe how the module can be checked in this same article), but first you need to remove it, to do this, first disconnect the wire block from the module (see photo 1) which is attached to it by a latch, so don’t forget to bend the latch on the block, otherwise you can break it off as soon as the block will be disconnected, pick up a wrench and use it to completely unscrew the upper bolt (see photo 2) of the module fastening, then unscrew the side nut (see photo 3, indicated by the red arrow) of the bolt and so as not to lose the bolt, you can remove it like this well, and finally, move lower (Under the car if you can) and there look for the last bolt securing the module in the lower part (see photo 4, the bolt is indicated by an arrow), loosen this bolt a little and then completely remove the ignition module from the car, with To do this, disconnect all four wires that are connected to it, otherwise they will not allow you to remove the module from the car.
THIS IS ONLY ONE METHOD FOR CHECKING A MODULE
!!! DO NOT RUN FOR A NEW IMMEDIATELY!!! THERE ARE MORE METHODS, THIS IS.
https://youtube.com/watch?v=4wHGBUx6x3M
In general, when working with the module, it is recommended to de-energize the on-board system (the network is de-energized by removing the minus terminal from the battery; if you don’t know how to remove the terminal, read the article: “Replacing the battery”, everything is written in paragraph one of that article), you never know what can happen, so safety is paramount, but before de-energizing the system, check the wiring block that is connected to the module and after that you can de-energize it, to check, disconnect it and turn the ignition key until all the devices in the car light up as soon as they light up they pick up a multi-meter and turn on the voltmeter mode on it and measure the voltage on the block, to do this, connect two wires coming from the multi-meter, connect one of the wires to the terminal that is marked (see the wire block, it has these markings on it ) with the letter C, and the other which is marked with the letter D and the device should show a voltage of 12 V, if it shows less or does not show anything at all, then either the battery is discharged or the wiring is faulty, but to check the ignition module itself it is better to do this either using a special device, or changing it to a known-good module, taking it from a neighbor as an example (If he has the same car), or using the same multi-meter, you can try (But even a multi-meter can show incorrect results, therefore, do not rely too much on this method), read about how to do this in the article: “Replacing the module and coil on a VAZ”, namely in that article the item “Note!” read it!
2) Now that the module has been removed, disconnect it from the bracket; to disconnect it, use a wrench and a socket head of a suitable size; in total, the module is attached to the bracket with three nuts (see photo 1), unscrew all these nuts and then you can disconnect the module from the bracket (see photo 2).
1. The new module is installed in its place in the reverse order of removal, but only when installing, first align the new module with the bracket by tightening the three nuts that secure the module to the bracket and something else, when the module is put in its place, the high-voltage wires that you got from the old one disconnected to a new one, you need to connect it in a certain order, that is, on each wire there is a number from 1 to 4 (see small photo below), on the module itself these numbers are also there (Red arrows are indicated, but unfortunately the number 2 is not visible, because her small photo is covered), in addition, with these numbers on the module there are pins (Indicated by blue arrows) to these pins and high-voltage wires must be connected, so connect all the wires to these pins so that the numbers match (That is, the first wire, to pin one, the second wire to terminal two, etc.), if there is a mismatch, the car will not work correctly and may not even start.
Contactless distributor
The contactless ignition system is a modernized KSZ. Its main difference is the absence of a contact group, instead of which a Hall sensor is used. The advantages of such a distributor are:
- no need for periodic adjustment;
- more reliable engine starting;
- reduction in fuel consumption;
- increase in power.
A non-contact distributor is considered a more modern and reliable device
The Hall sensor is mounted on the distributor shaft. Structurally, it consists of a permanent magnet, which has a special screen with slots. The number of slots usually corresponds to the number of cylinders. As the shaft rotates, the screen holes pass past the magnet, causing changes in its field. During operation of the ignition distributor, the sensor reads the shaft revolutions, and the received data is fed to a switch, through which the signal is converted into current.
Examination
Checking the contactless mechanism repeats the same steps as with the contact system, excluding the contact group. In addition to the cover and slider, problems may arise with the switch. The main sign indicating problems with it is the absence of a spark on the candles. Sometimes a spark may be present, but very weak or disappear periodically. At the same time, the engine runs intermittently, stalls at idle, and power decreases. The same problems can occur if the Hall sensor malfunctions.
Switch
The easiest way to test a switch is to replace it with a known good one. Since this possibility is not always available, another diagnostic option is also possible.
One of the reasons for the lack of spark on the spark plugs may be a faulty switch
Before starting the test, you must make sure that power is supplied to the ignition coil and that the Hall sensor is in working condition. The tools you will need are a test lamp and a standard set of keys. We check the switch in the following sequence:
- Turn off the ignition.
- Unscrew the nut on the coil contact “K” and disconnect the brown wire.
- We connect the control unit into the gap between the removed wire and the coil contact.
- Turn on the ignition and crank the starter. The light indicator will indicate that the switch is working properly. If there is no light, the switch will need to be replaced.
Video: checking the ignition distributor switch
To replace the switching device, simply unscrew the mount to the body, disconnect the connector and replace the non-working part with a working one.
Hall Sensor
The sensor is located inside the distributor, so to access it you will have to remove the cover.
The Hall sensor does not fail very often, and if this happens, the fault can be identified by the absence of a spark
You can check the part in several ways:
- replace the sensor with a known good one;
- use a multimeter to check the voltage at the output of the element, which should be 0.4–11 V;
You can check the Hall sensor with a multimeter by connecting the device to the output of the device - assemble a circuit that simulates the operation of the sensor by connecting contacts 3 and 6 going to the device being diagnosed (the appearance of a spark will indicate a faulty part).
Contactless - transistor ignition system (BTIS)
Now we have come close to the ignition system of the VAZ 2109. This VAZ car model is equipped with a non-contact ignition system, which has been used since the mid-80s.
In this system, the chopper mechanism has been replaced by a more modern non-contact sensor, which instantly and accurately determines the engine speed and angle of rotation.
Unlike earlier ignition systems, where their operation was based on the mechanical action of parts with each other, the principle of operation of the new ignition system is based on an electrical impulse, which is generated using a non-contact sensor. But first things first.
Device Features
The ignition coil serves to produce a spark coming from the spark plug electrodes. To put it briefly and simply, this is a small transformer that operates in pulse mode and converts 12 volts from the car into 20-30 thousand volts at the output. High-voltage wires are used to transmit the impulse, which also sometimes cause coil malfunctions.
The distributor-type ignition system works simply - the distributor (distributor) receives a low-voltage pulse from the car's network, transmits it to the coil, and it, in turn, transforms the pulse into a high-voltage pulse. Next, the distributor distributes sparks among the cylinders depending on the order of their operation.
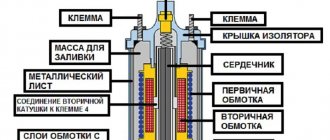
Structurally, the VAZ 2109 coil consists of a pair of windings - secondary and primary.
- The primary winding has fewer turns, but wires with a larger cross-section;
- The secondary winding of a coil with a large number of turns, but a smaller wire cross-section.
Windings
Signs of breakdown
Often the spark at the carburetor disappears unexpectedly when the driver is not prepared for such a turn of events. But if you have enough experience and pay close attention to the behavior of your car, you can detect signs of a malfunction before the spark disappears and the engine does not start.
So, why does the spark disappear, what are the reasons and what signs may indicate a failure of the ignition coil?
Approximately 500 kilometers before the coil’s life is over, on a cold engine the device normally starts working only after a couple of minutes of warming up. The engine starts with difficulty, but some people think that the problem is in the idle system. At the same time, the engine begins to behave unstably at low speeds.
This phenomenon occurs within 10-30 seconds, so you don’t always have time to pay attention to it. Another short-term symptom is the active vibration of the engine when starting a cold engine and holding the gas pedal.
This will happen literally for 3-5 seconds, and after pressing the pedal again, everything will return to normal. When accelerating or changing gears at the gearbox, the engine may produce jerks, vibrations, and the dynamics deteriorate for a short time
The downside is that such a symptom may appear for a few moments, but disappears just as quickly. The most obvious sign is the complete failure of the engine to try to start. The spark disappears, and therefore the chances of starting are zero.
Checking the ignition distributor
If you suspect a malfunction of the breaker-distributor, you must carefully inspect its cover from the inside.
- If the cap is in order, then simply wash it with gasoline,
- If any cracks are found, the cover will need to be replaced.
The center carbon contact of the breaker is checked for sticking by lightly moving it with your finger.
The rotor insulation of the breaker-distributor is checked for breakdown as follows:
- Place the central high-voltage wire with a gap of 5-8 mm from the rotor electrode,
- After this, close and open the breaker contacts with your hand (the ignition must be turned on).
The appearance of sparks in the gap indicates a rotor malfunction that will need to be replaced.
Lada 2109 › Logbook › Dual-circuit ignition on the VAZ 2109
I suffered several times in the winter with starting the engine. Even when it’s not cold, but at 0 degrees, you come to start it and the car is silent. You unscrew the damp spark plugs and the battery eventually dies! With a good battery, it starts normally. As it turned out in the end, I had a contact ignition coil B- 117 from the classics. I immediately changed it to a coil from BSZ. And the car started to start and drive much better, but I didn’t stop there and decided to make a dual-circuit ignition with 2 hall sensors, 2 switches and 2 coils from the Volga ZMZ- 406
How to check the ignition module of a VAZ-2114 injector 8 valves
To begin with, I started assembling the distributor because it is the most basic and thinnest part of the system. I took the distributor from OKI as a basis, or an ordinary nine-wheel one. I just had it from the window lying in the garage. I completely disassembled it and started installing the second one. hall sensor directly to the standard platform at an angle of 90 degrees. Marked the approximate position of the 2nd sensor. On the platform there are risks of the approximate position of the middle of the sensor:
Drilled and tapped the threads for the bolts:
Then I carefully cut the hall sensors themselves with a metal cloth so that they do not interfere with each other. It looks something like this:
Then I modified the shaft, replaced the ignition angle advance weights with nine-shaft ones. They are smaller and lighter than those of the Oka, the photo shows Okushinsky weights! And accordingly, I also replaced the springs. The curtain remained the standard Okushinsky one, I didn’t touch it. If you make it from a nine-shaft shaft, then the curtain must also be modified sawing off two opposite ones so that it looks like in the photo:
That's all for the shaft! Next, I cut out a small piece from the distributor body itself to attach the fork of the 2nd hall sensor, drilled a hole and cut a thread for the bolt
Then I put the whole thing together. Here’s what happened:
Note: during assembly it turned out that the platform on which the hall sensors are attached from the Oka is larger than from the 2109 and it turned out to be easier to mount the sensor, so another one +, It is advisable to buy the same sensors themselves in the same store from the same batch as they are slightly different! That's all for now with the distributor!
Then I bought the rest of the necessary parts: 2 coils from the Volga ZMZ-406, a wiring harness for the BSZ 2108, an “Astro” switch, as I already had the same one
I connected the wiring according to the diagram:
Note: when connecting according to scheme 1, the tachometer will show half the revolutions. If you want to make a normal tachometer, then there is also scheme 2, you will need to solder in 2 KD213A diodes. But I did not do this and did it according to scheme 1. And don’t try to connect wires without diodes according to scheme 2; thereby you parallel both coils and it turns out that all 4 spark plugs spark at the same time when both hall sensors are triggered! Tested personally)
I made a metal mount for the coils, but it didn’t turn out very well:
And now about the most important thing: for the system to work well, you need to adjust the synchronization of the hall sensors so that the spark on all cylinders is the same advance. To do this, you need to make the opposite mark on the flywheel, this will be the TDC of the 2nd cylinder. You need to count 64 teeth along the crown from the standard mark. And Using a strobe light, align both marks from the 1st and 2nd cylinders, moving the 2nd hall sensor up and down or both sensors in the direction of the white arrows. To do this, I drilled holes with a thin drill in the sensors to move.
Description of the ignition coil for the VAZ 2109
The characteristics, type and even appearance of the coil differs depending on the car model. Specifically on VAZs, you need to look for the ignition coil under the hood, in the engine compartment. Using special pins, it is attached to the mudguard on the left side and looks like an insulated cylinder. Inside it (or, in mechanics' slang, inside the bobbin) there is a transformer between two windings. It’s worth talking about them in more detail.
In VAZ cars, the initial voltage, which is then converted to high voltage, is 12 volts. First, freedom is given to the primary winding - a small copper wire (130-140 turns). A secondary winding is placed on top of the primary winding, which is also a copper wire, but much thinner. The number of turns on the secondary winding can reach 25 thousand.
Signs of a faulty ignition coil
If, after turning the key in the ignition switch, you hear that the starter is turning, but the engine does not start, then, as a rule, this may mean that the ignition coil is not working correctly or has failed. Although there are many reasons why the engine does not start when you try to start it: spark plugs, explosive wires, problems in the fuel system (pump, fuel filter, clogged line), and so on...
But if, after all, the reason is in the ignition coil, then this can be understood by the following symptoms:
- There is no spark at the spark plugs;
- There is no current on the BB wires;
- Visual defects (cracks and chips on the reel body);
- A burning smell under the hood, which leaves traces of melting of the ignition coil (the primary or secondary winding has burned out).
Checking the ignition system of the VAZ-2106
Prepare a Phillips and flathead screwdriver, a test lamp or tester, rubber gloves and pliers. Before checking the contact ignition, apply the parking brake or chock the vehicle's wheels.
- First, carefully check the integrity of all elements of the system, as well as the reliability of the connection of high-voltage wires in all areas. They must be tightly seated in the appropriate contacts.
Turn on the ignition and check the current flow into the system. To do this, connect one wire of the lamp or tester to ground, and the second to the “+B” contact of the coil. The lamp should be on and the tester should show a voltage of more than 11 V. Turn off the ignition.
- To test the high voltage wire, put on rubber gloves and remove the center wire from the distributor cover. Install a working spark plug into the cable end, and then press it against the mass with the metal part. Turn the ignition on and turn the crankshaft. If there is a discharge on the spark plug, then the wire is OK. In the case where there is no spark, you need to look for the cause of the malfunction in the distributor.
To check the performance of the distributor, remove the cover and inspect it for any damage, as well as the integrity of the carbon contact. If defects are found, the cover should be replaced with a new analogue.
Look at the distributor rotor. The runner must not have any damage. Sometimes the rotor housing can break through to ground. Also check the functionality of the noise suppression resistor installed in the rotor. If there is the slightest doubt, it is recommended to replace the rotor.
- After this, it is necessary to check the presence of a gap between the contacts of the MP. First, install the crankshaft using a special wrench in a position in which the upper end of the distributor shaft cam will be exactly in the center of the textolite pad of the rotating contact lever. Measure the gap between the MP contacts, its specified value is 0.35-0.4 mm. Make appropriate adjustments if necessary. After this, check the advance angle.
After completing the above steps and correcting any identified problems or replacing damaged components, start the engine. If in this case the motor does not work, try replacing the capacitor located in the breaker.
Useful tips
- If the noise suppression resistance installed in the distributor rotor fails, it can be temporarily replaced with a spring from a regular ballpoint pen.
What should you do if you discover a breakdown of the ignition switch or a broken wiring along the way and as a result, power does not flow to the ignition coil? In this case, you can go to the nearest service center by connecting the emergency power supply using an additional wire. Connect one end of it to the positive terminal of the battery, and the other to the “+B” terminal of the coil. However, make sure that there is no sparking. If strong spark discharges occur, immediately disconnect the wire. This means there is a problem with the wiring and this option will not work.
Today we will look at the design and diagrams of ignition systems for VAZ cars of all major models. Since carburetor versions of VAZ are practically history, we will dwell in detail on the ignition systems of injection cars. Their ignition system is based on an electronic ignition module. We also recommend that you carefully consider the choice of spark plugs and the quality of high-voltage wires, because the quality of the spark and, accordingly, the operation of the ignition system as a whole will depend on them. The information is intended as a reference guide for self-repairing a car.
Setting the ignition
Another important problem among VAZ 2107 owners with an injector system is how to accurately set the ignition. As you know, in such models, all engine control is carried out electronically, so for such work you will need a computer, installation of a special program on it for the engine of an injection car, a tester, as well as keys and screwdrivers
As you know, in such models, all engine control is carried out electronically, so for such work you will need a computer, installation of a special program on it for the engine of an injection car, a tester, as well as keys and screwdrivers.
First of all, turn on the ignition and ground to make sure the electric pump is working. If it does not work, then check the relay that controls it.
Is the fault light flashing? Connect your personal laptop with a special program to the car’s on-board computer to try to determine the cause using the available data.
If the engine is working properly, you should start it and check the throttle device: throttle position sensor, throttle opening level (no more than 1%) and passing wires. Use a tester to measure the voltage of the sensor (it should not exceed 0.55 volts) and the on-board network (its voltage should exceed 12 volts).
Perform the same actions again, but with the gas pedal pressed all the way. Now all readings should change as the sensor voltage is normally around 4-4.5 volts and the throttle opening is hovering around 90%. Adjust the throttle to full opening and turn off the additional air flow, and then start the engine and lock the throttle at half opening. Now you should adjust the throttle to completely close the hole.
As you can see, there is nothing difficult either in installing the coil yourself or in setting the ignition on this car model. Now you can decide for yourself whether to contact specialists or not. Remember that by performing small checks and minor repairs on your VAZ 2107 on time, you will always be confident in the reliability of your “iron horse”.
labavto.com
One of the reasons for problems with a spark in the internal combustion engine on a VAZ 2109 is a malfunction of the ignition coil (IC). To accurately diagnose a malfunction, you need to know the design of the unit, be able to check it and, if necessary, install a new product.
Coil design features
This unit is designed to convert low on-board voltage (12 V) into high voltage (15-30 thousand V), which is supplied to the spark plugs to ignite the fuel assemblies in the engine cylinders. The impulse is transmitted through high voltage wires.
Both engines with injector and carburetor engines have an ignition system with a distributor (distributor). The scheme of work is not complicated. The distributor receives low-voltage current, which is then transmitted to the short circuit. The received pulse is converted into high-voltage current. Then the distributor distributes it in a certain order to the candles.
The main elements of the coil are the primary and secondary windings, wound on an external magnetic circuit. The first one has a small number of turns of copper wire - from 100 to 150, but it has a large cross-section. The second has a much larger number of turns - from 15,000 to 30,000, the wires are also made of copper, but with a smaller cross-section. There is a primary winding on top, and a secondary winding inside it.
In the secondary winding, a high-voltage current arises due to the action of electromagnetic induction and the accumulation of charge in the primary winding, which arise after cutting off the current in the primary. The high-voltage current is supplied to the central terminal of the short circuit, and then the distributor distributes it to the spark plugs.
Signs and causes of malfunctions
Most often, the spark disappears unexpectedly, but attentive drivers with experience can predict the disappearance of the spark by the following signs:
- 500 km before the end of the short circuit service life, the car can sometimes be difficult to start, only after a few minutes of warming up. Some drivers associate this with idling.
- When starting a cold engine and pressing the accelerator pedal, the engine begins to actively rev. This lasts a few seconds and after further pressing the accelerator, the engine runs normally.
- Dips or jerks at start.
- Unstable idling, unstable engine operation at low speeds.
- When you press the accelerator hard, instead of increasing speed, dips appear.
- Weak spark or its complete disappearance.
Typical short circuit faults:
- there are oil stains on the cover;
- short circuit between the turns of any of the windings;
- breakdown of insulation of the secondary winding to the housing (ground) short circuit;
- break in the electrical circuit of the windings;
- mechanical damage or defects on the body or cover of the short circuit;
- The readings on the measuring tester do not meet the requirements.
Replacing the ignition module of a VAZ 2107
In case of malfunction, it is better to replace the ignition module with a new one. Repair is possible only if the breakdown is not a break or short circuit of the windings, but a visible violation of any connection. Since all the conductors in the module are aluminum, you will need special solder and flux, as well as certain knowledge from the field of electrical engineering. However, no one can guarantee that the device will work flawlessly. Therefore, it is better to buy a new product that costs about a thousand rubles and be sure that the problem with the ignition module has been solved.
Even an inexperienced car enthusiast can replace the module independently. The only tools you will need is a 5mm hex wrench. The work is performed in the following order:
- Open the hood and disconnect the negative terminal from the battery.
- Remove the air filter housing, find the ignition module and disconnect the high voltage wires and the wiring harness block from it.
- Use a 5mm hex to unscrew the four screws securing the module to its bracket and remove the faulty module.
- We install the new module and secure it with screws. We connect the high-voltage wires and the wire block.
- We connect the terminal to the battery and start the engine. We look at the instrument panel and listen to the sound of the engine. If the Check engine light goes out and the engine runs stably, everything is done correctly.
Video: replacing the ignition module of a VAZ 2107
Thus, it is quite simple to determine the malfunction and replace the failed ignition module with a new one with your own hands. To do this, you only need a new module, a 5-point hexagon and step-by-step implementation of the instructions from specialists.
