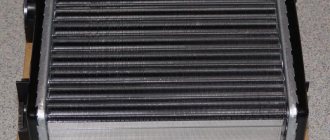
The stove heating system on the Lada Granta car functions quite well, the owners have no complaints. The stove radiator is reliable and durable. However, there comes a time when the process of metal corrosion begins and the seams peel off. A faulty heating system can cause a lot of trouble, especially in sub-zero temperatures.
Frosting of windows and cold inside the cabin are the first symptoms of unstable operation of the heating system. Prevention is necessary.
Let's look at the step-by-step process of replacing the heater radiator on a Lada Granta car.
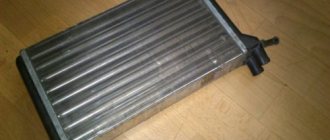
Heater radiator: responsible for heating the interior
It’s hard to imagine a modern car without a standard set of devices and options, thanks to which driving the vehicle becomes as convenient as possible, and staying in the cabin is comfortable and safe. The functions of maintaining a favorable temperature regime in the car are assigned to the heating, air conditioning and ventilation system, which, depending on the situation, can heat, ventilate or cool the air in the cabin. At the same time, one of the key components of the heating system is the stove, which includes a radiator that acts as a heat exchanger. The air entering the car interior is heated by the radiator, and it is heated by the liquid that cools the engine.
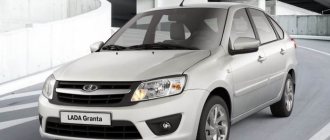
"Lada Granta" is equipped with a large number of options, thanks to which driving the vehicle becomes quite convenient
How does the Lada Granta heating system work?
Structurally, the Lada Granta heating system consists of:
- an air duct directing the flow to the left deflector (deflector is a device for enhancing traction);
- heat exchanger covers;
- seal;
- stove radiator;
- air duct to glass;
- stove body;
- central air duct;
- an air duct directing the flow to the right deflector;
- recirculation shutter rods;
- fan shell;
- directly from the fan;
- a resistor that regulates the operation of the fan;
- main air duct;
- distribution valve rods;
- regulating device;
- a device that directs air to the feet of passengers;
- thermostat shutter rods.
The structure of the Lada Granta heating system allows you to carry out repairs on your own
How does the heating system work?
The heating and ventilation system in Lada Granta is a supply and exhaust system . What does this mean? Air from outside penetrates into the cabin through a special device in the form of an air intake box placed in front of the windshield. The amount of air coming from outside is regulated by a special recirculation damper. The recirculation system provided in the Lada Grant allows for better heating of the air in the cabin in winter and faster cooling in summer (if air conditioning is available). However, you should not abuse the recirculation mode, since this will introduce stale air into the car. It is convenient to use recirculation to protect against foreign odors from the street entering the cabin, but only for a short time. The principle of recirculation is to block the access of air from outside and repeatedly pass internal air flows through the heating or cooling element.
Next, an air filter 7 appears on the path of air flows, which serves as a barrier for dust and dirt particles. Do not forget to change the filter element in accordance with the schedule recommended by the manufacturer. The air, cleared of mechanical particles, is picked up by fan 11, driven by engine 12, and pumped into the car interior.
After this, the air stream passes through the air conditioner evaporator 13 (if provided in the package), under which there is a drainage hole 14 for draining the condensate. Depending on the position of the damper 15, which regulates the temperature, the air moves to the heater radiator or bypasses the heat exchanger. If the damper directs the jet to the radiator, then heated air enters the cabin, the flows of which can be distributed as necessary onto the windshield and side windows or under the feet of passengers.
Heating and ventilation system "Lada Grants" - supply and exhaust
The exhaust occurs through special openings in the rear of the body, which can be found under the trunk lining. For normal operation of the hood, these openings should not be blocked by cargo carried in the trunk. Among other things, a closed hood can cause windows to fog up.
Brand name – LRh – Luzar Radiator heater
Heating radiators (also known as heater radiators, also known as heater radiators) are heat exchangers that use the heat generated by the engine to heat the vehicle interior. They allow you to maintain a comfortable temperature and prevent the car windows from fogging up.
For reference: different names of this node have equal rights of use. For example, “heating radiator” and “stove” come from the function of this heat exchanger, “heater radiator” and “stove radiator” - from the installation .
LUZAR manufactures hundreds of heater radiators for a wide range of cars presented on the Russian market. They can be purchased in partner stores throughout Russia or online.
Many models of heater radiators are supplied to car factories in Russia and Ukraine - both for passenger cars and for trucks and buses.
The production range of manufactured stoves is constantly increasing; New types are being developed for the most popular cars in Russia.
Powerful R&D allows us to conduct research in the field of improving heat exchangers and create new designs that provide increased performance properties of heater radiators. Main areas of research:
- use of different types of tubes
- changing the location of the tubes
- change in the “fillability” of the core
- use of turbulators-swirlers
- use of various aluminum alloys
- testing of solders with different characteristics
- improving the corrosion properties of metal
- ... and many other R&D areas.
Sequence of actions when replacing the Lada Granta heater radiator
Note to the driver!
There are two ways to dismantle the heater radiator on a Lada Grant: according to the instruction manual and the “folk method”. Let's look at each with a specific example.
- We place the car within the perimeter of the repair area, turn off the engine, and open the hood. We provide priority safety measures.
- After the engine has cooled down, we proceed to dismantling the heating system on the Lada Grant without a condenser.
Heating system composition
The operating principle of the heater in the Lada Kalina is very simple. It is built on a supply and exhaust circuit. The heater circuit contains:
- cabin air filter;
- air ducts;
- heater radiator;
- electric fan;
- air flow and fan operating mode control module.
The design of the interior stove looks exactly like this, and is located behind the dashboard and only the system controls are present on its front surface in the Lada Kalina cabin. A running engine generates heat, which is removed from it by the cooling system. This circuit includes a heating radiator.
Replacement process
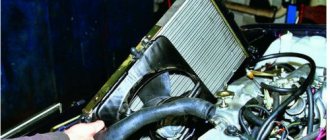
Sometimes Lada Granta owners have to deal with a situation when a heater radiator leak is detected. In these cases, car owners make different decisions. Some people prefer to purchase a sealant and use it to stop the leak. Indeed, the “magic” sealant very quickly copes with such a problem. However, it should be taken into account that along with the holes that appear, the sealant also clogs the rest of the radiator space, as a result of which it will be useless to count on excellent operation of the stove.
If you find that the stove is blowing cold air or warm air flows into the cabin, but extremely slowly, you should suspect problems with the radiator. In this case, we strongly recommend that you remove it and then conduct a thorough visual inspection. Only after this can a decision be made regarding all subsequent actions. You can thoroughly clean it and blow it out. If it is absolutely clear that it is impossible to return it to its previous state, it will not be possible to clean it, then you have to resort to drastic measures, which include replacing the stove radiator.
Flushing
If you inspect the removed radiator and are convinced of its integrity, then the problem is only in its excessive contamination; accordingly, this device needs thorough cleaning. Of course, if you are convinced in advance that the radiator is in order, then you can wash it without even resorting to dismantling it.
However, an already removed radiator can be cleaned. We suggest that you acquire special chemicals that will be able to cope with the “age-old” dirt. Experienced car owners can further disassemble the radiator, then continue cleaning it using a kind of brush. We do not recommend that you resort to such actions, so as not to complicate your “life” and not provoke even bigger problems.
You can clean a removed radiator without fear because chemicals may have an aggressive effect on other elements involved in the heating process. Please note that chemicals should not be selected thoughtlessly, not blindly based on the advice of your friends, but based on what material the radiator is made of.
In particular, if you have a copper-brass version, you need to purchase caustic soda and rinse the device with it. If your device is made of aluminum, it is prohibited to use soda; you will need acid. Clean the device by pouring the chemical inside and always watering it from above. It is very important to clean all the pores so that the interior of your Lada Granta subsequently warms up as quickly as possible.
Design of heating radiators from LUZAR
LUZAR heating radiators are available in three types:
- Tubular-plate, prefabricated, aluminum. It consists of aluminum plates through which aluminum tubes pass, inside which coolant runs. The tanks on such radiators are made of plastic. Heater radiators of this type are used for heating small-sized salons due to limited heat transfer; have the best rigidity and light weight, as well as the lowest price.
- Tubular-tape, non-assembled (brazed), aluminum. The corrugated aluminum tape in such a radiator is located between aluminum flat-oval tubes. Radiator tanks of this type can be made of either plastic or metal. The design of non-assembled (brazed) aluminum devices is the most universal, allowing the creation of heat exchangers with any specified characteristics. Aluminum stove radiators are light in weight and relatively high rigidity, as well as at optimal prices.
- Tubular-tape, non-assembled (soldered), copper-brass. The design is very close to type 2 - between the copper flat-oval tubes there are copper strips folded in the form of an “accordion”. At the same time, the tanks on such heating radiators are made of brass - in order to increase the overall rigidity of the structure. Copper heating radiators - due to the high specific heat capacity of copper - have excellent heat transfer rates. However, due to the high softness of copper, heating radiators made of this metal are forced to have a narrow tube and a large interval (step) between the tubes, which imposes serious limitations on maximum efficiency. Also, copper heater radiators have the highest cost and the lowest rigidity to torsion, fracture and internal pressure. In this regard, copper heater radiators are “outdated” and are gradually falling out of use.
LUZAR: time-tested and road-tested
LUZAR radiators have been awarded the “Radiator of the Year” award several times. For several reasons:
- Our products are not inferior to the original ones in quality and durability.
- Often it is our products that are “original”.
- We provide a warranty of 2 years or 125,000 kilometers.
- We check each model for leaks, and several models of each batch for corrosion and vibration resistance.
- You can buy stove radiators in all possible ways (more details in the “Where to buy?” section)
- We answer all customer questions openly and quickly
Make sure of this by calling 8-800-555-8965.
Installation of a new Lada Granta radiator
When buying a new radiator, you need to understand that it must be either original or very close to the original in its characteristics.
Car enthusiasts have to console themselves mainly with a radiator heater for the Lada Granta Luzar. In general, he performed well. Especially with the use of special additives that seal the liquid supply channels. The new generation of radiators has features in the fastenings; they consist of two parts and are assembled together with three self-tapping screws.
The new radiator will fall into place correctly if, after purchase, you carefully cover it with foam rubber around the perimeter, after which a small window of the required format is cut, somewhere at the bottom of the stove body. Thanks to these manipulations, the new radiator should fit perfectly into place. Next, the entire assembly proceeds in reverse order.
LADA Kalina
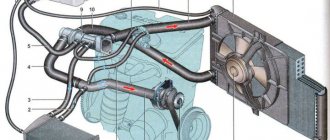
1 - expansion tank; 2 — radiator outlet hose; 3 - inlet hose; 4 - radiator; 5 — steam exhaust hose; b — radiator supply hose; 7 — electric fan; 8 — electric fan casing; 9 — coolant temperature sensor; 10 — coolant temperature indicator sensor; 11 — throttle assembly; 12 — bracket for the coolant pump pipe; 13 — coolant pump; 14 — coolant pump pipe; 15 — heater radiator supply hose; 16 — heater radiator outlet hose; 17 — exhaust pipe; 18 — coolant pump pipe hose; 19 — thermostat housing
Before you start
Before removing and disassembling the stove, you need to purchase new spare parts. The radiator must be from the Lada Granta. You will learn how to disassemble the heater in this article; however, it is advisable to have some experience. It is worth noting that the cost of a radiator for this car is twice as high as a regular one, for example, the one that comes with Kalina. Also, get a canister of antifreeze and a tube of sealant. Naturally, it is better for the replacement to be carried out by professionals in a specialized workshop, but if you decide to work on your own, invite a friend with you. The whole process will take you approximately 3-4 hours.
Removing the heater control unit
Replacing a stove radiator or a song about swearing
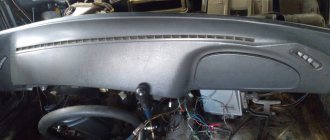
Removing the instrument panel trim, article - How to remove the central trim of the instrument panel Lada Granta
Using a screwdriver, press out the two clamps of the shell tip holder (the clamps are shown by arrows)
Remove tip 2 of the damper rod shell from holder 1 on the heater body
Using pliers, we recess the traction lock on the damper drive pin
Remove the black rod from the recirculation damper drive
We also remove the blue rod from the temperature regulator damper drive, the green and yellow rod from the air distribution damper drive
Remove the control unit with rod assembly
Restoring the functionality of the stove radiator on Grant
As you know, in some cases it is not practical to restore the heater; it is easier to replace it with a new product. Therefore, before removing the heater radiator on a grant, it makes sense to resort to some tricks, we will dwell on them in more detail.
For example, if the car's mileage is more than 40 thousand kilometers, there is a high probability of scale and foreign deposits forming in the system on the walls of the channels. To correct this situation, washing with a special product is ideal. There are many flushing methods, both with and without draining the coolant.
In our opinion, the most acceptable way is to add a special product to a system that already contains antifreeze. With this approach, it is possible to achieve the following results: - dissolve scale; — improve heat dissipation and restore the performance of the interior heater. Moreover, the cleaning agent does not corrode materials, gaskets, or sealants. In general, whether to flush or replace the unit depends on the severity of the malfunction and the individual decision of each car owner.
Reviews
| № | Positive |
| 1. | Vasily: for two years of operation there were no breakdowns of the heating system. Several times I noticed an antifreeze leak at the joints of the pipes. After replacing the clamp with a new one, there were no cases of depressurization. |
| 2. | Vladlen: Granta is assembled with high quality, the fit of parts is good, there are no comments. Provided regular maintenance, it will last a long time. |
| 3. | Gennady: for a year and a half of active use of the machine, I did not make any capital investments, with the exception of the purchase of consumables. I treat equipment with care, I buy only original parts. |
| 4. | Ivan: I recently underwent the fifth maintenance, the master assured me that the equipment was in good working order, there were no comments. |
| 5. | Dmitry: at 50,000 km, I replaced the return pipe once due to the formation of a crack. The system is operating normally, there are no complaints. |
| 6. | Ignat: my machine works like a watch, no complaints. I carry out technical inspections in a timely manner, fill with high-quality oils and high-octane fuel, and strictly follow the manufacturer’s recommendations. |
| 7. | Victor: It will soon be two years since I bought a Lada, I’m happy with the choice. My friends advised me to buy a Renault Logan, but I chose a domestic one. |
| Negative | |
| 1. | Ivan: I’m dissatisfied with the purchase of the Lada Grant; in the first winter, the antifreeze supply pipe to the radiator cracked. Fortunately, I noticed it in time and replaced it with a new one, otherwise the consequences could have been different. |
| 2. | Sergey: during the year and a half of operation of the car, the car underwent unscheduled repairs twice. I think this is too much for domestic transport. |
| 3. | Gennady: Now I regret buying Granta; Renault Logan is better. The car is falling apart every day. |
Conclusion There are difficulties when dismantling the stove heater. Many owners are familiar with this. At the same time, the “craftsmen” came up with a way to replace the heat exchanger without actually removing the dashboard, which significantly reduces time, money, and effort.
The final choice is up to the owner of the technical equipment. You should still listen to the recommendations of experts.
The stove radiator on Grant is a fairly reliable and durable device. However, it happens that for a number of reasons the device fails and causes some trouble to the car owner.
Replacing the Lada Granta heater radiator
If it's cold in the cabin when the heater is on, it means it's time to repair or replace the heater. Among the most typical reasons why you have to change the heater radiator on a Grant:
- clogging of channels due to the formation of scale or dirt;
- the occurrence of cracks or holes in the heating system.
In some cases, it is possible to get by with repair and restoration measures. For example, before changing the radiator, you can try flushing the system with a special liquid. There are means to get rid of scale inside the heating system, both by draining the antifreeze and the coolant inside. Such products, as a rule, do not harm sealants, gaskets, hoses, etc.
In some cases, it is possible to repair the heater radiator of a Lada Granta car without having to replace it
Adviсe
Antifreeze leaked into the cabin
To prevent problems with the heater core, you need to carefully monitor it. For example, from the first days of buying a car, periodically look under the car to see if there are dark spots there. And in the engine compartment it would be a good idea to observe the condition of the cooling system hoses. If you notice traces of antifreeze in any of these places, you need to immediately seek help, or carry out repairs yourself.
If possible, the hoses for connecting the heater radiator should be replaced with new ones, having coated the connection points with sealant. But some do not agree with this opinion. After all, sealant from the hose can get inside the cooling system and cause damage to the pump. As a result, the timing belt will break and the valves will meet the pistons.
Radiator replacement and stove repair Lada Granta
The engineering staff of AvtoVAZ worked very hard on the heating of the Lada Grant. The interior warms up very quickly and the temperature reaches the desired level. But, despite the high-quality performance of the stove itself, breakdowns sometimes cannot be avoided. For example, the radiator may leak or become clogged. For this reason, you need to understand the causes of the breakdown by dismantling the stove.
This type of repair eliminates the need for a jack, a lift, or even an inspection hole.
All the main work is done in the upper level of the engine compartment or inside the car; the only inconvenience is the difficulty of accessing the engine.
- We begin the repair by unscrewing the two clamps that secure the stove pipes to the heater radiator. We remove the pipes completely.
- We find a container for draining the coolant in advance and drain it.
- At the end of the work in the engine compartment, we move the pipes to the side.
- Inside the car, unscrew the self-tapping screw that secures the tunnel near the handbrake, and the other that serves as a clamp for the parking brake housing. We find and unscrew two more screws on the driver and passenger sides.
- Using a screwdriver, you very carefully remove the cover of the gear shift knob. And at the same time the tunnel rises slightly, moving it to the left.
- Unscrew the nuts securing the gas pedal and the stand under it.
- A few more screws securing the casing are unscrewed, and the cover is removed.
- Next we do the cutting. And only now the radiator is removed, the brake pedals, which interfere with this process, are clamped.
I would like to remind you that all these manipulations must be performed after first de-energizing the car, that is, you need to remove the terminals from the battery. Otherwise, you can get a short circuit that will damage all elements of the Lada Granta electrical network.
You can replace the radiator of the Lada Granta stove without removing the panel. To do this, it is necessary to cut off the pipes flush, extending beyond the body and interfering with the installation of the radiator. Remove the key from the pedal so that the pedal goes deep and does not interfere with the process. A long pipe with an internal diameter of 16 and an outer diameter of 24 is purchased and installed. Connects to pump and thermostat.
Method without removing the dashboard
Replacing the heater radiator on a Lada Kalina without removing the panel has become popular due to its speed and the need to dismantle a minimum number of components. The algorithm has some differences from the classic one.
- We drain the coolant and remove everything unnecessary under the hood, unscrew the clamps that secure the hoses at the inlet and outlet of the stove.
- In the cabin, we begin to disassemble the steering column - dismantle the protective cover, steering column switches, and all the wiring to them. We free access to the steering column and pedal assembly.
- The steering column is removed at the location where the electric power steering is mounted. It is held on by 4 bolts and is detached from the cardan.
To disconnect the steering column, you need to unscrew four bolts
- The gas pedal (3 bolts) is removed from the passenger compartment and the gas cable is disconnected. The brake pedal does not interfere with removing the radiator, but if you remove it, it will be much more convenient to work.
- The side wall of the heater is now accessible and can be pulled out. To do this, remove the decorative heater cover by unscrewing 3 screws.
The decorative heater cover is held on by three screws
- It becomes clear that the entire radiator will not fit into the hole. To widen the hole, use a hacksaw, jigsaw, or small grinder to cut through the body. Cut out in one whole piece. After replacing the stove, it will need to be glued in place. The pipes can be cut off - they will no longer be useful.
- We pull out the stove in the direction of the pedal assembly. There will still be some coolant left in it.
Carefully remove the stove
- We try on the new radiator in place. For ease of installation, the pipes are shortened by 1-2 cm. We glue anti-vibration strips and a seal around the perimeter.
- We pull the hoses onto the fittings, fix them with clamps, firmly fix the stove in the heater body and close the decorative cover. We install a cut piece of plastic onto the sealant or glue.
- We assemble the remaining components in the reverse order, fill in antifreeze and check the functionality of the entire system.
The advantages of this method are obvious: labor-intensive disassembly and disconnection of numerous connectors is not required. Crickets will not appear in the front panel after assembly, and later disassembling and replacing the heater radiator is much easier. This does not reduce the efficiency of the stove.
Video: Lada Kalina - replacing the heater radiator (without removing the panel)
As operating experience shows, a new radiator lasts for 3-5 years of operation, after which problems inevitably begin. The driver decides how to repair. Having the simplest car maintenance skills will be enough to replace it yourself in the garage. Otherwise, you should contact the service. “Kalina” with air conditioning has a more complex climate control system with two radiators, and replacing the interior heater involves disassembling the entire front panel.
Dismantling the stove
Although the heating on Grant is of high quality and does not cause any complaints from users, breakdowns in the system can still occur. If you take into account the radiator, it may leak or clog. In any case, to get to the true breakdown, you need to disassemble the stove, which will allow you to determine whether it requires repair or complete replacement.
Most of the work is done in the engine compartment, the rest is done inside the car. Neither a hole, nor a lift, nor a jack will be useful. It is worth considering that access to the engine compartment will be quite difficult.
- Initially, you need to unscrew several clamps attaching the pipes to the radiator. This way you can release them and completely remove them.
- After this, access will open to drain the coolant, which must be removed by first preparing a special container.
- The pipes must be moved to the side. So, the most difficult stage of work in the engine compartment is coming to an end.
- Now let's go to the salon. Look for self-tapping screws near the parking brake, one of which secures the tunnel, and the second - the handbrake housing. They need to be completely unscrewed. And also on the passenger side, unscrew the two screws that secure the tunnel.
- After this, you need to remove the gear change lever cover from the groove and at the same time move the tunnel to the left, lifting it slightly.
- The gas pedal, as well as its stand, are fixed with certain nuts that need to be unscrewed.
- The radiator cap casing is secured with two more screws, which also need to be unscrewed. After this, remove the cover. The radiator is now accessible.
- To remove it, you have to saw it off. In this case, the brake pedal must be pressed (this will require the help of a friend).
Sources
- https://remont-avtovaz.ru/zamena-radiatora-pechki-na-lade-grante/
- https://ladaservice.info/lada-granta/raznoe-lada-granta/zamena-radiatora-pechki-na-grante/
- https://autozam.ru/remont-i-obsluzhivanie/zamena-radiatora-pechki-granta.html
- https://ladaautos.ru/lada-granta/samostoyatelnaya-zamena-radiatora-pechki-lada-granta.html
- https://autorn.ru/lada/granta/447-zamena-radiatora-pechki-lada-granta.html
- https://remam.ru/vozdsys/zamena-radiatora-pechki-lada-granta.html
- https://remam.ru/vozdsys/zamena-pechki-lada-granta.html
- https://carfrance.ru/menyaem-radiator-pechki-na-lada-granta-svoimi-rukami-video/
Preliminary disassembly
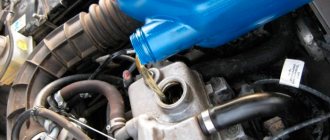
- First, you will need to empty the system of working fluid before replacing the heater radiator. This is done by opening the cap on the main radiator and draining the antifreeze into a previously prepared container.
- Now it is necessary to dismantle the air filter along with the suction pipe.
- We remove the battery.
- When access to the stove pipes appears, we first move the container under the junction of the pipes with the heating radiator. After removing the hoses, at least 1 liter of antifreeze will collect in the container.
- Near the pipes we find a nut that secures the plate inside. It will need to be moved, since there is a likely risk of interfering with the process of removing the radiator assembly. To do this, loosen and unscrew the nut from the engine compartment. We do this after the liquid has completely drained from the designated pipes.
- We go into the interior and remove the accelerator drive cable.
- Next you will need to dismantle the pedal itself. It is secured with three bolts.
- Remove the decorative radiator panel (it is located on the right side of the gas pedal).
- The brake pedal of the LADA Kalina can also cause inconvenience during the disassembly operation. There is no need to dismantle it, but by removing the rod it can be raised above its working position.
At this point, the preliminary disassembly procedure is complete.