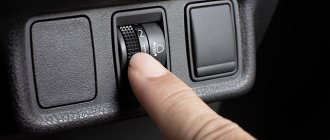
The low beam of car headlights has an established cut-off line, the position of which is regulated by international rules and standards. This is a conditional line of transition of light into shadow, which must be chosen in such a way as not to blind other road users. On the other hand, it must provide an acceptable level of road illumination. If the position of the car body changes due to some reason, then the position of the cut-off line also changes. In order for the driver to be able to adjust the direction of the low beam, i.e. cut-off line and the headlight range control is applied.
Purpose of the headlight range control
Initially, the correct headlights are adjusted on an unloaded vehicle, when its longitudinal axis is in a horizontal position. If the front or rear is loaded (for example, with passengers or cargo), the position of the body changes. An assistant in such a situation is the headlight range control. In Europe, all cars since 1999 must be equipped with a similar system.
Headlight position for normal and heavy loads
Possible problems
Like any sensitive electronic system, the headlight range control is subject to malfunctions and malfunctions. The most common malfunctions occur in the operation of sensors. When the car moves, strong vibration invariably occurs, including jolts and impacts of the wheels. Due to such impacts, the sensor mounts move or become unusable. As a result, inaccurate readings are transmitted to the control system, which leads to a malfunction of the entire system.
Another common type of malfunction is poor conductivity of electrical connections. The influence of sudden changes in temperature and humidity lead to the oxidation of metal elements.
There are a number of cars whose parameters make adjustments to the operation of the road lighting control system. At a certain landing height, restrictions are set on the angle of adjustment of the light flux, and the beam itself coming from the headlights is directed downward with a large deviation.
To understand the importance of headlight range control in a modern car, let’s take some simple statistics. In Europe, about 30 percent of accidents occur at night
In Russia this figure is even higher.
Taking into account the fact that traffic flow at night is several times less than during the day, this figure is more than impressive. If you look at the statistics in context, it becomes clear that in many cases poor-quality lighting is to blame. We are talking not only about non-working lights on the highway, but also about the absence or malfunction of the headlight range control.
First, let's figure out what a headlight range control is? It is best to take the classic transcript. This is a device that maintains the optical axis of the headlights in the desired plane relative to the route. As a result, even when the body is skewed (this is quite normal when the car is moving at high speed), the road is well lit.
Types of headlight correctors
Headlight correctors are divided according to the principle of operation into two types:
- forced (manual) action;
- auto.
Manual adjustment of the light is carried out by the driver himself from the cabin using various drives. By type of action, drives are divided into:
- mechanical;
- pneumatic;
- hydraulic;
- electromechanical.
Mechanical
Mechanical adjustment of the light beam is made not from the interior, but directly on the headlight. This is a primitive mechanism based on an adjusting screw. Typically used in older car models. The level of the light beam is adjusted by turning the screw in one direction or another.
Pneumatic
Pneumatic adjustment is not widely used due to the complexity of the mechanism. It can be adjusted automatically or manually. In case of manual pneumatic adjustment, the driver must set the n-position switch on the panel. This type is used in conjunction with halogen lighting.
In automatic mode, body position sensors, mechanisms and a system control unit are used. The reflector regulates the air pressure in the lines that are connected to the lighting system.
Hydraulic
The principle of operation is similar to mechanical, only in this case the position is adjusted using a special liquid in sealed lines. The driver adjusts the lighting position by turning the dial in the cabin. In this case, mechanical work is performed. The system is connected to the main hydraulic cylinder. Turning the wheel increases the pressure. The cylinders move, and the mechanism turns the rod and reflectors in the headlights. The tightness of the system allows you to adjust the position of the light in both directions.
The system is considered not very reliable, since over time the tightness at the junction of the cuffs and tubes is lost. The fluid flows out, allowing air into the system.
Headlight hydrocorrector
Electromechanical
The electromechanical drive is the most common and popular option for adjusting low beam in many cars. It is adjusted by the driver rotating a wheel with divisions inside the car on the dashboard. There are usually 4 positions.
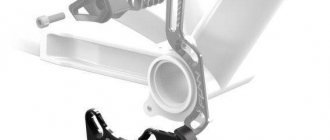
Geared motor
The actuating mechanism is a gear motor. It consists of an electric motor, an electronic board and a worm gearbox. The electronic board processes the command, and the electric motor rotates the shaft and rod. The rod changes the position of the reflector.
Xenon and LEDs
The century-long reign of the incandescent light bulb is coming to an end. The noble gases krypton and xenon help her “end her career” with dignity. The latter is considered one of the best fillers for incandescent lamps; with xenon, you can raise the temperature of the filament close to the melting point of tungsten and bring the light spectrum closer to that of the sun. But ordinary incandescent lamps filled with xenon are one thing. But “xenon” with a bright blue glow, which is used on expensive cars, is fundamentally different. In xenon gas-discharge lamps, it is not the red-hot filament that glows, but the gas itself—or rather, the electric arc that occurs between the electrodes during a gas discharge when a high-voltage voltage is applied.
For the first time such lamps (Bosch Litronic) were installed on the production BMW 750iL in 1991. Gas-discharge “xenon” is head and shoulders more efficient than the most advanced incandescent lamps; not 40% of the electricity is spent on useless heating, but only 7-8%. Accordingly, gas-discharge lamps consume less energy (35 W versus 55 W for halogen lamps) and shine twice as brightly (3200 lm versus 1500 lm). And since there is no filament, there is nothing to burn out; xenon gas-discharge lamps last much longer than conventional ones. But gas-discharge lamps are more complicated.
The main task is to ignite the gas discharge. To do this, from 12 “constant” volts of the on-board network, you need to get a short pulse of 25 kilovolts - and alternating current, with a frequency of up to 400 Hz! A special ignition module is used for this. Once the lamp is lit (it takes some time to warm up), the electronics reduce the voltage to 85 volts, enough to maintain the discharge. The complexity of the design and inertia during ignition limited the initial use of gas-discharge lamps to low beam mode. The distant light was the old fashioned way - “halogen”. The designers were able to combine low and high beams in one headlight six years later, and there are two ways to get bi-xenon. If a spotlight is used (like the one invented by Hella), then the switching of light modes is carried out by a screen located in the second focus of the ellipsoidal reflector: in low beam mode it cuts off some of the rays. At a distance, the screen hides and does not interfere with the light flow. And in the reflective type of headlights, the “double action” of the gas-discharge lamp is ensured by the mutual movement of the reflector and the light source. As a result, the light distribution changes along with the focal length. But according to the French company Valeo, by using separate gas-discharge lamps for low and high beams, you can achieve 40% better illumination than bi-xenon. True, not two, but four ignition modules are required; the expensive Volkswagen Phaeton W12 has such headlights.
However, the future of HID lamps is not nearly as bright as the light they emit. Experts predict the greatest success for LEDs. An LED is a semiconductor device that emits light when current passes. Until the early 90s, their automotive use was limited to display; the light output was too low. However, already in 1992, Hella equipped the three-ruble BMW Cabrio with a central brake light based on LEDs, and today they are increasingly used in rear lights as “dimensions” and brake lights. LEDs operate 0.2 seconds faster than traditional light bulbs, consume less energy (for brake lights - 10 W versus 21 W) and have an almost unlimited service life. But in order to replace bulbs with LEDs in headlights, a number of obstacles must be overcome. Firstly, even the best LEDs are still comparable in efficiency only to halogen lamps (light output is about 25 lumens per watt). At the same time, they are more expensive and require a special cooling system - after all, these are the same semiconductor devices as computer processors. But the developers assure that by 2008 the light output of diodes will reach 70 lm/W (for the current xenon it is 90 lm/W). So the first production LED headlights may appear in 2010. In the meantime, semiconductors are entrusted with secondary functions - for example, constant “daylight”, as Hella did by placing five LEDs in each headlight of the Audi A8 W12.
Automatic headlight leveling
If the car has an automatic low beam correction system, then the driver does not need to adjust or turn anything himself. Automation is responsible for this. The system usually includes:
- Control block;
- body position sensors;
- actuators.
Sensors analyze the vehicle's ground clearance. If there are changes, a signal is sent to the control unit and the actuators adjust the headlight positions. Often this system is integrated with other body position systems.
The automatic system also operates in dynamic mode. Lighting, especially xenon lighting, can instantly blind the driver. This can happen when there is a sudden change in ground clearance off-road, when braking and suddenly moving forward. The dynamic corrector instantly adjusts the light output, preventing bright light from blinding drivers.
According to regulatory requirements, cars with xenon headlights must have automatic low beam level control.
Results
Automatic headlight leveling is required for cars equipped with standard lighting. This module will have a positive effect on the quality and direction of lighting, even if your car is loaded to the maximum. With autocorrector, you don’t have to worry about the fact that your car’s light can negatively affect the comfort of oncoming drivers. If the car is equipped with an auto-corrector, then you are guaranteed an easy and unhindered passage of the next technical inspection. Let the light in your car be correct.
Sources
- https://farainfo.ru/avtokorrektor-far-chto-eto-i-dlya-chego-printsip-rabotyi-avtokorrektora-far-i-vazhnyie-momentyi/
- https://mashinapro.ru/1800-korrektor-far.html
- https://InfoKuzov.ru/remont/korrektor-far
- https://ZnanieAvto.ru/svet-zvuk/korrektor-far-princip-raboty.html
- https://VipWash.ru/remont-far/avtokorrektor-far-svoimi-rukami
- https://TechAutoPort.ru/elektrooborudovanie-i-elektronika/sistema-osvescheniya/korrektor-far.html
- https://autodromo.ru/articles/korrektor-far-princip-deystviya-ustroystvo-nepoladki
- https://akki-carsh.ru/to/princip-raboty-korrektora-far.html
- https://fastmb.ru/autoremont/427-korrektor-far.html
- https://xenon-lampa.ru/cat-avtomobilnye-innovatsii/a-pravilnyj-svet-s-avtokorrektorom-far
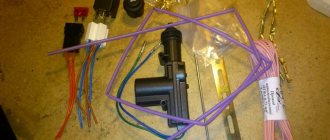
Corrector installation
If your car does not have such a system, you can install it yourself. There are various sets available on the market (from electromechanical to automatic) at very different prices. The main thing is that the device matches the lighting system of your car. If you have special skills and tools, you can install the system yourself.
After installation, you need to make adjustments and adjust the luminous flux. To do this, you need to draw a special diagram on the wall or shield, which indicates the points of deflection of the beam. Each headlight is individually adjustable.
Headlight adjustment
An alternative to the VAZ hydraulic corrector
There are several replacements on the market for the “stock” hydraulic headlight range adjustment. Namely:
Mechanical
They are a blank of the working cylinder of a classic hydraulic corrector. Instead of a hose and piston, a long screw is used. One end of which goes into the engine compartment, the other rests on the headlight reflector lever.
To install it, simply disconnect the factory hydraulic corrector cylinder and insert a mechanical one into the seat. To do this, you need to press the latch and turn it counterclockwise a quarter turn. This latch will come out of the grooves, the hydraulic cylinder will be disconnected from the headlight housing.
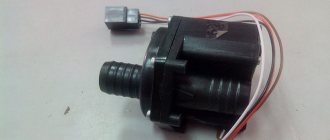
Electric corrector
It is a separate system. Wires are used instead of liquid-filled tubes. The control unit is located in the handle of the regulator, which is placed in the cabin in its standard place. Actuators are electric. They fit freely into the mounting locations of the factory hydraulic corrector.
A clear advantage of an electric corrector over a hydraulic one is the absence of working fluid. It will not leak, the pistons will not jam. Before the mechanical one, there is the possibility of remote adjustment of the headlight angle from the interior.
How to check functionality
Body position sensors may be different. For example, the service life of potentiometric sensors is 10-15 years. The electromechanical drive may also fail. If there is automatic adjustment, you can hear the characteristic buzzing of the adjustment drive when you turn on the ignition and low beam. If you cannot hear it, then this is a malfunction signal.
The performance of the system can also be checked by mechanically changing the position of the car body. If the luminous flux changes, then the system works. The cause of the breakdown may be electrical wiring. In this case, service diagnostics are necessary.
Headlight range control is an important safety element. Many drivers do not attach much importance to this. But you need to understand that the wrong or blinding light can lead to dire consequences. This is especially true for cars with xenon headlights. You shouldn't put others in danger.
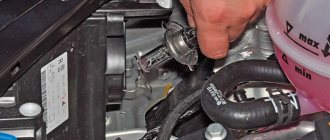
Design and markings
Automotive lamps usually differ in the design of the base and light output. For example, in two-headlight systems, H4- lamps with two filaments are most often used, for high beam and low beam. Their luminous flux is 1650/1000 lm. The “foglights” use H8 single-filament lamps with a light flux of 800 lm. Other single-filament lamps H9 and HB3 can only provide high beam (luminous flux 2100 and 1860 lm, respectively). And the “universal” single-filament lamps H7 and H11 can be used for both low and high beam, depending on the reflector in which they are installed. And as always, the quality of the lamp depends on the specific manufacturer, equipment, concentration and types of gases (for example, H7 and H9 lamps are sometimes filled not with halogens, but with xenon). Gas-discharge “xenon” has different designations. The first xenon lamps were devices with the indices D1R and D1S - they were combined with an ignition module. And behind the indices D2R and D2S are second-generation gas-discharge lamps (R- for “reflective” optical design, S- for floodlight).
Hydrocorrector of headlights: how it works and how to use it
The headlight leveler is an inconspicuous and rarely used device. But sometimes without its work it is impossible to move at night on busy roads.
A typical situation that requires the use of this device: a combination of a heavily loaded trunk and a trip in the dark.
When the trunk is overloaded, the rear part of the car lowers, and the front part “lifts up”. In this case, the “low beam” from a certain distance from the car automatically becomes “high beam”.
At first, the driver is perplexed why all oncoming drivers begin to “blink” and demand to switch the lights. If the driver guesses what happened, then he has to reload bags of potatoes into the cabin and onto the front seat in the dark. If the seats are occupied by passengers, then you have to either turn off the low beams and drive on the lights, or create an emergency situation on the road.
But there is a third way out: use a corrector and adjust the tilt of the light beam, lowering it down.
The opposite situation may also occur: if the hydraulic corrector is adjusted to the maximum load, and the machine is empty, then, on the contrary, it is necessary to raise the beam of light upward. In this case, the driver no longer blinds others, but illuminates the road “in front of his nose,” which is also fraught. Figure 1 illustrates these situations. The normal position of the light beam is shown in yellow.
- How to use the corrector?
- How does the headlight hydrocorrector work?
- How does headlight range control work?
How to use the corrector?
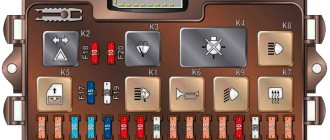
The corrector has knob A on the dashboard of the VAZ 2107 to the right of the steering wheel, next to knob B for adjusting the brightness of the dashboard lighting. If you rotate knob B counterclockwise, the brightness of the light decreases.
As they say, the control knob of the device has an “intuitive interface.” To change the direction of the light flow, with the trunk loaded and the headlights on low beam, you need to align the mark shown on the regulator with one of the marks marked on the unit body so that the beam of light does not blind oncoming drivers.
The VAZ 2107 hydraulic corrector has four switching options (in order from large point to small point):
I - minimum load, the front of the car is slightly lowered: one driver, or there is a passenger in front;
II - driver and four passengers, the body sags evenly downwards;
III - the same as II, with an additional load of up to 75 kg in the trunk:
IV - driver and maximum trunk load: the “nose up” the most.
In order to see how the angle of inclination of the light beam changes during operation of the corrector, it is better to place the car perpendicular to the wall. Let us recall the standard requirements for the location of the low beam.
How does the headlight hydrocorrector work?
Below is shown the headlight hydraulic corrector without a control knob on a VAZ 2107.
The corrector structurally includes:
- adjustment knob and master cylinder (on the dashboard);
- two pipelines and clamps (to each block - headlight);
- two actuator cylinders, installed on the VAZ 2107 headlight block;
- frost-resistant working fluid (brake) in a closed circuit.
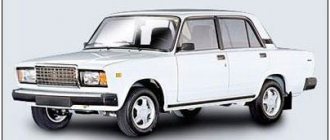
For VAZ 2107 models, a hydraulic corrector model “2105-3718010” is used.
How does headlight range control work?
The cylinder system is manufactured hermetically, with:
- The highest (basic) fluid pressure corresponds to switch position I;
- when switching sequentially to positions II, III and IV, a vacuum is created in the system;
- pistons are retracted in the actuating cylinders and the optics are turned down;
- when returning to position I, the pressure in the system increases to the base one, the pistons protrude and turn the optics upward.
Since the system is under pressure almost all the time, except when the trunk is heavily loaded, seals often leak. The reason may be the fragility of domestic rubber on the VAZ 2107 during winter temperature changes. Due to a leak of working fluid, the piston in the working cylinder becomes stuck in one position.
A working hydraulic corrector must ensure free play of the piston and must be at least 7 mm.
Due to the manufacturing features (tightness), the hydraulic headlight angle correction on the “classic” in general, and on the VAZ 2107 in particular, is non-removable and cannot be repaired. Its cost is low, so it is advisable to replace the entire set if it fails.
Let us remind you that before removing the old cylinders from the headlight housings, the main thing is not to forget to tighten the clamps on the working cylinders and turn them counterclockwise
In conclusion, let us remind you that there are no trifles on the road, and the topic of the corrector is a vivid example of this. Drivers who do not monitor the condition of this small but important device sometimes argue that they do not drive with a full trunk, especially at night. But according to traffic rules, outside populated areas you need to drive with your low beams on, even during daylight hours. And then an incorrectly adjusted corrector can blind road users even during the day and cause an accident.
Settings
If it is not possible to set up the system at a car service center, you can do it yourself. To do this, you will need a flat area with a wall or a solid fence opposite it. This is a prerequisite for any adjustment option.
Low beam
In this case, it is easier to use a universal method, which is almost the same for all cars. Only the distance from the wall to the car can differ, most often it is 7.5 meters, but some models are placed 5 meters away; it is better to clarify this point separately in order to correctly adjust the light. Next you need to prepare the markup.
- The car is driven close to a wall or fence, then marks are made on the surface clearly in the middle of the low beam headlights and opposite them. These will be the main guidelines.
- Then you can drive the car away and start drawing. Two more marks are placed 5 cm below the center of the headlights and connected by a horizontal line. Vertical lines are also drawn through the points to provide a clear reference point.
- The central axis of the machine is determined and also marked on the wall. The end result should look something like the diagram below.
All parameters are determined individually, since the size of the cars and the location of the headlights are always different.
Next you can start setting up
It is important that at least half a tank of gasoline is filled in the car, and that a person is sitting in the driver’s seat or there is a load approximately equal in weight to the driver. The easiest way to adjust headlights near a wall is this:
The car is located at a distance of 5 or 7.5 meters, and the center line should coincide with the middle of the hood
It is important to position the car correctly. The hood is opened and a screwdriver or other tool is prepared for adjustment. The light is turned on and one headlight is covered with cardboard or any other opaque element. The upper edge of the light flux (it is clearly visible) should be located along the line
If it is displaced, adjustment is made with the corresponding screw that regulates the light in the vertical plane. Adjustment in the horizontal plane must be done so that the place where the luminous flux begins to rise is at the vertical mark opposite the headlight.
This is what the adjusted light output looks like.
The second method is in many ways similar to the first, but in this case you will need to place the machine at a distance of 10 meters from the wall. In this case, the horizontal line is drawn 12 cm below the center. Some argue that increasing the distance allows for greater tuning accuracy, so if you have the space, you can try this option.
Video: A visual example of setting up the headlight.
High beam
The high beam headlights do not have clear lines, they distribute the light evenly, so the adjustment will be much easier. The preparation process is almost the same as with low beam, the main guideline will be a horizontal line 5 cm below the center of the headlights and vertical lines opposite the bulbs.
In this case, you need to adjust the light so that the center of the beam falls at the intersection of the vertical and horizontal lines of the corresponding headlight. Here accuracy is not so important, since long-range lighting is used only when there is no oncoming traffic. If the low and high beam are combined in one bulb, then adjusting one option is enough for the headlight to work as it should.
High beam is distributed differently than low beam.
In the video they set the high beams on a Hyundai Tucson.
Fog lights
In this case, there are no screws for adjustment and the position of the light flux can only be changed in the vertical plane. Before you begin, you should loosen the fog lights. They often oxidize, so it is advisable to treat them with a penetrating lubricant in advance.
A line is drawn on the wall; its height should be 10 cm below the location of the fog lights. After this, the car needs to be driven 7.6 meters, positioned opposite the markings and the headlights turned on. In this case, the upper limit of the light flux should coincide with the line; only this position will ensure normal visibility in fog.
Fog lights also require adjustment to function properly.