It can be said with great confidence that among experienced drivers who have just received a “driving license”, there are those who are hearing about this for the first time. For the majority of car owners who do not service and repair their “iron horses” themselves, there is no need to know about this. For those who like to tinker and look after their car themselves, this article may be useful.
Option 3
Excessively “positive” camber.
It is undesirable to change it without toe correction, therefore positive toe is also introduced. The steering wheel became lighter again, the responses when entering a turn became lazier, and the lateral movement of the body increased. But there is no catastrophic deterioration in character. However, when simulating an extreme situation, the “steering feel” is lost. With the advent of slips, unexpectedly early it becomes difficult to get into the given corridor at the “rearrangement” and the car begins to slide too early. In fast corners, the strongest slip of the front axle dominates. Read more: Chevrolet Niva heater fuse is on
Wheel alignment of Gazelle, Sobol, Volga vehicles.
Today, a modern car is a comfortable and easy-to-drive vehicle. The safety of passengers largely depends on the stability of its movement and predictability of behavior on the road.
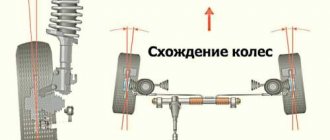
For easy turning and rolling of the steered wheels without slipping, they must be installed so that they occupy a certain position relative to the longitudinal axis of the vehicle and the axes of the king pins.
The position of the front wheels is determined by the angles of their installation and the inclination of the pivot pins of the axles. Correct installation of the front wheels
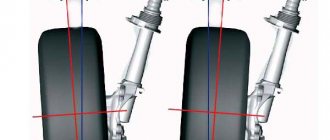
contributes to the safety of tires, reduces wear on front axle parts by reducing the dynamic loads acting on them, and also ensures stabilization of the wheels, i.e. their tendency to return after turning to a position corresponding to the linear motion of the car. Stabilization of the wheels is achieved by the presence of longitudinal and transverse inclination of the kingpin.
Figure 1 – Front wheel alignment angles
Camber angle is the angle between the vertical plane and the plane of the front wheel inclined outward (Fig. 1). This angle is necessary so that the wheel takes a vertical position when the car moves. When the car moves under the influence of load, some deflection of the parts that determine the position of the front wheels occurs, the existing gaps in the bearings and pin bushings are selected and the wheel takes an almost vertical position. A lack of camber angle can cause the wheel to tilt inward, which prevents it from rolling correctly. The camber angle of Gazelle cars is +0°30'.
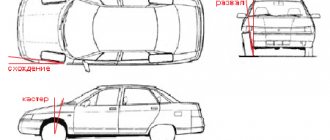
Toe-in is the rotation of the front wheels at a certain angle inward, as a result of which the distance between the rims of the wheels in front is less than in the rear (Fig. 1). Wheel alignment is necessary to ensure parallel rolling. The rolling resistance force that arises when the car is moving tends to turn the wheel outward, while the gaps are selected and both wheels roll parallel to each other without lateral slipping. Correct wheel alignment is a prerequisite for good tire health; incorrect alignment causes accelerated and uneven wear. The amount of toe-in of the wheels is defined as the difference (YX) in the distances between the wheel rims (or tires) at the front X and rear Y. For gazelle cars, the amount of toe-in of the front wheels is equal to the difference YX ranging from 0 to 3 mm. The wheels must be in the direction of straight motion.
Figure 2 – Steering angles and toe-in of the front wheels of the Gazelle car
Figure 3 – Non-adjustable parameters of the Gazelle car suspension
The procedure for adjusting the front wheels of a Gazelle car.
Before making adjustments, make sure that the steering elements are securely fastened and that there is no play in the wheel apron hub bearings.
We install the car on a flat horizontal platform.
If there is no special ruler, you can measure the difference in distances between the wheels using a 1.5 m long rod and a caliper depth gauge.
We start measuring from the front side of the wheel axle.
By rotating the rod, we set the amount of toe. If the rod does not turn, treat the threads of the tips with penetrating liquid.
Wheel alignment spacer SS20 (camber plates)
The use of branded SS20 camber plates, which give negative camber to the rear wheels, slightly increases their track. This has a positive effect on maneuverability.
Advantages of camber plates (wheel alignment spacers) SS20
- increases camber to -1°;
- improves high-speed cornering;
- improves vehicle stability when exposed to lateral loads;
- improves vehicle grip on the road;
- reduces tire wear.
Guarantee
Many modern cars have negative camber on the rear axle, which is built into the design initially, and this angle reaches 2 or even more degrees. Owners of VAZ cars (except for the latest Grant and Kalina-2 models) have zero wheel camber on the rear axle of their cars. It is possible to establish negative camber of the rear wheels using camber plates, which are installed between the rear beam and the rear wheel hub axle.
As you know, when installing many camber plates widely available on the market, in addition to obtaining a camber of -1°, we also get negative toe-in of the rear wheels, which has a bad effect on handling. This result is obtained due to the fact that when designing these spacers, manufacturers do not take into account the angle of inclination of the rear beam arm. Negative toe-in of the rear wheels increases the likelihood of skidding when cornering, as the car receives excessive oversteer, and when driving in a straight line under the influence of road unevenness and lateral influences (for example, wind or when driving on a rut), the car requires constant steering and becomes excessively sharp and unstable .
When designing the SS20 spacers, the angle of inclination of the rear beam arm was taken into account. The axis of symmetry of the camber plate was shifted by an angle α' equal to the inclination of the beam lever. This solution allows you to maintain stable behavior of the car when turning and driving in a straight line. When installing SS20 camber plates, a -1° camber and a slight positive toe-in of the rear axle wheels are provided.
The use of branded SS20 spacers, which give negative camber to the rear wheels, slightly increases their track. This has a positive effect on maneuverability. A wider track allows you to increase cornering speed without the risk of tipping over.
In addition, increasing the camber to -1° improves high-speed cornering, since wheels with negative camber perceive a greater amount of lateral forces without “breaking” the tires, which reduces deviation from the trajectory.
When the body rolls in corners, the most loaded wheels with negative camber retain a larger contact patch and better grip. Toe compensation allows the wheel to roll with the least resistance and reduces tire wear.
How to make a wheel alignment yourself on a VAZ 2109
You can adjust the wheel alignment angles of your car with your own hands using available tools and simple devices. In this material we will talk about how to do wheel alignment yourself at home, and what difficulties are most often encountered when adjusting wheel alignment angles.
Incorrect alignment adjustment can cause, for example, rapid wear of tires, or the fact that when driving in a straight line, the car will pull to the left or to the right.
At the end of this article you will find a video that explains and shows in detail everything you need to know about wheel alignment.
First, let's look at the theory: wheel alignment - what is it? What are the wheel alignment angles and how does the car’s behavior on the road depend on them?
Wheel alignment - what is it?
Camber is the angle between the vertical and the plane of the wheel. It ensures reliable contact of the tire with the road (see picture above).
Toe is the angle between the direction of travel and the plane of rotation of the wheel. The stability of the car in corners and tire wear depend on it.
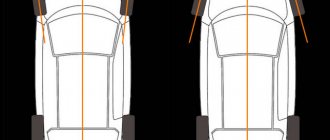
On rear-wheel drive cars, the wheels should be slightly turned towards each other - this is called positive toe. When moving, they move apart and become parallel. For front-wheel drive vehicles, on the contrary, the toe-in should be negative (see the diagram below). Caster is the longitudinal inclination angle of the king pin. This parameter very rarely needs adjustment, only on a newly assembled front suspension from new parts, so we will not consider its adjustment.
Repairing the suspension or steering (replacing the same shock absorbers or steering joint) leads to a significant change in the wheel alignment angles. Daily use of the car also makes adjustments to these parameters over time, so the need to adjust the wheel alignment periodically arises.
It is best to adjust wheel alignment twice a year, during seasonal tire changes. During this time, you will fall into a hole more than once or run over a curb, causing the chassis to become loose and the angles to change. Timely alignment adjustment will cost much less than a set of new tires.
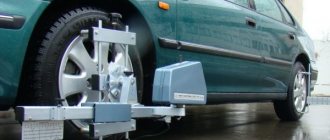
In 1955, American engineer Lee Hunter developed the first wheel alignment stand. Sensors mounted on the wheels sent focused beams of light and accurately measured angles. That's why the stand was called optical. But already in 1969 it was connected to a computer, and in 1995, 3D technology was first used to measure and adjust angles.
True, Soviet car enthusiasts managed without any stands or computers - using wrenches, calipers, thread and a plumb line, they adjusted the camber and toe angles with their own hands.
Instructions for adjusting wheel alignment yourself
Before you begin adjusting the camber and toe angles, it is imperative to check the vehicle's chassis. If repairs are needed, then doing a wheel alignment is pointless. The steering and suspension must be in perfect order.
Pay attention to three points on which the wheel alignment angles on a car greatly depend:
Serviceability of the chassis (read more about car suspension diagnostics). Tire pressure. Loading the machine. Be sure to check the tire pressure before adjusting the wheel alignment and make sure that you haven’t accidentally forgotten a couple of bags of potatoes or cement in the trunk
An experienced driver told how you can do a wheel alignment yourself
In this simple old-fashioned way, the old driver has been doing wheel alignment on his car for the past 8-9 years.
And he says that there is no difference between a wheel alignment done on a special machine at a service station and if he did it himself.
Now service stations will be left without “earned bread” because they have taught them how to do wheel alignment at home on their own. An old driver shared his experience.
Why did you decide to do wheel alignment on your car yourself?
Especially if the car is not new at all - it has already seen the replacement of tips, steering rack, silent blocks, shock absorbers and more.
I had to go to the service station for a wheel alignment more than once - I had to find time and find money for repairs and for the wheel alignment itself.
But when he was shown how he could do a wheel alignment himself in a simple way, he was initially afraid that he would do something wrong. Still, for a homemade wheel alignment you only need a building level and one device in the form of a straight, even stick.
At that time, the tires had already “passed” 3 years. But the old master explained to him that, firstly, there is no need to set it perfectly to “0” - a couple of millimeters is acceptable, and our roads are not entirely smooth.
Of course, there will be wear on the wheels if the wheel alignment is broken or done incorrectly. And also due to the failure of some spare part that affects this, for example the steering rack, front arm silent blocks, steering tips.
An experienced driver says that this is not necessarily a guide to action - everyone decides for themselves how and where to repair their car.
But one thing he knows for sure is that there is a result and for 8 years now the tires have been normal without wear, and this is an indicator of the correctness of the wheel alignment in the first place and the steering wheel is at “0” - even if you throw it on the highway.
Do-it-yourself wheel alignment at home
I advise you to check the angles 2 times a year when the season changes, when you change tires from summer to winter and vice versa. During this time, the car could have been in different situations and the angles changed.
Using a stick and a level, we check the camber by leaning them against the disk (the place on the disk must be level - you can lean it in several places) and, if necessary, remove the wheel and adjust it using two 19-point bolts securing the shock absorber to the steering knuckle.
Do-it-yourself wheel alignment on a VAZ 2109
Today we will describe in detail the sequence of actions, and at the same time we will tell you what the words “camber” and “toe in” mean.
What is wheel camber and toe
Camber is the angle between the vertical plane and the plane of the wheel. It directly determines how well the tires contact the road surface.
Toe is the angle between the direction of movement and the plane of rotation of the wheel. It determines how stable the car is when cornering and at what rate the tires wear out.
Toe has one caveat - it varies depending on the drive of the car. Vehicles with a rear-wheel drive axle should have positive toe-in (where the wheels are slightly turned towards each other), but front-wheel drive vehicles should have negative toe-in (the wheels, on the contrary, are slightly turned to the sides). It should be noted that while driving, the wheels become straight in both cases, which ensures a comfortable and safe ride.
There is another little-known adjustment called caster - the angle at which the king pin is tilted (in the longitudinal plane). The caster is set at the factory once and for all, and therefore does not require adjustment. However, if you make major changes to your car's suspension (preparing it for sports events, for example), it will need to be re-adjusted. This procedure will not be discussed here. Experts recommend adjusting the wheel alignment 2 times a year, simultaneously with the transition to summer/winter tires. But in fact, the vast majority of drivers carry out this procedure only after repairing suspension elements or replacing steering rods, as well as before a technical inspection.
How to adjust wheel alignment on a VAZ 2109
Before you get started, do 3 important things. First, make sure you won't be doing any suspension or steering repairs in the near future. Otherwise, you will waste your nerves, time and effort. Secondly, don’t be lazy to check the tire pressure. If it is abnormal, the measurements will be incorrect. Thirdly, check the trunk and interior to make sure nothing is lying there, since the adjustment is made on an unloaded car.
Do-it-yourself alignment
It can be said with great confidence that among experienced drivers who have just received a “driving license”, there are those who are hearing about this for the first time. For the majority of car owners who do not service and repair their “iron horses” themselves, there is no need to know about this. For those who like to tinker and look after their car themselves, this article may be useful.
Three options for constructing the longitudinal axis of a car
There are three different methods to choose from that can be used to create a “baseline” line when calculating individual wheel alignment angles:
- The longitudinal axis can be taken as a horizontal line that passes through the axis of symmetry of the body. It can be easily constructed by marking their midpoints on the front and rear bumpers.
- The second option is the longitudinal axis of the chassis. This line is lined up along points that are located at the centers of the distances between the wheel hubs.
- Quite often, the trust line is used as the longitudinal axis. It is laid strictly in the direction of movement of the rear axle of the car. This vector does not always coincide with the longitudinal lines built along the body or chassis, as in previous versions. A similar phenomenon is typical for cars in which the rear axle is turned slightly to the side. At the same time, the car drives sideways, which is often observed on old Zhiguli, Gazelles, etc.
Longitudinal axis and trust line on a car.
The angle between the “trast line” and the central longitudinal axis of the machine should ideally tend to zero. But in some cases, rear suspension defects cannot always be eliminated. Therefore, when diagnosing alignment and camber, measurements are taken based specifically on the “trast line”.
How and what to measure
Caster angle cannot be measured. Decreasing it leads to the inability to take a turn at speed, and increasing it leads to a “heavier” steering wheel. Usually 2-3 degrees is considered a “sporty” option. This is what we need to build on.
To measure toe and camber angles, it is enough to place a thread and a weight. Zero camber corresponds to the fact that the values of A and B are equal (Fig. 52).
Measuring with a thread
“Zero toe” is also easy to check: measure distance B (Fig. 51), knowing that the track of the front and rear wheels differs by 30 mm. The rear wheel is “recessed” inward compared to the front.
To accurately measure the toe angle, you will need equipment: a sliding ruler or a chain with a dynamometer. Only one thing is used.
Measuring the toe angle
The “measuring device” itself is brought in front and behind, then the obtained values are compared. For zero degrees, the two digits should not be different.
How to make a camber on a VAZ 2109
After any repair to the suspension or steering, it is necessary to adjust the camber and toe angle of the front wheels. This procedure is extremely important, because if you do not carry it out, in the best case, the car will “eat up” the rubber, and in the worst case, it will constantly be pulled to the side while driving, which is extremely dangerous, since it is fraught with an accident. Typically, car enthusiasts prefer to go to a car service center because they have all the necessary equipment. However, some people want to try to adjust the wheel alignment themselves or cannot afford the extra expenses. How to carry out this operation yourself?
Today we will describe in detail the sequence of actions, and at the same time we will tell you what the words “camber” and “toe in” mean.
What is wheel camber and toe
Camber is the angle between the vertical plane and the plane of the wheel. It directly determines how well the tires contact the road surface.
Toe is the angle between the direction of movement and the plane of rotation of the wheel. It determines how stable the car is when cornering and at what rate the tires wear out.
Toe has one caveat - it varies depending on the drive of the car. Vehicles with a rear-wheel drive axle should have positive toe-in (where the wheels are slightly turned towards each other), but front-wheel drive vehicles should have negative toe-in (the wheels, on the contrary, are slightly turned to the sides). It should be noted that while driving, the wheels become straight in both cases, which ensures a comfortable and safe ride.
There is another little-known adjustment called caster - the angle at which the king pin is tilted (in the longitudinal plane). The caster is set at the factory once and for all, and therefore does not require adjustment. However, if you make major changes to your car's suspension (preparing it for sports events, for example), it will need to be re-adjusted. This procedure will not be discussed here. Experts recommend adjusting the wheel alignment 2 times a year, simultaneously with the transition to summer/winter tires. But in fact, the vast majority of drivers carry out this procedure only after repairing suspension elements or replacing steering rods, as well as before a technical inspection.
How to adjust wheel alignment on a VAZ 2109
Before you get started, do 3 important things. First, make sure you won't be doing any suspension or steering repairs in the near future. Otherwise, you will waste your nerves, time and effort. Secondly, don’t be lazy to check the tire pressure. If it is abnormal, the measurements will be incorrect. Thirdly, check the trunk and interior to make sure nothing is lying there, since the adjustment is made on an unloaded car.
Vehicle diagnostics for wheel alignment
After studying the theory, it’s worth figuring out how to correctly diagnose your car. After all, VAZ-2109 owners often adjust this parameter with their own hands. First you need to find a garage equipped with a lift (a pit will also work), or find a flat area.
First you need to check that:
- when the car was moving straight, the steering wheel was level;
- the number of turns of the steering wheel to the right or left side relative to the position when the car was moving straight was the same.
In addition, you should make sure that the suspension is reliable, and also measure the pressure in all tires. This parameter must be the same on each wheel.
First you need to make sure the following:
- That you do not plan to repair the suspension or steering control in the near future.
- That the tire pressure is within normal limits.
- That the trunk and interior of the car are empty.
If you ignore the above factors, adjusting the wheel alignment will cause a lot of unnecessary trouble.
How to make a wheel alignment with your own hands on a VAZ-2109
Almost every owner of a business-class car, when adjusting such a parameter as wheel alignment in the car, will prefer to entrust the matter to a specialist so that he can do everything quickly and correctly. However, those motorists who drive, for example, a VAZ-2109, often resolve this issue on their own. Today, car enthusiasts are increasingly trying to repair their own cars on their own. After all, if we are talking about a domestic brand, then there is nothing complicated or impossible. It is worth remembering that the life of a car directly depends on how carefully the owner treats it
It is important that vehicle repair work is carried out on time. Car wheel alignment should be done every 10-15 thousand
km run. These manipulations do not require a lot of effort and energy, but they can protect you from negative consequences and extend the service life of the machine.
Step-by-step instructions for adjusting steering rods on a VAZ-2109
Well, all that remains is a small matter of adjusting the steering rods. For this:
Lightly unscrew the nuts on the steering rods using a 27 wrench
When unscrewing, pay attention to the fact that the nuts with marks on the edges are left-hand threaded;
Using the “24” key, we begin to turn the clutch, changing the length of the rod, while controlling the horizontal position of the steering spokes;
We set the moving scale located on the ruler to “0” and move the car back;
Once the reading is between -1 and +1 millimeters, the adjustment procedure can be completed. However, if you want to make sure that you did everything correctly, you can now drive the car forward, while the measurement indicators should remain within the same limits.
Camber - alignment - why is the procedure needed?
Before I give you step-by-step instructions, let's figure out what kind of wheel alignment procedure this is, what are the wheel alignment angles of the VAZ 2109 and how does the car's behavior on the road depend on them?
To ensure good stability and controllability of the car, the front wheels are installed at certain angles relative to the body and suspension elements. Three parameters are adjusted: toe-in, wheel camber angle, and the longitudinal inclination of the steering axis.
The casting angle of the steering axis is the angle between the vertical and the line passing through the centers of rotation of the ball joint and the bearing of the telescopic strut support, in a plane parallel to the longitudinal axis of the vehicle. It helps stabilize the steered wheels in the direction of straight motion. This angle depends on the number of adjusting washers at the ends of the extension. To decrease the angle, washers are added, and to increase it, they are removed. When installing/removing one washer, the angle changes by approximately 19′. Symptoms of deviation of the angle from the norm: the car pulls to the side when driving, different forces on the steering wheel in left and right turns, one-sided tread wear.
Angle of axle rotation when turning VAZ 2109
Wheel camber angle is the angle between the plane of rotation of the wheel and the vertical. It promotes the correct position of the rolling wheel during suspension operation. The angle is adjusted by turning the top bolt securing the telescopic strut to the steering knuckle. If this angle deviates greatly from the norm, the vehicle may deviate from straight-line motion and cause one-sided wear of the tread.
Camber angle of VAZ 2109 wheels
Wheel toe is the angle between the plane of rotation of the wheel and the longitudinal axis of the car. Toe can also be defined as the difference in distances between the flanges of the rims, measured from the rear and front of the wheels at the level of their centers. Wheel toe ensures the correct position of the steered wheels at various vehicle speeds and turning angles.
Wheel alignment VAZ 2109
The toe-in is changed by rotating the adjusting couplings with the locknuts of the tie rod ends loosened. Before adjustment, the steering rack is set to the middle position (steering wheel spokes are horizontal). Signs of toe deviation from the norm: severe saw-tooth wear of tires in the transverse direction (even with small deviations), squealing of tires when cornering, increased fuel consumption due to high rolling resistance of the front wheels (the vehicle's run-out is much less than required).
What is meant by toe-in and camber of the front wheels?
When the camber and toe of the wheels on the car are installed correctly, all recommendations of the vehicle manufacturer are followed, this will ensure good stability when driving on any road. Rubber wear will occur evenly over the entire area of the wheel, control will become easy and reliable.
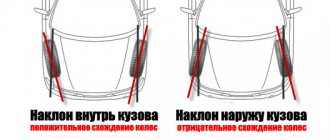
Camber refers to the position of the wheel in relation to the road. The normal position is considered to be when the top of the wheel is tilted outward. This value is determined by the factory and has a certain meaning for different car models. It is bad for the car and for the wheel itself when the tilt of its upper part is directed inward. In this case, you have to forget about good stability and controllability, and tire wear is greatly accelerated.
Toe-in refers to the distance between the front and rear points of the front wheel rims. Wheel camber is measured in degrees, and wheel toe-in, in addition to degrees, can be determined using distances in millimeters.
Acceptable values (errors) for wheel alignment
There are certain limits, the values of which cannot be exceeded when arranging toe and camber. In other words, as it is configured for the left axis of the car, it should be configured for the right axis of the car. But it will not be possible to adjust with an accuracy of 0 minutes, so certain errors are allowed, in which handling and driving in a straight line will not be affected.
- The camber difference (for example: left wheel 39′ – right wheel 33′ = 6′ permissible camber difference) should not exceed 30′ minutes, otherwise the car will drift to the side when driving.
- The same applies to the caster angle: the difference in angles (subtract the smaller angle from the larger angle) should not exceed 30′.
- Front axle offset - if this value is positive, then the left front wheel is closer to the rear than the right one, if the value is negative, then vice versa. This parameter is very important, because it characterizes the state of the body geometry, and the closer this indicator is to zero, the better. The permissible deviation is 20.30 minutes.
everything useful is here
Adjusting the front wheel alignment angles
Rice. 1. Casting angle of the wheel axis
Rice. 2. Wheel camber angle
Rice. 3. Wheel alignment
To ensure good stability and controllability of the car, the front wheels are installed at certain angles relative to the body and suspension elements. Three parameters are adjusted: toe-in, wheel camber angle, and the longitudinal inclination of the steering axis.
The casting angle of the steering axis (Fig. 1) is the angle between the vertical and the line passing through the centers of rotation of the ball joint and the bearing of the telescopic strut support, in a plane parallel to the longitudinal axis of the vehicle. It helps stabilize the steered wheels in the direction of straight motion. This angle depends on the number of adjusting washers at the ends of the extension. To decrease the angle, washers are added, and to increase it, they are removed. When installing/removing one washer, the angle changes by approximately 19. Symptoms of deviation of the angle from the norm: the car pulls to the side when driving, different forces on the steering wheel in left and right turns, one-sided tread wear.
The camber angle of the wheel (Fig. 2) is the angle between the plane of rotation of the wheel and the vertical. It promotes the correct position of the rolling wheel during suspension operation. The angle is adjusted by turning the top bolt securing the telescopic strut to the steering knuckle. If this angle deviates greatly from the norm, the vehicle may deviate from straight-line motion and cause one-sided wear of the tread.
Do-it-yourself wheel alignment, ANTI-CRISIS. VAZ, Lada Kalina, Priora, Granta
VAZ, Method for adjusting wheel
on a VAZ, with your own hands without a stand. _ COOL car LIFE HACKS.
Do-It-Yourself Camber
Do-It-Yourself Camber
Camber Toe
With Your Own Hands, clearly demonstrated how to do it
do-it-yourself wheel alignment.
Wheel toe (Fig. 3) is the angle between the plane of rotation of the wheel and the longitudinal axis of the car. Toe can also be defined as the difference in distances between the flanges of the rims, measured from the rear and front of the wheels at the level of their centers. Wheel toe ensures the correct position of the steered wheels at various vehicle speeds and turning angles.
The toe-in is changed by rotating the adjusting couplings with the locknuts of the tie rod ends loosened. Before adjustment, the steering rack is set to the middle position (steering wheel spokes are horizontal). Signs of toe deviation from the norm: severe saw-tooth wear of tires in the transverse direction (even with small deviations), squealing of tires when cornering, increased fuel consumption due to high rolling resistance of the front wheels (the vehicle's run-out is much less than required).
It is recommended to check and adjust the angles of the front wheels at a service station. The car is placed on a horizontal platform and loaded in accordance with the manufacturer's recommendations (see below). Checking and adjusting the angles on an unloaded vehicle is acceptable, but will give less accurate results. Before doing this, you should make sure that the tire pressure is normal, the tread wear on the left and right wheels is approximately the same, there is no play in the bearings and steering, the wheel rims are not deformed (radial runout - no more than 0.7 mm, axial runout - no more than 1 mm).
Checking the wheel alignment angles is mandatory if suspension parts that affect these angles have been replaced or repaired. Due to the fact that the installation angles of the front wheels are interconnected, first of all the caster angle of the turning axis is checked and adjusted, then the camber and, lastly, the toe-in.
For a run-in vehicle in running order and with a payload of 320 kg (4 people) in the cabin and 40 kg of cargo in the trunk, the wheel alignment angles should be within the following limits:
caster angle
Vehicle wheel alignment angles in running order:
Preparation and procedure for adjusting wheel alignment angles of VAZ 2107
Having a level area, balanced equal-sized wheels and tires with the required pressure are far from the only requirements
It is equally important to remove the decorative caps before starting the adjustment and ensure:
- lack of free movement in “running” units;
- permissible play in the steering;
- proper tightening of all connections in the chassis;
- serviceability of the depreciation system.
It is advisable to check and adjust the chassis by first placing 70 kg on each seat and 40 kg in the trunk. However, adjustments can also be made on an empty car. With the steering wheel in the direction of straight-line motion, you should remove all the play in the suspension by shaking each of the four bumpers several times.
Wheel alignment on a car, which indicates the need for adjustment
Toe-in and camber refer to the vehicle's chassis settings. The controllability of the car depends on them, so it is necessary to check this point regularly. The motorist must understand why wheel alignment is needed and why it occurs. Unexpected collisions and accidents, loss of control, rapid tire wear - all this is the result of incorrect wheel alignment.
What does a correct wheel alignment look like?
Camber is the angle formed by the vertical line of the tire and the road surface; they are distinguished as normal, negative and positive:
- in the first case, the angle of the wheels relative to the road surface is zero, the wheels are exactly perpendicular to the road surface;
- in the second case, the angle is acute - the upper zone of the tire is directed inward;
- in the third case, the angle is obtuse - the upper zone of the tire is directed outward.
With a negative discrepancy, road grip improves and the car becomes easier to control when cornering. The disadvantage of such a camber is that the tires wear out quickly, the car can move from side to side, and handling deteriorates at speeds above 80 km/h. The sharper the camber angle, the more pronounced the imperfections.
The following correct wheel alignment angle is recommended:
- for sports cars, set the camber angle to -3°;
- for civilian cars intended for tuning - set to -1°.
What should the alignment be like?
Toe-in is another angle of the wheels, calculated by the ratio of the vertical to the plane of the car body. Many people are wondering whether wheel alignment is done on the rear wheels. In most cases, it is adjustable from the front and back. This parameter can be measured in degrees and millimeters.
The toe-in, both in one direction and the other, should not exceed 5 mm, otherwise the tire will wear to zero within 1 thousand km of the vehicle.
A severe violation in the wheel alignment parameters can “put a pig on the driver” at any moment. For example, as soon as you drive onto wet asphalt, the car starts to drive.
You will have to constantly adjust the car so as not to become the culprit of an accident.
Then perform wheel alignment adjustment
The need to check and set chassis parameters arises after restoration work on the suspension, steering or replacement of shock absorbers and springs, as well as balls, bushings, and silent blocks. In most cases, this is the time when the wheel alignment is done.
Error-free adjustment of these parameters is possible only at a service station. Here they will first check the fixation of the steering balancer to the movable stand, the attachment of the bipod, the pendulum and much more.
Adjustment is carried out by changing the length of the side steering rods and increasing/decreasing the number of cuffs located between the rod of the lower lever and the cross member (you can also turn the eccentric on the front pillar).
The time when this type of work is performed is also determined by the following:
- if the car tires wear unevenly, be it on the inside or outside;
- after a collision, collision or any accident;
- if he drives the car, the handling is not up to par;
- The steering wheel turns too tightly, although there is no reason for this in the steering.
Services after which it is necessary to perform wheel alignment:
- Upon completion of the car suspension repair. (Necessarily)
- During the first maintenance, scheduled maintenance. (not necessary)
- After running in only the purchased car. (not necessary)
- After the seasonal “re-shoeing” of the wheels. (not necessary)
- Upon reaching a mileage of 15-20 thousand km. (not necessary)
- After 3-5 thousand km. after replacing the springs. (not necessary)
- After a rough collision with an obstacle, falling into a hole (especially if the chassis is broken or the discs are deformed). (Necessarily)
In case of wheel angles shifting. (Necessarily)
Professional bench equipment makes it possible to accurately check and adjust wheel alignment. It is impossible to do this “by eye,” as some “experts” claim, because even a 0.5° difference can negatively affect driving characteristics.
If the car has not undergone suspension repairs or been involved in an accident, then it does not require adjustment of the parameters in question.
How long does it take to do a wheel alignment?
Wheel alignment time takes an average of 30 minutes, the minimum time spent, subject to the availability of vehicle elements, is 15 minutes.
Installing spacers
Spacers on the VAZ 2114 are installed between the rear beam and the rear hubs of the car. Camber plates must be installed correctly, that is, the thicker part of the plate must be at the bottom of the beam.
To install the rear camber plates, you will need the following tool:
- Balloon key;
- Hammer;
- Combination wrench 12;
- Socket wrench or wrench with 14mm head;
- A wooden block or a soft metal drift (in case the brake drum is difficult to remove);
- Pliers.
A bottle of WD-40 will also come in handy, which will help unscrew soured bolts without breaking off the heads.
It is a good idea to use a lift to carry out the work. But if you don’t have one, you can get by with a jack. Only then will you have to carry out the work in stages - first do one side, and then start working on the other.
To install spacers, we perform the following operations:
- Install the jack and remove the rear wheel;
- Unscrew the two bolts on the brake drum;
- Remove the brake drum;
- We dismantle the pads;
- Unscrew the four bolts securing the rear axle and hub assembly. Often these fasteners stick, so before dismantling it is better to treat it with WD-40 and wait a while until the bolts “come off”;
- Having unscrewed the bolts, carefully move the hub to the side, trying not to damage the brake pipe;
- Install the plate and assemble everything in reverse order.
The bolts that come with the negative camber plates are usually too long and have a head that is inconvenient for tightening with a wrench, so it makes sense to purchase additional fasteners separately, a little shorter in length than these. It should be noted that for the VAZ 2114 sets of plates are provided only for the rear wheels.
In this article we will look at the most frequently asked questions about wheel alignment. Let's talk directly about the theory: what is wheel alignment, when to adjust it, what parameters to set. Then we’ll move on to the practical part: what are the advantages and disadvantages of different wheel alignment variations, how to avoid getting scammed by a service center, and much more.
What is wheel alignment?
The combination of words “wheel alignment” includes the alignment and camber of wheels relative to the road and to the car body.
- Setting up convergence on a gazelle
Toe is a certain angle that is formed between the plane of the wheel and the axis of symmetry or traction
Pay attention to the figure: it shows positive toe-in, i.e. in the direction of travel the wheels face each other
There is also negative toe-in, i.e. the wheels are facing away from each other.
Camber is a certain angle that is formed between the plane of the wheel and the asphalt. If the upper part of the wheel is tilted towards the body, then the camber is considered negative, if it is tilted away from the body, then it is considered positive.
Also, there is another term here - “castor” or “tilt of the axis of rotation”
Castor is the angle between the steering axis of the wheel and the vertical as seen from the side. In other words, when we turn the steering wheel completely, the wheel tilts in the direction of the turn (falls on its side).
07.05.2013
In this article we will look at the most frequently asked questions about wheel alignment. Let's talk directly about the theory: what is wheel alignment, when to adjust it, what parameters to set. Then we’ll move on to the practical part: what are the advantages and disadvantages of different wheel alignment variations, how to avoid getting scammed by a service center, and much more.
How to make your own wheel alignment on a VAZ-2109
For good handling of the VAZ-2109, wheel alignment is installed on the front wheels at the required angles. The angles of the steering axes affect the stabilization of the steering wheels of the machine in the straight direction. This angle can be adjusted by adding special shims in the area where the lower arm axis is located.
Deviation of the angle from the established norm threatens with the following:
- When driving, the car pulls to the side.
- Turning the steering wheel left or right requires different amounts of effort.
In order to calculate the amount of wheel toe, you must first measure the distance between the front and rear wheel rims, and then calculate the difference in values. Here you will need a ruler and a device with a special-purpose chain. When measuring toe-in, the ruler is placed so that all the tips from the tubes attached to it are directed into the car tire on the sides, while the chain itself touches the ground. After setting the arrow to position 0, you need to roll the car forward so that the ruler is behind the axle. These steps will help determine the exact alignment of the wheels. Correction and adjustment of toe should be carried out using rotations of the connecting couplings, which are located on the steering rods on the sides
It is important to remember that the locknuts must be tightened at the very end. Adjusting camber in vehicles is a relatively complex process
Regardless, this process can be completed on your own. First, you should lift the car so that the tires hang in the air and do not come into contact with the ground. Now you can determine special points of equal runout on the sides of the car on the tires. In this case, helpers will be a rest for the hand of the master and chalk or a marker. The hand must be fixed on the support. A marker is needed in order to mark those parts of the wheels that protrude slightly along the diameter itself. After this, the wheel should be turned so that the marked points are vertical.
Now you need to hang a special weight on a suspension near the wheels. You can also put a rectangular stand there. Five millimeters is the permissible deviation value when setting this parameter. To adjust the camber on the VAZ-2109, it is necessary to strengthen the gap between the cross member and the lever axis. You can use special gaskets. In addition, in authorized stores it is time to purchase washers designed for camber adjustment, which change the camber by eight degrees.
For those who are thinking about doing car repairs themselves, this article will be very useful. One way or another, if any difficulties arise, you can turn to any service station for help. There, they will eliminate all errors without any problems and correctly adjust the wheel alignment on your car.
Video: what you need to know about wheel alignment
It is possible to do a wheel alignment for a VAZ car with your own hands; you don’t have to go to a service center and pay a lot of money. Let's consider two options that are somewhat similar, but have fundamental differences. First option. To do this, you will need as level a platform as possible, a ruler, a mechanism made of folding tubes, and keys.
So, we park the car on a horizontal platform and check that the steering wheel is absolutely level. You should also measure the air pressure in the tires; it must correspond to the values provided by the vehicle registration certificate; we check whether the suspension is securely fastened. We make notes on the rims of the front and rear wheels strictly along their geometric axis and find the difference between these values, in this way we can determine the toe-in of the wheels. Take a ruler or chain with a tensioning device. We will place a scale and a control chain on the mechanism of folding tubes. Let's place the ruler so that the ends of the folding tubes rest against the side of the wheel, and the measuring chain touches the surface of the area.
We set the scale to zero and move the car so that the measuring chain is behind the axis, and the arrow will indicate to us the amount of toe. Toe can be adjusted to the required level by rotating the tie rod coupling. After making adjustments, be sure to tighten each lock nut back. Let's now check the camber of our car's wheels.
It is necessary to lift the car with a jack or lift so that the wheels come off the ground. We place a firm stop near each wheel, take chalk and mark opposite points on the wheels. Rotate the wheel so that the points are on the same vertical, strictly perpendicular to the surface.
Next to the wheel you need to place a pre-prepared rectangular cube. The distance between the plane of the rectangle and the rim will be the camber value. It should be from 1 to 5 mm, with such values the car behaves confidently on the road.
With large camber values, it is necessary to adjust it; this is done by adding adjusting shims between the transverse beam and the lever axis. Option two, in our opinion, is simpler. You need to place the car on a flat surface, then drive one revolution of the wheel and fix it so that the car does not move from the spot. Next, you need to attach a thread with a plumb line to the car fender, so that it passes through the center of the hub.
Using a ruler, you need to measure the distance from the axis of the thread to the edges of the disk at the top and bottom of the wheel. If the distance is different, loosen the adjusting bolt nut and use the bolt to adjust the position of the wheel. To make adjustment easier, you need to loosen the second knuckle adjustment bolt. If the distance from the thread axis to the disk is greater at the top than at the bottom, then the adjustment is normal and the car will be stable. The difference between the upper and lower values should be in the range of 1-5 mm. Then we do the same with the next wheel.
Let's check the alignment. Unscrew the locknuts of the bushings that secure the steering rods and ends. Pull the cable through the central axis of the hub from the front to the rear wheel. A matchbox must be placed between the cable and the wheel. Turn the steering wheel so that the cable begins to touch the front and rear wheel disks.
We do a similar situation on the other side; we need to bring the thread to a similar position. After adjusting, you need to tighten the locknuts and check everything again to see if the adjustment has gone wrong. .
How to destroy the alignment of a VAZ 2109
When is it recommended to carry out alignment - VAZ 2109
Various sources recommend adjustments at approximately 12-15 thousand kilometers, or once a year. Sometimes there are cases when it is necessary to perform such an operation ahead of schedule. The reason for this in most cases is the condition of our roads. It is enough to “catch” a good pothole once to require checking and adjusting the camber and toe of the front wheels.
If the owner plans to use his car for a long time without any problems, then it is not worth saving on this operation. After each replacement of ball joints, silent blocks, steering rods, shock absorbers, it is necessary to check and adjust the camber and toe of the wheels.
Tire wear due to incorrect camber of VAZ 2109
Performing this operation today is quite simple. You just need to go to a service center that performs such an operation, and specialists will quickly and efficiently complete this work. But there are times when such work must be done independently in a garage.
We carry out the camber and alignment ourselves.
We will not repeat the importance of this operation. This process is important and must be taken seriously. To perform it you need tools and accessories:
- Availability of inspection hole.
- Plumb.
- Chalk or felt-tip pen.
- A set of keys.
- Sliding ruler with scale.
Carrying out the operation of checking and adjusting camber and toe for cars with front-wheel drive and “classics” have some differences. To perform this operation at home, it is necessary to ensure the presence of a flat, horizontal platform. Checking and adjustment is carried out in several stages:
- The car is installed on the site so that the front wheels are straight. There are two marks on the outside of the tire, one at the top and the other at the bottom.
- Apply a plumb line to the wing so that it is in the plane with the applied marks. Next, use a caliper or other measuring tool to measure the distance from the cord to the wheel disk near the upper and lower marks. If the difference is about 3 millimeters, this is normal.
- Next, you need to turn the wheels, rolling the car forward so that the applied marks are located horizontally.
- Again, measurements are taken from the cord to the wheel disk in the vertical plane.
- To obtain more accurate measurement data, this operation must be performed several times.
The difference in size between the upper and lower marks for cars with front-wheel drive should be no more than 1 mm, and for “classics” - 3 mm. If the obtained measurement results do not fit into these standards, adjustments are made. For cars with front-wheel drive, the desired result is obtained by moving the strut forward or backward, while for “classics” the shims for the lower control arm of the front suspension are added or removed. If the “classic” front suspension has a MacPherson strut, the strut is also moved for adjustment.
Wheel alignment is checked using a sliding ruler. To do this, make two marks on the inside of the wheels in front of the car and measure the distance. Next, you need to roll the car so that the marks are at the rear along the direction of the car. The measurement obtained between the marks should be approximately 1 mm larger than the previous one. This can be achieved by turning the steering rods.
I would like to remind you that such independent adjustments are temporary, therefore, do not put off checking the front suspension of your car using special equipment for too long. Good luck on the roads!
Recommendations
The above also applies to those cars that have other types of suspensions. With different design features of individual components, there are significant differences:
Cars in which there is no rack and pinion drive, and its function is performed by a steering linkage and gearbox, require special attention to the bushings and the pendulum joint. Adjustment depends on the wear of these parts.
Its detection is possible only when the elements are in a certain position. For cars with a pivot suspension, when adjusting the wheel alignment using an eccentric, changes also occur in the caster, which will need to be monitored. In a number of car models, wheel alignment is adjusted both front and rear. In most cases, this factor is changed by rotating the coupling, which is installed on the transverse rod. In an all-wheel drive vehicle with a front continuous axle, wheel alignment is not provided at all.
After the adjustment is completed, you should think about which wheel rims to choose. They can be cast or stamped. The former significantly reduce the load experienced by the suspension, the latter are more practical.