01/26/2022 6 107 VAZ 2107
Author: Ivan Baranov
Any experienced car owner will tell you that a stable cylinder head is a guarantee of reliable functioning of the car’s engine. A VAZ 2107 cylinder head in good condition reduces fuel consumption and improves vehicle dynamics.
VAZ 2107 car
Inexperienced car owners should know that head repair work should be carried out only by highly qualified specialists. Otherwise, an incorrectly adjusted unit can lead to damage to many engine components. Restoration work can cost a considerable amount. But experienced car enthusiasts with the required skills can replace, repair and tighten cylinder head bolts themselves.
[Hide]
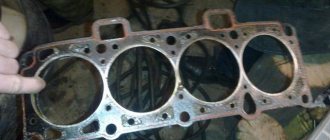
Cylinder head gasket VAZ 2107
The cylinder head gasket is a one-time use item, since its physical properties and geometry change during installation.
What is the cylinder head gasket used for?
The cylinder head gasket is designed to seal the connection between the cylinder block and the head. Even taking into account the fact that these engine components have perfectly flat mating planes, it will not be possible to achieve complete tightness without it, because the pressure in the combustion chambers reaches more than ten atmospheres. In addition to this, the seals also require connection of the oil channels, as well as the cooling jacket channels. Tightness is achieved by uniform compression of the gasket while tightening the connecting elements.
The gasket serves to seal the connection between the head and cylinder block
What are cylinder head gaskets made of?
The cylinder head gasket can be made of different materials:
- metal (copper and aluminum alloys);
- asbestos;
- combinations of metal and asbestos;
- combinations of rubber and asbestos;
- paronitis.
The main requirements for the gasket are resistance to high temperatures and ability to compress. Each of the listed materials has its pros and cons. Products made from multiple layers of metal or asbestos, for example, better withstand high temperatures, but may not provide the best seal. Parts made of rubber and paronite, on the contrary, maximize the connection between the head and the block, but their temperature stability is lower.
Metal cylinder head gaskets for VAZ 2107 are made from copper and aluminum alloys
When choosing a gasket, it is better to give preference to a combined product, for example, made of asbestos and metal. Such seals are made of sheet asbestos, but the holes for the cylinders are reinforced with metal rings. Holes for fastening elements are reinforced with the same rings.
When choosing a gasket, it is better to give preference to a combined product
What to consider when choosing a cylinder head gasket
If you are going to replace the gasket, you need to know exactly the characteristics of the engine. The fact is that the “sevens” were equipped with three types of power plants: VAZ 2103, 2105 and 2106, which have different cylinder diameters. For the first it is 76 mm, for the last two it is 79 mm. Gaskets are manufactured according to these dimensions. Therefore, if you purchase a cylinder head seal for a 2103 engine and install it on a 2105 or 2106 power unit, the pistons will naturally tear the edges of the product with all the ensuing consequences. If a gasket with a cylinder hole diameter of 79 mm is installed on a VAZ 2103 engine, the seal will not provide the necessary tightness due to the fact that the part will not completely block the cylinder holes.
Causes and signs of cylinder head gasket failure
The destruction of the seal is characterized by its breakdown or burnout. In the first case, there is slight damage to the part, which in some cases cannot even be seen with the naked eye. When a product burns, the scale of damage is significantly greater. The part is deformed and loses its integrity, leaving joint areas without sealing.
Causes of destruction
The main reasons why a cylinder head gasket fails prematurely include:
- overheating of the power unit;
- incorrect order or tightening torque of the mounting bolts during installation;
- factory defects or low quality materials used to manufacture the part;
- use of low-quality coolant;
- engine malfunctions.
Engine overheating most often causes gasket failure. It usually occurs due to interruptions in the operation of the cooling system (malfunction of the thermostat, radiator fan, fan switch sensor, clogged radiator, etc.). As soon as the driver drives a car with an overheated engine for half a kilometer, the gasket will burn out.
When installing a new seal on a power unit being repaired, it is important to follow the order of tightening the bolts that secure the head to the block. In addition, it is necessary to adhere to the specified tightening torque of the fastening elements. If the bolts are not tightened or overtightened, the gasket will inevitably become deformed and subsequently be punctured.
Most often, the gasket burns out due to engine overheating.
When choosing a replacement seal, you should pay attention not only to its parameters, but also to the manufacturer. Under no circumstances should you buy cheap parts from unknown companies. The result of such savings may be unplanned engine overhauls. This also applies to coolant. Low-quality refrigerant can cause corrosion and damage not only the gasket, but also the head itself.
As for disturbances in the operation of the power plant, processes such as detonation and glow ignition also have a destructive effect on the seal. Therefore, it is worth monitoring the quality of the fuel and the correct adjustment of the ignition timing.
Signs of cylinder head gasket damage
A breakdown or burnout of the gasket can manifest itself in the form of:
- rapid heating and overheating of the engine;
- unstable operation of the power unit;
- oil or coolant leaks from under the cylinder head;
- traces of coolant in the oil and grease in the refrigerant;
- steam in exhaust gases;
- an increase in pressure in the cooling system, accompanied by the appearance of smoke in the expansion tank;
- condensation on the spark plug electrodes.
Symptoms will be different in each individual case. It depends on where exactly the integrity of the seal was damaged. If the gasket is damaged near the edge of the cylinder bore, then, most likely, the power plant will overheat with an increase in pressure in the cooling system. In this case, hot exhaust gases under pressure will break through the seal damage into the cooling system. Naturally, antifreeze or antifreeze will begin to heat up quickly, increasing the temperature of the entire engine. This will increase the pressure in the system, and gas bubbles will appear in the expansion tank.
When a gasket burns out, refrigerant often gets into the oil.
There will definitely be a reverse effect. If coolant enters the combustion chambers, it will disrupt the normal operation of the engine. The engine will begin to stall due to the fact that the fuel-air mixture, diluted with coolant, will not be able to burn. As a result, we will get a noticeable malfunction of the engine at idle, accompanied by exhaust gases in the cooling system, coolant in the combustion chambers and thick white smoke with a characteristic odor from the exhaust pipe.
If the gasket burns out somewhere between the windows of the cooling jacket and the oil channels, it is possible that these two process fluids will mix. In this case, traces of grease will appear in the expansion tank, and antifreeze or antifreeze will appear in the oil.
Oil may get into the cooling system
If the gasket is damaged along the edge, oil or coolant leakage is usually observed at the junction of the cylinder head and the cylinder block. In addition, a breakthrough of exhaust gases between the main engine parts is also possible.
If the gasket is damaged and coolant is leaking into the cylinders, thick white smoke will come out of the exhaust pipe.
Self-diagnosis
Diagnosis of gasket failure must be approached comprehensively. In other words, you should not immediately start removing the head when you see white smoke from the exhaust pipe or oil leaks from under the head. To verify that the seal is faulty, follow these steps:
- Inspect the junction of the head and cylinder block around the perimeter. If you find oil or coolant leaks, make sure that it is leaking from under the head.
- Start the engine and notice the color of the exhaust and its smell. If it really looks like thick white steam and smells like antifreeze or antifreeze, turn off the engine and carefully unscrew the expansion tank cap. Take a sniff. If exhaust gases enter the cooling system, the smell of burnt gasoline will come from the tank.
- Without tightening the cap of the expansion tank, start the engine and look at the condition of the refrigerant. It should not contain any gas bubbles or traces of lubricant.
- Turn off the power plant and let it cool. Remove the oil dipstick, inspect it and determine the oil level. If there are traces of a white-brown emulsion on the dipstick, or the oil level has suddenly risen, mixing of process fluids is taking place.
- Let the engine run for 5-7 minutes. Silence it. Unscrew the spark plugs and inspect the electrodes. They must be dry. If there are traces of moisture on them, most likely, refrigerant is entering the cylinders.
Video: signs of cylinder head gasket damage
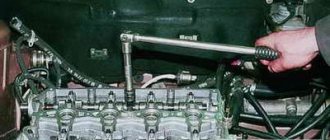
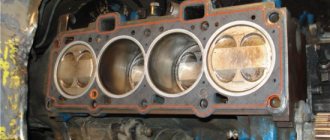
Lada 2107 7up › Logbook › Two methods of tightening the cylinder head. Which one is correct? Let's figure it out.
I once had to climb into the engine and remove the head due to a burnt-out valve. Then the question arose: how to actually tighten the cylinder head according to science? In different manuals, this operation is described by two methods. 1. Tighten in several passes to a torque of 10.5-12 kg/m 2. Pull in several passes to 8 kg and then turn 90 degrees 2 times. Which method should you choose? The second method supposedly puts the bolts into elastic deformation mode, stretching them like a spring, while the moment goes beyond 13 kg/m. Being in a stretched state, the bolts compensate for the subsequent shrinkage of the gasket and tightening the bolts is no longer required. It goes without saying that re-tightening old bolts is fraught with entering the zone of plastic deformation and subsequent breakage. The fact that the bolts should be tensioned is in principle correct, but how can this be checked? Right! Moment! Having come to this conclusion, I decided to stall purely for the moment, and at the same time see how effective the second method would be. I took a click wrench marked up to 32 kg. I started with a smooth tightening from 2 kg in several passes and reached 11 kg and then the fun began. Each bolt began to live its own life. 70% of the bolts clicked when turned at the same angle, while the rest required turning more than 90 degrees to click. The cylinder head was previously milled and the plane of the block was carefully cleaned with a scraper. It turned out that the real compression of the gasket began only after 11 kg and took place in different areas with different intensities. If I had used the angle method, I would have gotten a scatter of moment across the entire plane and a bend in the cylinder head, which would have inevitably led to gasket burnout. Why is the gasket crimped at different speeds over its entire area? This may be due to the design features of the gasket itself; perhaps there is a curvature of the plane of the cylinder block. In any case, it is necessary to tighten solely using the torque on the torque wrench; this is the only way to guarantee tight and, most importantly, uniform pressing of the cylinder head plane to the block. At what torque should you turn? I settled on 13.5 kg, perhaps a bit too much, but good compression is guaranteed.
Mileage: 89100 km
Like 17 Subscribe
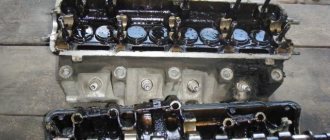
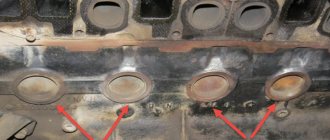
Cylinder head
Essentially, the head is the cylinder block cover that covers the cylinders. It contains the upper parts of the combustion chambers, spark plugs, intake and exhaust ports, as well as the entire gas distribution mechanism. The VAZ 2107 cylinder head is a monolithic part cast from an aluminum alloy, but inside it there are channels where oil and coolant circulate.
The head is the housing for the timing mechanism
Are there any differences in the design of the cylinder head for the carburetor and injection engines of the VAZ 2107
The cylinder heads of the carburetor and injection engines of the “seven” are almost the same. The only difference is the shape of the intake channels. For the former it is round, for the latter it is oval. A manifold from a carburetor car without modifications will not be able to completely block the intake windows. Therefore, if there is a need to replace the head, this point should be taken into account.
The device of the cylinder head of the VAZ 2107
The main task of the cylinder head is to ensure the operation of the gas distribution mechanism. It serves as a housing for all its elements:
- camshaft assembly with “bed”;
- levers;
- valves;
- valve seats;
- guide bushings;
- oil seals;
- springs;
- "plates";
- "crackers";
- retaining rings;
- adjusting bolts with bushings, etc.
The valve mechanism is part of the cylinder head
Dismantling the unit and preparing for repair
Carrying out work of this kind requires fairly high qualifications and special equipment. Removal of the cylinder head is carried out in the following sequence:
- The car is installed in a garage box, the battery is disconnected.
- The following elements are removed from the engine: air filter housing, carburetor and head cover.
- The upper timing sprocket is unscrewed from the camshaft and removed.
- Using a socket and a powerful wrench, the head mounting bolts are removed.
- After this, the assembly is carefully removed from the cylinder block.
- The gasket, or rather its remains, remains on the surface; they must be removed using a non-metallic tool to avoid damage.
Step by step guide
Many problems can be solved after tightening the bolts, but if this does not help, then a major overhaul of this unit may be necessary, which involves removing not only the cylinder head, but also other parts of the block. Some parts may need to be replaced, such as gaskets, valve stem seals and valve guides.
Tools
To work we will need the following tools:
Micrometer
- flushing liquid;
- pliers;
- hammer;
- mandrels for removing and installing valves and caps;
- torque wrench;
Torque wrench - tiles (preferably the spiral is closed);
- desiccant.
Valve desiccant
Before starting work on repairing the cylinder head, it must first be removed and cleaned of dirt.Stages
Preparatory work and head removal
- The first step is to drain the coolant from the engine.
We remove the carburetor.
- Having disconnected the pipes and hoses, remove the air barrier.
- Remove the head cover.
- We align the marks on the crankshaft pulley with the mark on the camshaft drive and the marks on the camshaft pulley with the mark on its housing as shown in the photo.
Aligning marks - By disconnecting the camshaft lock washer, loosen the chain tension.
- Having torn off the bolt, remove the sprocket.
- Unscrew the fastenings.
- We remove the camshaft with the housing.
Camshaft Having previously made marks using a marker, remove the rockers.
Removing rockers - Disconnect the wires.
- We remove the pipe and unscrew the bolts securing the cylinder head to the block.
- We remove the head.
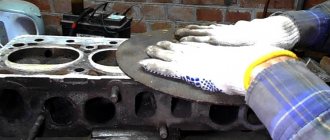
- We inspect its condition and clean it of dirt.
Inspecting the condition of the head
This video shows the process of removing the cylinder head.Checking status
Now it's time to dry out the valves. This is done with a special device. If chips, cracks, and rust are not visible, we conduct a further inspection. We evaluate the condition of the saddles, the repair of which is recommended every two hundred thousand kilometers.
Changing guide bushings
We inspect the guide bushings; if they are in unsatisfactory condition, they must be replaced.
A special tool is used to remove them. If you don’t have this on hand, you can get by with pliers and a clamp. After removing the bushings, we measure their diameter. We buy similar ones, the size of which is 0.05-0.07 millimeters larger than the ones being replaced.
The guides are pressed in using a mandrel, an electric stove, a hammer and lubricant.
- We place the head on a stand at the edges.
We place the electrical device under the place of work.
- We wait until the metal heats up to about one hundred degrees (so that it expands).
- Now you need to properly lubricate the bushing with grease.
- Having removed it from the holders, we drive in new guides.
- When all eight are replaced, we wait for the cylinder head to cool down.
- The valves should not dangle and move freely, there should not be any jamming.
- using a hose tightly placed on the part;
- using a device very similar to a corkscrew.
Disconnect the hoses and pipes
Checking the tightness of the head
To ensure a tight fit of the valves to the seats, you must do the following. Using lapping paste, lubricate the valve and insert it into the head. There are several techniques for rotating it, here are some of them:
The main sign of good valve lapping will be a specific matte surface of the seat in the place where it contacts the part.
The tightness of the head can be checked by pouring kerosene into the collectors; you can also use gasoline. If done correctly, there should be no leaks for the first five to seven minutes.
Attention! All engine parts must be washed with a special solution, this will ensure long-term and uninterrupted operation of the power plant for a long time.
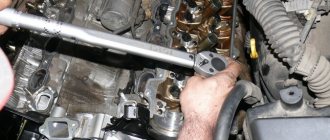
When assembling the head, be sure to pay attention to the correct tightening of the bolts. It must be carried out strictly according to the scheme. In case of incorrect broaching, distortions may appear and, as a result, all your previous work will be crossed out. If you have any questions, watch the video.
Countersinking saddles
When repairing the cylinder head yourself, be prepared for the most monotonous and lengthy process - countersinking. A lot depends on its quality:
- tight fit of the valve to the seat;
- compression ratio in the combustion chamber.
The seat grinding work is carried out with a special tool - a roller cutter (less often - a countersink). With its help, a not quite finished seat can be given the desired shape so that the valve fits more tightly. Start work with a countersink at 60 degrees.
As soon as metal removal has begun in a circle, change the nozzle - take a countersink with a cone angle of 120 degrees. Work with it until a clear round edge appears. The final stage of countersinking is done with a 90-degree cone - it should go through the working chamfer of no more than 1.5 mm. Further grinding of the valve will increase it to the required value.
Torque Tips and Common Mistakes
- Do not jerk the cylinder head bolts. Tightening should be done smoothly.
- When installing cylinder head bolts (especially old ones), carefully examine their condition - there should be no damage to the threads. Exactly the same as inside the installation site.
- If necessary, the part must be cleaned of contamination.
- It is better to lubricate the threads with oil, but pouring them into the mounting holes is not recommended. If the wells are blind, then the lubricant must be applied very carefully. Fluids do not compress and excess lubrication will prevent you from tightening the bolt all the way.
- Failure to use a torque wrench may result in inaccurate tightening torques and incorrect gasket operation or damage to the cylinder head.
Valve stem seals
While adjusting the valves, it is quite possible that you had no idea that you were next to another very important element of the gas distribution mechanism - the valve stem seals.
Purpose of valve stem seals
While the engine is running, the camshaft, rocker arms, valve springs and valve tops operate in an oil mist. Oil is deposited on all parts and mechanisms located under the valve cover. Naturally, it also ends up on the top of the valves, called stems.
Under the influence of gravity, the oil will tend to flow into the combustion chamber. As you know, it shouldn't be there. Oil seals are designed to prevent oil from flowing down the valve stem into the engine combustion chamber.
Engine malfunctions associated with worn caps
The sole purpose of the oil seal is to prevent oil from draining into the engine combustion chamber . Over time, the rubber of this element loses its functions and is destroyed under the influence of an aggressive environment. This leads to the penetration of oil into the air-fuel mixture, where it burns successfully.
A working engine should have oil consumption of about 0.2 - 0.3 liters per 10 thousand kilometers. With worn valve stem seals, it can reach one liter per thousand kilometers.
- clogs and destroys catalytic converters and particulate filters (devices that reduce the content of harmful substances in exhaust gases), which themselves are very expensive;
- causes overheating and premature failure of engine exhaust valves;
- greatly increases exhaust smoke;
- increases the risk of engine oil starvation due to lack of oil.
The service life of valve stem seals on domestic cars fluctuates around 80 thousand kilometers. This parameter very much depends on the quality of the caps themselves and the oil used.
What components are best to use?
Today, the greatest trust among car enthusiasts and mechanics is in the products of such well-known brands as Corteco and Elring - these brands have proven themselves to be the best in the production of gaskets, oil seals, seals, and valve stem seals.
There are products from domestic manufacturers on the market. Their quality varies greatly, but nevertheless does not reach the quality of the products of leading companies.
How to change valve stem seals
The topic of replacing valve stem seals is extensive and worthy of a separate article. Briefly it is done like this.
- Remove the valve cover.
- Remove the camshaft sprocket.
Video: replacing valve stem seals on a “classic”
Start of work
The very first step is to remove the air filter. Of course, on a carburetor engine it is somewhat easier to remove it. If you have an injector, you will have to tinker with its rubber fasteners. But the essence remains the same - it is necessary to disassemble the fuel system completely to get to the cylinder head. But we will look at the example of not an injection, but a carburetor seven. Still, there are many more classic cars with such a power system.
It is advisable to dismantle the carburetor, since if you remove the head along with it, you can accidentally damage it. On all classic series cars, the carburetor is removed in the same way. This procedure is quite simple, but it will take some time. Now you can unscrew the nut securing the distributor and remove the distributor along with the wires. Getting closer to the engine, all that’s left to do is drain the antifreeze from the system.
And then turn off all the pipes that you see. After this, it will be possible to dismantle the cylinder head cover. It is secured with nuts and shaped washers. Don't lose them during repairs. That's all, the preparation is complete, you can begin the most difficult part - dismantling and installing the cylinder head.
Stages
The procedure for replacing the cylinder head gasket on a VAZ 2106 consists of the following steps:
- Disconnect the car from power by disconnecting the negative terminal from the battery.
- Drain the coolant into a prepared container.
- Remove the air filter, valve cover, air damper control drive.
- At the next stage, it is necessary to align the timing marks on the camshaft and crankshaft so that you do not have to set the valve timing again during assembly.
- Next, you need to dismantle the carburetor and ignition distributor with high-voltage wires.
- After unscrewing the tensioner cap nut, you should loosen the tension on the timing chain.
- Having loosened the fastening of the gear, it is necessary to dismantle it.
Removing the camshaft sprocket
The chain should be tied with wire so that it does not accidentally fall into the motor.
Installing an injector on a carburetor VAZ-2109
The transition to a different type of fuel system for VAZ 2109 family cars is simpler, if only because there is no need to change the cylinder head, make a plug for the distributor drive, and the like. The set of replacement parts here is approximately the same as what is generally required to switch from a carburetor to an injector; using the VAZ-21099 as an example, we will briefly consider how tuning of this kind is performed:
- We perform partial disassembly: we remove the air filter housing, the manifold assembly with the carburetor, the distributor-distributor with wires, the cooling system housing at the rear of the cylinder head;
- we dismantle the crankshaft and generator pulleys, the last of them needs to be changed, since now a multi-ribbed drive belt will be installed instead of a V-shaped one, and the oil pump will also have to be changed (it must have a special bracket for the A/V sensor);
- if we do not install a phase sensor, then the camshaft does not need to be changed; accordingly, we do not remove the valve cover;
- we remove the choke cable, it will no longer be needed, and the gas cable will have to be replaced with another cable suitable for the injection system;
- the exhaust manifold does not need to be changed, but it is better to take the exhaust pipe of the muffler (“pants”) from the injector; of course, the receiver (intake manifold) here will also be different;
- to replace the oil pump, you will have to remove the crankshaft gear, also the timing belt, and engine sump;
- if we install a remote (suspended) gas pump, you don’t have to change the gas tank, you just need to choose the place where it is best to mount the pump (usually on the bottom of the car, it should not be placed in the engine compartment).
Having prepared everything for replacing the injector, as well as replacing the oil pump (standard operation), we proceed to assembly. It is better to start with the wiring; the “braid” can be extended by removing the plug on the panel in the engine compartment.
Then we continue:
- we install the factory plug at the rear of the cylinder head instead of the distributor, use another cooling system housing for the thermostat (with an outlet for the temperature sensor), connect the water pipes;
- we mount the exhaust pipe, exhaust and intake manifolds, install the gears according to the marks, return the timing belt to its place;
- we attach a receiver with injectors and a fuel rail, an air corrugation;
- We attach the throttle cable to the receiver bracket and connect the end of the cable to the throttle valve;
- Having secured the fuel pump to the body, connecting all the hoses and cutting the fuel filter into the line, we mount the air filter housing and mass air flow sensor, connect the wire plugs to the injectors;
- You will also need to install an ECU in the car’s interior, connect it to the “braid” connector, and place the ignition module under the hood (its standard location is at the bottom, in the area of the gearbox housing, but it is better to mount it somewhere above);
Having checked whether everything is connected, we perform a test start of the engine, and if everything is in order, we return the timing belt casing to its place.
Preparatory work
Removal, inspection and installation of the cylinder head ZMZ - 402
The first thing to do is remove the air filter. For those who have a carburetor VAZ, the process is not difficult. With injection models you will have to tinker a little longer.
To gain access to the cylinder head, you need to completely dismantle the part of the fuel system located in the engine compartment.
It is better to remove the carburetor completely, since removing the cylinder head with it is a rather labor-intensive procedure, as a result of which one of the components is often damaged.
After this, unscrew the nut holding the distributor - it and the cables are removed. Sometimes the fastener does not give way. It is not difficult to break its tightness by treating the fastener with WD-40 and leaving it alone for a couple of minutes.
At this point, disassembly is stopped, since it is necessary to drain the coolant - place a container under the fitting located on the bottom and unscrew its plug
After this, slowly (this is important) unscrew the cap from the distribution tank. When the antifreeze pours out, proceed to dismantling the cylinder head casing
Use a socket wrench for this. Place the loosened nuts and spring washers in a box so as not to lose them.
When the antifreeze has poured out, proceed to dismantling the cylinder head casing. Use a socket wrench for this. Place the loosened nuts and spring washers in a box so as not to get lost.
Now all that remains is to remove the head and install a new gasket. We won’t dwell on this point – there is nothing complicated here.