Principle of operation
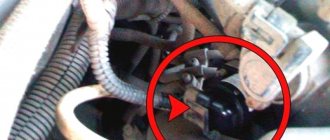
The Grant idle speed sensor with 8 valves is located at the very bottom of the throttle assembly. This part is a rod that regulates the amount of air supplied to the fuel system. The IAC works according to the following principle:
- When the engine starts, the throttle valve is in the closed position.
- Information about this is sent to the engine ECU.
- The ECU sends a signal to the IAC.
- The IAC opens, sending air bypassing the throttle valve through the outlet channel.
- The ECU, receiving signals from the temperature sensor, adjusts the clearance of the IAC rod, thereby maintaining the required idle speed.
The sensor operates until the engine warms up to 80 degrees. After reaching the required temperature, or after pressing the gas pedal, the IAC switches off. After shutdown, the throttle assembly comes into operation, opening the throttle valve. The IAC is switched on again when the car is idle with the engine running, in neutral gear.
Symptoms of a problem
The IAC on Grant is called a sensor or IAC. But it is not one, because it does not provide information about calculating air pressure or speed. This part is a regulator. For this reason, the ECU does not receive a fault signal and does not send a “CHECK” signal to the instrument panel. The malfunction can be identified by the following signs:
- The engine starts with difficulty.
- It stalls after starting.
- Speed is unstable, especially in cold weather.
- Poor speed maintenance in neutral gear.
- High idle speed.
- Unstable engine operation when shifting the gearbox to speed.
All of these symptoms may be the result of a malfunction of other sensors and regulators that are part of the throttle body and fuel system. The main reason for this engine behavior is a lean fuel mixture or excessive air consumption in the system. The ECU clearly regulates the amount of air and gasoline, mixing them. Any discrepancy directly affects the stability of the engine.
Important! Checking the throttle assembly for operability must begin with the idle speed regulator.
There are several ways to check the IAC for performance. This will require dismantling the part. Without dismantling, you can only check the resistance and electrical conductivity of the IAC.
Important! It is prohibited to knock on the regulator body. This method will not improve performance. But it can render the part unusable if other components of the throttle system malfunction.
Resistance check
To do this, you need to disconnect the terminal supplying the IAC. Next, using a tester set to resistance testing mode, remove data from terminals A-B and CD. The operating resistance should be in the range from 0.4 to 0.8 Ohm.
Electrical conductivity
If the resistance is within normal limits, it is necessary to check the electrical conductivity. To do this, you need to disconnect the connector. Next, you need to connect “+” to terminal A. Then measure the output voltage from the remaining contacts. It should be equal to 12 volts. In this case, the operating resistance should increase to 50 Ohms.
Frame
Checking the short circuit between the housing is very important. The IAC may show operating resistance within normal limits, but be closed to the housing. To check, you need to set the tester to the “dial-in” mode. Next, connect one tester probe to the body, and connect the other one in turn to the conductive contacts in the regulator socket. If one or more contacts are shorted to the housing, the part is faulty.
Equipment diagnostics
- We switch the tester to resistance testing mode (ohmmeter), measure the resistance at the regulator terminals according to the diagram: A - B, C - D. Data in the range from 0.040 to 0.080 Ohm.
- Using a caliper, measure the distance between the end of the needle and the flange; it should not exceed 23 mm.
Measuring the distance
- We inspect the mounting socket for each of the sensors, clean it with a rag from dirt and dust.
- Before installation, lubricate the O-ring with engine oil.
- We tighten the screws of the regulators with a torque of 3 - 4 Nm.
Source
Dismantling check
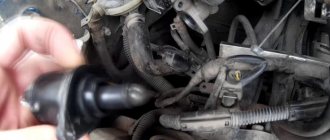
In order to dismantle the IAC, it is necessary to remove the air duct. Next, you need to unscrew the 2 mounting bolts, disconnect the power terminal, and remove the IAC from the mounting seat.
On Lada Granta with 8 valves, an electronic gas pedal can be installed. Its power connector may be located next to the IAC connector; it will also have to be disconnected. Before checking, the part must be cleaned of grease and dirt. It is not recommended to press or twist the rod. The rod is adjusted to 800–1500 rpm. Any impact may disrupt this setting. You also need to wash and clean the contact socket from oxidation. Check the integrity of contacts and wires.
1 way
You can check the functionality by simply connecting the power connector to the dismantled IAC. Next you need to start the engine. In this case, the rod should move slightly outside the housing. If this does not happen, the node is not working. There is no need to help the needle with this. Pressing or trying to influence movement is prohibited.
Method 2
This method is based on measuring the distance from the end of the needle to the IAC body. The measurement can be carried out using a ruler or caliper. For the working mechanism, the distance should be 2.3 cm. If this limit is higher, it means the rod is constantly open and the idle speed is higher than normal. If the distance is below 2.3 cm, then the end of the needle has worn out or has dried up in its saddle.
If a discrepancy with the required parameters is detected, this means that the IAC is inoperative and requires replacement.
Grant instrument pinout - dashboard diagram
This part is the most difficult. The large number of pins and the miniature size of the terminals greatly complicates the search for the required group:
- 1/2 – connecting blocks for the front electrical harness;
- 3/4 – similar for the feed harness;
- 5 – lighting control unit;
- 6 – ignition switch module;
- 7 – on-board computer;
- 8 – lever for switching the position of the wipers;
- 9 – tidy;
- 10 – control of emergency modes;
- 11 – cargo compartment lid lock;
- 12 – diagnostic connector;
- 13 – block for the air intake drive;
- 14 – button to turn off the heated rear windshield;
- 15 – emergency contact;
- 16 – brake light switch;
- 17/18 – contact group – output to radio equipment (radio tape recorder);
- 19 – rotating equipment module;
- 20/41 – driver/passenger airbag drive;
- 21 – horn power supply;
- 22 – mounting block group;
- 24 – cigarette lighter group;
- 25 – backlight for stove control;
- 26 – interior lamp;
- 27 – contact group of the ignition switch;
- 28 – controller;
- 29 – incoming connector to the rear of the on-board network;
- 30 – electronic part of the gas pedal;
- 31 – additional resistor;
- 32 – stove motor;
- 33 – heater switch block;
- 34 – door lock module;
- 35/36 – cooling system head fan relay;
- 37 – compressor relay wiring;
- 38 – additional relay or reverse indication coil;
- 39 – air conditioner switch button;
- 40 – automatic transmission drive;
- 42 – evaporator thermometer;
- 43 – output to the rear wiring harness.
Replacement
Replacing the idle air control valve on a Lada Granta is very simple. To do this you need to do the following:
- Stop the engine and wait for it to cool completely.
- Disconnects the negative terminal from the battery.
- Remove the air duct.
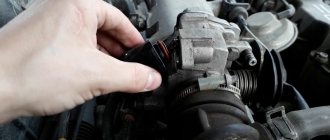
- Disconnect the electrical connector from the IAC socket.
- Using a key set to “13”, unscrew the 2 mounting bolts.
- Remove the regulator from its seat. It is also worth removing the rubber sealing ring.
- Clean the IAC seat from dirt and oil.
- Place the new O-ring into the seat.
- Reinstall the idle speed control.
Next, in reverse order, secure the IAC, install, and connect all elements of the system. After installation, you must turn on the ignition and give the computer time to recognize the new part. After 5–7 minutes, you can start the engine to check the functionality of the IAC.
Addresses of companies providing installation/replacement services (Moscow, St. Petersburg, Kyiv region)
| № | Name | Address |
| 1. | "Oiler" | https://oiler.ua/ Kyiv, V. Lobanovsky Ave., 119D, Goloseevsky district |
| 2. | "AUTOKLONDAYK" | https://auto-vaz.com.ua/ TO AUTOKLONDAYK, Kyrylivska street, 60P, of. 1, Kyiv, 04080 |
| 3. | "Star - D" | https://star-d.ru/ st. Savushkina, 89, not far from the Staraya Derevnya metro station, 200 meters from the St. Petersburg - Finland highway (from Primorsky Prospekt). |
| 4. | "OSA" - Society for Assistance to Motorists" | Address: 190013, St. Petersburg, st. Vvedensky Canal, 7, BC “Farvater”, office 210 |
| 5. | "Auto Mechanic" | Address: Rostokinsky pr-d, 3с61 |
| 6. | "PaAlex" | Address: st. Ozernaya, 46k2s2 |
Original IAC
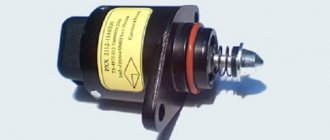
The working life of the original idle speed sensors is 90 thousand km. During this “time”, it is worth diagnosing this node. If there are any signs of malfunction, it is better to replace the IAC than to carry out independent repairs. Independent disassembly and assembly of this mechanism can lead to unbalance of the level of position and distance of needle movement. It is better to replace the IAC with original components. Russian manufacturers mark idle speed regulators with article numbers 2190 KZTA1148300-02 or KZTA 2112114830004. Non-original components of poor quality will not allow this part to operate for the required 90,000 km.
Reviews
| № | Positive |
| 1. | Vasily: I’ve been driving a car for a year and a half, I haven’t made any capital investments, except for the purchase of consumables. I regularly maintain it, buy good oils, and fill it with high-octane fuel. |
| 2. | Gennady: at 30,000 km I cleaned the idle air regulator once, and since then I forgot about the malfunctions. In winter, the car starts with a half turn. |
| 3. | Ivan: I recently went to a service station, the car started to be difficult to start. After diagnostics, the technician discovered poor contact between the block and the wires on the throttle position sensor. Now the Lada Granta works like a watch. |
| 4. | Vladlen: I have no complaints about the quality of the machine, because it is a budget option. Yes, breakdowns do occur, but they are minor and can be repaired independently. |
| 5. | Gennady: a year has passed since the purchase of the equipment, there are no comments. I tighten the fastenings in small ways, check the wiring, otherwise no comments. |
| 6. | Dmitry: for two years of operation of the car there were no major breakdowns, minor ones were fixed independently, and I did not contact the service center. |
| 7. | Valery: I am satisfied with the quality of workmanship and assembly of the machine. After the purchase, I immediately tightened all the fasteners, the interior is quiet, the plastic does not make noise. |
| Negative | |
| 8. | Victor: the first time the regulator flew 40,000 km, I contacted the service center and had it replaced. At 65,000 km the TPS began to act up. I decided to sell the car and will buy a Renault Logan. |
| 9. | Georgy: after a year of operation, the car began to crumble, I visited the service station twice unscheduled. I am dissatisfied with the quality of workmanship and assembly and plan to sell the car. |
| 10. | Vladislav: I used the car actively for six months, it started to fall apart, I had it repaired twice under warranty. I do not recommend Lada Granta for purchase. |
Location of the idle speed sensor on the Lada Granta
The Lada Granta with an electronic pedal does not have an idle speed sensor! That's why they sent you from the store to remove yours. There is only one idle speed sensor, you can’t go wrong if you have one, of course.
This is what the electronic pedal looks like
Finding out which pedal you have is easy. If you have a throttle cable under the hood, then you have a regular pedal. So, if you do not have an electronic pedal, then the sensor is located on the throttle valve assembly, or rather in its lower part.
Throttle assembly without idle speed control (electronic gas pedal)
To remove it, you must:
- remove power from the battery;
- remove the power supply from the idle speed sensor;
- unscrew the two fastening bolts;
- remove the idle speed sensor.
Recommendations for choosing components
Insufficient driver experience and a wide range of spare parts are the main factors that make it difficult to select and purchase components for the Lada Granta.
Cheapness is the first sign of low quality workmanship.
When purchasing, carefully check the catalog items and search indexes with the actual data specified in the operating instructions. If you do not have experience in servicing equipment, use the services of certified service stations and demand a quality guarantee for the work performed.
Speed floats on grant 8 valves
After the owners try to start the engine in the morning, sometimes a problem arises: the idle speed of the Lada Granta fluctuates. This is considered one of the most significant shortcomings that arise in VAZ cars. If, after lengthy checks, it is discovered that the cause lies precisely in the throttle assembly, it is necessary to pay special attention to how air leaks through the connections of the intake receiver and the remote control.
General information
Any car owner sooner or later faces a problem when the idle speed of the car fluctuates. If the car has been in use for several years, then you will inevitably have to face this problem. In order to determine the reason for this breakdown, you need to carefully understand the design of the car.
THIS IS INTERESTING: VAZ 2112 will not start
If, when starting the engine of a Lada Granta, it is observed that as it warms up, instead of smoothly decreasing, the speed simply disappears for a few seconds, and then operates spasmodically, then the reason is 60% precisely because the idle speed fluctuates .
However, the problems disappear after the engine continues to function. All visible symptoms suddenly disappear and the engine continues to operate normally. However, the problem will repeat itself every time it is started and will not go away.
With each subsequent use of the car, this problem will only get worse. Therefore, you should not postpone its solution indefinitely, as in the future this will lead to very expensive repairs.
First causes of malfunction
Most often, cars that have an electronic fuel injection system suffer from this problem. The root cause of this situation is that there is a constant suction of excess air, the volume of which continues to constantly increase, which, in turn, leads to breakdown.
The electronic unit, or electronic sensor, is responsible for fuel injection and at the same time calculates the entire volume of air entering the cylinders. In addition, based on the indicators provided by other sensors, the electronic unit opens the injection solenoid valves for a certain time.
The problem may lie in the incorrect operation of the crankcase ventilation valve.
Consequently, when excess air enters them, the sensor responsible for the throttle position shows the motorist that this task is impossible.
At the same time, the temperature sensor indicates that the engine should have already left the warm-up system, therefore, it needs much less fuel. It is during this period that the idle speed of the car fluctuates.
We can conclude that this happens due to the fact that the electronic unit simply does not know where to supply excess air.
The second reason why idle speed fluctuates is constant jamming. It occurs directly in the crankcase ventilation valve. If the malfunction depends on this, the frequency with which the automatic power control sensor operates is disrupted. As a result, the sensor shows instability of engine speed. When in a faulty state, they range from 1,200 to 800 rpm.
If the car is equipped with a carburetor-type engine, then a similar problem may arise due to a violation of the servomotor adjustment. It is not difficult to carry out work to eliminate such a malfunction; it is enough to unscrew the adjusting bolts in the area of the loose servomotor, where the sensor points to the drive, which is dangling along with floating speed. Once you complete this procedure, the fault will disappear, unlike a normal engine.
How to set up a carburetor
Before you start adjusting the penny carburetor, you need to make sure that all components that affect the normal functioning of the internal combustion engine are in good condition. Check the spark plugs, the gap between the electrodes, the distributor, the coil, and the high-voltage wires. You can adjust the carburetor on a VAZ 2101 car only at engine operating temperature (85..90 degrees).
But before you start making adjustments, be sure to purchase a repair kit for the VAZ 2101
Moreover, pay attention to the fact that this repair kit matches your carburetor. If Solex is installed, then you do not need to buy a repair kit for DAAZ. Of course, the price of this set is not very high, but if you buy the wrong one, you will have to run around a little, exchanging for the right one
Disconnect the cable that connects the accelerator pedal to the throttle valve drive. The pipe connecting the air filter housing to the breather must also be disconnected.
Of course, the price of this set is not very high, but if you buy the wrong one, you will have to run around a little, exchanging for the right one. Disconnect the cable that connects the accelerator pedal to the throttle valve drive. The pipe connecting the air filter housing to the breather must also be disconnected.
Make sure that there is no vacuum in the hose connecting the carburetor to the advance angle adjuster on the distributor. Now you need to adjust the quality of the mixture. Screw in the screws one at a time until the engine begins to shake slightly. Now we need to achieve normal and most stable operation. To do this, unscrew the quality screws one by one. Do not make more than one turn. This adjustment is purely by ear, but it is quite possible to normally adjust the carburetor of a penny in this way.
To determine how well the adjustment has been made, open the throttle sharply and then close it immediately. If the speed increases sharply, there are no delays, then the carburetor is adjusted correctly. But the further operation of the VAZ 2101 will show more accurately. Carefully monitor how much gasoline is consumed per hundred kilometers. From time to time, check the condition of the spark plugs; if there is carbon deposits on them, adjust the air supply to the carburetor of the VAZ 2101.
Welcome! Idle speed - Over time, a person who uses a car with a broken idle speed decides to adjust it, because as we all know, if the idle speed is too low, the engine will stall from time to time, and if it is too high, then the fuel consumption of this engine increases and here you have to look for, as they say, a golden mean.
But in order to find this middle ground, you must first learn how to adjust the idle speed of a car, and not all people know how to adjust the idle speed. Therefore, today we will look at the issue regarding idle speed adjustment on cars of the “Classic” family.
Note! To make adjustments, you only need one single screwdriver!
- Adjusting the idle speed using a gas analyzer
- Adjusting the idle speed without a gas analyzer
Tips for adjusting idle speed: Firstly, adjustment must be performed at engine operating temperature (90-95 ° C), and also when adjusting, the air filter must be installed on the car.
Secondly, when adjusting the idle speed, the fuel level in the carburetor float chamber must be adjusted.
Thirdly, the valve clearances must also be adjusted and the car’s ignition timing must be adjusted.
Fourthly, when adjusting the idle speed, the air damper must be completely open; you can check this by removing the roof from the air filter housing and then looking at the damper.
Fifthly, adjusting the idle speed of a car is not always easy for a beginner, because adjusting the crankshaft rotation and adjusting the carbon monoxide (CO) content must be done together.
Note! To more accurately adjust the idle speed, you need to use a “Gas Analyzer”, which most owners do not have at all. But the adjustment can also be made without this device, but it will be more complicated! (How to make adjustments without this device, see the section: “Adjusting the idle speed without a Gas Analyzer”)
Conclusion
Replacing the idle speed control is not a panacea in the fight against floating speed or a throbbing engine. Most automotive electricians have a tester in their arsenal to check the operation of the regulator. To do this, remove yours and give it for inspection. The regulator glitch may be intermittent, but the tester will show the correct picture.
Sometimes I have the same problem, the speed jumps, but the engine does not stall. Now I understand, most likely it is the idle speed sensor. I watched the video, in principle, now I can change it myself.
If the revolutions on 16 valves “float”, then the first thing you should check is the idle speed sensor. The only thing is that not all novice car enthusiasts know where it is and how to change it. It’s good that there are videos with which you can easily figure out what’s what.
A meaningful article that will be useful to every Lada Grant owner who does not want to spend their money on a hundred.
Comments from the same laymen as the author of the article... Do you even understand what you are writing about?
The idle speed sensor in the injection system of the Lada Kalina model is a special electronic device. Such a component can be found in any other car that runs on gasoline and has distributed injection. The design of the sensor is represented by an electric motor, paired with a conical needle by the manufacturer. Note that the device is controlled by an ECU.
The idle speed sensor rarely experiences malfunctions, but if such a fact occurs, it causes a malfunction in the idle speed of the engine. They begin to “float”, and the engine, in turn, ceases to function normally. As a result, achieving a timely return to operating temperature after a cold start becomes problematic.
Repair
Diagnostics
The VAZ 2110 lambda probe has four outputs:
Pads for VAZ 21102
Checking the oxygen sensor heater comes down to a basic check of the heater circuit:
the presence of voltage at the power contact of the vehicle’s on-board network (if there is no voltage, check the entire circuit); presence of continuity of the negative contact circuit.
In the future, we are exclusively interested in the signal wire, or rather, the change in voltage passing along it from the sensor to the ECU during various engine operating modes. You can check the operation of the sensor in two ways:
- Using a voltmeter;
- Using an oscilloscope (motor tester).
Since this instruction is intended for the common man who simply cannot have professional equipment in principle, we will diagnose the sensor using a voltmeter.
Method one: reading trouble codes
In order to read the fault codes located in the controller’s memory, it is necessary to either connect special diagnostic equipment to the diagnostic block (located on the left side under the instrument panel console) (too simple - not for us), or close contact “B” to ground, which is so The same can be done by connecting contacts “A” and “B”.
Diagnostic block VAZ 2110
- “A” - contact connected to the vehicle ground;
- “B”—controller signal contact;
- “G” — control of the VAZ fuel pump;
- “M” is a contact for issuing information (serial data).
After these contacts are closed, turn the ignition key to position “III” (do not start the engine), observe the “CHECK” indicator, which should flash the number 12:
- Flash;
- 1-2 second pause;
- Flash;
- Flash;
- Long pause of 2-3 seconds;
- Double repetition of the above cycle.
Reading fault code number “12”
Attention! This code indicates that the self-diagnosis program is running, otherwise this program does not work. After this, the program displays codes of existing faults in a triple cycle (each code three times), in the absence of these, code “12” continues to be displayed constantly. After this, the program displays codes of existing faults in a triple cycle (each code three times), in the absence of these, code “12” continues to be displayed constantly
After this, the program displays codes of existing faults in a triple cycle (each code three times), in the absence of these, code “12” continues to be displayed constantly.
Attention! When the diagnosis is completed, these contacts are allowed to be opened only after the ignition is turned off, after ten seconds. Erasing fault codes from the ECU memory in order to make sure that the fault has been eliminated occurs by turning off the controller's power for at least ten seconds. The power is turned off either by disconnecting the negative terminal from the battery or by removing the controller fuse
The power is turned off either by disconnecting the negative terminal from the battery or by removing the controller fuse
Erasing fault codes from the ECU memory in order to make sure that the fault has been eliminated occurs by turning off the controller's power for at least ten seconds. The power is turned off either by disconnecting the negative terminal from the battery or by removing the controller fuse.
Malfunctions of the electronic gas pedal
Moving contacts and conductive paths are subject to wear, which makes their signals incorrect. As a result, the engine will operate unstably, “dips” will appear, and at idle the speed will “float”. If a malfunction occurs in the operation of E-gas, the Check Engine warning lamp on the instrument panel will light up, and the ECU will switch the system to a reserve mode of operation, in which the speed will increase slowly, even when the gas pedal is pressed sharply. Fuel consumption may also increase.
If both sensors fail, the ECU will switch the engine management system to emergency operation mode, the engine will only operate at speeds slightly above idle (1500 min-1). In this case, it is recommended to contact a service station to replace the failed parts under warranty.
Controls and additional devices
Vehicle controls include:
- clutch pedal;
- brake pedal;
- gas pedal.
The front panel is very difficult to remove. In addition to the listed special devices and fret controls, it also contains some additional devices that are located in its central part.
The control system of the Lada Kalina is simple, so neither professionals nor ordinary car enthusiasts have any problems with it. It includes the following devices.
- Control mechanism for interior ventilation and heating.
- Air conditioner control device.
- Rear window heating control device.
- Ashtray.
Functional features
The main purpose of the sensor discussed here in Lada Kalina is to measure the main parameters in the intake system and adjust the speed. This is done by sending pulses to the engine control module, which, based on the data received, adjusts the volume of injected fuel.
Due to the fact that the specified idle speed regulator acts as an actuator, determining its failure is a very difficult task. This is due to the lack of a useful self-diagnosis function in the Lada Kalina.
The device is designed to control the volumes of air that are directed through the intake tract into the combustion chambers of the engine. Here, the air mass (also measured by the mass air flow sensor) enters through a special channel, bypassing the throttle valve, which is closed in idle speed mode.
This idle speed regulator is involved in warming up the 8-valve engine, ensuring that the unit reaches its operating temperature in a timely manner.
When the ignition is turned on, a rod “crawls out” from the regulator and reaches a specially designed hole. This is called the initial position of the sensor.
Next, we outline the primary functions of this device:
- adjusting the optimal air mass;
- participation in warming up the engine 8 valves;
- determination and adjustment of the number of revolutions.
We determine the malfunction ourselves
The regulator is designed to maintain idle speed in a given range and ensure correct and timely warming up of the engine.
Although malfunctions in the functioning of the engine in this mode rarely occur on the Lada Kalina, practice has made it possible to establish a certain set of signs indicating a malfunction of the regulator.
- difficulties starting the unit;
- when the gearbox is in the neutral position, “floating” engine speeds are observed;
- when switching transmission stages on the move, the engine stops without authorization;
- Once the unit begins to warm up at low outside temperatures, the speed is not able to overcome the 1500 per minute mark, which “delays” the time it takes to reach operating temperature.
Observant owners of Lada Kalina testify to a decrease in speed after turning on the air conditioning compressor. This often leads to the engine stopping, and the lubricant pressure symbol in the unit lights up on the instrument panel.
The most common breakdown is instability of speed. For mileages exceeding the 50,000 mile mark, and if such symptoms appear, we first recommend cleaning the cavity of the throttle assembly. Only after this can the regulator be replaced. This device cannot be repaired, so this action becomes a non-alternative measure.
IAC cleaning
Do-it-yourself troubleshooting of the idle air regulator consists of simply washing it to remove carbon deposits. To do this you need to follow the instructions:
- disconnect the wire plug from the sensor;
- Unscrew the two fastening screws with a small shaped screwdriver and remove the sensor from the mounting socket;
- Clean the needle cone using WD-40 or carburetor cleaner.
Read more: KAMAZ rear axle gearbox weight
The same means can be used to wipe the regulator contacts and the entire throttle assembly.
After cleaning, the IAC is installed back. In this case, you need to measure the distance from the end of the needle to the body - it should be approximately 2.3 cm.
List of online stores providing goods (Moscow, St. Petersburg, Kyiv region)
| № | Name | Address |
| 1. | "Existential" | https://exist.ua/ |
| 2. | "Klondike" | https://autoklondayk.com.ua/ |
| 3. | "Major-auto" | https://www.major-auto.ru/ |
| 4. | "AvtoRus" | https://www.autorus.ru/ |
| 5. | "How much" | https://www.avtostore.spb.ru/ |
| 6. | "PulseCen" | https://spb.pulscen.ru/ |
Replacing the idle speed sensor
The sensor replacement begins, we dismantle the device.
- We remove the engine screen from the LADA Kalina and disconnect the cable connectors from the corresponding blocks on the throttle unit and the idle speed controller.
- To disconnect the heating pipes, you will need to partially drain the antifreeze. We carry out the indicated manipulations.
- To dismantle the device itself, we need a regular screwdriver with a cross-shaped profile.
- We remove the pipe leading from the crankcase ventilation system. We do this by loosening the clamps and moving them. We are temporarily putting this hose aside.
- We repeat such manipulations with the refrigerant supply pipes (if they have not been previously removed) and the purging of the absorber circuit.
- Using the key set to “13” (the head is more convenient), we remove the throttle block. It is attached to the inlet receiver with nuts.
- Let's look at the gasket. If damage is found, we must replace it, otherwise the intake system will receive unwanted air leaks.
- Installation of the regulator in the LADA Kalina car is also simple and is carried out with an eye to the reverse sequence of manipulations during disassembly.
- It is important to pre-measure the needle here. The optimal position will confirm the exit from the regulator body to a length of at least 23 mm. For measuring action we use a caliper. If the required value is not achieved, then you will need to “recess” the valve itself into the regulator body. Here we connect the positive contact of the device to the corresponding terminal of the battery (you will need a temporary cable).
We apply the bare edge of the element to the negative contact. The needle moves slowly, and therefore quite a lot of such touches will be required.
Lada Granta 8 valve idle speed floats
» Articles » Lada Granta 8 valve idle speed floats
After the owners try to start the engine in the morning, sometimes a problem arises: the idle speed of the Lada Granta fluctuates. This is considered one of the most significant shortcomings that arise in VAZ cars. If, after lengthy checks, it is discovered that the cause lies precisely in the throttle assembly, it is necessary to pay special attention to how air leaks through the connections of the intake receiver and the remote control.
Source