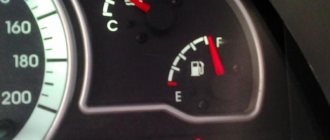
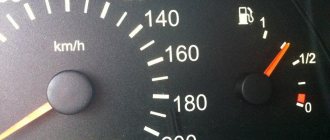
For almost a year now my fuel gauge has been lying, I haven’t had time. When the tank was full, it showed less than it was, or even completely - it dropped to zero and the reserve lamp came on when there was half a tank. In general, I'm sick of it, and besides, it's still warm - I need to fix it.
Fortunately, I have a friend, an excellent auto electrician, who assured me that 99% of the problem is with the sensor itself in the tank.
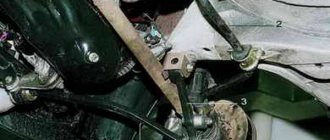
So, I went to the gas pump. The car sat for almost a day, so there was no pressure in the system, and the fuel hoses could be safely unscrewed. If you drove recently, just rip the chip off the fuel pump and start it, let it puff and die. This will draw out all the fuel from the hoses. The car won't generate a check, so don't worry.
Unscrew and pull out the fuel pump.
Important:
The car must be parked on the street, open all the doors, and do everything quickly, otherwise you will stink the interior with gasoline. You can temporarily cover the hole in the tank with a bag so that it doesn’t smell so bad.
Use a thin flat screwdriver to unclip the sensor connectors.
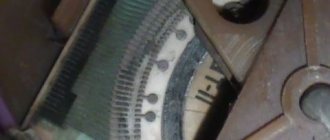
What I discovered. Having removed and inspected the sensor (I have a DUT-1-01), it was clear that the slider itself had been worn out, namely its contact ball (in my case, both balls, the main one and the reserve ball).
But the contact track itself, surprisingly, was in very good condition. I cleaned it with fine 2,000-grit sandpaper, and that’s it.
I went to get a new DUT. I have DUT-1-01, it was hard to find, I found it with great sorrow.
BUT!
Although the number is the same (1-01), the contact path of the new FLS is different. That is, the arrow readings will be different. That’s why everyone is struggling with these DUTs, it seems like they installed the same one - but the arrow is dancing all over the place. And the new FLS itself is very poorly made, compared to my original factory one.
General information about the sensor
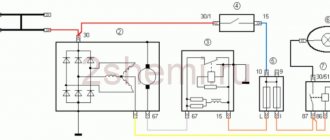
Fuel consumption displays information on the dashboard, where the corresponding controller is located. The controller itself is a scale with an arrow that shows the level of remaining gasoline in the tank. Many car owners confuse this regulator with the VAZ 2110 fuel pressure controller, but this is not at all true, because these are different devices.
Where is?
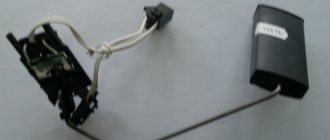
In domestic “tens”, the fuel sensor (FLS) is located directly in the fuel tank, and in order to save space, the engineers of the automobile concern decided to install it in the same design with the fuel pump. Accordingly, if the fuel level sensor does not work, then in order to diagnose and replace it, you will need to completely remove the pump. If you need to get to the device, you will have to remove the back seat and open the hatch, which we will discuss below.
Fuel pump "tens" assembled with FLS
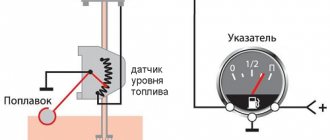
Design and principle of operation
By its design, this controller is a rheostat with nichrome resistance. The adjustable contact of the device moves as a result of the action of a float lever equipped with an additional contact. It should be noted that this contact, when placed in a certain position, can complete a control circuit. As a result, this demonstrates the need to use a reserve volume of gasoline - depending on the design features of the car, the reserve can range from 4 to 6.5 liters of fuel. As mentioned above, warning drivers about a lack of fuel is carried out on the dashboard using arrows.
The fuel level controller on the VAZ 2110 itself is a device that cannot boast of great reliability. After the unit has completed a certain service life, its readings may be incorrect. This is usually due to the main drawback of the device - the track of its contact group is ground off as a result of the friction force of the slider. So if you are interested in the question - why the sensor does not work - then first of all you need to check the track (author - alehtrikus channel).
Common faults
Depending on the design, the device can be repaired by slightly bending the bend of the slider, that is, making sure that its working surface is slightly higher. If the wear is too great, then the only solution is to replace the VAZ fuel sensor. It often happens that the VAZ 2110 fuel level sensor does not display correctly; adjusting the device can solve the problem. It will be necessary to dismantle and change the position of the lever from one boundary to another. In this case, you need to carefully monitor the correct installation of the indicator needle on the device.
In addition, the device can be repaired if the car has an empty gas tank, and the arrow indicates the presence of fuel in the system. Or if the tank is full and the needle is somewhere in the middle of the scale. In this case, it will be necessary to restore the correct values by bending the tongue. This way you can increase the useful stroke of the spoke.
There is another way to change the device parameters; it involves positionally adjusting the arrow on the device. This method will take a long time to implement because the control panel will have to be removed.
If you are sure that your car’s tank is at least half full, but the arrow on the dashboard shows zero, you need to do the following:
First, diagnose the technical condition of the group of contacts on the rear part of the control panel. If necessary, you will also need to tighten the fastening of the plug with the wire. You also need to check the smooth movement of the spoke with the float
Please note that it should not stop at intermediate positions. It would not be superfluous to diagnose the regulator for functionality as a whole. As an option, you can also take control of the quality of the contact of the wiring coming from the battery, as well as the section of the circuit that runs under the handbrake (the author of the video is the Auto Electrician HF channel).
Adjusting the readings
If the arrow periodically increases and decreases the values, then adjustment will help in this case.
Adjusting the fuel sensor (FLS) - removing the fuel pump
- Raise the rear sofa.
- We remove the fuel pump and clean everything from dirt. (More information about removing the fuel pump here).
Preparing to remove the fuel pump
If in any position the arrow indicates incorrect values, then it is necessary to bend the adjusting tongues on this side so that the float rod can move to the right or left freely, depending on its location.
Adjusting the control arrow on the instrument panel
If the problem is the arrow on the instrument panel, then you need to remove the instrument panel and adjust it manually.
Main malfunctions in the sensor operation
If the sensor does not display the fuel level correctly, you can judge that a certain breakdown has occurred and needs to be repaired. Modern sensors that record the fuel level, like all vehicle parts, fail from time to time. In this case, it is necessary to repair the fuel level sensor.
Malfunction in indicators
The main sign of a sensor failure is the display of false data displayed on the pointer. Based on its “behavior,” certain conclusions can be drawn regarding the resulting breakdown. Here are the most basic types of breakdowns and their causes:
The indicator is at zero, regardless of the fuel level
The problem is that the float stop is broken. The pointer moves, but still drops to the zero mark. In this case, you need to pay attention to the general condition of the device winding, as well as the reliability of the contact between the sensor and the current collector. Fluctuations in fuel quantity indicators. This malfunction indicates sufficient wear on the contacts. When starting the engine, the fuel gauge does not rise above the zero mark. Such a malfunction is directly related to the electronics of the vehicle
Here it is important to check the wires for possible breaks and the degree of reliability of the connection. It is important to ensure the overall integrity of the fuse. The low fuel light does not come on. This problem is often associated with device failure. The fuel level sensor is lying
In such a situation, it will be necessary to check the float for the level of tightness
This problem is often associated with device failure. The fuel level sensor is lying. In such a situation, it will be necessary to check the float for the level of tightness.
According to modern traffic regulations, operating a car with a faulty indicator is strictly prohibited. Problems that arise with sensors must be eliminated as promptly as possible.
Mechanical and functional malfunction
Along with problems that are expressed in incorrect indicators, sensor failure can manifest itself in the following malfunctions:
- loss of tightness of the built-in float;
- strong bending of the wire holder;
- violation of the general tightness of the housing and the resulting decrease in the level of resistance;
- mechanical break of the variable resistor;
- loss of tightness at the point where the device is attached to the fuel tank.
After the float loses proper tightness, the control device, with a full tank, will indicate an incomplete fuel level. If there is a sufficiently strong loss of tightness, the indicator will immediately show the minimum fuel level. In this case, the actual quantity will not matter. To fix this problem, you will need to remove the sensor and replace the float. If it is not possible to purchase a float, you will need to completely replace the entire device.
Quite often, the sensor fails due to long-term movement over rough or uneven terrain. Repeated impacts on the tank will cause serious damage to the wire holder of the built-in float.
With such bends, the behavior of the indicator will directly depend on where the holder was bent. If the bend is directed upward, the parameters will always be increased, if downward, the parameters will be underestimated. If the breakdown involves such a bend, you just need to straighten the wire holder and give it its original shape.
Often the seal of the sensor housing is broken. This happens after an accident has occurred, as well as after long-term use of low quality fuel. If gasoline gets into the device, it will malfunction and, as a result, cause incorrect sensor readings. These malfunctions can only be eliminated by completely replacing the device.
If the variable resistor breaks, this will cause the sensor to always show a full or completely empty tank. Similar signs can be observed in the process of a break in the signal wire running from the sensor to the display unit. Before removing the sensor, you will need to connect a variable resistor with a resistance level of 100 - 200 Ohms to the car body and to the signal contact. As you rotate the knob, you need to make sure that the sensor readings change. In this case, the malfunction can only be eliminated by completely replacing the device.
This is interesting: Updated Subaru Forester
The main sign of a complete loss of tightness at the installation site of the device is the appearance of the smell of gasoline in the cabin.
Heater valve VAZ 2110
Replacing the stove tap on a VAZ 2110
There is a possibility that most users of VAZ 2110 cars will not be able to find this tap in their car. It was installed on earlier and recently released modifications of the car, and therefore, if the model was purchased not so long ago, then this mechanism may not be in this place. Although, some craftsmen manage to install a similar mechanism on their car. The heating system is one of those that most often breaks down. This part of the car allows you to drive the vehicle in different weather conditions with increased comfort.
VAZ 2110 stove faucet
Adjustment of this stove tap. carried out remotely. In versions of VAZ 2101 - 2110 cars, this mechanism is one of the most frequently broken. After each trip, it is necessary to constantly monitor its valves. This is necessary to eliminate leaks. As soon as leaks are discovered, the equipment must be replaced immediately.
Note. It was this fact that forced the manufacturers of the VAZ 2110 to abandon the crane. But after modernizing the crane, they began to install it again.
Replacing the faucet
VAZ 2110 heater tap
To carry out work to replace this equipment, you must have a special tool on hand. You will need:
After each tool is ready, you must immediately begin replacing it. For this purpose, you must use the following methods:
- The engine must be drained of coolant.
- The heater has two hoses. They are secured with clamps. Liquid swells from one and flows into the other. These clamps need to be slightly loosened, but not completely unscrewed.
VAZ heater taps
They must be disconnected from their mounting points.
Note: if the valve is replaced due to insufficient sealing, then, most likely, all the coolant has already managed to drain into the car interior before the repair is carried out. This problem can be detected if there is a puddle of the same liquid under the passenger seat rug. Also, if there is no coolant in the system, a constantly cold air stream will flow from the stove.
An undoubted companion to a fluid leak is the presence of a specific odor in the cabin.
- The two bolts are unscrewed with a key marked “7”.
- The rubber insulation is removed.
Faucet for stove VAZ 2110
Note: the bolts must be unscrewed carefully, since the fastener itself is plastic and the slightest failure in the thread can lead to major complications.
- The body is removed from the box.
- The duct has a bracket nut that needs to be removed. A wrench with the number “10” is used.
Electric stove faucet
- ”
- Using a screwdriver, you need to disconnect the clamps on the heater body.
- The right air duct is disconnected first.
Description of "brains"
The VAZ 2110 is considered the first vehicle in the domestic automobile industry equipped with an injection engine. The power unit is controlled by an ECU, an electronic device that determines the basic parameters of engine operation in accordance with sensor signals. In fact, the ECU of a VAZ 2110, VAZ 2112 or any other model is the “brains” of the car, the operation of which affects the functionality of the vehicle as a whole.
Control controller in VAZ 2110
In the “Tens”, as well as the VAZ 2112, there are 16 valves and other models equipped with BOSCH 7.9.7 or January 7.2 systems, one M6 screw is installed in the head. From this screw the mass is taken to the ignition coils, and the mass is taken directly to the control model in the cabin. Typically, the mass is a welded stud mounted on the ECM bracket, particularly behind the center console, behind the left screen. In this case, the mass is transferred to the bracket through a pin, which is welded on the engine shield in the middle. It should also be noted that the nut on this stud is not usually tightened.
Control unit location
Now let's consider the location of the VAZ 2110 ECU. This device in the Ten is located under the center console, in its lower part, in particular, under the control panel. In order to gain access to the control module, you must remove the plastic panel on the passenger side, to do this you will have to use a Phillips screwdriver. Once you remove the cover, you will see many different wires, plugs, and safety devices. The controller itself is located behind them, it is screwed to the bar in a horizontal position.
The arrow indicates the location of the ECM module behind the center console
Typical malfunctions: their symptoms and causes
If the electronic engine management system malfunctions, this can lead to problems with the operation of the power unit. Unfortunately, ECU malfunctions in dozens of domestic cars are not uncommon, so the car owner should be aware of the main problems, as well as the reasons for their occurrence.
First, let's look at the symptoms of malfunctions:
As for the reasons, malfunctions in the electronic control unit can occur as a result of:
Replacement allowance
How to change the fuel level sensor of a VAZ 2110 injector at home?
Detailed instructions are presented below:
First of all, you should disconnect the electrical circuit of the car. To do this, you need to disconnect the negative terminal from the battery. Next, open the rear doors and remove the rear seat with the lock
Carefully remove the seat from the car and set it aside. Using a Phillips head screwdriver, you will need to unscrew the bolts that secure the special hatch
Once done, you can remove the cover. Next, you need to disconnect and disconnect the wiring that is supplied to the connector - simply remove the plug. Using a 17mm wrench, you need to unscrew all the hoses, after which the lines through which gasoline is transmitted must be turned to the sides. These steps will allow you to remove the fuel pump with greater comfort. Having done this, you can unscrew the nuts that secure the clamping ring. There is nothing complicated about this - you only need a 7 key. It happens that the fuel pump has not been removed for a long time, so the mounting nuts may rust. If this is the case, then treat them with WD-40 - it will remove the rust and unscrew the nuts without any problems. When the mount is dismantled, you need to carefully pry up the ring and remove the fuel pump from the gas tank, along with it the lever and the float should come out. At this stage you need to act as carefully as possible, otherwise you risk damaging the unit. The next step is to unscrew the bolts that secure the controller itself to the assembly. By unscrewing them, you can remove the electrical plug from the regulator. Next, you need to remove all the guides from the fuel pump casing, and do not forget about the fasteners - they can be bent using a screwdriver. After completing these steps, unscrew the screws that are on the pump cover, making sure that the nut does not rotate. To do this, you can fix it with a key number 5. Remove the cover itself, so you can see the controller. Inspect it carefully - you need to understand the principle of operation in order to make a verdict - whether the sensor is working or not. If faults are found during diagnostics, the device will need to be replaced. Further assembly is carried out in the reverse order, just do not forget to treat the contact area between the pressure ring and the gasket with sealant.
Messages 9
1 Topic by drummer04 2015-04-14 10:42:54
Topic: How to choose the right fuel level sensor for a VAZ 2110?
Hello everyone, the gasoline needle has started to lie, and I want to replace the FLS, but I heard that there are already 8 varieties, and I don’t know which one to buy. They say that you can buy it by the number of the device, I have a device, Automatic Device (AP) with one window Article: 2110-3801010-04, has anyone come across this?
2 Reply from Daniil.Smit 2015-04-14 10:49:18
Take off yours and see what air you have on it and buy the same one, profit
Added: 2015-04-14 11:48:42
It should be written there
Added: 2015-04-14 11:48:59
Added: 2015-04-14 11:49:18
019395.jpg 45.6 kb, 18 downloads since 2015-04-14
3 Reply from drummer04 2015-04-14 10:52:01
Take off yours and see what air you have on it and buy the same one, profit
Added: 2015-04-14 11:48:42
It should be written there
I thought about it too, but it never changed. and maybe everything there is erased.
Added: 2015-04-14 10:51:02
what is written, where is it written. the picture is only of the FLS
Added: 2015-04-14 10:52:01
aaaaaaaaaaaaaaaa got it all. I didn't notice at first))))
4 Reply from Daniil.Smit 2015-04-14 11:24:40
Yes, I think it is held on by two bolts, you take out the pump and look at the FLS like this
5 Reply from drummer04 2015-04-14 11:29:13
yes everything is simple)
6 Reply from Andrey.Lazarev 2016-12-15 23:45:06
drummer04, hi, please tell me what kind of blower you installed, I also have a tidy 2110-3801010-04, the arrow jumps either down or up, it’s tortured.
Added: 2016-12-15 23:45:06
I've searched all over Google and there is not a single clear piece of advice on what to install for this or that device.
7 Reply from Dmitriy.Isaev 2016-12-18 15:15:58
It depends on the type of tidy, if the tidy is from 10 then DUT 1-01, DUT 1-02, DUT 1-03 will do. If the tidy is from Samar (2114,2115) then FLS 2-01.
8 Reply from Andrey.Lazarev 2016-12-19 15:47:56
Dmitriy.Isaev, thank you
9 Reply from vl_f 2016-12-24 22:11:41 (2016-12-24 22:12:36 edited by vl_f)
Frequent malfunctions of the fuel sensor on the VAZ 2110
In principle, a fuel level sensor can present drivers with many unpleasant surprises, which are very confusing on the road:
- The fuel level readings start to fluctuate. In such a modification, the device can show anything - either the highest or the lowest fuel level. Understanding such a situation becomes absolutely unrealistic. The root cause of this phenomenon may be damage to roads on the board of the control body. Sooner or later they may wear out due to the continuous impact of the runner. If a similar symptom is found in your car, you can try to bend the slider, that is, move it to a significant area of the board. However, this can only help when the roads are not yet very worn out. Otherwise, the sensor needs to be replaced.
- The fuel level sensor constantly shows incorrect information. There may be a number of reasons for this phenomenon: If the level readings are constantly increased or decreased, in this case the fuel gauge can be adjusted. The fuel level cursor indicates the fullness of the tank. In fact, you clearly know that the tank is only partially filled.
How to repair a fuel sensor on a VAZ 2110
Check the quality of drawing of absolutely all contact connections on the device panel harnesses (for this you will need to remove it)
Pay special attention to the small nuts that are pressed against the indicators and make the main contact
Make sure the device panel is working properly. It often happens that the old type of equipment is used, which quickly fails. In such a situation, repair or replacement is needed.
The fuel level needle may be out of position. In this case, press the daily mileage button and turn on the ignition.
Often, the root cause of a breakdown is a float getting stuck in the tank or a failure of the FLS.
Malfunctions in vehicle operation with a faulty FLS
So:
- Let's say you see that your fuel level is changing rapidly. The reason for this phenomenon may be the contact path worn out under the influence of the slider.
- If there is slight wear, you can try to get out of this situation in this way: bend the runner mount a little more than the problem area. If the track wear is enormous, you will need to change the VAZ 2110 fuel level sensor.
- There is another difficulty that often arises: the device deceives - its indicator indicator shows the level of remaining fuel with a significant error. The device probably just needs to be configured.
- In this case, it is disassembled and the pointer is moved manually from the left extreme position “1” to the right position “0”, monitoring the accuracy of the readings. If the pointer does not reach the extreme positions, tighten the adjusting tab - this will increase the stroke of the arrow.
- There is also a similar picture: you have half a tank of fuel, but the device indicates that there is nothing there. In this case, it is necessary to check all contacts of the meter. First, those that are on the device panel - it is probably necessary to tighten the nuts that secure the wires.
- Everything is fine with the wires on the panel - check if the lever is jammed in transition positions. To establish the general functionality of the fuel gauge, it is necessary to check the connections of the ground wires and the handbrake handle.
Before purchasing a new device, check its labeling. For this purpose, there is a proper annotation in the machine’s operating manual. There are approximately 10 types of meters, differing in resistance levels. This coefficient is personal for any device.
Choosing something new
Purchasing a fuel sensor for a VAZ 2110 is not at all a problem if you have already removed the old element from your car.
It is not recommended to just go out and buy the first one you come across, even if it is high-quality, since it may simply not be suitable.
There are two ways to solve this issue.
- Remove the old element, take it to an auto parts store and purchase a similar one.
- Take a look at your car's owner's manual to find out which sensor with which characteristics is used for your car. Buy a similar one.
How to calibrate the FLS on a standard BC
An important parameter is the fuel level in the tank. For the sensor to work correctly, it must be calibrated. For this:
- Empty the fuel tank completely.
- Switch to mode to select the fuel type. To do this, press and hold the first top button in the right row. The display will show "0".
- To switch to tare mode, you must press and hold the button with the car on it. The on-board computer on the VAZ-2110 will emit a short signal.
- Fill the fuel tank with 3 liters of gasoline.
- After a few seconds, press and hold the car button again. The on-board computer display should indicate that there are 3 liters of fuel in the tank.
- Gradually fill the tank and press the button after each addition.
- After maximum filling, the on-board computer will turn off - this completes the calibration.
So that after installing the VAZ-2110 on-board computer, it notifies you that the maximum permissible speed is exceeded, you also need to carry out “training”. To do this, switch to the average speed input mode and hold the button (top right) for several seconds. To enter an integer corresponding to the speed, you need to use the “+” “–” buttons on the front panel of the device.
Where is it installed?
There are two options for installing an RTD: on the fuel rail and in the fuel tank.
The regulator was installed on the fuel rail on cars with a 1.5 liter injection engine. On such engines, two fuel lines come from the fuel tank: direct and return.
The regulator was installed in the fuel tank on cars with a 1.6 liter engine. In such engines, the return line was abandoned. Now the regulator directly relieves pressure in the car tank.
Fuel level indicator and its malfunctions
The measurement system in question operates using a rheostat with a resistor made from nichrome particles. The moving part of the rheostat, which is immersed in gasoline, moves under the influence of a lever with a float. The other side of the lever is an additional contact. If it is placed in a specific position, the circuit for regulating the process of replenishing reserve fuel is closed.
In this case, from 4 to 6.5 liters of fuel are allocated for reserve
Despite the importance of the device, on VAZ 2110 cars the fuel sensor quite often becomes faulty. But not all situations require mandatory replacement.
All you need is a small adjustment that will return the fuel level indicator to a working state.
If you notice a sharp change in the values of the fuel consumption indicator, most likely the contact track has become heavily worn under the influence of the slider. In case of minor wear, this can be corrected in a simple way. It is necessary to bend the slider mount so that it is located slightly above the problem area. Of course, if the contact track is significantly worn, it is better to replace it completely.
The next common pointer malfunction is incorrect readings, that is, the sensor indicates a value that does not correspond to reality. In this case, the device needs proper adjustment. In order to fix this problem, you need to disconnect the sensor from the VAZ 2110 gas tank, and then adjust the gasoline consumption indicator. The position of the arrow is adjusted manually; it must be moved from the stuck position to the original position, that is, to zero.
If the pointer is difficult to move and does not reach the desired position, you will need to bend the tab slightly to make adjustments, increasing the pointer's travel interval. It often happens that the fuel tank is more than half full, but the indicator indicates that it is completely empty. In such a situation, you will need to examine all pointer contacts for breaks or movement. The first thing you need to do is check the wiring under the dashboard.
There is a possibility that the fasteners holding the wires are loose and need to be tightened. If the instrument panel is fully operational, it is necessary to examine the intermediate paths for short circuits
It is important to check all the wiring, starting from the dashboard and ending with the connections of the ground wires and the handbrake handle. The absence of any results will indicate that the gasoline sensor needs to be replaced
When purchasing a new device, you need to check its serial number and model in order to choose an identical one. This information can be found in your vehicle's manual. The VAZ 2110 is equipped with sensors with different resistances, so it is impossible to name a specific model that will suit your car.
Mass air flow sensor
The power unit of the "tens" is controlled using the ECM - an electronic system. This system must always know how much air needs to be supplied for a certain volume of gasoline. These two parameters are closely related to each other, since with their help a combustible mixture with the required density is formed in the engine power unit. After the system determines the required volume of air, it begins to select the appropriate amount of gasoline. As for the regulator, it is responsible for the suction volumes.
Air controller for "ten"
This controller has certain disadvantages, in particular:
- its performance may be impaired if the controller is exposed to moisture;
- if the car is moving at lower speeds, the controller can produce higher readings;
- as practice shows, at idle the air regulator does not work entirely correctly;
- when starting the power unit, certain difficulties may arise;
- the power unit may stop abruptly for no reason after an increased power mode;
- Gasoline consumption during vehicle operation may increase.
We've dealt with the shortcomings, now let's talk about how the device functions:
- The controller design consists of several sensitive elements installed directly in the line itself through which the air flow passes. One of these components is designed to fix the temperature of the air flow, and the other two are always heated to the required parameters.
- To correctly determine the air flow rate, the principle of measuring electrical power is used to maintain the desired temperature level.
- The air regulator controller has a special mesh installed in the line, designed to filter the air flow.
- Thanks to this, the sensor can transmit the necessary data to other regulators designed to activate certain modes. Subsequently, these regulators either change or support the loads.
How to replace the fuel level sensor and how to check it on a VAZ 2110-VAZ 2112?
Note! When replacing an old sensor with a new one, try to buy the same type that was installed, the thing is that the sensors all look similar to each other, but they are different, and if you buy with the wrong marking, then there is a chance that it will work for you it won’t, or it won’t be as it should be!
Removal: 1) Essentially, this sensor is changing and is not so difficult, but the first thing you need to do is remove the fuel pump from the car, you can read more about how to do this in the article entitled: “Replacing the fuel pump with VAZ ".
2) When you have removed the fuel pump, proceed to disassembling it and removing the sensor. To do this, use a screwdriver (Thin screwdriver) to move the retaining ring (Indicated by the red arrow) from the upper groove to the lower one, which is indicated by the blue arrow, thereby giving yourself the opportunity lift the cover of the fuel pump, and after it is lifted, disconnect the wiring from the fuel pressure regulator terminal as shown in photo 2.
Note! This locking ring is located on only one guide; there are essentially two guides in total, but on one of them there is a spring and a locking ring, so when the locking ring is moved to the very bottom, lift the cover to the highest level!
3) Now you will need to deal with the wires, namely, disconnect all of them so that they do not interfere with the removal of the sensor, we proceed to disconnect the first block of wires, to do this, simply squeeze out the latch that secures it (It is indicated by the arrow) and then disconnect the block and make sure that she hung.
4) Then move on to the second block of wires, it is attached a little differently, but disconnecting it will also not be difficult, to do this, use a screwdriver to press the latch (It is indicated by an arrow) and then disconnect the block as shown in the small picture.
5) And finally, you will need to slide the sensor along the grooves (It moves in them) and by releasing the two clamps that secure it (see photo 1), completely remove the sensor from the fuel pump as shown in photo 2.
Installation: The new sensor is installed in the same way as it was removed, only in the reverse order of removal it will all need to be done.
Checking the fuel level sensor for serviceability:
1. Using an ohmmeter, checking the sensor will not be difficult, but this can also be done without a special device, first let’s talk about how to check using the device, first you will need to connect the leads from the ohmmeter to the sensor as shown in the figure below, and when the leads are connected, you will have to move the float of this sensor, in the lowest position of the float the device should show a result of 285–385 Ohms (This indicates that the tank is empty), at the middle positions of the float, that is, when the tank is half full, the device should give a value of 100–135 Ohms and, accordingly, at the very top it should show 7–25 Ohms; if there are other values, then the sensor is faulty.
Note! If you want to clearly see how to move the float and what value the device will produce, then watch the video below, which shows everything clearly!
2. What should those who don’t have a device do, you ask? Let's explain! Without a device, you can also check the sensor, in this case, without removing the sensor (You will just need to remove the fuel pump as much as possible), turn on the ignition on the car and then move the sensor float to different positions, respectively, if the float is at the very top, then the arrow of the fuel level indicator will also have to show that the tank is full, after it has shown this, lower the float and make sure that the indicator arrow has fallen to the very bottom, if at some values the arrow shows the wrong value, then in this case bend the rod and check everything again, by doing so you will adjust the sensor and it will work normally for you.
Additional video clip: You can see more details about how to change the sensor in the video below, in it the disassembly of the fuel pump is shown and the replacement of the sensor is explained in detail.
Crankshaft regulator
New crankshaft controller for the “ten” Depending on the type of car, on a 16- and 8-valve engine, the location of all controllers may be different.
However, all of these devices combine into one functioning system, and the crankshaft adjuster is no exception. Thanks to this controller, the electronic engine management system of the “tens” can independently determine at what point to supply gasoline and a spark through the spark plugs in order to ignite the combustible mixture. In fact, the design of the device is a magnet, as well as a coil of thin wire. The crankshaft sensor has certain advantages:
- As practice shows, at “tens” this regulator can work for quite a long time. Its service life does not decrease even as a result of using the vehicle’s power unit under increased loads.
- The crankshaft adjuster works in conjunction with the crankshaft pulley.
- If the device fails, the engine may not be able to start. Or, if the regulator breaks down, the speed parameters will be reduced to 3.5 thousand per minute.
This controller is installed on the oil pump, actually at the very top of the shaft teeth. Or rather, one millimeter from the cloves. You can learn more about how to replace this controller yourself from the video below (the author of the video is the channel In Sandro’s Garage).
Methods for restoring performance
A faulty sensor does not always need to be replaced. Restoring the fuel level indication system must be done in the following sequence.
- Check the electrical equipment of the car in the dashboard area, check the voltage of the on-board network, along the power supply circuits of the dashboard.
- Process the sensor contacts.
- Dismantle the device, check the condition of the slider, and tighten the contacts if necessary.
- Check the condition of the float, its fastening, and draft.
- Calibrate the device by moving the float sequentially to its extreme positions.
- If the working areas of the sensor become dirty, wipe them with a soft cloth.
Fuel level indicator VAZ 2110 does not work
Among all the various information displayed on the dashboard of the VAZ 2110, this is one of the most important places. real information about the remaining fuel. In any case, realizing that the corresponding indicator is lying down or does not work at all, any driver will feel uncomfortable, especially if he is on a closed highway or, obviously, far from the nearest gas station.
Based on the above, it is clear that any owner of a car (in this case, a VAZ 2110) must have at least basic knowledge of the principle of operation of the fuel level sensor, understand the signs of its failure, know how to do it and, if possible, be able to solve some problems without replacing it , not the cheapest product.
The fuel level sensor itself is a rheostat with a resistor made of nichrome conductor. The rheostat is moved using the float lever. The end of the lever is equipped with an additional contact, which in a certain position closes the control circuit, indicating the beginning of the development of the reserve fuel balance (6.6 - 4.0 l).
/>
Unfortunately, the VAZ 2110 fuel level indicator cannot be considered one of the most reliable parts, and over time you may notice that the fuel level readings jump sharply. As a rule, the main cause of this malfunction is the erasure of the track under the influence of the slider.
READ How many teeth are on the VAZ 2110 starter
In some cases, you can get around this by bending the slider once and placing it over the worn area, but if a significant area is worn away, replacing the sensor will not be avoided.
Another common problem. when the indicator arrow shows the amount of available fuel with a large error. In such a situation, adjusting the sensor can save the situation by removing the sensor from the fuel pump, and then manually changing the position of the lever from one extreme position to another, checking the accuracy of the indicator arrows.
If the needle does not indicate "0" (empty tank) or does not reach the "1" (full tank) mark at the extreme positions of the float spokes, you can restore the true values by bending the adjusting tabs, thereby increasing the direction of the spokes in one direction or the other. In addition to this method, there is a way to correct the readings by changing the extreme position of the arrow of the indicator itself, although in this case it is necessary to disassemble the instrument panel.
A few more steps should be taken if, when the tank is approximately 50% full, the indicator convinces us that the fuel has been completely consumed. In this situation you should:
Check the connections on the back of the dashboard and, if necessary, tighten the nuts that secure the wires; Check the smooth movement of the float needle, paying special attention to the absence of jamming in intermediate positions. At the same time, check the sensor for overall performance; Check the connection of the “mass” wires, including the handbrake wires secured under the handle.. READ How to Improve the Low Beam on a VAZ 2110
READ How to Improve Low Beam on VAZ 2110
/>
If there is a need to replace the fuel level indicator, remove it together with the fuel pump. To find out where this device is located, open the process door under the rear seat of the car.
When solving the problem of replacing the VAZ 2110 fuel level indicator, you should remember that it is currently available in two versions: firstly, for the Vladimir assembly of instruments, including the assembly performed by Shetmash OJSC.
The second type is for VDO. To avoid instrumental errors, it is better to install one type instead of a faulty sensor. As a last resort, make sure that the designations of the removed and installed sensors match the first numbers after the name. In other words, DUT-1-01 and DUT.1-02 are interchangeable, and DUT.1-02 and DUT-2-02. No.
Source