Most of the units and components in cars of the Lada Samara model line can be changed with your own hands. To do this, just stock up on the necessary tools and purchase a new part. This material describes in detail how to replace a VAZ 2110 fuel pump and its filter element - a mesh. The work is quite simple, since installing a new product does not require an inspection hole or a lift. After studying this material, the reader will learn how to change the fuel pump, when it needs to be done and how to determine that the unit has failed. To make sure that the device has failed, you need to measure its pressure - the article contains several ways to perform this action.
Advice! Many Samara owners install a VAZ 2110 Bosch fuel pump. Despite the higher cost, the imported unit has a long service life, and it is easier to maintain when compared with a standard unit.
Fuel purification in VAZ 2110–2112
Different filters are used in the fuel supply systems of carburetor and injection engines.
Gasoline for a carburetor engine passes through a fine filter installed in front of the fuel pump.
Gasoline for a carburetor engine passes through a fine filter installed in front of the fuel pump
This non-separable disposable unit is assembled in a transparent plastic case, thanks to which the condition of the paper filter element can be assessed visually. The filter is the same as in all carburetor cars. In addition to this, mesh types of cleaning the fuel intake, fuel pump and carburetor are guarding the purity of gasoline.
The filter installed in the power supply system of injection engines is also made of paper. But due to the fact that it works under high pressure, it is assembled in a non-separable metal case.
The fine fuel filter installed in the power supply system of injection engines is also made of paper. But due to the fact that it works under high pressure, it is assembled in a non-separable metal case
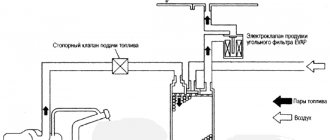
In addition to it, the system has a strainer installed in the fuel tank along with an electric fuel pump.
The strainer is installed in the fuel tank along with the electric fuel pump
The tenth VAZ model was supposed to be a sedan based on Samara, which later became the “ninety-ninth”. In fact, the index 2110 received a second-generation front-wheel drive car - a car without a proper name, which everyone knows as a “ten”.
Oleg Polazhinets
Cleaning the fuel pump mesh yourself
Cleaning the fuel pump is a rather urgent procedure that must be performed if the following symptoms occur:
- difficulty starting the engine with the starter;
- decreased acceleration dynamics of the car;
- jerking when pressing the accelerator pedal sharply;
- floating speed and sluggish engine response;
- the engine stalls in transition modes after pressing the accelerator, etc.
In some variants, when you press the gas, the car does not actually accelerate, overcomes inclines with great difficulty, and does not overtake. There may be several circumstances for such a malfunction, but often the problem is localized in the area of the fuel pump. Next we will look at issues related to the electric fuel pump, which is installed in the gas tank of injection cars.
Selecting a fine filter
The abundance of consumables on the market makes it difficult to choose. Surveys show that more than a third of “ten” owners use the BIG brand. The brands SCT, Bosch, Mann and Nevsky have proven themselves well.
“Experts” recommend assessing consumables visually by opening the casing. It is unlikely that such an “examination” makes sense. The differences are not fundamental; they are impossible to see with the naked eye. Universal advice - buy one that you don’t mind spending money on.
What you need to work independently
You will need screwdrivers, wrenches, a vice, a 7-head, etc. When purchasing a new element, make sure that it fully matches the old one. Cars of the “tenth family” are equipped with different engines (carburetor, injector, 8 valves, 16 valves). Accordingly, injection systems are also different - be sure to check the correspondence tables, which are easy to find on the Internet.
If the unit is located in a tank, the fuel must be drained before the procedure. Don't forget to disconnect the “-” terminal on the battery to de-energize the car.
Replacing fuel filters
There are fewer problems with replacement on a carburetor engine. The fine filter is visible when you lift the hood. It is attached to the hose section with ordinary clamps. The arrow on the body indicates the direction of fuel movement: from the fuel pump to the carburetor.
Carburetor, fuel pump and fuel intake strainers require replacement extremely rarely. The manufacturer recommends cleaning them with a hard brush, rinsing them with gasoline or acetone and blowing them with air.
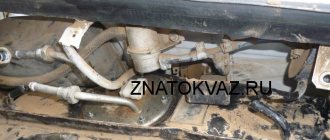
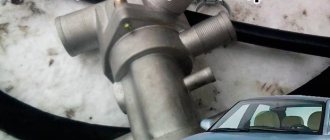
Location of fuel injection engine filters
A coarse strainer protects the inlet of the electric fuel pump located in the fuel tank. To access it, you need to remove the electric fuel pump through the hatch under the rear seat.
The designers of the VAZ 2110 placed the fine filter at the rear of the car under the tank.
The designers of the VAZ 2110 placed the fine filter at the rear of the car under the tank
From the point of view of ease of access, this is not the best solution. To get to the filter you need to drive the car onto an overpass. But do not forget that it works under pressure of several atmospheres. If the housing ruptures, a gasoline spill will cause minimal harm.
Replacement frequency
The manufacturer recommends changing the fine fuel filter of a carburetor engine after 15 thousand kilometers. Engines with injection - half as often, after 30 thousand km.
In practice, motorists usually change filters more often, motivating their actions by the low quality of gasoline at gas stations. They can be understood. Repairing the carburetor or injectors will be more hassle and cost more money than frequent replacement.
As for replacing the electric fuel pump strainer, there is no information about this operation in the list of maintenance work. The manufacturer believes that during the estimated service life of the vehicle, replacement of the electric fuel pump and filter will not be necessary.
However, cars usually last longer than the developers intend for them, so sometimes the coarse filter has to be changed due to interruptions in engine operation.
Filter replacement criteria
Signs of clogging:
- car jerks, which at first only occasionally occur at high speeds, but over time become more frequent and appear at medium speeds;
- reduced engine power (does not pull);
- poor acceleration dynamics (stupid);
- problems with fuel supply when starting the engine; you have to turn the starter for a long time before enough fuel reaches the injectors;
- poor fuel supply when there is little gasoline in the tank;
- black smoke from the exhaust pipe, because due to supply problems the engine runs on a very lean mixture.
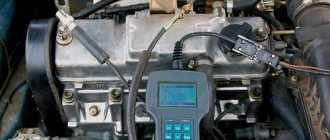
If the above symptoms appear, measure the pressure in the fuel supply system (FSS) with a pressure gauge using the fuel rail fitting. It differs for different motors.
If there are signs of fuel filter clogging, measure the pressure in the fuel supply system with a pressure gauge using the fuel rail fitting
Table: replacement of elements according to pressure criterion
| Engine model | Pressure in SPT | faulty part | ||
| kPa | kgf/cm² | |||
| 2111, 2112 | >325 | >3,3 | pressure regulator | |
| 21114, 21124 | >400 | >4 | ||
| 2111, 2112 | <284 | <2,8 | fuel filter | |
| 21114, 21124 | <364 | <3,6 | ||
When the problem is in the fuel filters (low pressure), the fine filter should first be replaced. If this does not help, wash or replace the electric fuel pump strainer.
Since the launch of the “ten” into production was constantly postponed due to a banal lack of funds, designers and constructors, willy-nilly, had the opportunity to modify the car and “refresh” it taking into account new trends. Perhaps that is why the VAZ-2110 design project was accepted only the third time. In parallel with the improvements in appearance, the content was also changed. In particular, thanks to the forced pause before the car was put into production, VAZ mastered fuel injection, without which entering foreign markets in the early nineties was simply impossible.
Oleg Polazhinets
Wheels
Change or clean
The mesh filter can be cleaned, washed and blown, or replaced with a new one. In the first case, the owner will undoubtedly save a certain amount, but will spend more time.
People rarely look into the gas tank. As a rule, if the electric fuel pump grid is clogged, it is completely clogged. Cleaning is possible, but it does not always completely restore the properties of the filter.
As a rule, if the electric fuel pump grid is clogged, it is completely clogged
The pressure in the system increases after cleaning, but since it is not always possible to completely clean it, there is a high probability of clogging again, and this happens much faster than the first time.
A new strainer for an electric fuel pump is not so expensive that you would have to do extra work for the sake of dubious savings.
Replacing the fuel filter
The fuel supply systems for engines of cars of the “tenth” family differ from each other. Externally, differences are noticeable in the design of the fuel filter. Motors 2111 and 2112 are equipped with filters in a housing with threaded fittings, while in engines 21114 and 21124 the fuel lines are attached with clips.
Engines 2111 and 2112 are equipped with filters in a housing with threaded fittings, while fuel lines are attached to filters on engines 21114 and 21124 with clips
The modification of the installed filter should be clarified by external inspection before purchasing a new one to replace it.
To work you will need:
- open-end wrenches 10, 17 and 19 mm,
- screwdriver,
- container for gasoline (bucket),
- overpass, inspection hole or lift.
Replacing the filter for engines 2111 and 2112
- Disconnect the battery.
- Raise the car with a lift.
- Place the bucket. Carefully unscrew the outlet fitting using 19 and 17 mm wrenches. Collect gasoline leaking from the fuel line into a container.
- Unscrew the inlet fitting.
- Loosen the clamp bolt and remove the filter.
- Install a new one, taking into account the position of the arrow on the housing. It indicates the flow of fuel from the gas tank to the injectors.
- Tighten the clamp.
- Connect the fuel lines to the fittings, tighten the threaded connections. Do not use old seals and washers, install fresh ones from the purchased kit.
- Connect the battery. Start the engine. Make sure it is sealed.
Photo gallery: replacing the fuel filter of engines 2111 and 2112
After loosening the clamp, remove the filter. Carefully unscrew the outlet fitting using wrenches 19 and 17. Loosen the clamp with a wrench 10.
Obviously, the appearance of the latest developments from VW and Audi has significantly influenced the image of the “ten”. Like the Eighty, the VAZ-2110 received a barrel-shaped body with soft lines and smooth transitions from volume to volume. The general “slickness” was also facilitated by glued glass, which appeared on the “ten” for the first time on a production car in the CIS.
Oleg Polazhinets
Wheels
Replacing the filter for engines 21114 and 21124
Before depressurizing the system, relieve fuel pressure:
- De-energize the electric fuel pump in one of the following ways: by disconnecting the power connector from it or by removing the fuse or the fuel pump relay.
- Start the engine. Wait until it stalls, having used up the remaining gasoline.
- Operate the starter for a few seconds to release the pressure inside the fuel line.
- Turn off the ignition. Restore power supply to the electric fuel pump.
To replace:
- After disconnecting one or both terminals, disconnect the battery from the on-board network.
- Raise the car with a lift.
- Loosen the clamp spring by hand and disconnect the fuel outlet hose.
- Disconnect the supply in the same way.
- Loosen the clamp. Remove the old one.
- Install the new one, orienting the position according to the arrow on the body. Tighten the clamp.
- Place the fuel lines onto the fittings and press them against the filter until the latch clicks.
- Connect the battery, start the engine. Visually check the tightness of the new fuel line and connections.
Photo gallery: replacing the fine filter for engines 21114 and 21124
Remove the filter from the clamp. Use a 10mm wrench to unscrew the clamp securing bolt. Loosen the spring clamp and remove the fuel line tip.
Video: replacing the VAZ 2110 fuel filter
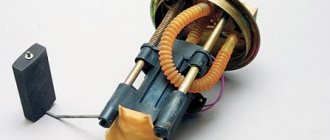
Replacing the electric fuel pump strainer
To replace, you need to remove the electric fuel pump:
- Remove the rear seat in the cabin, open the hatch cover under it.
- Disconnect the electrical wiring connector from the electric fuel pump.
- Relieve pressure in the power system as described above.
- Disconnect the battery.
- Disconnect the fuel line.
- Unscrew the nuts and remove the pressure plate.
- Remove the electric fuel pump module assembly.
- Replace the strainer.
- Install the pump, secure it with the retaining ring, and tighten the nuts without any extra effort.
- Connect fuel lines and power.
- Connect the battery, start the engine, and make sure the power system is functioning normally.
Photo gallery: Replacing the coarse filter
Remove the electric fuel pump module assembly from the tank. Disconnect the fuel lines from the pump. Remove the rear seat in the cabin, open the hatch cover underneath it.
Substitution process
Before starting the replacement, you need to prepare the tool and the space for disassembling the glass itself. For this, unsullied tissue (a medical system of cells and intercellular substance, united by a common origin, structure and functions)
in order to spread it on a workbench or table and create work on it. This is necessary to prevent excess debris from getting into the fuel pump.
Required tool:
- Ratchet or wrench;
- Head on “10” or “8”;
- Key to "17";
- Pliers;
- Screwdriver;
Step by step process
- The first step is to relieve the residual pressure in the fuel line. To do this, remove the fuel pump fuse (F3-15A). The fuel pump fuse is located under the center console on the passenger side behind the plastic footwell vent cover.
- We start the car and let it idle until the car stalls.
- Next we proceed to removing the rear seat. On sedan cars, you need to press the seat latches on both sides.
- On a station wagon and hatchback, you need to pull the tongue and lift the seat up.
- Unscrew the two screws of the fuel pump glass cover.
- We clean out all the debris and dirt under the lid of the glass. You can use a brush, vacuum cleaner or compressor. This is necessary so that after the fuel pump glass is removed, excess dirt does not get into the tank.
- Remove the fuel pump connector.
- We unscrew the fuel pipe fittings on cars older than 2003. On cars produced after 2003. plastic fitting clamps were installed. In order to remove the plastic clamp, you need to press the buttons as shown in the picture and pull the fitting towards you.
- Next, using a “10” or “8” socket (it also depends on the year of manufacture of the car), carefully unscrew the 8 nuts securing the fuel pump cup ring.
- We remove the glass, carefully without bending the fuel level sensor, from the tank.
- Next, we begin to specifically disassemble the fuel pump glass on clean rags.
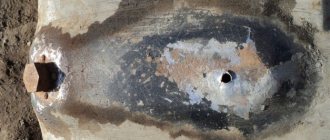
- We pull out the glass stopper and remove the sump.
- We remove the old fuel pump mesh by prying it up with a screwdriver.
- We install the new mesh and assemble it in reverse order.
When tightening the fuel pump cup ring, do not apply excessive force, otherwise the studs on the gas tank may come off.
We hope that the article was useful for you, then you can watch a video on replacing the fuel pump mesh on a Priora.
Fault diagnosis
There are several signs that indicate that the fuel pump is clogged. Each of them individually may not indicate this one hundred percent, but taken together they are sufficient grounds to begin cleaning. These are the signs:
- the engine stalls when you press the accelerator;
- the acceleration dynamics of the car decreases;
- the engine responds poorly;
- starting with the starter is somewhat difficult;
- When the gas pedal is pressed sharply, jerking occurs.
Depending on how badly the fuel pump is clogged, these problems can vary greatly in scope. For example, if the pollution is very high, then when you press the gas pedal, the car may hardly accelerate.
Cleaning the fuel pump screen can solve these problems, but it is important to remember that there are other reasons that can cause them:
- The injector has failed.
- The fuel pump is not working correctly.
- The fuel filter is dirty.
If the filter and mesh are still easy to change on your own, then for the rest it would be better for a beginner to contact a car service center. This will allow you to avoid gross mistakes that an inexperienced car enthusiast may make during the repair process.
User Experience
My engine rarely stalls. A couple of times there were simply problems with the fuel, but once there was a problem with the pump. I figured out how to take it apart myself. I realized that there was no damage, it was just pollution. I had to change the grille - before I had no idea that they could be cleaned. Since then I have driven a hundred thousand kilometers and so far everything is fine. When another 20-30 thousand are added, then I’ll look under the hood. This time only for preventive purposes.
I'm new to driving, but have already encountered this procedure. When the car didn't want to start the first time, I thought the problem was with the battery. But then the engine began to behave strangely - it either would not start or suddenly increased speed. Friends suggested that we need to disassemble and clean the pump. As it turns out, it's not difficult at all.
I became a motorist five years ago. Since then, I have never needed to repair or change anything - my husband usually does this. He simply cleans the grille for himself, but always installs a new one for me. The answer to my questions is that it is safer.
I clean the grille every 150 thousand kilometers traveled. I have a sedan made by Nissan, and I almost never drive it outside the city. Although there are no particular problems, I should do this after about a hundred kilometers. Focus on the ignition - if everything is fine with the battery, then the pump is probably dirty.
I never do this myself and I don’t recommend it. Any car service center will do this procedure almost free of charge. In addition, mechanics spend less than half an hour on it, and when you do it yourself, you don’t know exactly how much more digging you’ll have to do. Aleksey Ivanov
Frequency of procedures
There is no set time frame for cleaning this part. Some are forced to clean the mesh every 50,000 kilometers, while others have to do this no earlier than the car has traveled 150,000 kilometers. However, there are cases when the manual for using a particular car indicates a specific number of thousands of kilometers, after which it is worth changing this part. However, even before this point it may also be necessary to clean the fuel pump mesh. It is not difficult to make it yourself.
Tips and tricks
If it is necessary to replace the VAZ 2110 pump or after removing the pump for preventative replacement/cleaning of the mesh, after completing the reassembly and installation of the pump, do not immediately install the rear sofa and the pump cover.
Additional verification will be required before doing this. To do this, you need to turn on the ignition and determine whether gasoline is leaking from the fuel pipes. Also, the smell of gasoline in the car interior, etc. is not allowed. If this is the case, then you need to determine the cause of the leak and replace the problematic elements, tighten the tube nuts, etc.
We also recommend reading the article about what signs of a malfunctioning fuel pressure regulator indicate problems with this element. From this article you will learn about the main signs of fuel pressure regulator problems, what symptoms you should pay attention to, etc.
As for the fuel pump itself, the VAZ pump does not have to be replaced as a whole module. You can replace only the pump part, which will be cheaper. In this case, you only need to install the pump that came from the factory. You can also try to choose an analogue that matches the characteristics, but in the case of a VAZ, it is often optimal to use original parts.
To make the selection accurate, the existing module must be removed from the car and purchased a similar one. Also, when choosing, you need to take into account the type of engine, since the pumps are different. Before purchasing, the fuel pump itself should also be inspected, its housing should be checked (cracks, dents, and defects are not allowed).