The braking system greatly determines how safe the VAZ 2110 will be both for you and for other road users. Her condition must be systematically checked. Replacing brake discs may be required after an average of 100,000 kilometers, but in some cases earlier.
The braking system is an important component of the car.
Replacing the front brake discs of a VAZ 2110
The car is considered one of the most dangerous inventions that man has invented. To make the travel of a vehicle driver safe, developers had to create many inventions. One of them is brakes (see Repairing brakes at home). Every vehicle has a braking system. To avoid any troubles on the roadway, before leaving, you should take care of the brake system. It must be constantly maintained in working order. In most cases, repairs to brake discs and pads should be left to professionals. But if you take on repairs yourself, you should learn a few basic rules.
Note: Brake discs must be replaced on both sides at the same time. Each individual replacement of equipment requires the implementation of clear established rules. If new disks were damaged during installation due to the negligence of the installer, sellers will not provide warranty service or replace the product.
This is interesting: How to check ball joints on a Lada
Characteristic signs of wear on brake system elements
- Reduced braking efficiency;
- Increased braking distance;
- Periodic failure of the brake pedal;
- Stopping the car is accompanied by a metallic grinding and creaking sound. The thickness of the disc is below the permissible standard;
- In the expansion tank, the liquid level DOT - 4 is below the permissible norm, which indicates depressurization;
- When you press the pedal, the car moves to the right / left;
- Difficulties in controlling equipment at speeds over 80 km/h;
- An indicator lights up on the center console of the instruments, notifying you of a breakdown in the system.
The list is not exhaustive; each situation has an individual reason.
Using quality parts and accessories for your car is a must. If you decide to service the VAZ braking system, buy only reliable equipment with a factory guarantee. This can be done quite simply by contacting official dealers and suppliers of specific products. But you can also simply buy a fake, which is of no quality at all and will only last for a few weeks. Therefore, be careful when purchasing, check the factory documents and other features of the product offered to you.
Only use pads you can trust. Don't buy products you haven't heard of, and forget about the cheapest offers. They use unreliable materials that cannot ensure the proper level of operational safety. Therefore, with such elements in the braking module, the ride will not be confident. Always keep an eye on the remaining layer of the working part. Its thickness should be at least 15-20% of the original values. Read the car's owner's manual and see what recommendations the manufacturer gives for operating the brake system. How often do you usually change the brake pads on your car?
Replacing brake discs yourself
Front brake discs VAZ 2110
The first step is to dismantle the worn-out brake discs. To do this you should do:
- The car wheel should be removed.
- Remove worn brake pads.
- Disassemble the brake frame.
- Clean the surface of the hub.
- Check the operation of the hub.
- Remove excess coating from new discs.
- Check the brake disc runout.
- Install the brake pads.
To carry out this work, the following equipment, mechanisms, and tools should be used:
- Jack.
- Any device for unscrewing nuts with the number “7”.
- Wrenches with numbers "13" and "17".
- Hammer.
- A screwdriver designed for unscrewing flat fasteners.
Removing the wheel
Removing the front wheel of a VAZ 2110
In order to remove a car wheel, you must do the following:
- A jack is installed under the car.
- The car is raised to such a level that it does not tip over, but the removal of the wheel was carried out without interference.
- Unscrew the wheel mounts with a wrench.
- Remove the hubcaps and the wheel itself.
This work is no different from replacing a tire when the tires go flat due to a puncture.
Removing the brake pads
Front brake pads VAZ 2110
To remove used brake pads:
- The piston must be moved as far as possible from the standard mechanism.
Note: The distance should not exceed that which will be convenient for removing old brake pads.
- The seized brake pads are disposed of.
To make the work easier, you should disassemble the brake frame:
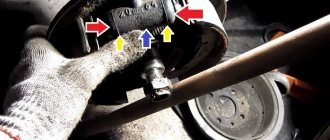
- Unscrew the two bolts that secure the VAZ 2110 pads.
- Disconnect the device completely.
Note: after unscrewing the bolts, the wheel cylinder brake hose remains untouched.
Cleaning the hub and checking for runout
Front hub VAZ 2110
The next step is cleaning the hub. It should be thoroughly cleaned, as additional debris can negatively affect the performance of the new equipment. For this purpose it is used:
- Wire brush.
- Alcohol solvent.
This method cleans the mechanism from rust, dirt and possible surface damage. Sometimes, when the hub surface is not cleaned, the brake system may make a sound that sounds like a beating sound. This condition is unacceptable.
Note: remaining dirt on the hub, its deviations in operation due to poor cleaning, are not a defect in the brake discs.
Before finally fixing the devices in place, a test run should be carried out. This will help you find out the hub runout. This test uses a special device. The normal runout should not exceed 0.1 millimeters. When the hub runout indicator is exceeded, the hub mechanism should be repaired and only then further installation of the brake discs should be carried out. Hub repairs are carried out quite carefully. It is necessary to replace the bearing if the runout of the mechanism is too great. To replace a bearing, do the following:
- Lightly unscrew the nut that secures the stand. There is no need to unscrew it completely.
- We completely unscrew the nut that holds the CV joint (see VAZ 2110: replacing the CV joint - do it right). The stand is removed.
- The spring must be compressed. To do this, it is necessary to use a tightening mechanism. It is installed on a spring and gradually clamped on both sides.
- At the moment of maximum compression of the spring (it should not be compressed completely), the old bearing is removed.
- The old bearing is removed and a new, ready-to-use working bearing takes its place.
After installing the new bearing, we assemble the hub mechanism in the reverse order. After each element is installed in its place, you should check the hub runout again. Don't forget about the maximum value.
Note. The check must be carried out carefully, since the safety of the driver and his passengers may depend on its operation.
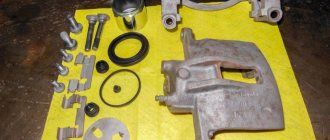
Preparing new drives for installation
VAZ 2110 front and rear wheels
An integral part of replacing VAZ 2110 brake discs is removing the coating on the new part. New brake discs have a special coating called conservative. Any solvent can be used for this purpose. After removing the coating, new brake discs should be installed in place of the old worn ones.
Checking the runout of the disc itself
VAZ 2110 front brake disc is heating up
Once again, it is necessary to do a small check of the performance indicators. This time you should pay attention to the runout of the brake disc itself. The maximum permissible value should not exceed 0.15 millimeters. When repairs are carried out carefully and according to the rules, this indicator should not exceed the permissible value.
Note. When the indicator is exceeded, and the repairman does not deign to do the calibration, the sensitivity of the brake pedal can increase significantly. In addition, vibration will increase during braking.
Installation
VAZ 2110 front disc brakes kit
The last step when replacing the brake disc of a VAZ 2110 car is to install the brake pads in their original place. The steps to perform this operation are carried out in the opposite order as at the time of disassembly.
Installation of R15 brake discs on a VAZ 2110
Installing R15 tires on the “ten” is not a problem, but it will not be possible to provide good braking to R14 brake discs. In order for the braking performance to be at the proper level, 15 brakes should be installed on the VAZ 2110. After 195/50 R15 tires were installed on the car, the effectiveness of the R14 brakes was clearly not enough. It was decided to install 15th ventilated brake discs.
We recommend: DIY car window tinting
What is needed to replace 14 brakes with 15 ones?
First you need to select the staples. There is a bracket on sale: bi-tuning (digested from a bracket for 14 brakes), LGR brackets and PROSPORT brackets. I settled on the last option. Price 1400 rubles. By the way, about the spacers for the brackets. You can use brackets from R13 ventilated discs, but they need to be sharpened. But in order for them to stand up like this, you need to grind off the edges of the ears. Selecting brake discs is more difficult. I ordered it on existential. The VAZ 2110 is equipped with 15th brake discs from Alfa Romeo; I chose Zimmerman (inexpensive and cheerful). Price 2300r.ps When purchasing brake discs, please note that you need 284mm. If the discs are 280mm, then the pads will protrude slightly from above the discs. This is fraught with chipping of the pads on top. The pads I chose were EBC Green from Alfa Romeo (it has a larger lining surface area). Price 1900 rub.
Installation of 15 brake discs on a VAZ 2110
Replacing it yourself is not difficult. We remove the brake discs, unscrew the brackets, guides, and cylinders. We remove the rims (instructions). The peculiarity of the Alfa Romeo rim is that the CO is 0.5 mm larger than that of the VAZ. Fiat has the same central center as Alfa Romeo. For proper centering, you will need to cut a strip from a beer can, which we insert between the disc and the hub to eliminate play. We put on the disc and screw on the new bracket. This photo shows the difference between brake discs 14 and 15 (in diameter).
When I started inserting my fingers, I discovered that one of the two holes for the finger (ProSport) was smaller than the other and the finger would not fit into it. The same picture was observed on the second bracket. Drilled it out with a drill bit d8.5mm. Then everything went without surprises. Reassemble in the reverse order and bleed the brakes. Another option is to install 15 discs from the Mazda PX-7 Turbo. The plates were turned by a turner, the main thing is to find the suitable metal. The hardened bolts were made to order. You can also use a set of adapters (price 800 rubles), which are installed with the Lada Kalina Sport R15 brake disc 284x21mm and the standard VAZ 2112 caliper.
Discs from Kalina are a reasonable limit. You can make an adapter for brake discs yourself: According to first impressions, the difference in braking is noticeable more than expected. In addition, this will provide greater stability when the disk heats up and good information content. At low speeds the difference is less noticeable than at high speeds, where the arrival is simply crazy. The difference also greatly depends on the quality of the brake discs. There is only one drawback - more expensive R15 tires, which you need to buy for the winter! By the way, to increase the performance of the rear brakes, you can replace the drums with discs.
Checking the new brake system
Note: You should immediately break in the new brake system. To do this, you need to travel 500 kilometers. The braking process should be done smoothly, without any sudden movements. If you ignore this rule, brake disc defects may occur. They arise during the process of overheating.
VAZ 2110 front brake discs
It should be noted that most modern motorists do not even think about the moment of changing brake discs. They cannot independently determine the right moment. Therefore, you should know several basic indicators that will indicate the proximity of this repair:
- You should pay attention to the thickness of the ventilated disc. Its normal condition and indicators should be 17 millimeters.
- A non-ventilated disk has its own indicator, which should not exceed 10 millimeters.
- Constantly pay attention to the runout indicator, which should not exceed 0.15 millimeters.
- Entrust the measurement of indicators to specialists. Self-measurement may not provide accurate results.
- Pay attention to the surface of the disc. If there is any damage to it, the brake system should be replaced immediately.
Motorists should pay attention to the choice of new brake discs. Purchasing from retail outlets that do not have permission to provide services to the public is strictly prohibited. The product may be counterfeit or not meet safety standards. The best option is a ventilated brake disc. Unlike a non-ventilated disc, such parts have an increased shelf life. Thanks to the constant air flow, the period of their use can be extended by 2 times.
Signs you need to replace drives
Not all car owners pay attention to the condition of their brake discs, which is why the problem of their failure occurs at the most inopportune moment. We recommend learning from the mistakes of others rather than making your own.
To determine whether the condition of the brake discs is close to the need to replace, it is recommended to do the following:
- Check the thickness of the brake disc. The normal size is 17 millimeters. This is when we are talking about ventilated discs;
- Non-ventilated elements have their own indicator, and it is 10 millimeters;
- Check runout. This parameter is normally 0.15 millimeters and does not exceed it;
- Runout indicators should be measured at professional service stations that are equipped with appropriate equipment. Independent measurements do not always give accurate results;
- Examine the surface of the brake disc. If you find any damage, defects, chips, or cracks, be sure to replace parts immediately;
- As for choosing new items, purchase them exclusively from certified stores that have permission to provide the appropriate services. Buying on the market can lead to fakes that do not meet strict safety standards. Alas, there are now more than enough such discs;
- You should buy ventilated discs, the shelf life of which is significantly longer than their non-ventilated counterparts, plus their efficiency is better. The air flow that cools the brakes approximately doubles the lifespan of a simple non-ventilated brake system.
The process is complex, but possible to do it yourself. Follow instructions, observe safety regulations, and use only high-quality, proven parts. Still, reliable brakes are a guarantee of your safety and the safety of all other road users.
Replacing brake pads is a consequence of changing discs
Since when replacing a brake disc, the brake pads must be replaced, the process of this work should also be described. It is not recommended to use old brake pads with new brake discs. This can worsen the braking process, and in some cases lead to immediate failure of the brake discs. To replace brake pads on a VAZ 2110, you should be able to do the following work:
- Since the car is in the air, you should start removing the pads the moment the wheel is disconnected from the car.
- Having a flat-head screwdriver, you should bend the lock washers. They are the locking mechanism for the caliper bracket bolts.
- After bending, unscrew the bracket nut (top). Using a key with the number “17”, we clamp the bolt on one side and unscrew the nut on the other.
Replacing the front brake pads of a VAZ
- After unscrewing the bolt, all that remains is to remove the brake pads. This applies to both internal and external.
- After dismantling the old equipment, it should be replaced with new one.
Note: New brake pads must be lubricated before installation. It would be preferable and more effective to use copper grease.
After the lubricated brake pads are in place, it is necessary to completely reassemble all parts of the brake system and wheel in reverse order. If it is necessary to replace all brake discs, this procedure is performed separately for each wheel.
Note. Before driving with a new brake system, the first few hundred kilometers should be braked smoothly. This is necessary for the safety of the driver and the integrity of parts of the vehicle's braking system.
If you have doubts about self-repair, the work should be entrusted to professionals. They will not only carry out high-quality repairs, but will also make a selection of spare parts. With their selection, brake system spare parts will be of high quality. This will allow the VAZ 2110 driver not to have to search for spare parts. In addition, it is recommended to watch the video tutorial downloaded from the Internet. It is also recommended to use photographic materials as a visual aid if the work is still done with your own hands. During the replacement process, you need to follow the advice given in the instructions. Thus, you can save a lot of money, because the price of professional services is not cheap.
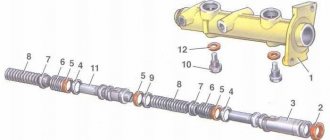
Withdrawal procedure
1. Remove the desired wheel and brake pads.
2. Unscrew the 2 bolts securing the shoe guide to the steering knuckle and remove the brake mechanism assembly. At the same time, we do not disconnect it from the wheel cylinder.
3. We hang the removed brake mechanism to the front suspension spring. Do not twist or strain the brake hose.
4. Clean the disk from dirt and apply WD-40 to the connections between the disk and the hub and to the guide pins.
5. Unscrew the 2 guide pins and remove the brake disc. You can knock it down with a rubber mallet.
6. Install the brake disc in the reverse order. If you are replacing an old disk, you need to use a file to remove the beads that have formed during wear.
This is interesting: What should be the compression in the VAZ 2107 engine
What to choose?
The simplest and cheapest option are ventilated wheels " Master Sport"
" They have both holes and notches. In principle, these parts work quite well. The disadvantage is the low service life. As a rule, these disks begin to deteriorate after 25,000 kilometers. But this problem is easily overcome by the low cost of the part.
Brembo Max wheels
are the record holder for service life. They rarely travel less than 50,000 kilometers. Among the disadvantages, increased wear of the pads can be noted. They can also heat up during heavy braking. But overall, despite the high price, this is one of the best options.
Also on 2110 and 2114 you can use 15-inch wheels. The best wheels for this are Alnas Kalina-Sport
. The easiest way is to take them together with a caliper. It will cost much less. This part is ventilated, but there are no holes or notches. These brakes work simply amazing. At the same time, they do not overheat, which is extremely important.
Important parameters when choosing brake pads
When choosing brake pads for Kalina and other VAZ models, it is necessary to take into account that the problem of the existence of counterfeits currently remains relevant, which is largely facilitated by the imperfections of the current legislation. Therefore, it is recommended to make such purchases in branded stores that are not interested in supplying products of questionable quality. On the contrary, small retail outlets bear virtually no responsibility for low-quality products, attracting customers with low prices and many other marketing ploys.
So, what you need to pay attention to first:
- for the presence of a certificate - the packaging of the pads must contain a mark of compliance of the proposed product with ECE criteria (marking - 90R/R90);
- An external inspection of the friction layer can also provide an invaluable service: the presence of foreign substances on it should raise suspicions, although the presence of such minor defects as small chips, cracks, dents or bulges is acceptable;
- pay attention to the metal base - it should be smooth, without visible bends, even microscopic peeling of the friction material should be absent;
- pay attention to the operating temperature of the pads you purchase - the higher the value, the better the braking performance. For most VAZ models, this figure is in the range of 280 - 350 ° C. At the same time, it makes no sense to overpay for expensive products that can withstand temperatures of 800 ° C or more.
Marking
An experienced motorist can tell about the quality of the pads both from an external inspection and from the product labeling. Most car enthusiasts do not pay attention to the last factor, and completely in vain. Thus, one of the most important indicators of braking efficiency is the friction coefficient, denoted by two Latin letters that correspond to certain numerical indicators
The first symbol indicates the average coefficient of the pad when it is heated, the second – after complete cooling.
Table of friction coefficient values (the higher the value, the more effective the braking and the higher the wear of the pads):
- C – less than 0.15;
- D – CT is 0.15 – 0.25;
- E – coefficient value lies in the range of 0.25 – 0.35;
- F – friction coefficient is 0.35 – 0.45;
- G – CT = 0.45 – 0.55;
- H – friction coefficient indicator is 0.55 – 0.8.
Unfortunately, not all products present on the domestic market have this marking.
In addition to the friction coefficient, the marking may include the following information:
- compliance with the EU certificate (we have already talked about it, it is indicated by the symbols 90R or R90, followed by the approval number);
- catalog number HEXEN;
- designation of the production batch;
- WVA number, which determines the geometry of the pads.
Here you can find out the country in which the product was manufactured:
- E1 corresponds to Germany;
- E2 points to France;
- E3 is Italy;
- E11 indicates a UK manufacturer.
Replacement steps
The entire replacement process can be divided into several stages:
- Removing wheels;
- Removing the old brake pad;
- Frame disassembly;
- Cleaning the hub and checking it;
- Removing coating from new disks;
- Runout check;
- Installation of new brake system elements.
Now let's talk about this in more detail.
Removing the wheel
In fact, dismantling the wheel for subsequent replacement of the brake elements is not difficult.
But a certain sequence of actions will have to be followed.
- Place a jack under the car.
- Lift it up so that it doesn't tip over, but still allows you to easily remove the wheels.
- Unscrew the wheel fasteners.
- Remove the hubcaps and the wheels themselves.
As you can see, the procedure is really simple, but it requires attention and accuracy.
Removing the pads
- Try to move the piston as far as possible from the brake mechanism. But do not exceed the distance beyond that which will allow you to comfortably remove the brake pads.
- Take out the block.
- To make the job easier, you can disassemble the brake frame. To do this, unscrew the two bolts securing the block and disconnect the device.
Hub
It must be cleaned, since all accumulated debris, dirt, and rust will negatively affect the effectiveness of the new brakes.
Dirty
For cleaning, alcohol-based solvents and metal brushes are used. If cleaning is not performed, the operation of the brakes will be accompanied by beating - this should absolutely not be allowed.
Be sure to check the hub for runout. Normally it does not exceed 0.1 mm. There is a special tool for checking. If the indicator is within normal limits, then a full assembly is performed.
Working with new disks
Many owners of the “Ten” are interested in which brake discs are best to choose for the VAZ 2110. The question is quite logical.
Choose certified replacements from reputable manufacturers such as Bosch, or stay true to factory parts. These are the two best options in terms of quality and compliance with the car itself.
New
Some take similar discs that partially fit the “ten”, sharpen them, and adjust the design. This is a dubious undertaking, since it requires serious skills in such a matter, additional time and financial costs. At the same time, it is far from a fact that such brakes will work better than those offered by the AvtoVAZ plant.
You've already figured out how to remove the brake element, so it's time to work on a new one. It’s not enough to just buy another brake disc and put it in place. First, it is prepared and a runout check is performed. Let's talk about this in more detail.
- The coating must be removed from a new disc.
- This coating serves as a kind of preservative.
- The layer is removed using any solvent.
- Clean thoroughly and wipe the part dry after finishing work.
- Now you can put the disk in a new place and check the runout.
- The permissible runout is no more than 0.15 millimeters.
- If the value is exceeded, this can lead to an increase in the sensitivity of the brake pedal, as well as the formation of vibrations during braking.
Installation and testing
Before changing brake discs, make sure that the problem with the brake system lies precisely in them. There are a number of other problems that are typical for the “ten” and all cars in general. A full diagnostic will be required so that the replacement is not in vain.
Adjustment
In fact, installation is performed in the reverse order of disassembling the brake discs. Therefore, there should not be any special problems.
But checking functionality is a more important and, to a certain extent, complex issue.
The first thing that experts advise is a full running-in of new discs. To do this, you need to travel about 500 kilometers. In this case, you need to brake smoothly, without making sudden impacts on the brake pedal. If this is not done, defects may form on the disks, and the cause will be simple overheating.
What does it look like
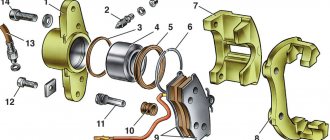
There are two main types of brake discs. The first type is ventilated, consisting of two rotating parts with special blades that allow excess heat to be removed from the wheel. The second option is with gas outlets. There are also perforated wheel rims, equipped with holes to allow water and dirt to escape from the wheel, as well as collapsible rims.
New brake disc VAZ 2110
The manufacturer installs ventilated structures on the front axle of the “tens”, since the front wheels of this car are driven and therefore receive a higher load. The ventilated disc cools faster, resulting in more efficient braking.
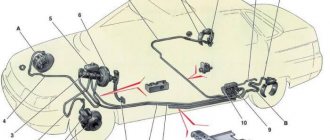
The disc is fixed to the hub, and the wheel is screwed on top of it. During its operation, it heats up and is simultaneously cooled by the incoming air flow. The design of the disc brake system is shown in the diagram.
Diagram of the VAZ 2110 disc brake system
How to understand that the thickness of the brake disc is approaching a critical level
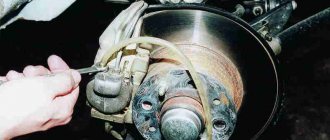
First of all, monitor the behavior of the car during braking, especially emergency braking. If there is a beating in the steering column, then it’s time to take a closer look at the brake discs. A visual inspection to determine the thickness of the brake disc should be carried out with the wheel removed.
The first thing to do is take a caliper and measure the thickness of the brake disc in several places. Why in different places? Because there is such a thing as uneven brake disc wear. It happens for various reasons.
When measuring brake discs, do not forget to pay attention to collars, deep scratches and other mechanical damage to the working surface of the brake disc. If they are, then it's time to think about brake disc repair.
Articles (original)
The VAZ-2110 offers a fairly wide selection of brake discs.
- The original catalog number of the disk is 2110-3501070 (ventilated) or 2110-3501090 (non-ventilated).
- The average cost of a set of two products is 5,000 rubles.
New brake disc on the car.
Analogs
And this is what it looks like in the package (Trialli)
No less popular Trialli brake disc.
In addition to the original parts, the automotive market offers a fairly wide range of analogues, which in terms of quality and cost can cover the needs of any motorist.
Let's look at the table of manufacturers, catalog numbers and average prices for VAZ-2110 brake discs:
| Manufacturer | vendor code | Price in rubles for 1 piece |
| Profit | 5010-1142 | 1000 |
| Denckermann | B130406 | 1000 |
| Ferodo | DDF1142 | 1200 |
| LPR | L1053V | 1200 |
| Brembo | 09.8894.14 | 2000 |
| ABS | 17339 | 1500 |
| Metelli | 23-0553 | 1500 |
| Bosch | 0 986 479 082 | 1500 |
| Cifam | 800-553 | 1600 |
| Trialli | DF 135 | 1750 |
| Pilenga | 4221 SPORT | 1750 |
| Pilenga | V221 | 1200 |
| QML | BD1003 | 1300 |
| Valeo | 297781 | 1500 |
| TRW | DF4108 | 2000 |
| Allied Nippon | ADC1710V | 2000 |
| Hola | HD904 | 2000 |
| Textar | 92109200 | 3000 |
As you can see, the automotive spare parts market is quite wide, and if original wheels are expensive, then there is always the opportunity to buy an analogue.
How long does it last
Typically, the first replacement of discs coincides with a similar procedure for brake pads. The wear of a disc is judged by its thickness, and how quickly the discs become unusable depends on your driving style. As a rule, this takes not even months, but years. There is also a dependence on which manufacturer the pads are installed. Some of them wear out discs faster.
The permissible wear of the brake disc on the “ten”, according to the manufacturer, is 17.8 millimeters for ventilated ones and at least 10.8 for regular ones. Disc wear can be determined visually by the presence of abrasions or by hearing (suspicious noise begins in the wheels). Experts recommend immediate replacement of discs if scratches or cracks appear on their surfaces, and the thickness of the discs becomes less than acceptable. The main thing is that brake discs are replaced only in pairs, since they wear out approximately equally on both sides. Failure to comply with this rule is fraught with loss of vehicle controllability (the car will noticeably drift to the side).
On the VAZ-2110, wear on the front axle discs occurs faster than on the rear ones, since this car is front-wheel drive, and most of the energy during braking is transferred to the front wheels. In addition, as standard, the rear brakes on the “ten” are not disc, but long-outdated drum ones. They are outdated, since most automakers in other countries install brake discs on all wheels. It is worth noting that there is no specific wear and tear time frame for them, so their condition must be monitored by the owner of the car himself. They are supposed to be inspected during scheduled technical inspections. There is nothing difficult about this, since, unlike brake drums, it is easier to inspect the disc on the rear axle; you just need to remove the wheel. It makes no sense to change disks early, and not changing them when the need arises is dangerous.
How to determine brake disc wear: acceptable standards and features
The brake disc is no less important in the braking system of a car than the pads. And if the latter are replaced when worn out, then almost no attention is paid to the former. But the efficiency of the system also depends on them. Let's find out how to determine the wear of brake discs so that they can be replaced on time.
Most of the discs that lie on the shelves of car dealerships are made of cast iron. The popularity of such products lies in their low cost and good friction characteristics. But the problem is that in the process of reducing the speed, the cast iron alloy product heats up. This leads to deformation, warping, and uneven abrasion. To reduce wear and tear from heat, manufacturers began to produce products with ventilation. Grooves are also cut on the surface of the disk. This allows you to increase the life of the disk.
Replacement: sequence of actions
To change these parts you will need:
- Hammer.
- The key is 13.
- The key is 17.
- Wire cutters.
- New brake discs and pads.
- Jack.
- Puller for brake discs.
- New discs and pads must be from the same manufacturer. If you do not replace the pads, they will not be in sufficient contact with the surfaces of the discs, which means braking will not be safe. Work on replacing parts of the brake system must begin by placing the car on a jack and securing it securely.
- Next you need to remove the wheel. To do this, use a spanner to unscrew the nuts holding it. Now you need to turn the steering knuckle outward and clean the outer surfaces of the disc and brake caliper from dirt.
The brake disc is immediately visible, you just need to remove the wheel
- After cleaning, remove the brake caliper from the disc by unscrewing the two bolts with a 17mm wrench. Disconnect the brake cylinder.
The caliper is held on the disc by two bolts
- Remove the brake pads and rubber boots. Definitely change the pads and boots, depending on the presence of damage on them. Before removing the disk, treat its surface with a stiff brush and the attachment points of the retaining pins with penetrating lubricant. To make it easier to remove these two screws, lightly tap the disc with a hammer. The screws are unscrewed with a 7mm socket wrench.
These screws hold the brake disc to the hub
These screws hold the brake disc to the hub
To remove the disk itself, there are two ways: use a puller with special grips or remove it gradually, tapping its inner side with a hammer and turning it a quarter turn from time to time. It will be faster and easier to use a special tool. We remind you that discs can only be replaced in pairs.
- The surface of the wheel hub in contact with the disc must be thoroughly cleaned and treated with a special copper or graphite lubricant that is resistant to high temperatures.
We knock down the brake disc with a hammer. Slowly
- We install a new brake disc. Before tightening, clean the retaining screws and lubricate them with the same grease as the part of the hub adjacent to the disk. It is also recommended to clean the caliper guides.
- After this, all the parts, as well as the pads and rubber boots, are put in their places. The last to be fixed are the brake cylinder and the brake hose. After completing the job, press the brake pedal several times to pump the brake fluid through the line.