Reasons for replacing the tank
Content
Below are the main causes of tank malfunctions on the VAZ 2110.
Nailing the tank
The tank on the vaz is very low, so it often happens that you hit it on a stone or some kind of stump. This happens extremely often, so you will need to replace the tank with a VAZ, or, if possible, you can weld the tank with argon and put it back.
Rust on the tank
Rust on a tank is a fairly common occurrence, because nothing lasts forever, well, the metal on the tank rots very quickly, and even more so on our vases, which are famous for their “high-quality” iron.
Important nuances
When replacing the gas tank and the studs on it, we must not forget about several important points:
- Fire safety. Work on the gas tank, as well as on any part of the vehicle’s fuel system, should only be carried out in a well-ventilated area or in the open air. There should be no sources of open fire or flammable materials nearby. And, of course, you should always have a fire extinguisher at hand;
During any work on the VAZ 2110 fuel system, a fire extinguisher must be nearby
When screwing new studs into a VAZ 2110 tank, it is recommended to treat them with THREADLOCKER sealant
Replacing the tank is not a very complicated procedure. Even a novice car enthusiast can do it. To successfully complete this operation, he will need not so much repair skills as physical strength: removing a large tank with remaining gasoline from under the car is quite difficult. And if the car owner cannot boast of a strong physique, then at this stage he cannot do without an assistant.
Source
Step-by-step guide on how to remove the tank on a VAZ 2110
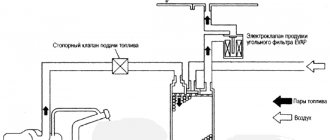
To begin with, I recommend that you familiarize yourself with the power supply diagram of the VAZ 2110 car, to which the tank is connected to the VAZ 2110. After that, we begin work on replacing the tank.
First of all, disconnect the fuel pump fittings.
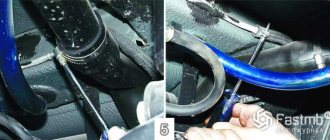
You need to loosen the filler pipe clamp.
The filler hose must be loosened using a socket and, if necessary, an extension.
Unscrew the tank fastenings.
Remove the clamp (or fastening, whichever is more convenient) of the tank.
Next we remove the tank.
Disconnect all fuel pipes from the tank.
VERY IMPORTANT!
After removing the tank, do not even think about doing any work with it, because there are gasoline vapors there and if a hits , it can make such a loud noise that a shell shock will seem like manna from heaven to you. Fill it with water and let the vapors escape from the tank (if you do not use it in the future). If you are repairing the tank, then just let the vapors dissipate (2-3 days will be enough).
DIY fuel tank repair
The first step is to assess the current condition of the gas tank. Does it make sense to repair it or is it easier to buy a new one?
Only soldering (if there are microscopic cracks) or welding (if a small hole has formed on the body) can be considered as a repair. If the VAZ 2110 tank is completely rotten or broken, then no restoration methods will help.
Argon welding allows you to eliminate minor defects and holes on the tank
In any case, the repair of the gas tank on the “ten” begins only after it has been dismantled and thoroughly washed.
Selecting tools and accessories
To independently remove, repair and install the gas tank, you will need a standard set of tools and some auxiliary materials:
- heads for 8, 10 and 13;
- Phillips screwdriver;
- flat screwdriver;
- open-end wrench 17;
- WD-40;
- flushing liquid;
- hot water;
- file;
- grinder (angle grinder);
- drill;
- extension for keys.
Removing the tank
The dismantling of the tank from the VAZ 2110 must be carried out in an inspection pit or overpass. You can, of course, jack up the body, but this option cannot be called convenient.
In large private garages, car enthusiasts usually arrange an inspection pit for servicing their cars.
Removing the gas tank on a VAZ 2110 can be divided into two stages:
- Turning off the fuel pump in the car.
- Removing the fuel tank.
First stage: turning off the fuel pump in the cabin
Before removing the tank from the “ten”, you will need to relieve the fuel pressure in the system. To do this, you need to open the rear door of the car and fold down the rear passenger seat cushion:
- It is recommended to completely remove the pillow and remove it from the passenger compartment.
- Under the pillow there is a sheet of sound insulation.
- Find a special cutout in the sound insulation, under which the gas tank hatch is located.
- Unscrew the hatch fastening screws with a screwdriver.
- Open the hatch cover and remove the pump from the tank cavity.
- Before removing the pump, you will need to disconnect the two fuel lines - disconnect the connector.
- After this, the first stage of work can be considered completed.
You need to remove the fuel pump from the hatch to be able to safely remove the tank.
Second stage of work: dismantling the tank
After the pressure in the fuel system has been relieved and the fuel pump has been removed from the tank cavity, you can begin the second part of the work, which takes place under the car body:
- Disconnect the fuel level sensor (wires go to the tank, you need to pull the wire out of the connector).
- Next, remove the hose from the sensor fitting.
- Find the tank mounting bolts and unscrew them.
- Remove the tank vent pipe.
- Remove the sensor.
- After this, carefully lower the tank itself to the surface.
If the metal tank mounts cannot be removed, you can spray them with WD-40 lubricant.
To remove the gas tank from the “ten”, you will need to carry out some work both inside the car and under the body. It is important to ensure that all suitable wires and lines are disconnected from each other.
It is not recommended to restore such a product, since the service life of a rotten tank is obviously minimal
Clean and wash the gas tank
You can flush the gas tank only after dismantling it. You will need to remove the tank from the body, disconnect all fuel and electrical lines, and remove the fuel level sensor.
Some car enthusiasts perform flushing without removing the tank from the car: they simply direct a stream of hot water under pressure through the filler pipe. After steaming, about five liters of gasoline are poured into the tank, tightly capped and shaken. After draining this mixture, the container must be thoroughly dried, it is best to use compressed air.
A stream of hot water is directed into the tank lid, after which the dirt and liquid are sucked out by a pump, and the tank cavity itself is dried with air.
For washing, it is recommended to use detergents such as “MS”, “ML” or “Labomid”. If the tank has not been washed for a long time, it is best to pour detergent into it several times and rinse it with water. At the end of the wash, be sure to steam the internal cavities with hot water and then dry the tank.
Rust inside a gas tank can only be removed with special preparations called “rust converters.” To thoroughly clean the tank, you will need about two liters of this substance, which you will need to pour inside and shake well. After 15 minutes, you can drain the converter - the liquid will come out along with remaining rust and dirt.
The rust converter is available in containers of different volumes, due to which you can choose the volume needed to wash the tank of a specific car model
We repair studs
Studs are elements of the fuel system that secure the gas tank hatch located in the car's interior. We are talking about that small hatch that is hidden under the soundproofing sheet and the rear seat cushion.
The first sign that indicates that it is time to change the studs is the appearance of the smell of gasoline in the cabin. The fact is that the gas tank hatch is closed using both bolted connections (nuts and studs) and a gasket. If the gasket is worn, then most likely the threads on the stud have been stripped (or one or more studs have broken). Accordingly, the gas tank loses its seal, which is why a persistent smell of fuel appears in the cabin.
On the VAZ 2110 there are only six studs on the gas tank hatch
To repair the studs, you will need to remove the tank from the body. After which you will need to rinse the tank cavity thoroughly and dry it (you can use compressed air from a tire pump). Then you can start repairing the studs:
- Broken studs or those with worn threads must be removed from the edge of the hatch - a grinder is usually used to cut down the studs at the root.
- Use a file to file down uneven areas and stumps from old studs - the surface of the hatch should be perfectly flat.
- Afterwards, attach the hatch pressure ring (without a gasket) and drill holes in its holes for new studs.
- The recommended drill diameter is 4.5 mm.
- On the back side of the hatch, insert bolts with M5 threads into these holes (the length of the bolts is determined in random order so that the nuts are tightened to the end).
- Tighten the bolts with nuts, closing the gas tank hatch.
Bolts of the same diameter and length are used as new studs - the tightness of the gas tank is not compromised
This method is used to repair fuel tank studs. During use, one or two studs inevitably break. Only those that are severely worn out or broken should be replaced.
At the owner's request, any modification of the product can be used as nuts for studs, for example, a hex nut
How many liters is the gas tank of the VAZ 2110
The fuel tank volume of the Lada 2110 is 43 liters.
| Options | Fuel tank volume, l |
| 1.3 MT 2110-91 | 43 |
| 1.5MT 2110 | 43 |
| 1.5MT 21102 | 43 |
| 1.5i MT 2110 | 43 |
| 1.5i MT 21102 | 43 |
| 1.5i MT 21108 Premier | 43 |
| 1.5i MT 2110M | 43 |
| 1.5i MT 21103 | 43 |
| 1.5i MT 211082 Premier | 43 |
| 1.5i MT 21109 Consul | 43 |
| 1.6i MT 21101 | 43 |
| 1.6i MT 21104 | 43 |
| 2.0i MT 21106 | 43 |
You can watch the video on how to remove the tank on a VAZ 2110 with your own hands:
Gas tank “tens”
The VAZ 2110 injector has a 43-liter gas tank, which is quite enough for long trips. The fuel tank is made of good metal, which can be welded perfectly if something happens. However, the fact is that in the classic series the tank was located in the trunk, and although it occupied a certain place there, it did not succumb to corrosion and other environmental influences. Starting with the 08 model, they decided to place the gas tank in the rear of the car under the bottom. This added aesthetics and space to the trunk, however, the tank now directly interacted with the environment. In addition, if you move when fully loaded, you can mechanically damage the tank, for example, by jumping into a hole and hitting it on the asphalt.