01/26/2022 23,089 Moskvich
Author: Ivan Baranov
The owner of a classic model of the Russian automobile industry needs to know how to set the ignition on a Moskvich-412. This is a fairly elementary process, which nevertheless can create difficulties if you do not know the procedure. It is how the ignition is installed on the Moskvich 2140 and other models of the brand that will be discussed in this article.
[Hide]
IZh Moskvich 412 › Logbook › How to set up the ignition of a Moskvich 412 in 5 minutes
The other day there was such a problem that one mu**k turned off the ignition for us!), not knowing anything about the ignition, we turned the ignition on) for this we need to know a little! To work you will need: - a ratchet wrench or a curved starter. - a flat-head screwdriver with a wide powerful tip - an open-end wrench 12x13 - a spark plug wrench - And most importantly, hands growing from that place :) I myself was faced with this problem and could not understand how to set the ignition, but then I searched the entire Internet and did not find a detailed answer and I decided to write a blog! (Maybe I’m not the only one)) and so: 1. Loosen the distributor bolt 2. remove the distributor cover and the slider 3. look for carbon deposits on the contacts 4. then insert the curved key and rotate to mark 2 (as shown in the figure ) the mark and the pulley must match
According to mark No. 2 5.assemble the distributor in the reverse order 6.now rotate the distributor and as soon as it grabs, secure the bolt (using a 13mm wrench) 7.then adjust it on the highway
for those who do not know the sequence of installing armored wires
Learn how to set up the ignition
#1 pandex
- Users
- 140 messages
- Residence: Road and garage
- Car: Moskvich 412 1978
- Top
#2 Val
- Gender: Man
- City: Kazakhstan, Ust-Kamenogorsk
- Vehicle: IZH-412 (1975)
I read a bunch of manuals and all without success.
And also explain to the top what kind of ignition to the bottom it is and to the top there is a knock and the down doesn’t knock like this or not, otherwise I can’t figure it out.
- Top
#3 pandex
- Residence: Road and garage
- Car: Moskvich 412 1978
- Top
#4 inikolayenko
- Gender: Man
- City: Ukraine, Smela
- Interests: auto, radio, IT
- Place of residence: Ukraine, Smila
- Car: AZLK 21408 1973
It can't be like this
Align the first mark on the crankshaft pulley with the alignment pin on the lower cover of the timing sprockets (.In this case, the piston of the first cylinder will be in the compression stroke, and the ignition timing will be 10° (before TDC). Connect the test lamp to the low voltage terminal of the distributor (you can use any automobile lamp) and to ground and turn on the ignition. Turn the distributor housing counterclockwise until the breaker contacts close (the lamp goes out). Push the slider clockwise with your finger and slowly turn the distributor housing in the same direction until the control lamp lights up. Check the accuracy of setting the breaker contacts to open by pressing the cam clockwise and at the same time lightly pressing the lever against it with your finger. In this case, the control lamp will either go out or the glow of its filament will decrease. Tighten nut 6 securing the distributor shank to the drive body.
- Top
#5 Val
- Gender: Man
- City: Kazakhstan, Ust-Kamenogorsk
- Vehicle: IZH-412 (1975)
Is the knocking still happening now?
- Top
#6 -=Andrey=-
- Gender: Man
- Place of residence: estuary, EKB
- Machine: m2140
- Top
#7 Vasily
- Place of residence: Vologda region, village. Tarnogsky Town
- Car: Moskvich 21412yu, 1990
- Top
#8 pandex
- Residence: Road and garage
- Car: Moskvich 412 1978
Message modified by: pandex
(November 30, 2011 - 06:19)
- Top
#9 pandex
- Residence: Road and garage
- Car: Moskvich 412 1978
- Top
#10 inikolayenko
- Gender: Man
- City: Ukraine, Smela
- Interests: auto, radio, IT
- Place of residence: Ukraine, Smila
- Car: AZLK 21408 1973
Why doesn't the newly assembled one work?
- Top
#11 pandex
Installation instructions
To work, you will need tools such as a set of keys and a test lamp.
The procedure for setting the ignition of Moskvich-412 is as follows:
- First, remove the valve cover. Next, use the starting handle and crank the crankshaft. Continue until the mark on it coincides with the tip of the pin on the block, and the mark on the sprocket also matches the mark on the cylinder head.
- Release the latches and remove the tumbler cover. Using a “10” wrench, unscrew the two nuts and lift the tumbler. The slider must be positioned opposite the wire of the first cylinder.
- Now place the tumbler in place and tighten it. Start the engine. Using a key set to “12”, you need to loosen the hexagon at the bottom of the distributor. With the engine running, you need to turn the distributor until you hear the engine running smoothly. This is a way to set the ignition by ear.
- Adjustment is also carried out through a control lamp. If you align the marks and direct the slider, you need to loosen the distributor. One wire of the control lamp must be connected to the low voltage terminal, the other to ground. Turn on the ignition. While holding the slider, turn the breaker until the light comes on, this will be the ignition moment.
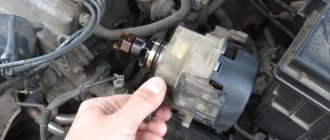
Distributor in a car
The procedure for setting the ignition of the Moskvich-412 is as follows:
- First, remove the valve cover. Next, use the starting handle and crank the crankshaft. Continue until the mark on it matches the point of the pin on the block, and the mark on the sprocket also matches the mark on the cylinder head.
- Release the latches and remove the tumbler cover. Using a “10” wrench, unscrew the two nuts and lift the tumbler. The slider must be placed opposite the wire of the first cylinder.
- Now place the tumbler in place and tighten it. Start the engine. Using a "12" key, you need to loosen the hexagon at the bottom of the distributor. With the engine running, you will need to turn the distributor until you hear the engine running smoothly. This is a method of setting the ignition by ear.
- Adjustment can also be carried out through a control lamp. After you align the marks and direct the slider, you need to loosen the distributor. One wire of the control lamp must be connected to the low voltage terminal, the other to ground. Turn on the ignition. While holding the slider, turn the breaker until the light comes on, this will be the ignition moment.
In the video below you will learn how to set the cam clearance (the author of the video is Garage in the USSR).
How to set the ignition on a Moskvich 2140
How to set the contact ignition on a Moskvich.
How to set the ignition on a Moskvich using a light bulb. And some thoughts about the future.
Setting the ignition gap Moskvich.
In the video below you will learn how to set the cam clearance (author of the video Garage in the USSR).
Tumblr installation and repair
The tumbler, also known as the ignition drive, may have various malfunctions: cracks in the cover, dirty or wet contact, or broken contact in the power circuit. You can solve them all or just replace the part.
To connect a new part, you will need to check that the roller is installed correctly in the housing. Then, after removing the tumbler cover, insert the shank into the distributor drive housing on the engine. Turn it until the floating clutch pins align.
Next, tighten the nut securing the distributor shank to the drive housing. Install the cover. Then, insert the high-voltage wires from the spark plugs in cylinder firing order 1-3-4-2, taking into account the rotation of the distributor rotor.
The tip of the high-voltage wire from the spark plug of the first cylinder is installed in the terminal socket above the low-voltage terminal in the housing. Next, the wire coming from the ignition coil is inserted into the central socket of the cover. All that remains is to connect the wire coming from the same one on the coil to the low-voltage terminal.
Now connect the vacuum regulator tube. Installation completed.
Sequence of valve adjustment on Moskvich-412
Moskvich-412 cars were produced at the Moscow (AZLK) and Izhevsk (IZH) automobile plants and were equipped with a four-cylinder UZAM-412 carburetor engine. The motor was in production until 2001 and is currently still very common.
Signs that adjustment is needed
A characteristic sign of the need to adjust the valves is knocking noises coming from under the valve cover when the engine is warm. Also, valve adjustment is required after grinding them into the seats.
Tools
To perform the work of adjusting the valves on the Moskvich-412, you will need a socket wrench with head sizes of 5 and 10 mm, a wrench with a throat size of 12 and 14 mm, as well as a standard set of feeler gauges. The adjustment is made at an engine temperature of approximately 20-22 degrees.
The camshaft on the UZAM-412 engine is located in the block head. The exhaust valves are located to the left of the camshaft mounted in bearings, the intake valves are located to the right.
Sequence of work
Let's take a step-by-step look at the procedure for adjusting the valves on Moskvich-412. It is necessary to disconnect the engine crankcase gas pumping hose from the valve cover and disconnect the carburetor vacuum corrector tube. On the Moskvich-2141 with the UZAM-412 engine, it is necessary to additionally remove the flexible air duct from the air intake pipe of the air filter. After unscrewing the seven fastening nuts with a socket wrench, you need to remove the valve cover from the head. It is important not to damage the cover gasket.
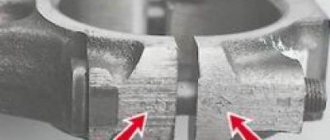
It is necessary to set the piston in the first cylinder to the top point for the compression stroke (TDC). The first is the cylinder next to the motor pulley. There is a special mark on the engine pulley that must be aligned with the pin on the crankcase. In addition, there is an additional risk on the gear for driving the camshaft. It needs to be combined with the tide on the head. When setting the dead center, you should rotate the crankshaft by the ratchet, and if it is missing, by the engine pulley.
Using a probe with a plate thickness of 0.15 mm, you should check the thermal gaps. The feeler gauge should fit through the gap between the rocker arm and the top of the valve stem with little force. If the gap does not match, it is necessary to adjust the Moskvich-412 valves.
To change the gap, loosen the clamp with a 14 mm wrench and rotate the pressure screw to set the required gap. After this, tighten the clamp and check the gap again. This operation is carried out on both valves of the first cylinder. The adjustment of the Moskvich-412 valves is completed on one cylinder.
Rotate the motor shaft 180 degrees clockwise. Carry out similar work in the third cylinder. By turning the shaft 180 degrees, set the gap in the fourth cylinder, then, turning the shaft again, in the second. Reinstall the removed parts. The valve adjustment in Moskvich-412 is completed. The check is carried out by starting and warming up the engine - the valves should not knock.
Basic information about the contactless ignition system
The contactless ignition system is considered a continuation of the design of the transistor-contact system. The proximity sensor replaces the standard contact breaker of this system. Thanks to this system, it becomes possible to reduce fuel costs, increase engine power, reduce harmful emissions using a high discharge voltage of thirty thousand volts, as well as increase the quality of combustion of the air-fuel mixture.
The design of the contactless system of the Moskvich car is similar to the wired system, only the signal sensor and transistor switch are excluded and includes a whole list of various elements, which include:
- Coil;
- Switch;
- Contactless distributor;
- High voltage wiring.
Contactless ignition system for Moskvich
The main advantages of installing a BSZ on Moskvich are:
- Improved engine starting, especially noticeable in the cold season;
- Saving engine operation.
- Improving engine stability;
- Increasing high voltage and spark discharge energy.
What is the operating principle?
A special sensor and distributor, when the engine crankshaft rotates, generates voltage signals, and then displays them on a transistor switch. The transistor switch generates signals in the initial winding circuit on the ignition coil. When the current in the secondary winding of the coil is interrupted, a high voltage current is generated and transmitted to the main contact of the distributor. Depending on the order of operation of the vehicle engine cylinders, high voltage current is transmitted to the spark plugs through high pressure wiring.
The spark plugs ignite the air-fuel mixture. As the engine crankshaft speed increases, the ignition timing is adjusted using a centrifugal ignition timing regulator.
When the load on the engine changes, the function of regulating the ignition timing switches to the vacuum ignition timing regulator.
Self-installation of a contactless ignition system
We will install the BSZ on Moskvich step by step, following the following algorithm:
- Advance the first piston at top dead center by ten degrees;
- Take out the old distributor;
- Remove the distributor drive from the engine;
- Insert a new distributor into the engine, but before doing this, you need to remove the cover from the distributor and turn the slider so that it points exactly to the hole for the spark plug wiring (the number is written next to it - 1);
- Take out the distributor and place the shank in this location;
- Insert the distributor into the drive and secure it;
- Install the switch on a flat surface so that it has good heat dissipation;
- Remove the old spool;
- Connect the wiring according to the diagram that comes with the BSZ kit;
- Place the high voltage wires in the following sequence: 1-3-4-2;
- The contactless ignition system is installed, now all that remains is to carry out the adjustment.
Why turn on the ignition?
Distributor in a car If you set the ignition timing correctly, this will directly affect the dynamics of the car.
This will also save fuel. If the ignition is too late, the engine overheats, the working mixture does not burn completely and this also reduces power. If the engine starts too early, this may cause detonation knocks in the engine. This can even cause valves and pistons to burn out.
Ignition switch connection diagram
To install a new ZZ, your action plan should be as follows:
- disconnect the ground wire from the battery;
- set the key to position “0” of the ignition switch;
- Now you need to disconnect the electrical wiring from the terminals of the lock contact device;
- unscrew the four bolts securing the lock bracket on the steering column and remove its cover, and then the entire bracket with the lock;
- now remove the 3 screws securing the lock from the bracket, then remove the spring washers of the screws and the rubber bushing;
- using a screwdriver, press in the flat spring and unscrew the lock from the bracket;
- Installing a new device is done in the reverse order.
1. Dismantled device 2. Lock in the process of replacement 3. Lock diagram
Contact ignition system disadvantages.
The contact ignition system has a number of disadvantages. The biggest of them is burning of the contacts, to prevent which it is necessary to reduce the current in the primary winding of the coil. For this reason, with a contact ignition system, there is a limitation of the secondary voltage. In addition, as the speed increases, the secondary voltage decreases, since the time of the closed state of the contacts decreases. For the same reason, the secondary voltage decreases as the number of cylinders increases. In the process of development, these shortcomings were eliminated in other systems, contact-transistor and contactless.
how to set the ignition on a Moskvich 2140 - Video tutorials
How to set the contact ignition on a Moskvich.
How was the ignition earlier...again? Details in the new video from Nail Poroshina! Enjoy watching!…. ˜ Dear subscribers! We recommend that you visit the website - https://minibk.ru.
Here you will find information about a multifunctional device that allows you to measure fuel consumption, including gas, if the car is equipped with an LPG system, measures temperature and on-board voltage, and can answer the question - “What time is it now?”
The developer of the device is our friend Alexey Tretyakov, an excellent specialist in the field of microelectronics and just a good person.
It’s been a long time since I tinkered with igniting the “cosmic” for so long... It was necessary to eliminate the “garbles” that I had already stepped on. The chip on the hood was puttied, the paintwork was polished... For using obscenities and/or insults in the comments - a ban without warning. #lexx #cramptestdrive #shaking #grassing
Video about repair and diagnostics of the Moskvich 2141 car. Enjoy watching.
youtube.com/playlist?list=PLpqCVQyQw9czGW9RHwPdFD2onuwlcCyUs *Household appliance repair* https://www.youtube.com/playlist?list=PLpqCVQyQw9cztbosQratxeY9qtkaF2nfX *Recreation and hobbies* https://www.youtube.
com/playlist?list=PLpqCVQyQw9cyO-t4ZefjjcM3bTgMermN0 To support the channel WMZ216805510163 WMR948730026938 WMU111476144736 Privat Bank 5168742024746905 Privat Internet card 4731185612098977
He got to the car wash fine. After washing it, it flatly refused to start, although it showed signs of life... I still don’t understand what happened in it then... For using obscenities and/or insults in the comments - a ban without warning. #lexx #cramptestdrive #shaking #grassing
Repair of Moskvich 412. Installation of BSZ, what and how (+ diagram). Strange holes in the carburetor mixing chambers, sealant on the quality screw and much more. If you want to know more, watch this video.
AZLK 2141 | Engines | Moskvich
3.0 Engines
Cylinder operating order 1–3–2–4 Non-flatness of the lower surface of the cylinder head 0.05 mm Camshaft 1.8 l engine Cam heights: – intake 39.751 – 39.850 mm – exhaust.
3.2 Operations to repair an engine installed in a vehicle
Many engine repairs can be carried out directly on the car. Before starting repair work, it is recommended to thoroughly clean the engine and engine compartment. Depending on the type of work, you can remove the hood to facilitate access to the engine. Without removing the engine from the car, you can eliminate various types of leaks, for example, replace the gaskets.
3.3 Top dead center of the first cylinder
3.4 Cylinder head cover
3.5 Intake manifold
3.8 Replacing camshaft sealing rings
PERFORMANCE ORDER 1. Remove the toothed belt, the toothed belt tensioner and the camshaft pulley. 2. Remove the rear timing belt cover. 3. Using a small screwdriver, remove the distributor O-ring.
3.9 Camshafts and tappets
3.10 Cylinder heads
3.11 Oil pan
3.12 Oil pump
3.13 Flywheel/drive plate
Removal PERFORMANCE ORDER 1. Raise the car and remove the gearbox. 2. Using a marker or paint, mark the position of the clutch drive assembly in relation to the flywheel. 3. Gradually, in a diagonal sequence, loosen b.
3.14 Replacing the rear crankshaft seal ring
PERFORMANCE ORDER 1. Remove the gearbox and flywheel. 2. The easiest way to remove the old O-ring is to use a screwdriver to hook the O-ring and remove it from its seat. 3. Also sealing.