If you are the happy owner of a VAZ 2110, then you were able to fully appreciate the undemanding and easy operation of your dozen. But one day, if you have had the car for a long time or got it from someone, you will notice that it has begun to sag a lot. This can be noticeable even with a completely empty cabin and tank. The consequence of this subsidence will most likely be impacts from the tires into the fender liners. And, as a consequence, their mutual destruction.
You can solve this problem of your VAZ 2110 by using spacers for the rear springs by contacting the nearest car service center, but it will be much cheaper and more interesting for any real car enthusiast to solve the problem on their own. Moreover, the process of installing spacers will not take much time.
Raising the rear of the machine
Installation of spacers and high springs in the rear suspension of a car is carried out in the same way as in the front. Even the set of tools remains unchanged, and a puller for pressing out ball pins is not needed at all. The difference lies in the order of disassembling the chassis:
- Remove the trunk trim or rear seat backrest to access the upper strut mounts.
- Release the upper strut support by unscrewing the nut on the stem. The latter must be held with a second key so that the shock absorber does not rotate.
- Raise the car with a jack and remove the rear wheel, then lower the body onto the block. Place the jack under the hub and lift it.
- Unscrew the lower strut support and knock out the bolts if they cannot be removed manually. Remove the assembled unit from the glass, disassemble it and replace the standard spacers with a spring with reinforced ones.
The rear pillar mount is hidden under the trim
The rear multi-link suspension is disassembled using the same algorithm as the front one: first, the lower shock absorber mount is unscrewed, then the lower arm is released, the spring is tightened and removed from the socket along with the extensions. When assembling, be sure to install extensions for the shock absorbers so that the rod has enough travel on an elevated body.
Spacer for extending rear shock absorber
Installing spacers for front shock absorbers
To begin with, we will look at how to raise the front of a VAZ 2114. But before you start increasing the car’s ground clearance, you should prepare all the necessary tools. So, you will need a set of keys, a hammer, as well as a lift or inspection hole (without them it will not be possible to complete the installation procedure).
The process of installing spacers is carried out in the following order:
- Place the car in the pit.
- Raise the front end using a jack.
- Remove the tie rod pin from the front strut (you may need a hammer and pry bar for this).
Removing the tie rod pin
- Unscrew the fasteners of the lower strut support.
Removing the rack mount
- Unscrew the upper shock absorber fastener.
Upper shock absorber mount
- Install a spacer between the body and the spring (if a spring-loaded type of spacer is selected).
Installing a spacer on the shock absorber
- Reinstall the rack in exactly the same sequence, but in reverse order.
- Repeat a similar operation with the second shock absorber.
After the ground clearance of the front rings has been increased, spacers should also be installed under the rear pillars.
Shock absorber modification
When transporting large loads (and often VAZ 2110 owners do not listen too much to recommendations regarding load capacity), the car seriously “sits down” and its ground clearance is significantly reduced.
If you have to constantly carry heavy things, it makes sense to install springs with class “A”. Naturally, they will make the shock absorbers stiff, and you will only be comfortable in a heavily loaded car, and without a load it will shake like on a cart.
There are also s, which are installed between the spring coils and do not allow the shock absorber to compress too much.
Interturn spacers in the shock absorber spring
In principle, such a car will no longer sag significantly under load, as well as nod off, but the shock absorber stroke will decrease and it will fail faster.
how to remove spacers
Topic author liv, 9.4.2006, 15:01
- 3 pages
- Log in to reply to this topic
#21 davidsoon
Message added 3.5.2006, 16:26
- ∧
- Full editing
- Quick Edit
#22 2bad4u
- Users-2
- 421 messages
- Offline
- Card
- PM
Message added 3.5.2006, 16:47
- ∧
- Full editing
- Quick Edit
#23 mc1988
- Offline
- Card
- PM
Message added 3.5.2006, 22:26
Even if Caster changes, then He will change both on the left and on the right Wheel - Proportionally. Although In fact, this is Fantastic. It is not necessary to do the alignment (although on our cars it is done on its own) - by auto-tuning. I drove 1500 km along the Highway. I checked the alignment, but it is different for you. And this is a Fact.. Caster is a shift of the wheel Forward, Backward. On Vases, the Caster is adjusted by placing a ..Reg Washer under the Saber (an extension going from the Lever to the Front Amplifier (Bracket))
What are they needed for
I won’t be unfounded, but I’ll just give simple examples from life. I think they will allow you to understand why it is worth considering the issue of installing spacers to increase ground clearance.
- The car is initially quite low. This applies to imported cars, since our automakers understand that fighting the roads is pointless, as is waiting for their quality to improve. Therefore, they try to adapt to current conditions, offering high ground clearance. But even that is not enough. As a result, driving through the next section, you again and again cling to the bottom, crankcase protection, cannot pass the curb, brake before each hole so as not to get hit. All this interferes with normal movement and driving turns into a test.
Installing spacers is the most optimal solution to the problem, if you look at it from a price-quality perspective. They increase rigidity and increase the distance from the bottom to the ground. Fortunately, my car is quite high, but this problem is very close to me, since my friends do not have such ground clearance. Actually, I would like to install inserts for them too, since I have to constantly take my car if we go somewhere in nature or outside the city. But let's not talk about sad things.
I think it’s very clear to you why these spacers are needed and what function they perform. But before you install and even purchase these elements, which are sold not only in Volgograd, but also in any cities such as Moscow, St. Petersburg, Novosibirsk, Yekaterinburg, Krasnoyarsk, etc., I suggest you find out what these spacers are.
Varieties
There are three main types of these elements used to increase ground clearance and increase the rigidity of a car's suspension.
- Interturn. Mounted in springs. They are considered the simplest and most accessible. Strengths include ease of installation and versatility. They are mounted in the rear and front springs. However, you should not count on an increase in ground clearance. They are designed to increase rigidity. Having installed them, you can easily load the car, place bags in it and not worry that the bottom of the car will start to rub against the asphalt. Installation is generally elementary. You need to jack up the car, hang the desired wheel and stretch the spring. Then a spacer is inserted there. Advice from me personally. Before inserting the element, wet it with soapy water. This way he will easily fit into his place.
- Under the springs. The problem of insufficient ground clearance is already being solved here. The element is mounted between the spring itself and the body of your car. Please note that the ground clearance rises exactly as much as the thickness of the spacer. Remember, if you install a spacer on a body with traces of corrosion and a faulty spring, the consequences can be dire. Also, if the spring sag, spacers for the spring will be ineffective. At this point, immediately replace them with new ones.
- Spring adjustable. They perform a function similar to the previous version, but can be adjusted. Well, yes, you already understood it from the title. A good option, since you will be able to quickly change the clearance height, if necessary, depending on the load of the machine. Yes, their price is higher, but it is completely justified if you want to do everything really efficiently and usefully.
Shock absorber modification
When transporting large loads (and often VAZ 2110 owners do not listen too much to recommendations regarding load capacity), the car seriously “sits down” and its ground clearance is significantly reduced.
If you have to constantly carry heavy things, it makes sense to install springs with class “A”. Naturally, they will make the shock absorbers stiff, and you will only be comfortable in a heavily loaded car, and without a load it will shake like on a cart.
There are also s, which are installed between the spring coils and do not allow the shock absorber to compress too much.
Interturn spacers in the shock absorber spring
In principle, such a car will no longer sag significantly under load, as well as nod off, but the shock absorber stroke will decrease and it will fail faster.
We cooperate with:
You can find the nearest representative office, track the cargo and calculate the cost of delivery on the website:
You can find the nearest representative office, track the cargo and calculate the cost of delivery on the website:
You can find the nearest representative office, track the cargo and calculate the cost of delivery on the website:
You can find the nearest representative office, track the cargo and calculate the cost of delivery on the website:
nrg-tk.ru Dear clients. Note.
The transport company does not insure your orders with car parts if they are not packed in rigid packaging (crate/pallet board).
If you require rigid packaging of the goods, please additionally indicate this information when placing your order in the order comments section.
You can find the nearest representative office, track the cargo and calculate the cost of delivery on the website:
pecom.ru Dear clients. Note.
The transport company does not insure your orders with car parts if they are not packed in rigid packaging (crate/pallet board).
If you require rigid packaging of the goods, please additionally indicate this information when placing your order in the order comments section.
You can find the nearest representative office, track the cargo and calculate the cost of delivery on the website:
dellin.ru Dear clients. Note.
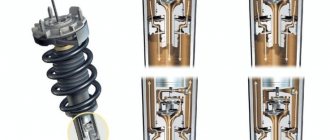
What are shock absorber spacers?
It’s good if a fully loaded car begins to sag, but there are also cases when the suspension is simply low or the shock absorbers are so worn out that the slightest load begins to put pressure on the wheel arch liners. In this case, as mentioned above, there are two options:
- Replacing shock absorbers;
- Installing the spacer.
This part is placed directly under the rack. Then the shock absorber is inserted into the spacer, the whole thing is securely fastened and it turns out that the car becomes slightly higher.
The great thing about using this simple mechanism is that you don’t need to make any changes, you don’t have to cut anything, cook it, etc. During the installation process, all standard bolts and regular wrenches are used, well, with a small addition.
Photo gallery
Many people have their own cars, of various brands, configurations, tuned and simply “gray” cars for everyday driving. Some make various gadgets for cars with their own hands, some send them to special services, and others simply admire how people do it. Actually, this is what I would like to talk about - tuning!
I didn’t have a car before and somehow didn’t need one, but in my heart I always wanted to sit, steer and enjoy the speed. The first step to buying a car was getting a driver's license, which I also went to study for spontaneously. In general, I studied for 3 months in DOSAAF and on February 29, 2008 I received my driver’s license. From time to time there was a desire to buy a car, but there was no money to buy it, and I began to think about it – where should I go?
Time passed, years flew by, rumors circulated about a crisis. By that time, we had managed to save a little cash, which we finally decided to invest in some kind of automobile before it disappeared. One wonderful morning, we got ready and went to the car market in Saratov to choose a car for me. I had to borrow a considerable additional amount of cash from friends, otherwise my savings were not enough.
We set off on the road, drove and drove, and finally arrived. Let's go to the market.
There were a lot of cars in Saratov, some not for our money, others too dead, in general, we wandered and wandered and saw a red VAZ2110 (my favorite color). After some time, after a lot of walking, it was finally decided to buy the first car I liked and finally go home.
The path to home was not close, about 200 km. At first, I thought that my friend would drive and drive my car to my native Kamyshin, but I still drove it back myself. This is my very first time when I drove for so long, because the last time I held it in my hands was back in February and that was for about 10 minutes. For the first 10-20 minutes I couldn’t come to my senses that I was sitting behind my own car, My hands were shaking a little and I still couldn’t believe that I was going. Literally, after driving 50 kilometers, I already began to feel much more confident, fell back on the seat and began to enjoy the trip.
Everything would be fine, but in Krasnoarmeysk at the traffic police checkpoint we were stopped to check our documents. And I stupidly took only my license with me, and the rest of the documents remained with my mother, who drove ahead in another car with a driver. Luckily they stopped about 300 meters from us. The inspector had to wait for some time, to which he made a menacing expression on his face. They brought the documents, checked everything, but still got to the bottom of the fact that there was no first aid kit, fire extinguisher and sign. And the fact that the car even had transit license plates and had just been purchased did not bother him; he had to pay some fine to the Inspector’s fund. We got into the car, refueled and hit the road.
We got home quickly, we drove for about 3 hours in total, although it could have been longer, but I was still a beginner at that time, and the car was not tested, you never know what would break down, so I kept the speed around 100-110 km/h . But still there was a desire to experience the drive and therefore I accelerated once to 155 km/h, the car behaved amazingly on the road, I remained satisfied throughout the journey.
Here is a short story about the steps to buying my first car, which is with me to this day and makes me happy. From time to time I do something for the soul in it, a little tuning, etc. what I will tell you about in my Logbook
.
Express your opinions about my work, and just like that, we can discuss something, further work, plans...
#3 10:43:22
Car enthusiast From: Vologda Auto: FF2 Registration: Posts: 1960
Thanked 170 times in 154 messages
Install an enlarged rubber support. she is about 2-3 centimeters higher than usual.
1 person said thank you: drugoi
Interturn spacers in springs, for what?
Undoubtedly, the interturn spacer allows you to increase ground clearance to some extent. This happens by reducing the compression of the spring. After installing such spacers, the car will no longer have the same rocking motion and the car will stop pecking at the front end. In addition, interturn spacers can protect the suspension from puncture, but they lead to a decrease in the shock absorber's compression stroke (the shock absorber practically does not work, the spring practically does not compress), an increase in suspension rigidity, and a decrease in comfort.
How to raise the suspension of a VAZ car
If the car suspension is raised, then you need to make sure that the car does not lose its characteristics. The main suspension components need to be replaced:
- Shock absorbers, when replacing there is no need to do anything on your own. In the catalog you need to select those shock absorbers that the manufacturer offers for a specific car model.
- But to raise the suspension, stiffer and shorter shock absorbers are chosen.
- Anti-roll bar. It is better to change the stabilizers together with the struts.
- The springs are chosen to be stiffer and shorter.
The suspension of a VAZ car is raised for several reasons. As a rule, car owners decide to raise the suspension in 2 cases: to increase load capacity and increase ground clearance (cross-country ability). Most often questions arise about how to properly raise the rear suspension. There are lift kits on the market today for different car models. These kits allow you to raise the suspension to a certain height.
Stories from our readers
“Fucking basin. "
Hi all! My name is Mikhail, now I’ll tell you a story about how I managed to exchange my two-wheeler for a 2010 Camry. It all started with the fact that I began to be wildly irritated by the breakdowns of the two-wheeler, it seemed like nothing serious was broken, but damn it, there were so many little things that really started to irritate me. This is where the idea arose that it was time to change the car to a foreign car. The choice fell on the melting Camry of the tenth years.
Yes, I had matured morally, but financially I just couldn’t handle it. I’ll say right away that I am against loans and taking a car, especially not a new one, on credit is unreasonable. My salary is 24k a month, so collecting 600-700 thousand is almost impossible for me. I started looking for different ways to make money on the Internet. You can’t imagine how many scams there are, what I haven’t tried: sports betting, network marketing, and even the volcano casino, where I successfully lost about 10 thousand ((The only direction in which it seemed to me that I could make money was currency trading on the stock exchange, they call it Forex. But when I started delving into it, I realized that it was very difficult for me. I continued to dig further and came across binary options. The essence is the same as in Forex, but it’s much easier to understand. I started reading forums, studying trading strategies. I tried it on a demo account, then opened a real account. To be honest, I didn’t manage to start earning money right away, until I understood all the mechanics of options, I lost about 3,000 rubles, but as it turned out, it was a precious experience. Now I earn 5-7 thousand rubles a day. I managed to get the car buy after half a year, but in my opinion this is a good result, and it’s not about the car, my life has changed, I naturally quit my job, I have more free time for myself and my family. You’ll laugh, but I work directly on the phone)) If If you want to change your life like me, then here’s what I advise you to do right now: 1. Register on the site 2. Practice on a Demo account (it’s free). 3. As soon as you get something on the Demo account, top up your REAL ACCOUNT and go to REAL MONEY! I also advise you to download the application to your phone, it’s much more convenient to work from your phone. Download here.
#5 11:25:25
Car enthusiast From: Vologda Auto: the same Registration: Messages: 1364
Thanked 68 times in 59 messages
I always thought that 2110 and 2112 had the same springs. maybe they meant from 2111?
How much will the ground clearance increase after replacing the wheels and tires?
Depending on the configuration of cars of the tenth family, wheel rims are installed with a 13th or 14th radius. If you replace the standard wheels of a car with wheels of a larger radius, then no matter how you look at it, the vehicle's ground clearance will increase. As well as replacing tires with higher ones (for example, 175/55 R13 to 175/65 R13).
It is important to know what size of wheels and tires is the maximum permissible for a particular car (data for wheels/tires according to VAZ 2110). I wouldn’t be surprised if, after installing high tires, the wheels start to touch the fender liners
Spacers for rear shock absorbers VAZ 2110, 11, 12 (Tuning VAZ 2110)
To install the spacers, we hang up the rear of the car. Using a 19mm socket, unscrew the bolt of the lower shock absorber mounting, holding the nut from turning with a wrench of the same size... ...and remove the bolt
Please note that the spacers are mirror symmetrical and can be installed on either side of the car. The side of the spacer, in which the distance shown in the photo is greater than on the other side, must face the longitudinal axis of the vehicle during installation.
For proper installation of the spacer, it is necessary that the line passing through the centers of the holes for fastening the spacer to the beam and the lower end of the shock absorber is close to vertical and coincides with the longitudinal axis of the shock absorber. This condition must be met regardless of which hole for attaching the spacer to the lower end of the shock absorber (the height of the rear lift of the car) you choose. This determines which side the spacer will be installed on. We install the spacer on the beam eyes. We insert a spacer between the beam eyes and insert the bolt. Place a nut on the bolt and tighten it to a torque of 70–85 N.m. In this position of the spacers, the rear of the car can be raised to the maximum or minimum amount. In order to select the middle position, the right and left spacers would have to be swapped. We chose the bottom position. Insert the bolt into the holes in the spacer and into the shock absorber bushing. Place a nut on the bolt. Similarly, install a spacer between the lower end of the other shock absorber and the eyes of the rear suspension beam. We tighten the nuts securing the lower ends of the shock absorbers to the spacers in the “car on wheels” position with a torque of 70–85 N.m. To correctly install the pressure regulator, press the rear of the car with a force of 40–50 kgf. Using a “13” wrench, loosen the bolt securing the pressure regulator to the bracket of the regulator drive lever... ...and move the bracket with a screwdriver so that the gap between the lever and the lever spring is within 2.0–2.1 mm. We check the gap with a drill or a piece of wire of the appropriate diameter. After adjustment we carry out a road test. An observer outside the car should note that the rear wheels lock, which should occur slightly later than the front wheels when braking sharply from a speed of 30–40 km/h. If the locking is too late, we reduce the gap; if it is early (the locking of the front wheels is ahead of the locking), we increase it, with the obligatory check in the manner indicated above. To adjust the headlights, we place the equipped car (with a spare tire, tools and a full tank of fuel) on a flat horizontal platform 5 m from the screen - a light wall of a building, garage, etc. We check and adjust the tire pressure on all wheels to normal, and place an assistant in the driver’s seat or place a 75 kg load. We mark the screen as shown in the figure (in this case, the intersection points of line 1 with lines A and B should be at the height of the centers of the headlights). Turn on the low beam and cover the right headlight with a piece of cardboard. By rotating the adjustment screws of the left headlight, we ensure that the upper horizontal boundary of the light spot on the screen coincides with line 2, and the intersection point of the horizontal and inclined boundaries (E) with line A. We similarly adjust the light beam of the right headlight. Set the headlight hydraulic adjustment handle to the minimum vehicle load position.
Ground clearance VAZ 2110
Despite the global trends regarding the relatively low “landing” of cars, this is, frankly speaking, unacceptable for Russian roads. The achievements of the creators of the “ten” include the fact that the ground clearance on the VAZ 2110 is quite sufficient, one might say optimal for city conditions and paved roads (which for the most part leave much to be desired).
VAZ 2110 with lowered suspension
Specifications
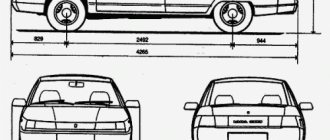
So, if we consider the factory design characteristics, then on all types of VAZ 2110 (and they were produced with sedan, hatchback and station wagon bodies), the ground clearance should be at least 165 mm - from the road to the oil pan, 140 mm - to the lowest point of the muffler. For 1.5 liter engines there is another indicator - the clearance to the catalyst must be at least 130 mm.
Dimensions of VAZ 2110
"Lifting" the machine
In principle, as we have already noted, this is enough for a more or less comfortable ride. But, of course, many people want to “raise” the VAZ 2110 a little more, based on their realities.
“Raised” VAZ 2110
We will tell you how you can actually do this. But let us warn you right away: “raising” the car above the asphalt level entails a number of unpleasant consequences:
- Clamping the springs, firstly, will lead to a decrease in comfort while driving, and secondly, the shock absorbers will suffer as a result, which will not be able to cope with their responsibilities;
- The suspension also suffers from too stiff springs, as this leads to increased loads on it;
- Corrosion is inevitable when using aluminum spacers;
- By increasing the ground clearance of the VAZ 2110, car owners risk the stability of the car while driving. The fact is that the center of gravity shifts, the car can rock, and in some cases it can even roll over. Therefore, experts strongly recommend not increasing the ground clearance by more than 5 cm. That is, the maximum limit should be no more than 170 mm!
Suspension adjustment after installation
This completes the installation of spacers on your VAZ 2110. Having returned the car to its normal position, you need to make a number of important adjustments. We are talking primarily about the pressure regulator for the rear brakes, headlights and front wheels.
In the case of the latter, we are interested in their longitudinal inclination angle, otherwise called castor. After installing the spacer on the rear pillars, the rear of your VAZ 2110 will naturally rise, and the castor, on the contrary, will decrease. This will negatively affect the vehicle's stability in motion and its overall handling. Obviously, these parameters are critical for your safety, so it is better to entrust castor adjustment to certified auto mechanics from a car service center.
The first two settings of the VAZ 2110 can be done independently.
Having picked up a speed of about 35 km/h in the car, we sharply brake. At this time, the assistant should observe how soon the rear wheels will lock. Normally, it lags somewhat behind the locking of the front wheel pair. If this does not happen, then return to point 16 of the plan discussed above and change the size of the gap upward.
Adjusting headlights after installing spacers
To adjust the headlights, you need a flat area where you place your ten and walls (preferably light in color) at a distance of 4-6 meters from the nose of your car. The vehicle must be fully fueled, have approximately your weight in the front seat, and have all tools and a spare tire in the trunk.
Having prepared everything described above, we turn on the headlights in low beam mode and, using their sequential shading with a piece of cardboard, begin the adjustment. By rotating the screws that secure the headlights, we, in a way, “raise” the light spot to the optimal level. Having done this, set the vernier of the headlight range control to the minimum load position of the VAZ 2110. In general, we wrote in more detail about adjusting the headlights in this article “Adjusting the headlights of the VAZ 2110”.
Important points
To summarize, we can say that using spacers on the rear pillars you will raise the body of the VAZ 2110, and its chassis will remain at the same height. The car's ground clearance parameters will also remain unchanged.
Spacers for the rear pillars are recommended for use on uneven surfaces. They reduce the frequency of their impacts and snags on the car body. If the VAZ 2110 is used mainly when driving in a rut, then the spacers are virtually useless.
Source
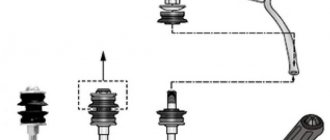
Types of spacers
In order to increase the ground clearance of the car, you will need spacers for the VAZ 2114. They can differ both in the material from which they are made and in the location of their installation.
So, they distinguish:
- aluminum spacers. They are the most reliable, most often used for installation under rear shock absorbers;
Aluminum spacers
- spacers made of polyurethane. Convenient and versatile - can be used both under the front and rear pillars;
- spacers made of plastic. Affordable and just as versatile as polyurethane ones.
According to the type of installation, all spacers can be divided into:
- interturn. As you might guess, they are installed between the coils of springs. They are easy to install and low cost;
Interturn spacers
- spring-loaded Mounted between the body and the spring. Due to the installation method and large contact area, they are highly reliable;
Spring spacers
- adjustable. They are similar to spring-loaded ones with the only difference that they allow you to reduce or increase the clearance of the VAZ 2114 at any time without any complex manipulations.
Adjustable spacers
Speaking about spacers, it is worth noting that the interturn method of fastening, although simpler, is less reliable. It does not provide uniform distribution of load and mass, and therefore preference should be given to the spring-loaded type of spacers.
Shock absorber modification
When transporting large loads (and often VAZ 2110 owners do not listen too much to recommendations regarding load capacity), the car seriously “sits down” and its ground clearance is significantly reduced.
If you have to constantly carry heavy things, it makes sense to install springs with class “A”. Naturally, they will make the shock absorbers stiff, and you will only be comfortable in a heavily loaded car, and without a load it will shake like on a cart.
There are also s, which are installed between the spring coils and do not allow the shock absorber to compress too much.
Interturn spacers in the shock absorber spring
In principle, such a car will no longer sag significantly under load, as well as nod off, but the shock absorber stroke will decrease and it will fail faster.
"Houses"
Another method of increasing ground clearance is to install so-called “houses” on the rear suspension. The “houses” have special holes through which the ground clearance is adjusted, and they are installed between the eyes of the rear suspension beam and the bottom of the shock absorber.
Spacers-houses
But experts generally cannot come to a common opinion - whether the “houses” of the VAZ 2110 help or harm it. Some people believe that they are needed when the springs have sagged, and with their help it will be possible to lift the rear of the car. Others suggest replacing the springs and not “fencing up houses”.
Adjustment work
Once again, it is worth saying that if you are an inexperienced person, then it is better to find a familiar specialist who would help carry out everything planned, from installing the described part to calibrating all the values, or take the car to a service station.
If you understand the structure of your car, then you need to start by adjusting the position of the pressure regulator. To install it correctly, you need to apply a force of 45-50 kgf to the rear of the machine. After this, you need to unscrew the bolt that holds the pressure regulator and move the drive bracket using a screwdriver until the gap between the spring and the lever is about 2 millimeters. You can check the remaining gap by simply placing a piece of wire with a diameter of 2 millimeters into it or taking a similar drill.
Now you can start setting the desired light level. To do this, you need to place the car on a flat horizontal surface at a distance of 5 meters from any light wall, let it be the wall of a house or garage, it doesn’t matter. It is better to do this “trick” together, at the same time the tire pressure is checked and the companion sits in the driver’s seat. Now a horizontal line is drawn on the wall at a height of 60 cm from the floor and split in half in the center of the car. Now, from the center of the horizontal line, measure the distance of the car headlights and draw perpendicular vertical lines. There should be a beam of light at the intersection of the horizon and vertical lines.
Tuning a VAZ 2110, 2111, 2112 "Ten" car - Rear suspension shock absorber spacers
To install the spacers, we hang up the rear of the car. Using a 19mm socket, unscrew the bolt of the lower shock absorber mounting, holding the nut from turning with a wrench of the same size... ...and remove the bolt
Please note that the spacers are mirror symmetrical and can be installed on either side of the car. The side of the spacer, in which the distance shown in the photo is greater than on the other side, must face the longitudinal axis of the vehicle during installation.
For proper installation of the spacer, it is necessary that the line passing through the centers of the holes for fastening the spacer to the beam and the lower end of the shock absorber is close to vertical and coincides with the longitudinal axis of the shock absorber. This condition must be met regardless of which hole for attaching the spacer to the lower end of the shock absorber (the height of the rear lift of the car) you choose. This determines which side the spacer will be installed on. We install the spacer on the beam eyes. We insert a spacer between the beam eyes and insert the bolt. Place a nut on the bolt and tighten it to a torque of 70–85 N.m. In this position of the spacers, the rear of the car can be raised to the maximum or minimum amount. In order to select the middle position, the right and left spacers would have to be swapped. We chose the bottom position. Insert the bolt into the holes in the spacer and into the shock absorber bushing. Place a nut on the bolt. Similarly, install a spacer between the lower end of the other shock absorber and the eyes of the rear suspension beam. We tighten the nuts securing the lower ends of the shock absorbers to the spacers in the “car on wheels” position with a torque of 70–85 N.m. To correctly install the pressure regulator, press the rear of the car with a force of 40–50 kgf. Using a “13” wrench, loosen the bolt securing the pressure regulator to the bracket of the regulator drive lever... ...and move the bracket with a screwdriver so that the gap between the lever and the lever spring is within 2.0–2.1 mm. We check the gap with a drill or a piece of wire of the appropriate diameter. After adjustment we carry out a road test. An observer outside the car should note that the rear wheels lock, which should occur slightly later than the front wheels when braking sharply from a speed of 30–40 km/h. If the locking is too late, we reduce the gap; if it is early (the locking of the front wheels is ahead of the locking), we increase it, with the obligatory check in the manner indicated above. To adjust the headlights, we place the equipped car (with a spare tire, tools and a full tank of fuel) on a flat horizontal platform 5 m from the screen - a light wall of a building, garage, etc. We check and adjust the tire pressure on all wheels to normal, and place an assistant in the driver’s seat or place a 75 kg load. We mark the screen as shown in the figure (in this case, the intersection points of line 1 with lines A and B should be at the height of the centers of the headlights). Turn on the low beam and cover the right headlight with a piece of cardboard. By rotating the adjustment screws of the left headlight, we ensure that the upper horizontal boundary of the light spot on the screen coincides with line 2, and the intersection point of the horizontal and inclined boundaries (E) with line A. We similarly adjust the light beam of the right headlight. Set the headlight hydraulic adjustment handle to the minimum vehicle load position.
Summarize
I cannot advise or dissuade you from installing spacers. Much depends on the specific car, its condition, driving style, operating conditions, and so on.
The reason to refuse spacers may be the fact that after their installation the levers are lowered and are constantly in this state. As a result, the geometry is disrupted, the suspension system works differently, and changes for the worse, the previous sensitivity of the steering is lost, and the car can skid at high speeds.
Spacers also increase the load on the suspension itself; silent blocks, shock absorbers, and steering rods wear out.
It's up to you to decide. Think about where to buy spacers and whether it is worth buying them specifically in your case. It may be easier to change the wheels or the springs themselves. It's more expensive, but safer.
Share your impressions if you have used spacers. Don't forget to leave comments, invite your friends and tell everyone you know about us. This is not difficult for you, but we are incredibly pleased!
( 15 ratings, average: 4.73 out of 5)
Did you like the article?
Subscribe to updates and receive articles by email!
We guarantee: no spam, only new articles once a week!
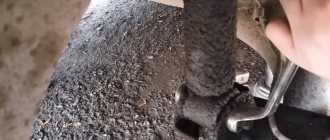
Good day everyone. It's no secret that if you use the Lada Kalina (and any front-wheel drive VAZ) not only to transport yourself, but also to the dacha, bring building materials, etc. The elasticity of the rear springs leaves much to be desired. How it was for me. I planted two guys 120 kg + me 65 kg + 50 l. in the tank and + 30-40 kg of potatoes and that’s it. I drove 280 km on asphalt and the result was that the rear fender liners were worn out on uneven roads (you know what the roads in Russia are like). I put the patches on. I decided to install spacers (houses. How I did it. 1). I took off the wheel. I cleaned everything that I will unscrew from dirt; 2). Unscrewed the lower bolt and nut securing the strut to the beam;
3). I took a pipe, inserted it into a round hole in the beam, pressed it, installed a spacer and screwed it on with a bolt (it comes included); 4). I secured the stand to the spacer with the original bolt and nut;
5). Installed the wheel. 6). On the other hand, we perform all operations in the same way; 6). I finally tightened the bolt and nut that secures the strut to the spacer (it is necessary to tighten it when the suspension is loaded). 7). Adjusted the brake force distributor (“sorcerer”). Place the car on a flat surface and rock the rear of the car several times to begin the adjustment.
After adjusting the regulator, test the brakes in action. Accelerate the car to 40-50 km/h and brake. If the regulator is adjusted correctly, the front wheels will lock first and the rear wheels should lock immediately, but not vice versa.
Adjustment is needed to set the start of braking of the rear wheels relative to the front wheels at different vehicle loads.
Note on installing spacers. The spacers must be installed correctly, otherwise the rack will break and the lower ear of the rack will come off under load. The spacer must be installed so that the lowest (which is attached to the beam) hole has two (in which the greater distance from the lower end faces the inside of the car, and the shorter distance faces the wheel).
The bolts and the construction must be located on the same line.
Spacers for VAZ
How to properly increase a car's ground clearance
Russian roads make us think about how to increase the vehicle's ground clearance. Such topics can even be found on forums dedicated to the Chevrolet Niva, to say nothing of cars of the tenth family. You can raise the suspension in different ways and to different heights, let's try to understand the advantages and disadvantages of all methods. The vehicle's ground clearance is a parameter that does not happen much on our roads. Although, if you look from the other side, it is not uncommon to come across a car on the street with a lowered suspension. Most often they decide to increase clearance due to the following cases:
- A loaded car hits the fender liners with its rear wheels or the mudguards on the ground, so they want to lift the rear of the car.
- It touches the bottom or crankcase protection on uneven roads, so they want to raise the front of the car.
The procedure for installing spacers on the rear pillars of a VAZ 2110
All you need for this operation are the spacers themselves for the rear springs for the VAZ 2110, a small set of tools and a little accuracy.
Let's look at the whole operation, breaking it down into 16 stages:
First of all, using available tools, you need to hang up the rear part of your VAZ 2110 and remove the rear wheels; Next, taking a 19mm wrench, you need to unscrew the bolt that secures the shock absorber from below. To prevent the bolt from turning, securely fix the nut with another suitable wrench. Remove the bolt. Take one of the spacers
Which one is not important, since they are symmetrical and equally suitable for any side of the VAZ 2110. We orient the spacer with the larger side facing longitudinally in relation to the length of the car. The spacer has three holes that connect it to the end of the shock absorber. You need to select one of the holes depending on what lifting height of the VAZ 2110 you need. Remember which hole you chose, you will need to select a similar hole on the other spacer. We mark the longitudinal axis of the shock absorber and mentally draw an imaginary line through the centers of the holes with which the spacer is attached to the bottom of the shock absorber and the beam
This line must be vertical. Observing all of the above, you need to put a spacer on the eyes available in the beam. Between these same eyes we place a spacer sleeve. We fasten everything with the appropriate bolt. Tighten the nut. To do this, you should use a torque wrench. It will allow you to maintain the optimal, in this case, force - about 80 Nm. Next, the bolt is also inserted into the shock absorber bushing. Tightens his nut. The recommended force is the same as in the first case - about 80 Nm. Next, we proceed to install the pressure regulator. To do this, you need to press on the car trunk with a force of about 45 kgf. After this, loosen the pressure regulator bolt connecting it to the regulator drive lever. Using a suitable screwdriver, move the lever bracket until the gap between the lever and its spring is about 2.05 mm. Use a wire of suitable thickness to check the distance.
For a car with passengers and a payload of 320 kg (4 people) in the cabin and 40 kg of cargo in the trunk, the wheel alignment angles must be within the following limits:
| camber angle | 0°±30′ |
| convergence | 0°00'±10' (0±1 mm) |
| caster angle | 1°30’±30′ |
Angles of vehicle wheels in running order (without driver, passengers and cargo):
| camber angle | 0°30’±30′ |
| convergence | 0°00'±10' (1.5±1 mm) |
| caster angle | 0°20’±30′ |
Why are spacers needed?
As mentioned above, spacers allow you to independently and without much effort change the vehicle’s ground clearance. Such an operation may be necessary if the car is often used loaded, for example, to transport 4 passengers and cargo in the trunk. In this case, the car sags greatly and the wheel arches touch the rear wheels.
In addition, increasing the ground clearance will also be beneficial if you often have to drive on country roads that are not in the best condition. A higher ground clearance in this case, albeit slightly, will increase the vehicle’s cross-country ability.
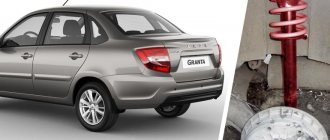
Rear spacers VAZ 2114
The only thing you should not forget about is that installing spacers will lead to a change in the behavior of the car on the road. That is why, immediately after increasing the ground clearance, you should visit a car service center to check the camber/toe.
Installation process
The first thing to do is to jack up the rear of the car. Check that the car is standing securely, because you will have to move under it for quite a long time, so protect yourself in advance.
Spacer for shock absorber
Then, using two wrenches, you need to remove the bolt that holds the lower shock absorber ear in place. At the same time, hold the bolt nut with another wrench and unscrew it. Once the shock absorber is freed and the bolt is removed, it's time to install the spacer.
When installing this mechanism, it is easy to notice that both spacers are symmetrical; they can be placed on both the right and left sides under any rack. However, one important point should be taken into account: the side of the spacer, which has a larger gap between the lower edge and the bolt hole, should face the middle of the car, i.e. be located closer to the center.
Now all that remains is to place the shock absorber strut in our part and also firmly clamp it using the removed bolt and nut. By selecting the desired hole, you will adjust the ride height of the machine. In this case, it is necessary to select one of the three holes before starting installation, because otherwise the spacer will have to be rearranged with the other side.
On the other side of the car, you need to do exactly the same manipulations, unscrew the shock absorber, install a part to raise the level of the rack and thoroughly tighten all the bolts. Next, we lower the car to the ground, remove it from the jacks, and proceed to adjust the brake pressure, headlights and castor tilt.
Installation
There is nothing difficult in installing houses; you just need to have the necessary tools and a little skill in car repair. The work will take no more than 40 minutes on both sides of the car.
Required tool:
- Set of keys or sockets;
- Penetrating lubricant WD-40 or similar;
- Two jacks
- Hammer and goatee;
Work process
The easiest way to install it is from an inspection hole, but if you don’t have one, you can do without it.
- We lift the car on jacks on both sides and remove the wheels, do not forget to fix the front wheels of the car using a rollback.
- We treat the bolt securing the strut to the beam with WD-40 penetrating lubricant and wait for 5 minutes. Then unscrew it.
- Remove the bolt from the silent block of the rear shock absorber
- We install the houses by first screwing them to the beam, and then insert the shock absorber into the house mount and fix it with a bolt.
TIP: It is recommended to install the stand in the middle hole on the house, this will allow you to achieve the optimal height and center of gravity of the car.
- We carry out similar work on the opposite side of the car.
The process of installing spacers for the rear shock absorbers of the Priora is completed, do not forget to adjust the headlights.
Appearance
Let's start with the body. The design of this car was outdated at the time of its release. Of course, the “top ten” has been created since the 80s of the last century. Due to perestroika, the first model appeared only in 1995. Externally, this car is unremarkable - standard rectangular headlights, square foglights (which were not included in all trim levels) and an incomprehensible pillar in the rear of the body. The owners raised a lot of complaints about it. On the “two-piece” this window has a more complete look. However, on the “ten” it looks “clumsy” - say the reviews.
Another problem is floating gaps. This is especially noticeable at the point where the hood touches the doors and fenders. Sometimes several fingers can penetrate this gap. And there is no cure for this. This is a disease of all VAZs of the “tenth” family. We also note that AvtoVAZ attempted to update its appearance, and in the mid-2000s the car received a more prominent bumper.
The quality of the metal on the “tens” is frankly lame - say reviews from the owners. VAZ-2110 does not withstand salt, water and road reagents well. Bugs appear on the paint after two years of use. The sills and bottoms of the doors are rotting badly.
Suspension adjustment after installation
This completes the installation of spacers on your VAZ 2110. Having returned the car to its normal position, you need to make a number of important adjustments. We are talking primarily about the pressure regulator for the rear brakes, headlights and front wheels.
In the case of the latter, we are interested in their longitudinal inclination angle, otherwise called castor. After installing the spacer on the rear pillars, the rear of your VAZ 2110 will naturally rise, and the castor, on the contrary, will decrease. This will negatively affect the vehicle's stability in motion and its overall handling. Obviously, these parameters are critical for your safety, so it is better to entrust castor adjustment to certified auto mechanics from a car service center.
The first two settings of the VAZ 2110 can be done independently.
Having picked up a speed of about 35 km/h in the car, we sharply brake. At this time, the assistant should observe how soon the rear wheels will lock. Normally, it lags somewhat behind the locking of the front wheel pair. If this does not happen, then return to point 16 of the plan discussed above and change the size of the gap upward.
conclusions
Selecting and installing a spacer for VAZ-2114 shock absorbers to increase ground clearance is quite simple. Even a novice motorist can cope with this task.
It turns out that my husband installed spacers for me secretly :) I thought there were factory ones at the back. Now I'm convinced that this is a revision. It’s clear why my butt is raised so much...
This seems like a joke. If someone is serious about using the 2114 for cargo purposes, it would be better to sell it right away. In a year or two he will simply ruin the car.
Hello, dear friends! Are you bored? Me too. Today we are considering a rather interesting issue - spacers to increase ground clearance.
I know that car owners often try, on the contrary, to lower the car, to make it as low as possible. But you yourself understand who is doing this. Especially when it comes to cars such as VAZ 2109, 2110, etc.