Installing speakers in the rear doors of a Lada Granta will require disassembling the door card. The further process will not cause difficulties if the diameter of the acoustics is standard 13 cm and you have a set of tools at hand. To install 16 cm speakers, you will have to build additional stands due to the non-standard diameter, but such installation is also quite possible to do yourself.
A short checklist for installation in the front doors of Lada Granta
To install speakers in the front or rear doors of the Grant sedan, you should study the step-by-step algorithm of actions. Basic moments:
- Dismantling the door structure.
- Removing cladding material and sound insulation.
- Removing the stock speaker.
- Installation of a musical element. If the size of the acoustics is 13 cm, then there is no need to make a cut in the door contour.
- Electrical wiring connection.
- Door card assembly.
During these manipulations, the driver has the opportunity to replace or improve the sound, heat and vibration insulation of the body part.
We install size 16 speakers on the Priora
If your Priora has speakers, most likely their size is no more than 13 cm. Will such acoustics be able to satisfy a true music lover? Do they provide high-quality and good sound? It is not surprising that the owner of this particular car, after purchasing the Priora, first of all decided to replace the speakers in it and install 16-centimeter speakers instead of the standard ones.
It turned out to be much easier to buy them than to install them; there were some nuances here. And although there is nothing complicated in such a modification, let's see how this can be done practically. The first difficulty is that the doors of the VAZ model are designed for size 13 acoustics. So we will have to refine them.
Many car enthusiasts solve this problem simply by using additional podiums that are placed on the doors and into which the acoustics are then mounted. But not everyone likes this method; podiums create additional noise, knocking and vibration. Our owner of the Priora decided not to go down this path; he didn’t need unnecessary and extraneous sounds, so he decided to increase the existing places for acoustics.
The first step is to remove the door trim
We will not focus on this process, since almost every car enthusiast can handle this. The upholstery was removed, we have a standard hole in front of us (see photo)
What to do next? You can use a jigsaw. If this tool is not at hand, use a regular drill. We take a compass or ruler, use them to mark points for the 15th diameter, then in these places we drill small holes along the contour. Then, using drills of a larger diameter, we drill out the holes already obtained. Make sure that the edges of the holes are smooth; you can use a file to do this.
photo). What to do next? You can use a jigsaw. If this tool is not at hand, use a regular drill. We take a compass or ruler, use them to mark points for the 15th diameter, then in these places we drill small holes along the contour. Then, using drills of a larger diameter, we drill out the holes already obtained. Make sure that the edges of the holes are smooth; you can use a file to do this.
When the hole for the new acoustics has been made, we move on to the next stage. We need to make sure that the door plane and the sound device are in good contact with each other. To do this, you can make special spacers from plywood, for example, or wood. If you don’t want to tinker, go to a specialized store and buy ready-made spacers. We fasten them with self-tapping screws or “seat” them with sealant. But remember that this must be done carefully and thoroughly, otherwise the speakers will soon begin to rattle.
Now we need to install acoustics directly in the Priora doors. Before doing this, glue some elastic material onto the spacer. For example, it could be splen. The speakers themselves can be attached with self-tapping screws. Now the final stage of our refinement, we need to thoroughly refine the plastic trim on the Priora doors.
Why is this necessary? So that the sound is of high quality and nothing interferes with it. To do this, remove part of the plastic door pocket using a sharp utility knife as a tool. You can also cut a round opening, and then attach a mesh for the speaker in it.
Now all that remains is to connect the acoustics. I will not dwell on this in detail either, since this is a topic for a separate conversation, although there is nothing complicated about this either.
What will we get as a result? More powerful and solid acoustics fit organically into the doors of the Priora. The sound has become much better quality. We didn’t have to install podiums that spoil the appearance of the interior and can rattle.
Find out what the Priora doors will look like after installation and how such speakers sound in this video.
What you need for installation
The equipment should be installed in a well-lit room with a comfortable temperature. The following equipment and consumables are prepared for work:
- flat and Phillips screwdriver;
- jigsaw;
- knife;
- metal files;
- spacers (wood or plywood - 2 pieces);
- chalk or construction pencil;
- speakers.
Experts recommend purchasing this equipment from the same company as the radio in the vehicle.
Sound emission angle
If the speaker is placed too high, it will affect the clarity of the music. High frequencies will be transmitted worse. Experience shows that tilt angles greater than 60 degrees distort the transmission of the audio signal. For this reason, when creating an external screen, this value should be accurately calculated.
When making the outer structure, you first need to securely fasten the inner screen. Then the outer box is either initially made with the desired slope to the vertical, or screwed obliquely with self-tapping screws. The voids are filled with putty. The entire structure is processed with fiberglass and covered with appropriate fabric.
Subtleties of the procedure
Installing speakers is a standard procedure if the car has standard equipment. Main subtleties of the process:
- It is necessary to make holes in the cladding for the acoustic system. To do this, it is removed. A hole is cut in the material itself, as well as in the body element. If the diameter of the speakers is 16 cm, then the standard recess in the doors will not fit. You will have to create additional wooden parts.
- The hole is made with a jigsaw. To saw off a circle, special steel files are used.
- After the speaker is in place, the trim is attached. When dismantling it, some fasteners may be damaged because they are made of plastic and break easily. A set of clamps should be purchased in advance.
Soundproofing Lada
It is most convenient to use a self-adhesive foil sound absorber, at least 1-1.5 cm thick.
To install the insulator, it is necessary to remove the casing
Please note that each front door has screws not only in the handle area, but also on the bottom. And on the driver's side there is also a self-tapping screw in the very middle (hidden under the plug) and in the recess of the latch
After removing the door decorative panel, it is necessary to pre-treat the internal metal surfaces. They are cleaned of the anti-corrosion compound with aviation gasoline, and then additionally degreased with alcohol or another substance with similar properties.
Next, the insulating material is cut into strips 10 or 15 cm wide. They are rolled into a roll, pushed inside the door one by one and pressed tightly with a hard rubber roller, removing the protective film. Upon completion of the procedure, all technological holes are also closed with the selected self-adhesive material.
Now all that remains is to finish the trim. Sound insulation is also applied to its inner surface. Then the speakers are installed and the panel is returned to its place.
The main differences between coaxial and component acoustics
Speakers have different designs. The sound of the speakers and the internal structure directly depend on this. The coaxial system implies that the axis contains both low-frequency and high-frequency waves. They can be arranged in one, two or three stripes. The sound quality depends on their quantity. A component system consists of a chain of speakers that are at different frequencies. You will need a lot of speakers. They are located around the entire perimeter of the car interior.
Coaxial elements with a mesh are mounted on the back row of seats for better sound, and component ones on the front doors or in the side panel.
Review of prices of audio products manufacturers
| Name / characteristics / article number | Price, rub.) |
| Comprehensive budget solution | |
| Radio tape recorder PIONEER MVH-150UBG | from 1500 – 1700 |
| Speakers Pioneer TS-1339 (13cm) | from 2000 |
| Speaker trim | from 450 – 500 |
| Additional noise/vibration insulation of doors | from 1200 |
| Consumables, bolts, screws for vinyl (wood) spacers | from 100 – 150 |
| Car radios | |
| Pioneer SPX-HUD01 | from 10000 |
| Pioneer DVH-345UB | from 12000 |
| Sony XAV-65 | From 15000 |
| Pioneer SPH-DA230DAB | —/— |
| Pioneer SPH-DA120 | from 12000 |
| Pioneer MVH-X585BT | —/— |
| Pioneer MVH-X580BT | —/— |
| Pioneer MVH-S300BT | —/— |
| Auto acoustics coaxial | |
| Two-way coaxial acoustics URAL AK-M | from 7000 |
| URAL AK-74 | —/— |
| Coaxial acoustics URAL AS-C6947 | from 5200 |
| URAL AS-C1647 | —/— |
| URAL AS-C1347 | —/— |
| Four-way acoustics German Maestro AC6511 | from 7500 |
| Focal Performance PC 130 | —/— |
| Dragster DCB 5 | —/—7 |
| Dragster DCA 943 | from 6800 |
| Dragster DC 572.2 | —/— |
| Dragster DC 502.2 | —/— |
| Auto acoustics component | |
| 2-component acoustics Dragster DSB 5 | from 4000 |
| URAL AS-C1627K | —/— |
| URAL AS-C1327k | —/— |
| URAL AK-74.C | —/— |
| URAL AK-47.C | —/— |
| Avatar CBR-6.21L | from 5000 |
| German Maestro MB 4.2 FR | —/— |
| German Maestro 2S 6512 | —/— |
| Dragster DSC 592.2 | —/— |
| Dragster DSA 582 | —/— |
| Dragster DS 532.3 | —/— |
| Alphard Machete MC-6.2A | —/— |
| Amplifiers single / multi-channel | |
| Machete MFC-650.1D | from 10000 |
| Taramps DSP 3000 | —/— |
| Taramps TS2000x4 | —/— |
| Taramps TL500 | —/— |
| Taramps TL1800 | —/— |
| Taramps TL1500 | —/— |
| Taramps DS800x4 | —/— |
| Taramps DS800x2 | —/— |
| Taramps DS440x4 | —/— |
*prices are as of September 20, 2018.
Sequence of actions when installing rear speakers in a Lada Granta liftback
Granta has factory openings in the rear door fragments, only the shape is cut out oval, so if round speakers are purchased, then a problem arises. Using the standard set of equipment described above, you can get to work:
- The inside of the door is disassembled: handle, trim, power window control unit.
- A hole is cut in the facing sheet. Using a jigsaw, the elongated metal pancake is dismantled. A round niche is created for the column.
- If a set of size 13 speakers is selected, then there is no need to dismantle the metal structure. Using a knife, only the top part of the panel is cut off.
- A stand is cut out of wood. It is lined from the inside and fastened with screws or self-tapping screws to the speaker.
- Cable laying and electrical wiring are being connected. It is recommended to install the ISO connector immediately.
How to process a cylindrical hole?
The above manipulations lead to the formation of a cylindrical hole inside the door panel of the Lada Granta, into the cavity of which further installation of the loudspeaker is implied. Before the immediate installation procedure, the contour of the internal cavity of the formed hole must be glued using Vizomat 10 (similar to gluing the outer side of the ring).
The purpose of pasting manipulation is to achieve two properties:
creating a trumpet-like effect; ensuring protection of the speaker contact group from moisture when the side window is fully lowered.
The installation procedure on LADA Granta requires preliminary preparation. “Vizomat 10” needs to be cut into thick strips and when pasting, it is necessary to ensure that the lowered glass does not touch the outer surface of the created cylindrical hole.
The density of the structure plays an important role. To achieve a sufficient level, it is recommended to glue the outer circumference of the wooden ring
Bitoplast is suitable for this purpose. This action will ensure that the installed speaker is pressed tightly against the ring.
After installing the loudspeakers, we also cover their circumferences with Bitoplast. This measure will ensure sound intensity, because air will not be able to penetrate behind the door trim.
Adviсe
Let's give some advice.
In addition to calculating the load on the equipment in a specific connection, it is important to correctly select the wires that match the resistance in the circuit. Preference can be given to acoustic wires, which give the purest sound at the output, or to ordinary wires with R not lower than 4 ohms. To avoid damage and short circuit, the polarity of the contacts + to - should be strictly observed. When you turn on the radio for the first time to check, the volume should be minimal
If the sound is distorted, the equipment should be turned off immediately. This effect occurs when the polarity of the connections is not observed, which will have to be corrected.
Body care
The speaker housing should only be cleaned with a dry cloth, or with a small amount of furniture polish that does not contain silicone.
If you want to use an aerosol for cleaning, first remove the protective grille by carefully pulling it out from the frame. Spray the aerosol on the cleaning cloth, not on the body
Test the effect of the aerosol first on a small area of the surface, because... Some substances may cause discoloration. Avoid abrasive, acidic, alkaline or antibacterial substances. Avoid contact of detergents with the fabric of the protective grille, as There may be stains on it. The fabric of the grilles can be cleaned with a regular clothes brush or a vacuum cleaner attachment. When installing the grills (grills) into place, ensure that the pins are perfectly aligned with the intake holes in the housing before pressing on them. Avoid touching the speaker cones, especially the tweeters, as this may damage them.
Important to remember:
Your speakers are designed to provide years of trouble-free operation and require no maintenance other than an occasional dusting with a soft, dry, lint-free cotton cloth. Plastic elements can also be wiped with a soft cloth. Handle the varnished surface very carefully to avoid scratching the finish. To remove fingerprints and smudges, apply a small amount of diluted neutral detergent without ammonia or alcohol to the fabric and gently scrub the surface. Never use abrasive cleaners or chemicals to clean the cabinet. If the cabinet becomes noticeably scratched or otherwise damaged, take it to a qualified furniture repair shop. Do not spray insecticide near the pumps. To remove dust from the grille fabric, use a vacuum cleaner on low suction. Do not wash the grate in water as water may discolor the grate or make it uneven. Never apply suction or compressed air to a tweeter or super tweeter. If the surfaces of the woofer cones become dusty, you can gently clean them with a soft, dry calligraphy brush or paint brush. Do not use a damp cloth.
All wiring connections should be periodically inspected and cleaned or reworked.
The frequency of maintenance depends on the metals involved in the joints, atmospheric conditions and other factors.
If this is your first time on our Forum:
Master Receiver went to the monastery
On the left side. There are several ways. In particular, the wiring under the hood comes from the left. You can carefully route your wires there. You will need a plastic cable holder. And Granta has many similarities with Kalina. If desired, you can make a cable entry in the switchboard.
Thank you! That means I’ll disassemble the driver’s side and look for where it can be pulled under the hood into the interior!
If it’s an automatic, then through the plug where the clutch pedal should go into the engine compartment. I have 2 x 25 square meters stretched this way. But there is enough space for 2 to 50.
No, I have the norm. There should still be plugs.
To be honest, I don’t remember anymore about the plugs. I've been pulling and making noise for a long time, but my memory is bad. At the grant club the topic was about pulling wires. Look. Well, listen to Papa Carlo’s advice. It also seems like people turned it on through the headlight range control somewhere, but I could be wrong.
Left for PPL Head of Personnel
Before disassembling, you can look under the hood for the direction of the harness that goes into the interior. The simplest and most effective method in this matter.,
Pull through the front fender (on the driver’s side) it’s very convenient, you will need to remove the locker (and the wheel accordingly) there is a factory power wiring in one corrugation (right under the wing), you can hook the power wire to it with clamps, the output is in the lower left corner from the clutch pedal (you need to remove the plastic threshold + unscrew the plug (above the pedals) and bend the floor backing. You may have to modify the hole in the rubber plug (depending on the thickness of the cable). I pulled it this way myself in Kalina (consider the twin grants) KG 50 and + and - in principle, it will fit in. Well, don’t forget to protect your power cable with corrugation or a snake.
Left for PPL Head of Personnel
It’s detailed, and it turns out without any problems. I don’t remember this lately - I look at everything for a specific car, damn, but they’re all different today.,
It's no secret that acoustics in a car are very necessary and perform various functions. Installing it is a bit of a concern for novice motorists: they find it difficult to choose the right speakers, they do not have enough money for high-quality installation, etc. This article was written solely to help everyone in this matter and we will find out how to install acoustics in a Lada Granta with our own hands. The Lada Granta and the acoustics, installed correctly in its interior, taken together, will create a completely different car, which even the owners of some foreign cars will look at with envy.
Acoustics Lada Granta
As a rule, installing acoustics in a car has three main stages of development:
- Car radio installation.
- Installation of front speakers.
- Installation of rear speakers.
Let's look at everything in more detail.
Parallel-serial connection diagram
This is the most popular connection method, as it allows you to regulate the power supplied to the device and avoid overloading it. This results in high-quality sound. This connection scheme combines both methods.
Step-by-step instructions for connecting four speakers to two channels of the device.
- The negative terminal of speaker 1 is connected to the positive terminal of speaker 2.
- Negative contact 3 is connected to positive
- Positive contact 1 is output to a common positive channel with positive contact 3.
- Negative contacts 2 and 4 are connected to a common negative contact.
- The derived common channels are connected to the amplifier, taking into account the polarity of the contacts.
In the same way, subwoofers can be connected to this system if two-channel equipment is used. With four channels, the subwoofers are connected separately by a bridge.
Watch the connection video
Speaker installation process
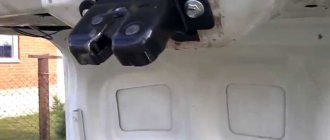
Installing the rear speaker, oddly enough, is even easier than the front speaker. We take the spacer and screw it to the back door, after which all that remains is to secure the speaker and connect it. With the front door, everything looks more complicated - there you need to glue threaded washers under the holes for the bolts. And normally these washers are held in place by brackets, which are not included in the “standard” configuration.
Rear and front door without trim
Each speaker is screwed onto 4 threaded screws, but it is better to connect the connectors first. One pair of speaker wires goes into each door, and they come from the main connector intended for the radio. Before making the connection, it is better to test the wires for breaks.
We have discussed in full how to install speakers in Kalina 2. We will not consider the method of installing and connecting the radio, but note that it is not at all necessary to dismantle the center console for this.