We often hear complaints from car owners about poor-quality Granta Liftback trunk door locks. They say they fail prematurely.
The dissatisfaction is well founded, since from 2014 to 2022 the manufacturer installed one type of lock, and then a number of improvements were made and a new version appeared. It is still used in mass production. In order to provide methodological assistance to drivers, we will consider in detail the stages of prevention and replacement of door locks on Grant Liftback.
Review of Manufacturer Prices
| Lock marking / article number | Price, rub.) |
| left rear 21911-6204986-30 | from 1500 |
| right rear 21911-6204986-30 | —/— |
| thrust 21911-6104986-10 | from 500 |
| handles 21911-6204986-20 | from 270 |
| —/— 21911-6204986-20 | —/— |
| limiters 21920-6104986-00 | from 360 |
| —/— 21911-6204986-00 | |
| Power trunk lid lock |
*prices are current as of 10/08/18.
What is important to know about silent locks on the Lada Granta Liftback
Not all car owners are satisfied with the ease and noise level when closing the doors of their car. The defect is caused by excessive wear of parts and design flaws at the manufacturer level.
The principle of noise suppression is implemented by an installed noise absorber. In Lada Granta Liftback models, this is a rubber insert or a plastic polymer.
Silent locks are structurally composed of a pin and a shackle with a noise-absorbing insert. Some car owners practice replacing the arms, while leaving the standard locks unchanged. Already in this case, the noise level will be significantly lower, and locking the door will be easier.
At the same time, systematic use of the door lock leads to rapid wear of the polymer/rubber material. The owner has to come back for preventative maintenance again and again.
How to close the trunk?
The roomy 480-liter trunk, although it seems problem-free, is weak in one area - the loop into which the trunk lock is latched barely holds on and does not always go where it should.
You should pick up the tools (swearing loudly about the shitty pre-sale preparation at the dealer and the entire Russian auto industry is allowed), tighten everything that can be tightened. And the loop from the body, where the trunk lock is hooked, also needs to be corrected. We take a Phillips screwdriver, unscrew (yes, unscrew!), the entire structure of the hinge, we see that the hinge itself is wobbly, that it is not securely fastened with anything (we are swearing again)). )
This miracle can be corrected only by additional hammering with a hammer (when we hit, we imagine the face of the engineer at the factory during the design, and the worker who tightened all the bolts), the screws are as tight as possible. If you want the trunk to close even more easily, you should lubricate the contact points between the hinge and the lock with any industrial grease.
Preparatory stage
- impact screwdriver;
- cross bits;
- pliers;
- plastic clips in case of damage to the standard ones;
- liquid for removing rust and corrosion;
- a new lock, the modification is chosen individually by the owner.
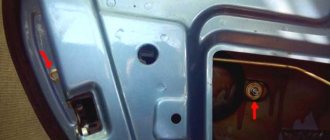
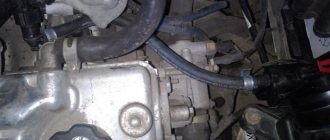
Procedure for independently replacing the driver's door lock on a Lada Granta Liftback
- We install the car within the perimeter of the repair area and provide unobstructed access around the perimeter.
- We take priority safety measures when carrying out work. We fix the rear row of wheels with wheel chocks and engage first gear to avoid arbitrary movement.
- Open the driver's door, use an impact screwdriver to unscrew the two screws securing the shackle to the car body, and remove it from its seat. We install a new shackle with soundproofing material.
- Let's start removing the constipation: unscrew the plastic float and remove the stem.
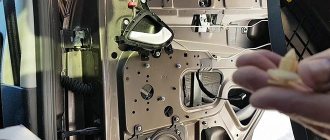
- We unscrew the car door card, two screws, eight plastic clips around the perimeter.
- We disconnect the block with wires from the double-glazed window control unit, speakers, and central locking.
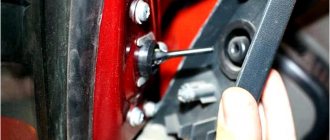
- From the outside, unscrew the three screws that secure the lock body to the door.
- We remove the two rods, having first disconnected them with pliers.
- We carry out preventive maintenance, clean the seat, remove old grease, and apply a thin layer of new one.
- Let's start installing the new lock.
- We assemble the structure in the reverse order, unless there are other breakdowns that require surgical intervention or elimination.
Let's make the alarm system and central locking together
Any modern alarm unit is equipped with two relays connected to the central locking control unit. One relay is opening, the second is locking, and the circuit in the general case looks like this:
In our case, the green and white cords coming from the signaling unit will be required, as indicated in the diagram. However, they will not be the only ones needed. We will connect the relay contacts to breaks in the standard wiring. This means there will be not 2, but 4 cords.
Connection diagram for VAZ central locker
Take another look at the diagram published in the first chapter. We will connect the relay to the gap in the white and brown wires going from the microswitch to the central lock control unit. And it is obvious that it is easier to break these wires near the 8-pin connector. The same one shown at the beginning.
To avoid any questions, we will show you what should happen as a result:
Connection diagram, central lock VAZ
The common contacts are connected to the wires coming out of the microphone. The white cord continues with the brown wire coming from the door, and so on. Normally closed contacts are also used, along with normally open ones. These are the features of connecting to the VAZ central locking system.
An approximate sequence of actions performed by the installer:
- Make and lay a 4-core cable running from the signaling unit to the 8-pin connector;
- Connect the cable on the side of the alarm unit (see the last diagram);
- Near the 8-pin connector, disconnect the white and brown wires coming from the microswitch (pins 5 and 7). The main thing is not to confuse them with the wires going to the triangular connector “C”;
- Make connections to the broken wires, white and brown. That's all.
We have given this sequence to emphasize once again that the relays are switched on between the microphone and the central lock control unit. There is no need to connect any additional devices. As a result, the alarm system will be able to control the state of the locks.
All wires added to the car structure must be protected (use heat-resistant tubes or electrical tape). Twisting is not the worst method to connect two wires. But it's even better to use soldering.
It would seem that if a person has experience working with electrical equipment, he can do everything according to the instructions given. As a result, if no mistakes are made, you may encounter an interesting phenomenon. Instead of closing, there will be a short-term locking followed by opening. And vice versa. What to do in this case?
Take a look at what exactly may be present in some of the configurations:
The driver's door may not have an actuator. And then, it is useless to connect the signaling system to the control unit. There is no actuator, which means there is no one to close or open the door and move the microphone lever. Let's say the locks are closed, and then we remove ground from the brown wire and we get the following: the white wire is on ground, unlocking occurs.
We note the following: installation can only be carried out when you are sure that there is an actuator in the driver's door.
There were configurations where only a microswitch was installed. There is no need for arrogance here - adding an actuator will be difficult, since standard wiring must go to it. As you understand, it may not be available from the factory. And it’s unclear what to do then.
There remains one unanswered question - where exactly the central locking control unit is located. In these VAZ models, if there is a central locking system, then there is also a control unit. And it is located under the torpedo cover, next to the driver, on the right:
We remove the “beard” of the torpedo and look at what is on the upper right. On the same plane with the radio connector there are two boxes attached - the one we need, as well as the immobilizer (if there is one).
We would be lying if we did not say that in reality there is another option for installing the alarm. Standardly, only two power cables go to the actuators. Having a power outlet equipped with a fuse, these cables are connected directly to the alarm relay. This option, as you might guess, is not recommended. Imagine what would happen if the alarm system broke. The central lock must remain, but in this case this will not be done. Happy connection!
Reviews
| from 1900 | |
| 21911-136800 | from 1500 |
| 21911-6104986-10 | —/— |
| 21911-6104986 | —/— |
| 21911-610504986 | —/— |
| 21911-6104986-10 | —/— |
| thrust 21910511800 | from 150 |
| bracket 2345983790 | from 100 |
| bushing 1118234598 | from 200 |
| —/— 111806105 | —/— |
| lock retainer gasket 34580610 | from 100 |
| clamp housing 5698710800 | from 300 |
| lock pin 63541800 | from 100 |
| front lock 21900610 | from 1400 |
| —/— 219006105 silent | from 2100 |
| 21911-610501310 —/— | —/— |
| 21911-610501300 —/— | —/— |
| 21911-610508426 —/— | —/— |
| № | Positive |
| 1. | Vasily: two years have passed since the purchase of the car, I have not made any capital investments, with the exception of the purchase of consumables for maintenance. |
| 2. | Kirill: I heard that some owners have difficulties with door locks. I can’t confirm, since everything is in good order, the doors close easily, without squeaking or knocking. |
| 3. | Vyacheslav: I systematically prevent constipation, lubricate it with silicone sealant, and try not to knock doors loudly. |
| 4. | Victor: in a year and a half of using the car, the front door creaked once. I lubricated it myself, no comments. I assume that a grain of sand got in, which caused the creaking. |
| 5. | Gennady: I would like to recommend silicone sealant. This is the second year I have lubricated the door hinges, there are no problems with the locks, everything works properly. The price is affordable, sold in any auto store. |
| 6. | Sergey: private entrepreneur, I deliver goods, I often use the trunk. In six months of use, I only lubricated the lock with graphite lubricant once. It works properly, there are no knocks or squeaks. |
| 7. | Igor: I periodically conduct an independent inspection of the car, add fluid, lubricate external mechanisms, and adjust clearances. There are no complaints about the operation of the constipation. |
| Negative | |
| 1. | Kirill: I’m dissatisfied with the quality of the locks, this is the third time I’ve changed them in the last year and a half. I heard that you can install silent locks, I will try it. |
| 2. | Vladimir: my negative review is about the standard constipations, the workmanship is poor, the material quickly wears out and gets washed out. When driving the car there is a constant knocking or metallic grinding noise. |
| 3. | Ivan: after six months of using the car with the original locks, I replaced the set with silent ones. I spent a little money, but the result is pleasing, everything works properly, there are no comments. |
Conclusion
The standard door locks on the Lada Granta Liftback are of good quality. Subject to careful handling and periodic lubrication, the service life is five years without mileage limitation.
Negative reviews are associated with violation of the terms of use of the mechanisms by the owners themselves.
Reasons for replacement
It is necessary to replace the entire lock or just the contact group, depending on the nature of the breakdown and the situation with your car. Therefore, we will consider options when replacement may still be required.
| Reason for replacement | Your actions |
| There was an attempted theft, as a result of which the integrity of the lock was compromised | In this case, only the contact group and the cylinder can be replaced, since the lock itself is most likely intact. Lower costs and required repair efficiency. Although experts advise purchasing a new lock right away and installing it |
| The keys were lost and there was no spare | There is no point in trying to find a master who will turn you exactly the same key as before. You will have to purchase a lock and install it on your car |
| Problems with contacts or contact group | It is not difficult to check whether this is really the problem. Turn off the battery by disconnecting the negative terminal, then remove the cover under the steering column and check the wires for resistance. Switch the key alternately to positions 1,2 and 3, while measuring the resistance. If the ohmmeter shows “zero”, then the lock really has a problem and needs to be replaced. |
| There was a desire to improve the castle | Often, car owners replace the standard ignition with a more modern one, equipped with lighting. It is not expensive, but it is convenient to use in the dark. No need to fumble for the key slot |
When checking the contact group, be sure to disconnect the negative terminal from the battery, otherwise a short circuit will occur, and not only the contactor will have to be replaced.
Circuit and pinout
First of all, get acquainted with the lock diagram and wire connection diagram, which will allow you to better understand the features of the 3Z pinout.
As you can see, the pinout includes 8 elements. What does each of them mean and what functions are they responsible for? We'll figure out.
- Power supply for the inserted key sensor microswitch (+12Volt).
- Power supply to ground when doors are opened on the driver's side.
- Power supply that supplies current to the starter (+12Volt, pin 50 on the diagram).
- Source at +12Volt. Activated after turning on the ignition. Power supply for additional equipment, such as video recorders, clocks, etc. (pin 15 in the diagram).
- Source at +12 Volts. Triggers when the key is inserted. Goes to pin 5.
- Power supply +12Volt. The illumination of the 3Z larva is activated.
- +12V source from the battery (pin 30 in the diagram).
- Not active.