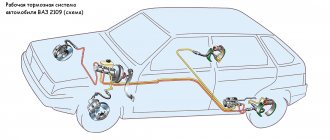
VAZ 2109 is the legendary “nine”. The front-wheel drive five-door hatchback was serially produced at the Volzhsky Automobile Plant from 1987 to 2004. From 2004 to the end of 2011, the VAZ 21093 modification was assembled in Zaporozhye.
Many car owners try to maintain their personal car themselves and know how to do it correctly, since they carefully study the operation of the main components and leading modules. The list of routine maintenance includes periodic adjustment of the VAZ 2109 clutch. This task is quite simple if you familiarize yourself with the operation algorithm in advance.
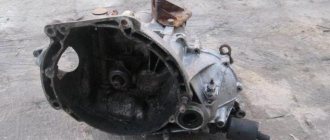
The design of the VAZ 2109 friction clutch and its purpose
Any self-respecting motorist will study the design of the unit before adjusting the clutch on a VAZ 2109. This will help you approach the issue wisely and avoid mistakes.
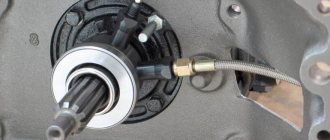
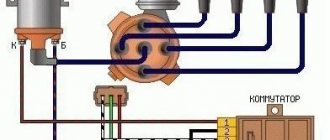
In the photo: The process of tightening the clutch cable on a VAZ 2109 car
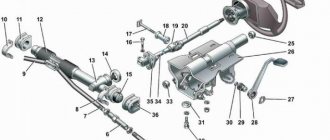
The mechanical drive design is simple and reliable. Compared to hydraulics, the cable requires minimal maintenance, and changing it is not labor-intensive. The mechanical drive consists of the following elements:
- Adjustable sheathed cable.
- Control pedal.
- Clutch release fork lever.
- Bracket for fastening the end of the cable sheath.
- Brake and clutch pedal bracket.
The mechanism serves to transmit force from the pedal to the release fork, which, in turn, removes the friction disc from the flywheel. Using a cable drive avoids major problems such as fluid leaks and periodic bleeding of air from the clutch control system. The weakest link in this chain is the cable, the quality of which at times leaves much to be desired. Therefore, replacing a cable on a Samara is a fairly common occurrence.
Meanwhile, the question of how to adjust the clutch on a VAZ 2109 car remains relevant for the cable mechanism. Setting standard values guarantees optimal tightness of the driven disk to the plane of the flywheel and basket when the clutch is engaged. The design also ensures complete separation (switching off) of the above parts from the passenger compartment through the pedal.
A few words about the clutch cable drive
Foreign automakers extremely rarely equip their cars with such a clutch drive, preferring more reliable hydraulics that rarely fail. But on vehicles of Russian manufacturers, cable clutch mechanisms are standard. And this despite the fact that they have a lot of real shortcomings, which are well known to owners of domestic cars.
The clutch cable needs constant adjustment during operation, which is due to the natural operating wear of the clutch drive. It quickly becomes covered with rust, breaks off at the most unexpected moments, and so on. It is for this reason that every driver driving a car with a manual transmission is simply obliged to know what to do if the cable that interests us fails.
We will talk further about how to change and adjust the cable mechanism. Now let’s describe it in a few words. The cable is connected to the clutch pedal using screws, its other end is also fixed with a screw, but to a special bushing in the shield. In this case, the cable is screwed to the pedal as tightly and reliably as possible, and to the bushing more freely, due to which the described mechanism rotates on the axis without any serious difficulties. In addition, a stop must be installed under the pedal, which protects the cable from breaking.
When the clutch needs adjustment
Adjusting the VAZ 2114 clutch may be required in the following situations: The clutch has been completely replaced. The clutch was repaired and its individual elements were replaced. The clutch travel is too large or, conversely, insufficient.
Photo: Clutch cable VAZ 2109
If everything is clear with the first two reasons, then in the latter case simple measurements should be performed. To do this, you need to measure the distance between the minimum and maximum positions of the pedal (that is, in situations when the pedal is pressed to the floor and when the pedal is freely released). The optimal value of this distance is in the range from 12 to 13.5 cm. If in fact it turns out to be larger or smaller than the specified dimensions, it is recommended to make an adjustment.
If the clutch travel exceeds 16 cm, then you should immediately stop all driving and make adjustments as soon as possible. In addition, in some cases, too much stroke may indicate severe wear of the friction linings located on the driven disk, as well as the need to replace them.
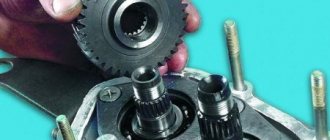
diagram, bolts, flywheel, where it is located, manufacturers
The clutch basket is the main device in a car, consisting of several parts that are located in a single unit. She ensures that the release plate and flywheel are properly disconnected and connected. That is, it is thanks to it that the engine is turned on and off. If the basket is bad, in a faulty condition, then the ability to start also fails, the mechanism does not work at all.
Purpose of the clutch
There are three main types of clutch baskets. They differ in design features.
This device is a very important kit in a car. Thanks to a part such as a spider, it is possible to separate the engine and transmission when braking occurs or a gear needs to be changed. Also regarding the classic movement, the clutch basket is needed to connect the two units of the car so that it starts. The engine operates using a fuse. Because thanks to the spider, transmission units, which can have very different diameters, are saved. The device parameters do not change even with strong dynamics. But in fact, running the engine is the simplest part of a car.
The point of supplying energy is that the spider controls the transmission of power coming from the flywheel and the main part to the main disk, which already sends the movement parameters to the gearbox.
The release plates are very elastic, they serve as petals of the basket, thanks to them the driven disk and the release disk are compressed together with the flywheel.
Such parameters indicate normal operation of the clutch basket. When you press the clutch pedal, no matter what the weight, the driven disc and release plate are separated, then no more torque is transmitted.
The weight of the kit is of great importance, since the lower it is, the easier the impact on the engine. The device is also responsible for the quality of operation of the entire set. The flywheel and spider should perform unconditionally well. At the same time, they must be in their places, since the car simply will not move without them. To summarize this subsection, we can say that the basket is an indispensable device in the engine kit.
The basic principle of clutch operation
As we have seen, the clutch basket refers to one set of parts that has a certain weight in the car. This includes the spider, the flywheel, and various bushings, bolts, and discs. Including the pressure plate, round spring and protective cover. There is an excellent tandem between the basket and the main parts.
It turns out that the bolts hold the basket and the drive flywheel together, but also thanks to the bushings and bolts, the return spring manages to stay in the basket, which is located in close proximity to the bearing.
The flywheel and secondary disc are connected by a pressure plate. If the clutch is disengaged, the disc presses on the basket, causing it to interact with the flywheel. When the pressure plate no longer presses, the engine starts working. Then the driven element begins to rotate on its own. At this time, the pressure element and the casing have the same parameters, pressing on the spring, which returns everything to its original state when the engine stops working. The diameter of such a spring has a lot of weight in operation.
Clutch diagnostics VAZ 2109
Diagnostics must be carried out on all cars without exception. Regular implementation of this procedure allows you to minimize the likelihood of breakdowns of all kinds. It makes it possible to detect failures and problems at an early stage.
Thanks to this, repair work is carried out with minimal time and financial costs. Certain diagnostic procedures require special equipment. It can be found at any car service center.
It is not recommended to buy them yourself due to the fairly high price of these devices. Below are operations that you can perform independently without special technical devices.
Diagnostics of the VAZ-2109 clutch is carried out in several stages:
- Turn off the engine, depress the clutch pedal several times, while doing this, listen carefully to see if any extraneous sounds appear during these operations: clicks, friction, squeaks, etc.
- You also need to pay attention to the pedal travel. It should not be accompanied by any jerks or interruptions. The lowering and raising of the lever should be smooth. If the pedal jerks or sticks, you need to check the clutch adjustment
- Using a ruler, check the distance from the car floor to the outside of the pedal. The exact required value is indicated in the technical documentation of the VAZ-2114.
- Press the pedal all the way, then release it and measure the distance; if it does not correspond to the stated distance, it is necessary to adjust the pedal.
Which side should the clutch disc be placed towards the engine? Which is correct?
Which side should the clutch disc be placed towards the engine? Which is correct? I have my own sad experience of incorrectly installing the flywheel disc, when I assembled everything and at the first start there was no clutch at all, and even grinding sounds were heard. I had to remove the box again and change the disk side. Technically, this is what happened:
The disc hub rested against the flywheel support bearing, and the damper springs rested against the flywheel mounting bolts. Because of this, a gap of several millimeters has formed between the disc and the flywheel (that’s right - the working part of the clutch disc should fit snugly against the working surface of the flywheel)
The basket pressed on the disk from the reverse side, which led to the disk being pinched between the basket and the flywheel. Even when the clutch was depressed, the release bearing did not do its job, and the clutch disc remained clamped, but torque was transmitted from the engine through the clamped hub and the damper spring housing.
What should you do to avoid mistakes when installing the clutch disc? There are three ways:
1) Some manufacturers mark the sides of the disk, which side should face, with inscriptions on the damper spring housing. Depending on the country of destination or production, the words will be in different languages.
The gearbox side is marked with the following words - GEARBOX SIDE, PP, Getriebeseite, GB SIDE, TRANS SIDE, T/M SIDE
The internal combustion engine side is marked with the following words - COTE VOLANT, FLYWHEEL SIDE, ENGINE SIDE, MOTOR SIDE, FW SIDE, SCHWUNGRAD-SEITE
2) Empirically, i.e. Apply the disk with different sides to the flywheel and see which side will lie better over the entire surface and will not cling to anything. But this option can lead down the wrong path, since some clutch discs have almost the same hub offset and, regardless of the side of contact, will not cling.
3) The best way to determine the side when there is no marking is to inspect the clutch disc itself, it is best to use a measuring tool (caliper - Columbian)
Here is the side from the gearbox side, it should lie tightly on the basket, as you can see, on this side the hub sticks out.
And in the basket there is a special opening for the housing of the damper springs, and the springs themselves are 75 percent placed towards the basket (gearbox)
But on the internal combustion engine side, the springs protrude less, by 25 percent, the body is seated almost flush with the working part (feredo), the hub practically does not protrude.
By the way, here is the inscription “FLYWHEEL SIDE”, meaning that the side is directed towards the flywheel (engine)
Step-by-step instructions for adjusting the clutch on a VAZ 2109 with your own hands.
In order to correctly configure (adjust the clutch) on a VAZ 2109 car, you must perform the following steps:
- Pull the handbrake and turn off the power to the car - for safety.
- In the engine compartment below, find the metal clutch cable. In the photo there are 3 red arrows pointing to it.
- Using 2 wrenches, loosen the cable end mounting nuts, and then, tightening or loosening them, until the clutch pedal travel becomes 125-135 mm.
- Get back into the car and press the adjustable pedal all the way down several times (at least 3 times). Then measure its progress again and adjust if necessary. If no adjustments are needed, then you did everything right.
If the nuts you are going to work with are rusty and therefore cannot be unscrewed, treat them with VD, machine oil or any other lubricant. This will save your energy and time.
Replacing the clutch cable
You can replace the clutch cable yourself. After all, this procedure is quite simple and does not require special skills or special knowledge. First, unscrew the adjusting nuts and inspect the clutch assembly, remembering well the position of all elements. Carefully remove the lower cable end from the bracket so as not to damage it. Dismantle the leash, which is located directly next to the clutch lever. Remove the stop tube from the pin and disconnect the cable end connected to the pedal. Pull out the elastic pad from the shield so you can pull the tip through. Install the new cable in the reverse order.
Functionality check
After you have completed this work, you need to check the correctness of the work performed.
- First, measure the travel of the clutch pedal.
- With the engine turned off, depress the clutch pedal several times and return it to its place.
- Next, we take a new measurement and clarify the received readings.
- If they have not changed compared to the first measurements, then the work has been completed, correctly, and the first stage of verification can be considered completed.
- And if they differ from the first indicators, it means that the locking nut was not tightened tightly, and the adjustment process must be carried out again.
There is one rule among car enthusiasts! A properly adjusted clutch should begin to engage approximately halfway through the pedal stroke.
How to understand that the clutch needs adjustment
Signs that the clutch needs adjustment are:
- Jerking or vibration when pressing the clutch.
- Slight clutch slipping when pressed for a long time.
- The clutch drives.
In this case, adjusting the clutch cannot be avoided. To carry out this process, you should perform the following steps:
- Place the transmission in neutral.
- Remove the clutch housing.
- Remove the bearing.
Note: this must be done smoothly and slowly, otherwise you may slightly damage the bearing.
- Turn the adjusting nuts until the pedal travel is adjusted.
- You also need to check whether the clutch is too oily, as this can also cause the clutch to slip.
Note: in this case, to resolve it, it will be enough to just wash it with gasoline.