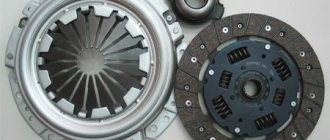
Most cars use a clutch consisting of 2 discs. To separate them when changing gears, a release clutch is created. When the car is moving, it is at rest and starts working after pressing the clutch pedal. Failure of this part makes it impossible to operate the car. If there are clear signs of a faulty release bearing, it must be replaced.
Types of release bearings
Release couplings are divided according to the design of the units into ball and roller and according to the method of transmitting force into mechanical and hydraulic. Older cars (ZAZ, Moskvich 412) used graphite plain bearings. In mechanical units, the part is moved by a fork, to which the force from the pedal is transmitted by a cable. In hydraulic couplings, a special fluid is used as a working fluid; the pedal moves the piston of the clutch master cylinder, which transmits force to the hydraulics. The latter moves the release bearing and disengages the clutch.
General operating principle
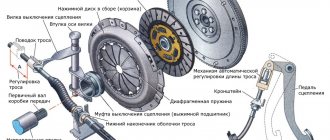
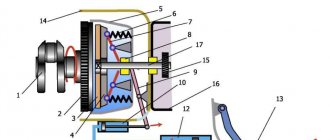
On passenger cars, a clutch with a diaphragm pressure spring is used. It replaces engagement levers and coil springs. The element has a flat shape, in the central part of which petals are stamped. They also serve as release levers. When you press the pedal, the fork moves the release clutch, which presses on the spring. Its inner part moves forward, the spring bends and with its outer edge retracts the pressure plate, disengaging the clutch.
When the pedal is released, the parts move in the reverse order. The spring returns to its original state and the clutch engages. Such a device is cheaper than a product with levers and requires fewer adjustments after repair.
Replacement
To replace the cable you only need a couple of keys. This is a tubular wrench for 10, an open-end wrench for 10, an open-end wrench for 12, and pliers (although I could do it without them).
First of all, spray VD onto the adjusting nut under the hood (it’s easier to unscrew).
Now take a 10mm wrench (any) and unscrew the 2 nuts on the expansion tank.
Then you need to click the wire clip that is attached to the tank (the clip is located behind the tank and prevents its movement). I just squeezed the petals with my fingers and removed them, but you can use pliers.
After we have freed the tank, we take it and carefully lift it without disconnecting the hoses and place it on the fuse box (the black one next to the tank). When carrying out this operation, you need to monitor the ebb on the tank where the clip snaps into place, so as not to break this ebb on the engine shield (in fact, everything is very simple and can be easily removed).
Now we can freely put our hand to the engine shield where the cable enters the cabin. We take a tubular wrench size 10 (you can use a regular one, but it’s not convenient to turn) and unscrew the 2 nuts securing the cable to the engine shield (I advise you not to unscrew it completely with the wrench, so that you can unscrew it with your fingers later, this way there is less chance of dropping the nuts and then crawling to look for them on the protection)
After this, unscrew the adjusting nut on the clutch fork and remove it along with the rubber pad (first remember how everything was positioned). To prevent the cable from rotating and twisting the rubber boot, you need to hold the mating part with a 12 key.
Now the cool and interesting part begins. We need to get into the pedal assembly. I did the simple thing, namely, I took out the rug, turned it over with the dirty side on the ground, and on the clean side I knelt down (in a very interesting position) and actually leaned under the steering column.
Here we need to disconnect the cable from the pedal. If I knew how to do this, the replacement would take 20 minutes, but I scratched my head for a long time and thought about who I would ask, but in the end, after about 15 minutes I figured it out myself. The fact is that the tip of the cable that goes into the cabin looks like this:
And it is put on such a hook on the pedal as in the diagram. You will see for yourself when you lean under the steering column.
Everything seemed simple, if not for one thing!! Koreans are cunning people!! There is a locking spring, it is wound onto the axis of rotation of the clutch pedal and its tip with an eye goes into the slot above the hook and prevents (blocks from spontaneous removal) the removal of the cable from the pedal . It looks like this (though it’s not very visible, climbing with a camera in the pedal assembly is still a pain, it’s good at least the camera has a rotating screen) whoever changes it will immediately understand. In short, press the ear with your finger towards the driver’s door until it pops out with a characteristic click. There is no need to be alarmed, the spring is weak and I was able to put it back in place much faster than to remove it (on the 1st try).
Hurray!!! The old cable is free!! But do not rush to immediately remove it from the engine compartment, but rather disconnect it and move it to the side. This is necessary so as not to understand how it passed between the elements of the car (like installing a new one along the old one)!! If you were in a hurry and took it out without looking, then here it is:
It goes under the drive! After installing the new one, remove the old one. If it is not torn, I advise you to leave it, in emergency cases, namely if the cable breaks on the way, it will still work.
Install the cable in the reverse order. We lay it along the old one, put it on the studs on the engine shield, having previously inserted the tip into the interior, put it on the hook, and return the spring to its place (the eyelet in the slot). Then we tighten the fastening nuts to the engine shield and insert the rubber stop into the bracket in front of the clutch fork, while at the same time inserting the threaded tip into the hole in the fork. Place the rubber pad on the adjusting thread and tighten the nut (you can also secure it with an additional nut, as I did, although the design of the main adjusting nut does not allow it to unscrew spontaneously, well, you will see for yourself how interesting it is done there). When tightening, we again use a 12mm wrench to hold the cable and not twist it.
Now all that remains is to adjust the pedal. I just tightened the nut until the pedals were level (clutch and brake) and that was it. It should be noted that the old cable was stretched out quite a bit and the nut on it was tightened (during the last adjustment on TO-2) much deeper.
Let's summarize. It all took about 40 minutes, or a little more (if I had known about the lock on the pedal, I would have done it much faster). I only got my hands dirty, which means I don’t have to change my clothes. The creaking disappeared, it became pleasant to press as if it were new. The gears engage much easier, apparently depending on the adjustment, in principle, if you gave up on the squeaking, you could still tighten the old cable a little and continue driving.
Part location
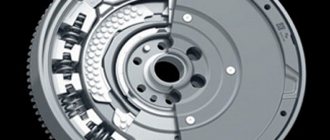
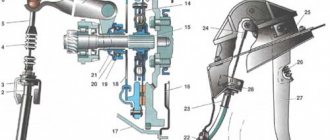
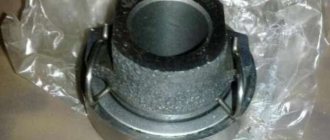
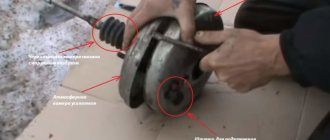
The release bearing, which serves to separate the engine and transmission, is located on the journal of the gearbox input shaft. When you press the pedal, the part moves freely along the shaft towards the clutch pressure plate.
On the back of the bearing there is a spring that holds the fork and prevents the device from rotating. The part consists of the following elements:
- inner race;
- rolling elements (balls or rollers);
- outer casing with a thrust heel and a spring.
The fork fits into the gearbox mount and is secured to the outer bearing housing. On the other side, a cable is attached that transmits force from the clutch pedal.
Selection of components
The clutch life on Grants depends on the operating conditions in which the car is located, and therefore can have significant differences. When using the car sparingly, the clutch is changed after 100,000 km. One of the most common types of clutch installed by the Volzhsky Automobile Plant is LUK clutches.
As a rule, clutches are sold in the form of kits, which include a clutch disc and basket, as well as a release bearing. The approximate cost of clutches for Granta starts at 2,000 rubles and can vary significantly in a particular region.
To purchase an original kit and not a counterfeit, buy parts only in specialized retail outlets, based on real customer reviews, or order the kit directly from the manufacturer (for example, using the Internet). Sometimes clutches are assembled from components made by different manufacturers.
Possible causes of failure
Loads on the release bearing occur when the clutch is disengaged. The higher the engine speed at the moment of gear shifting, the more intense its operating mode. The most common reasons for part failure are:
- Holding the clutch pedal down for a long time. High rotation speed and large axial forces from the diaphragm spring lead to rapid wear of the device elements.
- Abrupt engagement and disengagement of the clutch. Characteristic of aggressive driving style. Instant uneven loads occur on the bearing, which can lead to failure of not only the rotating part and the pressure fork, but also the clutch elements.
- Poor adjustment of pedal or cable travel. The bearing is in constant contact with the surface of the spring. Constant rotation causes heating of the rolling elements, which leads to rapid wear.
Part destruction may occur due to the installation of a low-quality product or lack of grease in the release clutch cavity.
Signs of malfunctioning parts
The release clutch can fail not only due to improper use, but also due to natural wear and tear. Knowing the operating principle of the device, you can determine its technical condition based on its characteristic symptoms. Typical symptoms of a malfunction are:
- The occurrence of extraneous noise when pressing the clutch pedal. The destruction of the node is accompanied by a grinding or loud crunch.
- Gear shift drive sticking. Sometimes it is impossible to turn on the desired speed.
- Excessively free play of the clutch pedal.
- Incomplete engagement or disengagement of the clutch. The situation may be accompanied by an unpleasant burning smell.
Additional signs of a breakdown are: increased fuel consumption, engine overheating, and jerky movement of the vehicle. The service life of the part is reduced due to dust and dirt getting into the bearing, increased temperature and lack of lubrication.
Signs of a defect cannot be ignored, because... This can lead to serious consequences when driving with a faulty transmission.
Control check
You can diagnose the condition of the squeezing device in the following way:
- Start the car engine. Listen to your work for any extraneous noise. If available, determine the location.
- Depress the clutch pedal. If an extraneous sound appears, the part will need to be replaced.
The bearing cannot be repaired. The problem is solved by replacing the defective part.
Consequences of malfunction
The element has sufficient strength, so it cannot fall apart instantly. However, there is no point in delaying the elimination of the defect, since failure leads to misalignment of the disks and uneven wear. As a result, problems will arise with the transmission, which will negatively affect the technical condition of the vehicle.
If the part falls apart, the driver will not be able to engage the desired gear and move away. If such a defect occurs while the vehicle is moving in the city, the services of a tow truck will be required.
Let's sum it up
As you can see, sooner or later every car owner may encounter a problem when the clutch slips. The fact is that the clutch mechanism itself is a unit with a limited service life (usually 80-100 thousand km), and in difficult conditions, individual elements (for example, a driven disc or release bearing) can fail much faster.
For this reason, when the first signs of clutch slipping appear, it is recommended to first eliminate external factors (for example, oil ingress), and then proceed to disassembly and troubleshooting, after which it is optimal to replace the entire clutch kit, selecting the best option from those available on the market (Valeo, Sachs clutch , Kraft, etc.).
How to change the clutch bearing yourself?
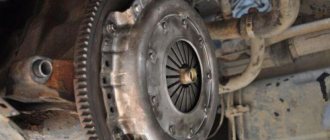
When replacing any part of the clutch mechanism, it is recommended to install a new release device. Its price is low, so you shouldn’t skimp on buying a part, even if it has not reached its intended service life. The work of replacing the clutch release bearing is not too complicated, so you can do it yourself if you have the necessary tools and some repair skills. To install a new part, you need to perform the following steps sequentially:
- Remove the gearbox and disconnect the pressure fork from the clutch.
- Remove the bearing from the transmission input shaft.
- Remove the spring clip from the piece of the outer body of the part.
- Check the new part for ease of rotation and presence of lubrication.
- Install the spring retainer onto the coupling.
- Place the assembly onto the gearbox shaft.
- Connect the plug to the coin and secure with a spring.
- Reinstall the gearbox.
After assembly is completed, adjust the drive if necessary . To check the operation of the replaced unit, you need to start the engine and squeeze the clutch. If no extraneous sounds are heard, it means the work was done correctly.
Replacing a unit at a service station should be carried out in cases where there is no confidence in the quality of the operation with your own hands.
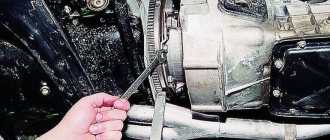
Dismantling the gearbox
The most important thing is to remove the gearbox. Therefore, it is best to carry out all work on an inspection hole or overpass - it’s really more convenient. Procedure:
- Remove the left wheel, unscrew the nuts from the ball joint and the tie rod end. You will need to move the box to the side; the drive on the left should come out without any problems.
- Loosen the nut securing the rocker and remove it from the gearbox shaft.
- Remove the starter, having first disconnected the battery and all wires from it.
- Unscrew the fastenings of the pillows holding the box. It is recommended to place a jack or reliable support under the gearbox housing before doing this.
- Disconnect the speedometer cable, disconnect the wires from the reverse sensor, as well as the ground bus.
- Unscrew the three bolts and nut that secure the gearbox housing to the engine block.
- Carefully move the box to the side; the right drive must be removed.
A little about how to properly remove the box:
- Firstly, you cannot remove both drives at once - replace one with a tube that will hold the differential.
- Secondly, it is imperative to drain the oil from the gearbox crankcase. By the way, why not replace it?
Resource extension
Warranty obligations do not apply to parts that fail early, because its wear and tear depends entirely on the actions of the driver. However, there are several recommendations that, if followed, will extend the life of the unit.
To extend the life of a part you need:
- avoid abruptly moving the car;
- do not allow the pedal to be slowly released at high engine speeds;
- drive with the clutch pedal fully released and do not press it while braking;
- Avoid situations in which the car may slip.
But the main recommendation is to minimize holding the pedal down for a long time. The release mechanism will last longer if the clutch pedal is used only to change speed.
Purpose
To understand where the release bearing is located, you need to understand the purpose and design of the clutch. The clutch and all its parts belong to the vehicle's transmission. It ensures the transmission of torque from the engine to the drive axle and wheels, and must be located between these parts of the machine. But an important condition for the location is accessibility in its control by the driver. Most often this is the clutch pedal, less often the lever near the steering wheel. Using the clutch mechanism, the driver periodically disconnects the engine from the transmission. This allows you to stop the car, change the gearbox, and change the driving dynamics.