01/25/2022 3,005 Transmission
Author: Victor
Violation of the operating condition of the car's clutch will lead to difficulty changing gears and other problems while the car is moving. Let's look at when clutch adjustment is necessary on a VAZ 2114 and how to correctly carry out this task.
[Hide]
The design and functions of the clutch in the VAZ 2114
In a VAZ 2114 car, the clutch is a simple unit in design. The system is equipped with a special cable, which, compared to a hydraulic unit, does not require constant maintenance. And you can change this element yourself if necessary.
The drive includes the following parts:
- cable for changing position in a special shell;
- a pedal that the driver controls from inside the car;
- clutch shift fork handle;
- a clamp securing the tip of the cable sheath;
- brake and clutch pedal retainer.
The mechanism is designed to transmit force from the pedal in the car interior to the fork in the engine compartment. This element removes the friction shaft from the flywheel of the power unit. Thanks to the use of cable transmission, AvtoVAZ engineers have ensured that the driver will not encounter problems with oil leakage or the need to remove air pockets from the clutch control system. In VAZ 2114 cars, the cable is considered the weakest component, so car owners are often faced with the procedure of replacing it. If you correctly install and tighten the cable when adjusting, this will ensure that the driven pulley is pressed well against the flywheel of the machine motor and basket when the clutch is activated.
Clutch device in VAZ 2114
When is it necessary to adjust the Lada Samara clutch drive?
As practice shows, the culprits of clutch failures are most often the car owners themselves. A sharp start with “slipping”, as well as prolonged holding of the pedal in a depressed state, negatively affects the performance of the mechanism. The presence of noise or vibration when shifting gears indicates a problem in the transmission line. Below are a few signs that may require adjustment:
- Loss of power due to “slipping”, i.e. unreliable connection between the disk and the flywheel.
- Difficulty changing gears.
- Changing the travel distance of the clutch pedal (the norm is from 125 to 135 mm ).
- Jerking or sticking when pressing the pedal.
Motorists who know which clutch to choose for the Lada 2114 will most likely install it together with a cable. Replacing any element of the clutch should end with adjusting the drive, as well as changing the pedal stroke.
The pedal stroke is measured with a ruler, which is pressed against the floor. The distance between the lower and upper points of the pedal position should be within 125-135 mm. The maximum permissible value is 160 mm. If the pedal stroke goes beyond these parameters, then we can talk about wear of the friction linings of the driven disk.
How to determine a breakdown?
If the pedal squeaks at the very beginning or at the end of its stroke, moves and grips poorly, or even fails completely, this indicates that there are problems in the functioning of the device.
As for the other “symptoms” of a breakdown:
- the driver has difficulty changing gears;
- the traction of the power unit has decreased, especially when driving uphill;
- new sounds appeared, grinding and creaking when pressing the pedal;
- incomplete switching;
- when the driver changes gears, the car slips.
Repair tool
You will need the following tools and accessories:
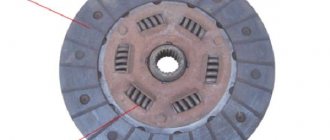
- Clutch kit - disc, release bearing, basket, bolts. It is imperative to change the driven disk. The leader (basket) is changed less often and has a much higher resource.
- A set of open-end wrenches, spanners, and sockets.
- Screwdrivers, pliers, chisels.
- Container for draining oil from the box. It will be necessary in any case, regardless of the substitution method you choose.
- Better than two jacks. The second one, when removing the box, should be installed under its crankcase to keep it at the same level and prevent it from falling.
- Supports for the car and wheel chocks.
- The presence of an overpass, pit or lift is welcome.
Having all these devices, you can begin the repair. If you have experience, then the whole procedure should take an hour or two. But if you are doing this for the first time, it will take more time.
How to change and adjust the cable yourself?
We figured out why the pedal creaks, now let's talk about adjusting the clutch on the VAZ 2114.
Correct adjustment and tension of the clutch pedal cable on a VAZ 2114 8 valve is carried out exclusively on the working mechanism.
When there are problems in the functioning of the system, they must be eliminated. One of the most common problems is a broken cable. Therefore, if the pedal fails, then before properly adjusting and tightening the cable, it must be changed.
If you are experiencing problems with your pedal squeaking, check out the video that demonstrates the procedure for lubricating the device. Filmed by VikiNow.
Required Tools
To adjust the tension and replace the cable, you will need the following devices and tools:
- the cable itself;
- Litol lubricant;
- set of open-end wrenches;
- ruler;
- pliers.
How to replace it correctly?
To repair the cable, you need an assistant:
- Open the hood of the car and remove the bolts securing the battery terminals.
- You need to disconnect the connected cable from the pedal itself. Using a 17mm wrench, unscrew the nuts securing the bottom of the product. Then remove it from the retainer and remove it from the plug installed in the engine compartment.
- Further steps are carried out in the car interior. Move the carpet away from the driver's seat. There is carpet under the pedals, it needs to be removed. This will allow you to find the place where the cable is attached to the pedal; the clamp must be disconnected from it. There will be no problems, since this element is simply removed from the hook.
- After which the cable itself is removed from the seat. To do this, the device must be pushed away from you towards the engine compartment. When the product is difficult to push out, most likely its fastening has soured. Then lubricate the retainer with WD-40 and work it out a little, moving it in different directions. If you have an assistant, while you are developing the cable, he can pull it from the side of the engine compartment, this will speed up the procedure.
- After dismantling the product, a new one is installed. Before this, the bushing that secures the cable is removed from the clutch pedal. If its condition is poor, it is worn out, it is advisable to replace the bushing. The retainer itself is lubricated with Litol before installation.
Channel Sdelaj Sam! Pljus interesting! A video has been released showing the procedure for replacing a product with your own hands.
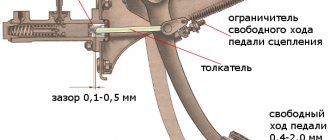
How to adjust free play?
After repairs, the cable is adjusted in height. If you do not adjust the stroke adjustment and adjust it, you will have difficulty changing gears. Before tensioning and adjusting the cable, it is recommended to test drive the machine. It will allow you to figure out how to properly tighten the pedal - raise or lower it.
Position tension diagram:
- If the car begins to move at the end of the pedal stroke, open the hood and locate the cable attachment location. There are two nuts here that can be unscrewed with a 17mm wrench. To reduce the free play of the pedal, that is, lower it, the bolt located inside the bracket is unscrewed. The outer screw must be tightened with a wrench.
- If, when starting to move, you realized that the free play should be increased, that is, raise the pedal, then the inner screw on the metal clamp should be tightened, and the outer one should be loosened. If there is rust on the free play adjustment nuts, it must be removed using WD-40. If there is no fluid, motor oil or brake fluid is used.
- If the adjustment is successful, check the free play with a ruler. If the actions are performed correctly, its length will be from 12.5 to 13.5 cm. This distance will be directly from the pedal itself in the car to the floor.
The VikiNow channel published a video showing the process of changing the cable and further adjusting its free play.
Checking work
If everything was done correctly, then you should make sure that the task was completed correctly. To do this, you need to press the pedal all the way several times, then measure the free play again. After pressing, it may go astray. If this happens, adjust the stroke again. Ideally, the clutch should engage in the middle.
How to check whether all actions were performed correctly:
- The VAZ 2114 car is installed on a flat horizontal surface.
- The handbrake lever is activated.
- The machine engine starts, the shift lever is moved to the first gear position.
- Try to start, but don't press the pedal. When all the setup steps have been completed correctly, the machine’s engine will stall. If the car starts to move, the mechanism needs to be re-adjusted. In this case, all the steps described above are performed again.
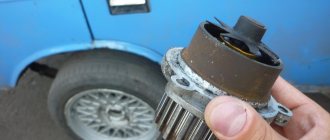
Replacing the Release Bearing VAZ 2115 ~ AUTORUSERVIS.RU
VAZ 2114 clutch release bearing - do-it-yourself replacement
The VAZ 2114 release bearing is a clutch element that is located in the clutch. The assembled clutch mechanism is designed to transmit axial force to the pressure plate, which removes the driven flange from engagement, as a result of which the torque of the motor is not transmitted to the gearbox.
Replacing the release bearing of a VAZ 2114 is a repair that is distinguished by the complexity of the process of dismantling the unit, since in order to change the part, the gearbox is first removed. Note that it is also possible to change the bearing without removing the gearbox, but at the same time, the complexity of the repair and the risk of incorrect replacement increase.
A clutch with a release bearing (VP) is a mechanism specifically involved in the operation of the clutch, therefore a malfunction of this unit is unacceptable. If you hear a hum or noise when the clutch operates, the bearing or sometimes the clutch assembly will need to be replaced.
A detailed summary is accompanied by 50 photos with several videos. First of all, the article is intended to help you correctly and correctly remove the speed unit, check the condition of the gearbox with the clutch, and change parts as needed.
Specific diagnostics consist of checking the functionality and presence of the following signs of failure.
Signs of a malfunction of the VAZ 2114 clutch release bearing, if detected, will require its replacement:
- When you press the clutch pedal, you hear noise, rumble or knocking (rolling, internal vibrations occur due to damage to the tracks with rolling elements, deformation of the separator or the clutch itself).
- A whistle when the clutch is engaged makes you realize that the quantity or quality of the lubricant is not enough;
- The speed does not change or the pedal moves hard (occurs when the clutch has fallen apart, as well as if the ear of the release bearing is broken).
- Watch a video example of how the release bearing of a VAZ 2114 makes noise and hums, as well as how the check is carried out. You can also hear the noise of the bearing after disassembling the box after removing the VP.
Video: “How to check a release bearing”
Video: “How a faulty release bearing makes noise”
Photo gallery
Photos of the procedure for changing the cable and adjusting the pedal position are shown below.
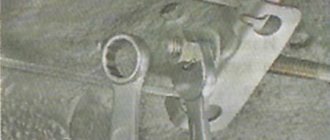
1. Unscrew the nuts securing the cable in the engine compartment
2. Disconnect the end of the product from the clamp
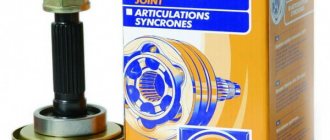
3. Install the new product and securely fix it in the installation location
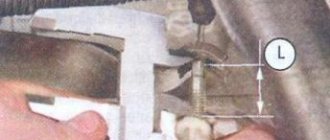
4. Adjust the cable position
Determining the pedal stroke
First of all, you will need to determine how much the clutch pedal has deviated from the standard values. To take a measurement, you need to do the following:
- the pedal is lowered by hand to the highest possible level;
- then she is released;
- In parallel, you will need to determine the stroke length of the drive using a ruler or tape measure.
First, find out what the distance is from the center point of the pedal to the floor of the cabin in the lowered position, and then take a measurement in the raised position. If it turns out that the deviation from normal permissible values exceeds the maximum, you will need to adjust the clutch.
There is also an option to check without exact measurements. In this situation:
- the machine is installed where there is a completely flat area;
- first gear is engaged;
- The drive is smoothly released, after which forward movement begins.
Debugging will be needed if the vehicle moves only when the pedal has reached the lowest point.
Video “Setup Guide”
User Sergey Serge published a video that clearly demonstrated the procedure for changing the position of the pedal, indicating all the nuances of this task.
Do you have any questions? Specialists and readers of the AUTODVIG website will help you ask a question
Was this article helpful?
Thank you for your opinion!
The article was useful. Please share the information with your friends.
Yes (100.00%)
No
X
Please write what is wrong and leave recommendations on the article
Cancel reply
Rate this article: ( 7 votes, average: 4.57 out of 5)
Discuss the article:
Noise when disengaging or engaging the clutch
A noise similar to rustling, grinding, a slight hum, or howling appears when the unit is turned off. When turned on, it disappears. With almost one hundred percent probability we can say that the release bearing has worn out. Replacing it does not require removing the entire component. However, its untimely replacement leads to failure of the entire mechanism. A squelching, whistling sound when you press the pedal is associated with wear on the master or slave cylinders. There is pressure, the broken part does not hold it - the liquid breaks through further, making noise. The noise in the box disappears only when the clutch is disengaged.
The second type of sound is constant, disappears only when the gear is disengaged, and is located in the area of the gearbox. The nature of the “tinkling” of Lada Vesta is a weakened connection between the three main nodes.
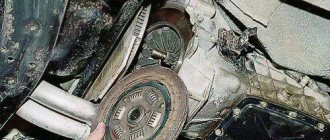
The worn driven circle loses its volume and begins to dangle inside the housing. Worn dampers are not able to press the circle tightly. The box is not tightly connected to the engine. Replacing the clutch on a manual gearbox
The procedure is very complicated. The main difficulty is not even that the gearbox needs to be completely removed, but that during assembly it needs to be centered in weight with the flywheel. Repairs can be done with your own hands. But if you do not have the proper experience, saving is not worth it, because we are talking about direct contact with the most important “organs” of the Lada. In general, the process looks like this:
- We de-energize Vesta, remove all attachments that block access to the gearbox mounting bolts (air filter, pipes);
- To prevent the loose internal combustion engine of the Lada from falling, we will hold it with a small diamond-shaped, barrel jack;
- We unscrew the power fasteners so as not to drain the oil, dismantle the box assembly with drives;
- We loosen one by one, then unscrew the fastening elements of the engaging mechanism housing (the bolts here are strong, but small in diameter, you need a good 8mm wrench). We remove the part and find the defect;
- We install the new product, adjust the position of the driven circle inside with a special tool;
- We change the release bearing in the box housing;
- Smoothly, without tilting, the input shaft of the gearbox hits the flywheel splines;
- We check the operation of the drive.
Not all operations are described here. For example, in order to remove the gearbox with drives, it is necessary to dismantle the suspension arms and so on.
The connection mechanism between the box and the engine is a “vitally” important element. Like any detail, it loves careful handling and timely service. The mechanism is directly connected to the internal combustion engine and gearbox; prolonged use of a faulty part can damage these two components. Do not neglect any suspicions that a unit is malfunctioning. May the car serve you for a long time.
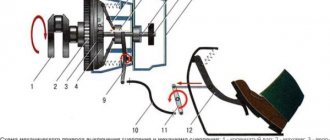
Design
The mechanical drive on the VAZ-2114, despite the fact that it has the least simple design, is in no way inferior in reliability to its hydraulic counterpart. Its system consists of a cable adjustable in length, sealed in a special anti-corrosion sheath, and the clutch pedal itself located in the car's interior, which, through free movement, is designed to transmit the pressing force to the clutch fork.
Despite the fact that such a scheme is simple, in general it is quite reliable.
Clutch diagram
A new product in the form of a clutch cable for VAZ-2114 cars helped to avoid all the problems that all owners of classics encounter. First of all, this refers to the leakage of hydraulic fluid from the system, and as a result, loss of control over the car. It would also require work to remove air from the clutch system after repair.
Why is it necessary to adjust the cable travel?
This procedure is necessary so that when the pedal, and with it the clutch cable, reaches certain values, the most squat pressing of the flywheel with the basket to the driven disk is made, at the moment when its operation is necessary. At the same time, thanks to the precise adjustment of this drive, the clutch is released at the moment the clutch pedal is released.
You can monitor the condition of the clutch, preventing such a situation from occurring, visually by positioning the clutch pedal relative to the floor of the car, using only a ruler.
Values
The optimal values should be from 125 to 140 mm, when measuring readings first with the pedal pressed and then with the pedal released. The maximum value that is allowed when measuring such indicators is 160 mm, and if they exceed these values, then this will mean severe wear of the friction linings, and therefore, after adjusting it, the clutch itself may soon need to be replaced.
We measure the result along the bottom edge of the pedal - in the photo the result is normal.