Based on the fact that the entire work of the oil pump consists of rotating the gears in the housing, with minimal clearances, its repair on VAZ 2108, 2109, 21099 cars comes down to defectiveness and rejection of worn parts after several control measurements.
Despite the fact that this unit has a long service life and rarely fails, the use of low-quality motor oil, and the considerable mileage of the engines of these no longer young cars (far exceeding 100,000 km - the trouble-free service life of the oil pump) leads to gradual or sudden (for some) his refusal.
To repair the oil pump, you will need special tools: a micrometer (with limits from 0 to 25 mm), a caliper. As well as a metal ruler and a set of flat probes. If they are not there, then it is better not to repair the oil pump, but to replace it with a new one (since the price of special tools will be higher than the price of a new pump).
Features of oil pump repair for VAZ 2108, 2109, 21099 cars
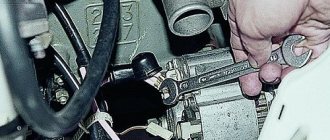
— We remove the oil pump from the car engine , disassemble it and wash it (with diesel fuel or kerosene). Blow with compressed air. Particular attention should be paid to flushing the pressure relief valve holes, as debris getting under the valve is one of the most common causes of oil pump failure.
pressure reducing valve holes for flushing
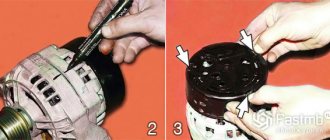
— Visually inspect the oil pump.
Its parts (working surface of the housing, gears) should not show signs of severe wear: scratches, cracks, crumbling. The pressure reducing valve and the hole for it should not have pronounced longitudinal marks.
the working surface of the oil pump housing 2108 under the drive and driven gears should not have deep marks
Next, we check how worn the driven and driving gears are, and their workplace.
— We measure the size of the gap between the plane of the housing and the gears.
We apply the ruler with its edge to the plane of the pump housing and use a feeler gauge to measure the gap between the ruler and the gears. The clearance for the drive gear is 0.12 mm, the driven gear is 0.15 mm.
measuring the gap between gears and ruler
— We measure the thickness of the drive and driven gears.
We use a micrometer. The thickness of the drive gear is 7.45 - 7.47 mm (nominal), the maximum size is 7.42 mm. The thickness of the driven gear is 7.45 - 7.47 mm (nominal), the maximum size is 7.35 mm.
measuring the thickness of the drive and driven gears of the oil pump 2108
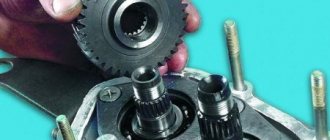
— We measure the diameter of the driven gear seat and the thickness of the partition between the drive and driven gears in the pump housing.
We use a caliper. The diameter of the driven gear seat should not exceed 75.1 mm. The minimum thickness of the dividing wall between the driven and driving gears (segment) is 3.4 mm.
measuring the mounting hole of the driven gear and the thickness of the segment in the oil pump housing
We carry out additional checks (optional).
— We check the presence or absence of deformation of the plane of the oil pump housing cover.
Place it on a flat surface and rock it. There shouldn't be any gap. If there is deformation, it can be eliminated by grinding.
the plane of the oil pump housing cover 2108 for grinding
— We measure the diameter of the hole for the pressure reducing valve (12.03 mm).
— It is also advisable to measure the size of the pressure reducing valve spring
Without load - 44.72 mm and under load 4±0.24 kgf - 31.7 mm.
pressure reducing valve spring length
Rejected parts should be replaced with new ones, measurements taken again, lubricated with engine oil and installed on the engine. Before installation, clean the oil intake receiver. In addition, it is advisable to replace the crankshaft oil seal pressed into the pump housing.
Notes and additions
— More unpleasant reasons for the emergency oil pressure light to come on include cranking or wear of the liners on the crankshaft and wear of the crankshaft journals (this is already an engine overhaul).
— The oil pump pressure reducing valve plug is tightened with great force. Before unscrewing, carefully clean it from dirt and use a high-quality edger with un-licked edges for unscrewing.
More articles on engines of VAZ 2108, 2109, 21099 cars
— Lubrication system of the carburetor engine of VAZ 2108, 2109, 21099 cars
Oil pump malfunctions can significantly harm a car's engine because they disrupt the normal circulation of engine oil through the system. The causes of the breakdown may be poor-quality oil used, its low level in the crankcase, failure of the pressure relief valve, contamination of the oil filter, clogged oil receiver mesh and several others. You can check the condition of the oil pump either with or without dismantling it.
Signs of a faulty oil pump
There are several typical symptoms of a faulty oil pump. These include:
- Reduced engine oil pressure. This will be indicated by the oil can light on the dashboard.
- Increasing engine oil pressure. Engine oil is squeezed out of various seals and joints in the system. For example, oil seals, gaskets, oil filter connection points. In more rare cases, due to excess pressure in the oil system, the car refuses to start at all. This happens because the hydraulic compensators stop performing their functions, and accordingly, the valves function poorly.
- Increased oil consumption. Occurs due to leakage or waste.
It is necessary to understand that some of them may indicate failure of other elements of the oil system. Therefore, it is advisable to carry out the check in a comprehensive manner.
Design
Oil pump VAZ 2109
Today there are three types of pumps:
- 2-gear pumps, in which one gear is connected to a shaft, which starts working from the intermediate or camshaft of the VAZ. This pump is installed inside a sump located in the lower area of the cylinder block. Typically, the rotation speed of the element is ½ the rotation speed of the motor.
- A gerotor pump has a rotating small gear inside an outer gear. This pump is located in the lower area of the motor in the sump.
Old style oil pump
Causes of oil pump failure
The reason why the oil pump has failed can be determined by diagnostics. There are at least 8 main oil pump faults. These include:
- Clogged oil pickup strainer. It is located at the inlet of the pump, and its function is to coarsely filter the engine oil. Like the system’s oil filter, it gradually becomes clogged with small debris and slag (often such slag is formed as a result of flushing the engine with various means).
- Malfunction of the oil pump pressure reducing valve. Usually the piston and spring included in its design fail.
- Wear of the inner surface of the pump housing, the so-called “mirror”. Occurs for natural reasons during engine operation.
- Wear of the working surfaces (blades, splines, axles) of the oil pump gears. It happens both over time of long operation and due to rare changes of (very thick) oil.
- Using dirty or unsuitable engine oil. The presence of debris in the oil can be for various reasons - careless installation of a pump or filter, use of low-quality lubricating fluid.
- Careless pump assembly. In particular, various debris was allowed to get into the oil or the pump was not assembled correctly.
- Drop in oil level in the engine crankcase. Under such conditions, the pump operates at excessive capacity, which causes it to overheat and may fail prematurely.
- Dirty oil filter. When the filter is very clogged, the pump has to make significant efforts to pump the oil. This leads to its wear and partial or complete failure.
Checking the oil receiver
Oil pump VAZ 2109
As a rule, the oil receiver tube is equipped with a screen, at the end of which there is a mesh to prevent the penetration of large debris. Through this element, oil is sucked into the pump from the crankcase. Pump wear can occur due to carbon, contaminants, or other microscopic particles. To check the oil pickup:
- remove the oil pan from the engine;
- The element is replaced when it becomes clogged or broken;
- It is quite difficult to clean the oil receiver, since small debris may not be noticed.
How to determine if an oil pump is faulty
There are two types of pump testing - without dismantling it and with dismantling it. Without removing the pump, you can verify its malfunction only when it is already in a “dying” state, so it is better to remove it to perform detailed diagnostics.
How to check the oil pump without removing it
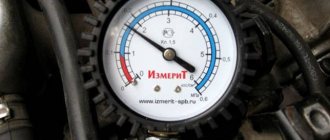
Before directly testing the pump, it makes sense to check the oil pressure in the system using a pressure gauge. This way you can make sure that the oil pressure light is working correctly and did not light up in vain. To do this, a pressure gauge is screwed in instead of the emergency lamp pressure sensor.
Please note that the pressure value often drops precisely “when it’s hot,” that is, when the engine is warm. Therefore, the test must be carried out on a warm engine and at idle speed. The minimum and maximum pressure values will differ for different machines. For example, for a VAZ “classic” (VAZ 2101-2107) the minimum emergency pressure value is 0.35...0.45 kgf/cm². It is under such conditions that the emergency lamp on the instrument panel is activated. The normal pressure value is 3.5…4.5 kgf/cm² at a rotation speed of 5600 rpm.
On the same “classic” you can check the oil pump without removing it from its seat. To do this, you need to dismantle the distributor and remove the pump drive gear. Next, evaluate her condition. If there are numerous scuffs on its surface on the blades or on the gear axis, then the pump must be dismantled. It is also worth paying attention to the gear splines. If they are knocked down, it means the pump is jammed. This is usually due to debris and/or sludge in the oil.
Another check without dismantling the pump is to check the play of its rod. This is done in the same way, with the distributor removed and the gear removed. You need to take a long screwdriver and simply move the rod with it. If there is play, it means the pump has failed. On a normal working pump, the gap between the surfaces of the rod and the housing should be 0.1 mm, respectively, and there is practically no play.
Oil receiver mesh
For further inspection it is necessary to dismantle and disassemble the pump. This is also done in order to subsequently flush out any accumulated debris. First you need to unscrew the oil receiver. In this case, it is necessary to check the condition of the sealing ring present at the joint. If it has hardened significantly, it is advisable to change it. Pay special attention to the oil receiver mesh, since most often it is the reason that the pump does not pump oil well. Accordingly, if it is clogged, it needs to be cleaned, or even the entire oil receiver complete with mesh must be changed.
Checking the pressure relief valve
The next item to check is the pressure relief valve. The task of this element is to relieve excess pressure in the system. The main components are a piston and a spring. When the extreme pressure value is reached, the spring is activated and the oil is poured back into the system through the piston, thereby equalizing the pressure. Most often, the malfunction of the oil pump pressure reducing valve is due to the failure of the spring. It either loses its rigidity or bursts.
Depending on the design of the pump, the valve can be dismantled (flared). Next you need to evaluate piston wear. It is advisable to clean it with very fine sandpaper and spray it with an aerosol cleaner for further normal operation.
It is imperative to inspect the place where the valve fits onto the body. There should be no risks or scratches. These defects can lead to a decrease in system pressure (reduced pump efficiency). As for the valve spring for the same VAZ “classic”, its size at rest should be 38 mm.
Pump housing and gears
It is necessary to inspect the condition of the internal surfaces of the cover, the pump housing, as well as the condition of the blades. If they are significantly damaged, the efficiency of the pump will decrease. There are several standard tests.
Checking the gap between the gear and the oil pump housing
The first is to check the gap between the contacting blades of the two gears. The measurement is made using a set of special probes (tools for measuring gaps of different thicknesses). Another option is a caliper. Depending on the model of a particular pump, the permissible maximum clearance will differ, so the relevant information must be clarified further.
For example, the new original oil pump of a Volkswagen B3 has a gap of 0.05 mm, and the maximum allowable is 0.2 mm. If this gap is exceeded, the pump must be replaced. The VAZ “classic” has a similar maximum value - 0.25 mm.
Development on the oil pump gear
The second test is to measure the clearance between the end face of the gear and the pump cover housing. To take measurements from above, you need to place a metal ruler (or similar device) on the pump housing and, using the same probes, measure the distance between the end side of the gears and the installed ruler. It’s the same here, the maximum allowable distance needs to be clarified further. For the same Passat B3 pump, the maximum allowable gap is 0.15 mm. If it is larger, a new pump is needed. For VAZ “classics” this value should be in the range of 0.066…0.161 mm. And the maximum emergency gap is 0.2 mm.
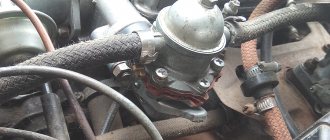
Where is the oil pump located on the VAZ 2108/2109, what is it responsible for
The oil pump in the engine design of every car is an important and integral mechanism, which is designed to create a certain pressure in the engine lubrication system. The design of the unit comes in various forms and can be driven by a camshaft or crankshaft.
On such common models as the VAZ 2108/2109, the device for circulating oil in the system is located behind the crankshaft pulley. Looking under the hood, you won’t be able to examine it so easily: this can only be done after removing the crankshaft pulley from the engine.
The pump is fastened to the cylinder block using six bolted connections, which ensures reliable fixation of the entire structure.
The oil pump on the VAZ 2108/2109 is located behind the crankshaft pulley, so it is not so easy to examine this element
Preparing to replace your pump
The design of a liquid pump is very similar to that of an oil pump, as it consists of similar elements. Initially, components manufactured by Pekar are installed. But if it is not possible to replace it with the same part, you can find analogues. However, not all of them will have the same characteristics as standard components.
Some have a shorter service life, others may have slightly different sizes, you will have to work with a file to install them in the seat. Try to select the analogue that will be as similar as possible to the standard one produced. The same requirements can be presented to other nodes. The fuel pump from the same manufacturer serves without fail for a long time.
Before replacing the pump, prepare wrenches for 10. You will need all types: cap, end and open-end. Some bolts are difficult to reach, so having different types of wrenches will help. Drain all liquid from the engine cooling system, allowing it to cool beforehand. Do not carry out such repairs immediately after turning off the engine. This risks boiling water getting on the skin and causing burns.
It's better to stock up on a small amount of automotive chemicals. These include sealant and thread locker. With their help, you will get rid of accidental leakage of the liquid pump of the VAZ 2108 car. When you remove the belt, you will have the opportunity to dismantle the pump.
To do this, use 10mm wrenches. With their help, you need to unscrew the three bolts that secure the Pekar pump housing to the engine block. It is not always possible to unscrew these bolts with ease. Sometimes dust mixed with antifreeze or oil accumulates near them. Therefore, before unscrewing, take five minutes to clear the repair area of any dirt.
Symptoms of a faulty oil pump
The first thing that will indicate problems with the oil pump is the oil pressure light coming on. In this case, the element indicates that there is a problem with the engine lubrication system. How serious they are remains to be determined by the car owner. In addition to checking the pressure, attention should be paid to oil consumption. If the pressure in the lubrication system of the power unit decreases, the vehicle should not be operated until the cause is determined and repairs are made. The main symptoms of problems in the system are a light coming on or a knocking sound in the engine.
Actions to be taken in the event of a breakdown:
- stop and turn off the engine;
- wait a while for the oil to drain into the engine crankcase, then check its level using a dipstick. If the level is minimal, you need to top it up to normal;
- start the engine;
- If the oil pressure lamp continues to light and extraneous noise is still heard from the engine, this may indicate a possible problem with the oil pump.
One of the reasons why the oil pressure light comes on may be a low level of lubricant in the engine.
How to check the oil pump
To test the mechanism, it is not necessary to dismantle it. For diagnostic purposes, it is necessary to measure the pressure in the lubrication system and compare it with the readings that correspond to the norm for a particular car. Based on the results obtained, we can draw conclusions: is there any cause for concern or not. If it is necessary to replace the oil pump on a VAZ 2108/2109, it is recommended to use only original parts. This is explained by the fact that many people today produce components for cars in the domestic automobile industry. However, their quality leaves much to be desired.
When replacing the oil pump, it is recommended to purchase an original part to avoid problems due to poor workmanship
Checking the oil pump on the stand
If possible, you can check the performance of the oil pump on a special stand. The essence of such a test is to evaluate the performance and pressure generated by the device, as well as the pressure at which the pressure relief valve operates. When testing the pump using a stand, special oil with a temperature of +20 ˚С is used. For an oil pump for a VAZ 2108/2109 engine, the flow rate should be within 34 l/min, the back pressure should be 5 kg/cm². The pressure relief valve should open at a pressure of 5.5–7.5 kg/cm². If the valve is checked on the engine using a pressure gauge, which is installed instead of an oil pressure sensor, the valve must operate at a pressure of at least 4.5 kg/cm².
Checking the pressure sensor
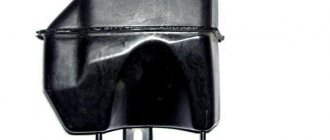
Oil pump cover VAZ 2109
If there is no unusual noise coming from the engine and the oil level is normal, the warning light may still sound indicating low oil pressure. Then, most likely, the problem will be with the oil pressure sensor. This sensor is usually located on the motor block. Inside the device there is a spring-loaded diaphragm, as well as an automatic switch diaphragm, which is highly sensitive to pressure. This switch is designed to close the low pressure warning lamp circuit when it drops below a certain level. Reasons for sensor failure:
- if the diaphragm stops moving;
- when the switch is jammed;
- if the hole through which oil gets inside the sensor is clogged;
- in case of unsatisfactory connection, which may be caused by corrosion, connector or wiring failure.
Attention! If the car is equipped with an electronic pressure gauge, a small rheostat will be placed inside the sensor, which, when this diaphragm moves, sends a variable voltage signal.
Causes of malfunction of VAZ 2108/2109 oil pumps
Before deciding to repair or replace the oil pump, it is worth understanding the reasons that may indicate problems. By the way, problems are possible not only with the mechanism itself, but also with other elements of the lubrication system:
- decrease in pressure in the crankcase;
- problems with pressure sensors;
- use of low quality motor oil;
- using oil that is not suitable for this vehicle;
- problems with the lubrication or safety valve;
- oil filter clogged;
- contamination of the oil receiver or pump housing.
Contamination of the oil receiver leads to a decrease in pressure in the system and the light comes on.
The blockage may occur due to contamination of the engine crankcase itself. The problem is solved by removing and cleaning the pan. The operation of the oil pump can be disrupted by other problems that are identified during the diagnostic process. These include:
- gasket damage;
- unreliable filter fastening;
- high wear of mechanism parts;
- reduction valve failure.
Removing the engine
The engine on a VAZ can be removed if you have the necessary tools. In addition, you need to have a special lifting device available that will help remove the engine from the compartment. You can, of course, do without it, but then you need additional workers. So, let's start:
- remove the hood;
- cover the front fenders of the car with soft blankets so as not to damage the paint when removing the engine;
- drain the radiator;
- disconnect all electrical wires from the distributor, as well as from the oil and temperature sensor and carburetor;
- remove the fuel supply hose;
- unscrew the exhaust manifold pipe (muffler);
- disconnect the battery terminals;
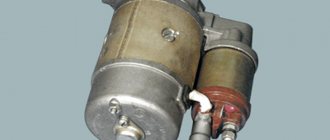
- remove the starter;
- the air filter housing is removed;
- disconnect the generator wires;
- unscrew the engine from the gearbox;
- use a screwdriver to loosen the clamps of the heater radiator pipes;
- remove the accelerator pedal linkage;
- remove the carburetor choke cable.
After carrying out the above work, you need to go down into the inspection hole or under the overpass:
- remove the clutch master cylinder;
- unscrew the gearbox;
- remove the protective casing;
- unscrew the engine bolts;
- We hook the engine with belts and lift it up.
At this stage, engine removal is complete. Let's move on to its analysis.
How to replace an oil pump yourself
Having determined that the oil pump needs replacement or repair, it is necessary to remove the mechanism from the engine.
Tools for work
In order to dismantle the unit, you will need a standard motorist kit, consisting of the following list:
- keys to “10” and “13”;
- socket heads;
- extension cord;
- cardan joints.
How to remove the oil pump
If the work is carried out on an injection engine rather than a carburetor engine, then the crankshaft position sensor will need to be removed from the engine. Otherwise, dismantling the mechanism is performed in the same sequence:
- We de-energize the vehicle's on-board network by removing the “—” wire from the battery.
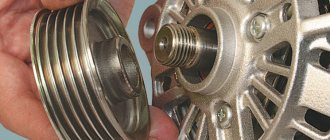
- Loosen the generator fasteners and remove the belt.
One of the first procedures for dismantling the oil pump is to remove the alternator belt.
After draining the oil, dismantle the engine protection and sump
To remove the crankshaft pulley, you will need to remove the timing belt.
One of the steps to dismantle the oil pump is to remove the crankshaft pulley
The oil receiver is attached to the main bearing cap with two bolts and one bolt to the oil pump
The pump is secured with six bolts, unscrew them
Having unscrewed all the fasteners, move the pump away from the main bearing cap and remove it from the engine.
Video: dismantling the oil pump on a VAZ 2108/2109
Pump installation
To perform reassembly, follow these step-by-step instructions:
- Before installing the assembly, the drive gear is installed accordingly.
Before installing the oil pump in place, the drive gear must be set in a certain position
The drive gear must align with the flats on the crankshaft
Before installing the pump, coat the working edge of the oil seal with engine oil.
After lubricating the oil seal with engine oil and installing it in its seat, install the pump
Video: how to install an oil pump on a VAZ with front-wheel drive
Removal and installation
After unscrewing the bolts, you will face the most difficult task - removing the pump housing from the engine block. Sometimes this is not easy to do, since the metal surface inside may oxidize, which is why the part simply sticks to the motor. To carry out the work you will have to use a thin chisel or flat-head screwdriver.
If you decide to use the latter, then make sure that it is massive and does not bend with a weak blow.
On cars with a carburetor injection system, it may be necessary to remove the air filter housing, as it sometimes gets in the way. When you have freed up space, install the chisel on the pump housing. Do not get confused, because in this case the jacket of the engine block can easily be damaged. Using light but sharp blows, knock the pump body out of its seat. You can throw out the old pump, take a rag with acetone and clean the metal in the engine block.
Thoroughly clean it of any remnants of the old gasket and sealant so that in the future the new elements will fit into place as tightly as possible. Installation must be carried out in reverse order. Install a new gasket along with the coolant pump, lightly coated on both sides with sealant.
The pump produced by Pekar fits into place as tightly as possible; no effort is required. But if the fit is too tight, you can use a wooden hammer to tap the pump body into the engine block. This is how to properly replace a pump.