There are actually many reasons for the malfunction. Firstly, the sensor itself, which indicates the oil pressure level, may fail, causing the light to indicate a problem. It is also possible that the oil pump itself or its parts are malfunctioning or not functioning correctly. To completely eliminate the problem in the event of parts failure, it is necessary to carry out special repairs to the oil pump.
Where is the oil pump located?
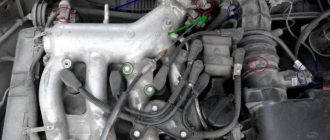
The oil pump is located behind the crankshaft pulley, and therefore can only be clearly seen after removing the pulley from the engine. The pump is attached to the cylinder block with six bolts, which ensure reliable fixation of the parts. When the oil pump fails, the following problems arise:
- the oil pressure level in the system drops sharply, which will be signaled by the sensor on the panel;
- Oil consumption will begin to increase significantly, which will entail the need to regularly add oil.
If you find similar problems in your car, you need to contact a service center for diagnostics and troubleshooting.
If you have experience in car repairs with your own hands, then replacing the oil pump on a VAZ-2109 yourself will not be a problem for you.
Reasons for the drop in oil pressure in VAZ cars
Instrument panel and oil pressure warning lamp
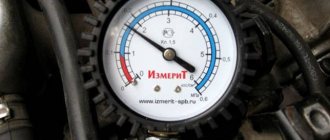
If the pressure drops, then, as mentioned above, a special light on the instrument panel begins to signal a problem. To begin with, it is recommended to check the entire circuit that is transmitted from the sensor to the warning lamp:
- take the wire from the sensor and lean it against the engine ground (if the circuit is in good order, the lamp will definitely go out);
- if everything is fine in the circuit, you need to remove the oil pressure sensor (if it is dry, then there is a problem, which you need to look for below).
And quite often it is the oil pump that causes the malfunction. The oil filter valve or some other element may be stuck in this part. By replacing a low-quality oil filter with a high-quality option, you can solve the problem. But if the pressure drops again, then you need to open the pan and check the oil receiver, and then the rubber sealing ring. If this does not help, you need to remove and disassemble the oil pump itself.
How to replace an oil pump
Before you begin removing the oil pump and replacing it, it is necessary to carry out preparatory work. First, make sure you have easy access to the following tools:
- set of wrenches;
- socket heads;
- universal joints;
- extension.
We remove the old pump:
- If you own a fuel-injected car, you must first remove the crankshaft position sensor from the engine. You won't have to do this with a carburetor engine.
- After this, you should completely drain the engine oil that is in the engine.
- When you have drained all the oil, you need to remove the crankshaft timing pulley.
- Now remove the oil pan, unscrew the bolts that secure the oil pan, and remove it.
- Remove the oil pump bolts using an extension.
- Move the pump using a screwdriver - to do this, insert it between the bearing and the pump.
- After all this, carefully remove the pump from the crankshaft.
Once you have removed the old oil pump, you can begin installing the new one. This must be done in the correct sequence:
- Before installing the new pump, rotate the drive gear so that it is completely aligned with the flats on the crankshaft.
- Now you need to thoroughly lubricate the working edge of the crankshaft front oil seal; use engine oil for this.
- When you have completed all the previous operations, you can install the oil pump on the crankshaft. Carefully tuck the lip of the oil seal in, and then tighten the bolts that secure the oil pump.
After this, you need to carry out the final stage of installation - collect all the parts that you removed before (including covers and gaskets) and install them in the correct order.
Source
Dismantling
Removing the pump yourself is not difficult. Yes, and you are quite capable of performing independent repairs.
- De-energize the car by removing the negative terminal from the battery.
- Loosen the generator mounting bolts and remove the belt.
- Prepare a clean container by draining the oil from the crankcase into it. Next, you will need to remove the engine protection and oil pan.
- Remove the camshaft drive timing belt.
- Now that the belt is removed, do not turn the crankshaft or camshaft under any circumstances. Otherwise you will damage the valves by hitting them with the pistons.
- Remove the crankshaft pulley by using two flat head screwdrivers and pulling it off the shaft. If the key does not hold well in its seat, it is better to remove it too.
- Next in line for dismantling is the oil receiver. To remove it, you need to unscrew the two fastening bolts located on the main bearing cover, as well as one fastening bolt connecting the oil receiver to the pump (oil).
- Remove the pump, held in place by six bolts.
- After unscrewing all the bolts, carefully slide the oil pump away from the main bearing cap, then remove the oil pump with peace of mind.
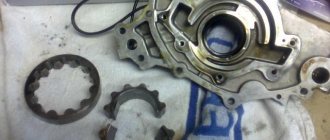
Disassembly and repair
After completing the dismantling work, you can proceed in two ways:
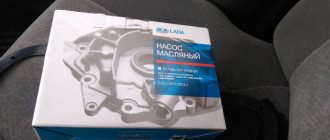
- Replace the old pump with a new one;
- Repair the old oil pump.
Repair allows you to identify worn elements and replace them with new ones, which will restore functionality. If the breakdown is more serious than simple wear and tear of consumables, the optimal solution would be to completely replace the oil pump.
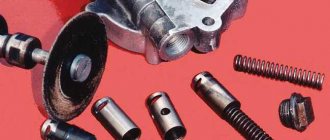
To disassemble the pump, follow the instructions.
- Divide the pump into two parts. To do this, we have already unscrewed 6 bolts securing the cover to the body and used a screwdriver to pry off this cover. It came out of the pins on the body. So we remove the element and put it aside.
- Inside the pump housing there are driven and drive gears, which need to be removed and placed aside for now. Then we will check their condition.
- Next, the pressure reducing valve is removed. To do this, first unscrew the valve plug and remove the spring from the hole, and then the valve.
- In some cases, problems may arise with removing the valve. If you encounter this situation, gently tap the oil pump body against a piece of wood or use a wooden cone-shaped pin. It is inserted into the valve hole, the valve is hooked and removed.
- After disassembling your oil pump on the VAZ 2109, thoroughly wash all its components using clean kerosene. Don't forget to wipe the parts dry afterwards.
- Check the condition of the cover and body of your pump for mechanical defects, chips, cracks.
- Pay special attention to the landing spots of the gears, where there should be no signs of wear or other mechanical defects. If they are, the pump will have to be replaced.
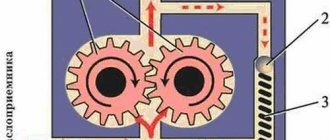
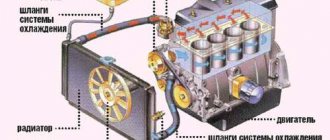
Design
Oil pump VAZ 2109
Today there are three types of pumps:
- 2-gear pumps, in which one gear is connected to a shaft, which starts working from the intermediate or camshaft of the VAZ. This pump is installed inside a sump located in the lower area of the cylinder block. Typically, the rotation speed of the element is ½ the rotation speed of the motor.
- A gerotor pump has a rotating small gear inside an outer gear. This pump is located in the lower area of the motor in the sump.
Old style oil pump
- The internal pump is often installed on the front cover of the engine. It begins to function from the crankshaft. Structurally, such a mechanism is similar to a gerotor mechanism, but in this situation it replaces the front damper of the engine. As a result, it is possible to generate higher oil flow with higher pressure.
Replacing the oil pump on VAZ 2108, VAZ 2109, VAZ 21099
Have you ever encountered a situation where, while on the road, a light suddenly lights up on the dashboard, indicating insufficient oil pressure in the system? Many people first go to fill the engine with oil, but after filling, when they get behind the wheel, they see that the light has not stopped burning. In today's publication we will try to understand the causes of this problem.
So, there are plenty of reasons: starting from the oil pressure sensor, which can fail and give false readings, and ending with the oil pump, where there may also be a malfunction, and the parts inside are not working properly. The solution is to repair this pump. We recommend that you familiarize yourself with the intricacies of the process and the sequence of actions here: “Oil pump repair.”
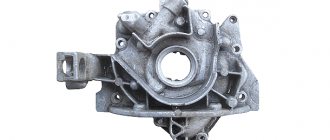
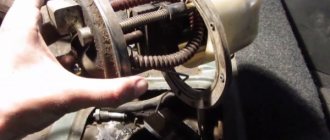
Pump location
Located behind the crankshaft pulley. It will be possible to examine it only with the pulley removed from the car engine. The photo below shows this pump attached to the cylinder block using six mounting bolts.
When to change the oil pump?
In case of the following problems:
• Firstly, the oil pressure in the system decreases, which is indicated by the oil pressure light.
• And secondly, oil consumption in the system increases, requiring constant addition of engine oil to the engine.
Malfunctions in the operation of the pressure reducing valve
The structure of the pressure reducing valve is quite simple, which ensures its reliability and reduces the likelihood of breakdown. However, sometimes this still happens. Most often this is due to wear and tear of the mechanism, so do not forget to regularly diagnose all components of the car, as well as promptly replace outdated parts.
There are two main types of mechanism failure.
- The valve creates insufficient pressure. Usually the cause of this problem lies in the spring. With prolonged use, it becomes less elastic and stretches. As a result, the valve remains slightly open all the time. Due to this, the pressure decreases, and the oil does not reach some engine components. Sometimes it happens that unprofessional craftsmen install a spring with insufficient elasticity during repairs. This has the same effect.
- Excessive pressure builds up in the valve. As a rule, the cause of this breakdown is the entry of debris into the mechanism or the use of old viscous oil.
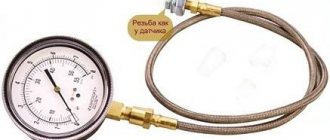
How to determine that the pressure relief valve is broken?
It is impossible to determine at first glance that the valve is broken. It is necessary to carefully inspect other elements of the system and exclude the possibility of damage to other parts of the oil pump. In order to understand that there are malfunctions in it, you should look at the dashboard. Most car models have a sensor located there that indicates problems in the system. It is a warning light with a pictogram that lights up at high speeds.
If this happens, you should stop the car immediately, as further movement may lead to permanent engine damage. Turn it off and get out of the car. Next, you will need to take the following steps.
- Wear protective gloves. At the moment, the engine compartment of the car is hot, so you can easily get burned.
- There is no point in checking the oil level if you have just stopped. It will take time before it drains into the crankcase. At this time, you need to inspect the engine: look for fresh oil leaks or damage to the crankcase.
- If the problem is a broken crankcase, you will need to seal it. This can be done using available materials: an ordinary rag, a piece of rubber and even tape.
- Inspect the oil filter. Damage to its gasket can also cause a breakdown.
- If the above items are in order, you should check the oil level. This is done with a special probe with o and “maximum”. Ideally, the oil level should be between them. If there is a lack of lubricant, simply add it.
All further actions are carried out on the valve removed from the pumping system. Examine it carefully. Often the cause of breakdown is clogging of the mechanism. This usually happens to drivers who are too lazy to change the oil. Dirt accumulates on the surface of the valve or spring, which prevents normal operation. If you have recently carried out a major overhaul of your car, then there is a risk that the valve was not properly washed and there are particles of chips and other debris left in it.
For this reason, technicians often recommend replacing valves after major repairs. If you do not want to do this, make sure that the system is not clogged before using the vehicle.
There is an unusual way to check the functionality of this element. Take a small piece of cotton (or other breathable) fabric and place it on the fitting that is parallel to the lid. Now you need to take a sharp breath through the material. If you feel strong resistance, it means that the valve is working as it should: it blocks the air flow and passes it through a special hole. A working mechanism should not be easily blown through.
Table: diagnosis of low pressure in the oil pump, causes and remedy
| Guide to diagnosing hypotension | ||
| Malfunction | Cause | Remedy |
|
|
|
| Low oil pressure throughout the entire engine speed range | There is too little oil in the engine. The oil intake screen is dirty, the oil intake tube is broken | Add oil to the engine. Remove the oil sump, clean the mesh, if necessary, replace the tube. |
| Worn oil pump | Remove, check, replace if necessary | |
| Engine bearing wear | Repair the engine | |
How to replace the oil pump, also known as the oil pump, on a VAZ 2108-VAZ 21099?
Note! The tools you will need are a set of basic wrenches, sockets, u-joints, and an extension.
Removal
1) On fuel-injected cars, first of all, it is necessary to remove the crankshaft position sensor from the engine. (Details and subtleties of the process are described in the article: “Replacing the crankshaft position sensor”)
2) Then drain the engine oil in the car engine. (Here the instruction will come to your aid: “Changing the engine oil”)