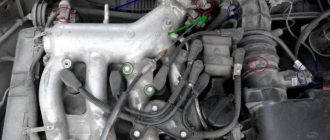
Malfunctions of the pump and the system as a whole
As you know, nothing lasts forever in this world and everything has to be repaired over time.
The oil system of the Shtil ms 180 is no exception, and has its own specific malfunctions. Let's take a closer look at them. Signs of a malfunctioning lubrication system are as follows:
- the chainsaw chain is absolutely dry and does not shine;
- oil does not leave the oil tank;
- the chain stretches quickly and this happens constantly;
- the saw bar moves to the side when sawing;
- The tire also heats up in the area of the drive sprocket and the paint melts.
All these signs directly or indirectly indicate problems in the chainsaw chain lubrication system.
The first thing to do after you suspect that chain lubricating oil is not being supplied is to check its supply. There are two ways to do this. The first is described in detail in the instructions for the tool and consists in the fact that you need to start the chainsaw, increase the gas as much as possible and point it towards any obstacle.
If the lubrication system is working properly, the oil will fly off from the tip of the tire and a strip of oily drops will appear on the surface towards which the tire is pointed. If there are still violations in the system, the surface will remain clean.
The second way is to remove the tire from the chainsaw and start it. When the engine speed increases, oil will flow from the oil channel at the tire shank installation site; if this does not happen, it is necessary to look for the cause of the malfunction.
Diagnostics
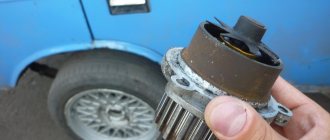
Diagnostics should begin with inspecting and checking the oil receiver (filter) of the Stihl 180 saw. As a rule, if the filter is very dirty, the oil supply may stop.
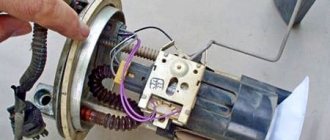
Next, you need to remove the drum sprocket and check the condition of the drive gear. The thread on it must be clearly defined, not licked or have any other defects; also, when the gear is removed, it is necessary to check the wire lever. It must press the gear tightly and not turn, otherwise the gear stands still and does not transmit force to the pump, as a result of which the oil supply stops.
If all of the above methods to detect and eliminate faults do not produce results, it is necessary to use extreme measures, i.e. dismantle the pump.
How to remove the pump
The oil pump is installed on the right side of the bottom of the housing, in the same place an oil line coming from the chainsaw tank is connected to it. To remove the pump, you will first need to release the saw from the handle; to do this, unscrew the rear handle of the unit and disconnect the throttle control rod. At the next stage, you need to remove the handle shock absorber plugs and, using a powerful slotted screwdriver, squeeze them out of their seats on the handle.
After the handle is removed, the chainsaw body is turned upside down. The hose leading from the oil tank to the pump will be immediately visible. It must be removed from its seat.
To better understand the process of removing the pump, you can watch the video below. In the video, the service center master shows in detail how to remove the oil pump from a chainsaw, and also describes the main malfunctions of the supply system.
After the pump is removed, it must be cleaned and purged. As a rule, the main failure of the oil pump is its blockage. Having eliminated it, you can install the pump in place.
Replacing the pump is only required if it is not possible to remove the blockage.
Dry sump engines: advantages, disadvantages and where to put them
Conventional engines have a special pan at the bottom where all the engine oil is located. From this pan, the pump pumps oil to lubricate the parts rubbing against each other through all channels.
But now there are engines that do not have an oil pan. Let's figure out why this is done and where are these engines used?
Need for lubrication
Lubrication of all parts is very important for any engine. It happens that the oil channels become clogged and the engine oil is not pumped from the sump. This leads to parts overheating and sometimes even jamming.
This leads to parts overheating and sometimes even jamming.
Dry sump. Cars with a dry sump installed do not have an oil pan at the bottom, because it was specially moved outside the engine. What it looks like: a plate is attached to the bottom of the motor, from which a special hose comes out. He, in turn, pumps oil into the oil tank, which can be located either in the passenger compartment or in the trunk. The oil then passes through the cooling radiator and filter directly into the engine. The oil, in turn, is pumped thanks to two pumps.
Advantages. The main advantage of the dry sump system is to ensure an uninterrupted supply of oil with constant pressure under all vehicle driving conditions. In addition, the oil is cooled better, because it is stored in a reservoir remote from the engine. Smaller sump dimensions reduce engine height. This makes it possible to position the engine lower, thereby lowering the center of gravity (improving stability), and increasing aerodynamics (the bottom is flatter). When the crankshaft rotates, it does not experience the resistance of oil splashing in the sump and several horsepower is gained.
Well, the oil is not sprayed by the crankshaft throughout the crankcase (lubricant consumption is reduced) and foams less. The oil does not come into contact with crankcase gases and its service life increases. All of these advantages improve the overall reliability of the motor.
Flaws. The disadvantages of a dry sump engine include greater weight, design complexity and larger oil volume. And complexity means higher maintenance costs.
To convert road versions of some cars into racing ones, kits are available for sale. However, installing a dry sump system is only justified if the car will spend most of its time on serious off-road or on a race track. When driving on normal roads, all the benefits of a “dry sump” will not be noticeable, which means that such conversion will be a waste of time and money.
Where can you find such an engine? The most common option for installing such engines is on racing cars and special equipment. In the first case, a dry sump helps to avoid problems with outflow - the transformation of engine oil into foam during sharp turns.
Another well-known case is the ability to avoid the so-called “oil starvation”, because this design completely ensures the lubrication of all engine elements. Another advantage, which was briefly mentioned above, is the cooling of the oil as it passes through the radiator, and this completely reduces the temperature of the engine during heavy load.
Bottom line. Unfortunately, installing such a system on ordinary cars will be extremely problematic due to its large dimensions and very high cost. Moreover, in an urban “life mode”, the car will need an ordinary and familiar oil sump.
How to replace an oil pump yourself
Having determined that the oil pump needs replacement or repair, it is necessary to remove the mechanism from the engine.
Tools for work
In order to dismantle the unit, you will need a standard motorist kit, consisting of the following list:
- keys to “10” and “13”;
- socket heads;
- extension cord;
- cardan joints.
How to remove the oil pump
If the work is carried out on an injection engine rather than a carburetor engine, then the crankshaft position sensor will need to be removed from the engine. Otherwise, dismantling the mechanism is performed in the same sequence:
- We de-energize the vehicle's on-board network by removing the “—” wire from the battery.
- Loosen the generator fasteners and remove the belt.
One of the first procedures for dismantling the oil pump is to remove the alternator belt.
After draining the oil, dismantle the engine protection and sump
To remove the crankshaft pulley, you will need to remove the timing belt.
One of the steps to dismantle the oil pump is to remove the crankshaft pulley
The oil receiver is attached to the main bearing cap with two bolts and one bolt to the oil pump
The pump is secured with six bolts, unscrew them
Having unscrewed all the fasteners, move the pump away from the main bearing cap and remove it from the engine.
Video: dismantling the oil pump on a VAZ 2108/2109
Pump installation
To perform reassembly, follow these step-by-step instructions:
- Before installing the assembly, the drive gear is installed accordingly.
Before installing the oil pump in place, the drive gear must be set in a certain position
The drive gear must align with the flats on the crankshaft
Before installing the pump, coat the working edge of the oil seal with engine oil.
After lubricating the oil seal with engine oil and installing it in its seat, install the pump
Where is the oil pump installed on Priora
As on most cars, on the Priora the oil pump is located at the bottom of the engine on the timing side. The mechanism is attached to the cylinder block. The drive or internal gear of the device is mounted on the front end of the crankshaft. The photo below shows a view of the location of the oil pump on the Priora (view from the right wheel arch).
This location of the oil pump on the car is not accidental. After all, it sucks engine oil from the crankcase and supplies it to the top of the engine. Due to this placement of the device, the process of dismantling it is quite labor-intensive. However, if there is any suspicion of a product malfunction, it must be dismantled and a detailed analysis carried out to determine its suitability for further use.
Diagram of some important engine parts
Name and article numbers of the Priora oil pump (1 part)
Name and article numbers of the Priora oil pump (part 2)
Above is a diagram of the location of the oil pump in the engine structure with the designation of its component elements.
Symptoms of a faulty oil pump
The main signs of problems in the lubrication system are sounds uncharacteristic of engine operation and the oil pressure light coming on. In this situation, you should stop, turn off the car and after a while check the oil level in the engine with a dipstick (you need to wait a little until the oil drains into the sump). If the level is below the minimum, add oil and check the level again (it should be between the min and max marks). If the light goes out when starting the engine, the reason it came on was precisely the low oil level.
A burning oil pressure light indicates a problem with the lubrication system.
If, after adding oil, the extraneous sounds do not disappear and the light continues to light, you should not continue driving. Most likely, there is a problem with the oil pump and will require replacement or repair. You can get to the garage or car service using a tow truck or tow. However, the light may also be on due to a failure of the oil pressure sensor. Therefore, until an accurate diagnosis is made, you should not rush to repair the oil pump and start disassembling the engine.
Methods for eliminating the reasons that caused the pressure control light to turn on
If the control light comes on, do not panic. You need to stop the car and perform diagnostic measures:
- Check the amount of engine oil using a special oil dipstick.
- If necessary, add lubricant to the required level.
- Start the engine.
- When the red light turns off, continue driving.
- If the light continues to glow, you must ensure that no fuel or lubricant gets into the engine sump.
This problem occurs when cracks occur in the pan, increased clearance in the cylinder walls, or piston wear. The problem can only be resolved after complete disassembly of the engine and major overhaul.
If the sensor breaks down and there is no pressure measuring device, then you can check the oil pressure in the following way:
- remove the terminals from the sensor;
- unscrew and dismantle the sensor;
- pull out the wire from the ignition;
- ask an assistant to turn on the starter so that the crankshaft starts working;
- if oil begins to flow out of the hole where the sensor was located, the pressure is normal;
The pressure is normal, but the light blinks, which means the sensor itself is broken. In a clogged oil filter, the bypass valve opens, causing the indicator light to light up. To eliminate the problem, it is enough to change the engine oil.
If a decrease in oil pressure is caused by a malfunction in the oil pump or as a result of the oil receiver screen being dirty and clogged, do the following:
- Clean and adjust the pressure relief valve.
- Remove the oil pan.
- Wash the contaminated oil receiver screen.
A major overhaul of the power unit, grinding the crankshaft, and installing special bearings are necessary when the main bearings are worn out. With such defects, the indicator light also lights up, and the lubrication system has pressure equal to zero.
The serviceability of the oil pump directly determines how long the car will run before the next engine overhaul.
To protect the engine from complete destruction, it is important to understand the main signs of a malfunction, as well as know how to check the oil pump and what pressure should be in the lubrication system
Oil pumps for internal combustion engines of cars
Since different cars are equipped with different types of engines with different operating parameters, the design of oil pumps can also be different. All modifications of these devices are divided into adjustable and unregulated.
With adjustable models, it is possible to change the performance in order to achieve optimal system pressure under different conditions. In the case of unregulated devices, the parameters are adjusted using special pressure reducing valves.
In car engines, gear and rotary type oil pumps are most often installed. In this case, the movement of oil through the system and the creation of pressure is carried out thanks to rotor blades.
In gear type pumps, these same functions are performed due to the movement of gears. They can be made in two modifications - with an external type of gearing or with an internal one. An external gear pump has two gears located next to each other, while an internal gear pump has one inside the other. With the same performance, the overall dimensions of gear pumps differ according to the type of gearing.
Useful tips
It is quite obvious that even such a reliable solution as an oil pump has a limited service life. Of course, in order to increase the service life, it is necessary to take into account the reasons for oil pump breakdowns discussed above. Understanding the reasons allows you to avoid such troubles.
First, you should always change the oil and oil filter regularly, and also monitor the engine oil level and its condition. If it is clear that the oil has become very black, its viscosity has changed, and problems arise with oil pressure in different operating modes of the internal combustion engine, you should check the lubrication, as well as the functionality of the engine oil pump.
If it is necessary to inspect and replace the oil pump, you must also replace the engine oil and oil filter, as well as thoroughly clean the engine crankcase, check the condition of the pressure relief valve and oil intake. It is also recommended to completely flush the lubrication system before adding fresh oil.
Why us?
Tiptronic car service is an experienced team of craftsmen with all the necessary equipment and tools. Reviews from satisfied customers and an impeccable reputation in the automotive service market speak for us. We will repair the automatic transmission pump or install a new one. Our specialists will cope with tasks of any level of complexity. Our advantages include free diagnostics when ordering repair work, the best price in the capital, a large selection of consumables and spare parts, and an individual approach to customer needs.
Contact us to agree on all the details of cooperation.
Types of plunger pumps
Plunger pumps installed on modern chainsaws are:
- Adjustable;
- Unregulated.
Unregulated pumps are usually installed on household-grade tools, for example Yamamoto CS-4552, Husqvarna 135 Mark II, Kruger GCSK 35-45, Husqvarna 120 Mark II. Such units provide a stable supply of working fluid regardless of operating conditions. They have a simple but reliable design. Their disadvantages include the lack of adjustment of the supply of lubricant to the friction surfaces.
Adjustable pumps are installed on chainsaws of semi-professional and professional classes, such as powerful chainsaws from Energomash, American McCulloch, Procraft, Parma. They have a more complex design.
The adjustment function is necessary when the saw is operating under difficult operating conditions, when the amount of working fluid specified by the manufacturer is not enough to properly lubricate the saw set. In addition, it may be needed when the plunger is slightly worn, when the pump cannot provide enough oil to lubricate the bar and chain.
The photo shows 3 types of adjustable oil pumps
Do-it-yourself KAMAZ oil pump replacement
The entire process of replacing the oil pump on a KAMAZ vehicle can be divided into three stages:
- Preparatory.
- Removing the old pump.
- Installing a new one.
Each stage consists of several actions that must be performed in strict sequence.
It is important to prepare the work area, tools and a new oil pump in advance
Tools for work
To quickly and easily remove and install a new oil pump, you will need:
- standard set of open-end wrenches;
- special puller for gears;
- screwdriver with a flat thin blade;
- screwdriver with a Phillips blade.
Usually in the garage every driver of a car or truck has such a suitcase with a set of all the necessary tools for self-repairing the car
And you also need to stock up on rags and a container for draining the oil in advance.
Preparatory stage
After all the necessary tools have been collected, you will need to perform a number of actions on which the safety and convenience of the operation depends:
- Drive the KAMAZ into the pit.
- Remove the wire from the negative terminal on the battery.
- Make sure the car is completely cool.
- Drain the oil from the crankcase (pull out the plug and place a basin under the drain).
- Unscrew the bolts securing the engine crankcase - only by removing the protection itself will you be able to get to the pump.
- Remove the crankcase and set it aside.
- It is recommended to immediately clean the protective housing from dirt.
The inspection hole is needed for general convenience of work, since you will have to crawl under the car when replacing the pump
The procedure for removing the pump from KAMAZ
The first thing the driver will see after removing the crankcase is access to the pump suction tube.
Together with it, a flange, mounting bracket and cup are connected to the pump. However, it will not be possible to dismantle the pump with bare hands:
- Take a special gear puller.
- Use it to remove the oil pump gear: first screw the gear all the way in so that the main screw rests against the end of the shaft. Then start rotating the puller handle to unscrew the gear.
- Next, remove the bolts securing the radiator and discharge sections. These are the top and bottom parts of the pump.
- Disconnect all lines from the oil pump. There may be slight oil leakage from under the hoses, so it is best to immediately block the holes in them with a rag.
- Unscrew the three pump fixing bolts.
- Remove the pump.
- Remove gasket residues from the landing site.
Video: dismantling procedure
New pump installation process
Before installing a new oil pump, drivers usually thoroughly clean the mounting area of dirt.
And it doesn’t hurt to wipe the hose joints with a clean cloth, since it is at the joints of the hose and fitting that the largest amount of dust mixed with oil usually accumulates.
Due to dirt, problems may arise in the near future, since the fluid in the lubrication system must always be clean.
Video: oil pump installation procedure
Therefore, after cleaning the seat on the bottom plane of the cylinder block, you can proceed with a “light heart” to install a new oil pump:
- Pour a small amount of the oil used into the pump housing.
- Rotate the gear so that the lubricant can immediately penetrate to all parts of the pump - this way the device will start working faster.
- Install the adjusting shim in place.
- Next, install the valve mechanism tube gasket.
- Install the pump onto the cylinder block with three bolts, but do not tighten it yet.
- Install the valve tube with two bolts.
- Attach the suction pipe bracket to the cylinder block with one bolt.
- After this, it is allowed to tighten all bolted connections until they stop.
- Be sure to check the gear clearance. Ideally, the gap should be between 0.15 and 0.35 mm. If it is not there, you will have to unscrew the pump and place another gasket under it.
- Connect all fuel lines to the pump.
- Pour oil into the engine.
- Screw the crankcase into place.
- Connect the wire to the negative terminal of the battery.
Replacement of battery cable terminals on all VAZ vehicles
Today, when removing the oil pump, I found traces of oil on it, but when I removed it, I didn’t notice any cracks, after which I installed it back, what could be the problem? I don’t understand, and besides, I don’t know much about cars except for the Murzilka?
Hello Vlad! Maybe your front crankshaft oil seal is deformed? Usually just after it is deformed and engine oil leaks through it! (How to replace the oil seal, see the article: “Replacing the front crankshaft oil seal”)
Thanks Oleg everything worked out. Indeed, the oil seal was slightly eaten away in the upper part, and that was probably why the oil was leaking. I replaced it today and everything is back to normal)
Hello! Please tell me, the problem is this: I went into the store for 5 minutes, when I went out and started my nine-injection engine, all the oil leaked out of the engine, okay, I towed it to a car service center, they said that the oil filter had come loose, bought new oil, filter , filled it up, installed it, paid for the work and left satisfied, the next day after lunch I started the car and after 10 minutes of warming up all the oil leaked out, I was, to put it mildly, freaked out, I towed it 20 km. Already in another service, the next day they call, they say, pick it up, everything is ready, the oil was filled in, the filter was changed, but the filter was tightened like a crab, again it seems to leak, which means it’s definitely the oil pump, I got home, and now I’m even afraid to start it, it’ll leak again anyway oil, please advise what to do. The car is worth it. The work is worth it :(
Hello Artem! Buy this special key. with which they tightened the filter at the service center and tighten it before each trip, but it unscrews because of excess oil pressure, most likely the oil pump is to blame for this, as they already told you at the service!
Hello. Replaced the original cylinder block with a used one from Priora. The oil pump was removed from the old block. The oil seal now sits slightly out of alignment with the crankshaft surface. How to fix it? Thank you.
This suggests that this oil pump is not intended for a block with priors; its design may be visually identical, but in practice it will not fit. There is only one result, purchasing an oil pump for this unit.
Hello, can you please tell me I have a VAZ2108, I only checked the engine head, before that the oil pressure was as soon as I replaced the head and started the oil sensor, do not put out the oil, the oil does not rise to the top, the cover of the bugs was removed and it was dry
Hello Nodir! You placed the gasket upside down, which caused the oil supply channel to the head and to the sensor to be blocked. Place the gasket correctly (there is a stamp on the gasket “TOP” - top) - everything will be OK.
Hello, on the VAZ 2114 the oil pressure indicator is on, the oil level is normal, but the engine sound has changed, become louder, with a slight grinding noise? Do you think the oil pump is damaged? Is it possible to drive 5-10 km to the service center without damaging the engine?
Hello! Drive, there is nothing to lose)) But seriously, you shouldn’t travel such a distance with such a problem.
Don't tell me. I started the car in minus mode 37-40, but suddenly the light came on, oil changed the filter, everything lights up smoothly, what should I do, help
Hello, Oleg! Perhaps fatal breakdowns occurred in the form of rotated liners, etc. But you should start checking by changing the oil to a thinner one, such as 5W-40 and 0W-30. Most likely, everything will pass. The main thing is don't panic. Even if the engine is poor, you can find a completely working engine for 5-6 thousand rubles and not waste your nerves and extra money.
Somehow I haven’t had any luck lately with the carb engine 21093... I was driving around the region on the weekend, was already returning to the city and about 30 kilometers away I noticed a blinking oil pressure indicator. I checked the oil level (changed it a week before) - normal. I decided that the sensor was faulty and, reducing the speed, drove on. After a few kilometers, the indicator began to light constantly, and a little later I noticed white smoke coming from under the hood. I turned off the engine, opened the hood, pulled out the oil level dipstick - and straight out came white smoke and the smell of burnt oil. I stood there for about 10 minutes, tried to start it, but the starter made a half turn and stopped. In general, they took me to the service on a tie, tomorrow there will be an autopsy, I suspect the inserts are turned, however, it’s unclear for what reason, this is the first time in my life I’ve seen this...
According to the technician, the oil pump had failed. Or its pressure reducing valve, which prevented oil from flowing to all connecting rods. In particular, the fourth connecting rod was dry, which is why the liner overheated. The first 2 connecting rods were in oil, the 3rd was in oil, but smaller, but the fourth, farthest from the pump, was dry.
And the oil was fresh, I just changed it a week ago. Mineral water from Auchan
The pump itself does not break down. Bad oil.
Hello. Here's the story. I started the engine and heard a hum (I just don’t understand whether the bearing is rubbing against metal somewhere), I placed a wooden stick in a strong hum in the pulley area + oil came out in the same area, tell me what could be wrong?
Hello, Nikolay! Perhaps the oil pump is grinding itself...
Hello, tell me, in the morning I start the car and unscrew and the oil filter is deformed and the oil leaks, I drove one km, changed the filter, filled in the oil and everything is fine, and the next day the same picture again and so 3 times what could it be?
Hello, Anton! The pressure relief valve may be faulty.
Hello. Lately I have been noticing this, in the area of the cylinder head there is a diesel rumble, as if the valves are knocking. And when driving, for example, in 4th gear 80 km/h, the speed is 3000-3100. The same is true in 3rd and 5th gear, i.e. 60 and 100 km/h rpm 3000-3100. What could it be? Tell me please
Hello, Ruslan! Either low-quality fuel or wear of the crankshaft bearings and journals.
Good afternoon VAZ-2114 (8-valve), mileage
108,000 km. I changed the oil (to exactly the same as before) and the oil filter. 5 days later. I was stuck in a traffic jam and the radiator fan came on. And I noticed that the oil pressure light began to blink at idle speed. You increase the speed to 1100-1200 - the light goes out. I came to the seller from whom I took the oil. He said that most likely the problem was in the oil filter. We changed the filter. When replacing the filter, I noticed that oil was leaking well from under the valve cover. In general, replacing the filter did not solve the problem. Only now the light began to blink not only at idle, but could also blink at 1500-2000 revolutions. All this is observed only after the engine has warmed up to 90 degrees and above. Tell me what could be the problem? Where to dig?
Engine oil pump repair
The pump, removed from the engine being repaired, is subjected to in-place diagnostics after cleaning. In the absence of external defects, the technical condition of the pumps is assessed by the end gap between the housing and the discharge gears and by the gap in the bearings of the drive roller. An increase in the end clearance leads to a decrease in pump performance. The end gap is determined by an indicator device based on the amount of axial movement of the pump drive shaft. For SMD-60, A-41, A-01M engines, the permissible gap without repair is 0.30 mm, and for other diesel engines - 0.25 mm. The bearing clearance is assessed by the radial movement of the drive roller neck.
If the gaps are within acceptable values, then the pump is tested on a stand and its volumetric flow is determined for diesel engines, and for carburetor engines, the supply pressure when pumped through a nozzle of a certain cross-section. In case of unacceptably large movements of the roller, the pump is disassembled and repaired.
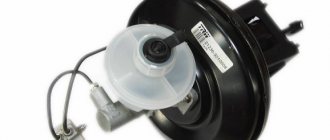
What does an oil pump consist of and how does it work?
The pump housing is located on the outside of the saw housing, under the centrifugal clutch drum of the gasoline saw. The drive mechanism of the oil pump is rigidly connected to the saw chain clutch. This means that the higher the engine speed, the more lubricant is supplied to the chain and chainsaw bar.
Unlike the plungers used on car pumps, the operating mechanism in chainsaws can be disassembled and reassembled without much effort. The pump body has two calibrated holes located opposite.
One hole is connected to the oil tank and serves to draw lubricant from the tank. The other communicates with the main line leading to the saw set. At the end of the plunger there is a longitudinal segmental groove to capture the working fluid.
Oil is supplied by rotating the plunger around its axis. The segment cut first opens the hole connecting the pump to the oil tank. At the same time, a vacuum is created in the pump chamber and a portion of oil is drawn into it.
Further rotation of the plunger closes this channel and creates excess pressure in the system. Passing the segment cutout through the discharge hole opens it, and the working fluid is supplied to the line to lubricate the chain.
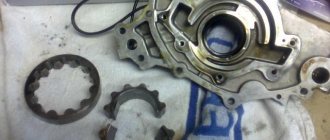
Step-by-step instructions for repairing and inspecting oil pump parts:
1. For a detailed inspection, it is necessary to remove the oil pump.
2. First, you need to unscrew the bolt (1) and remove the crankshaft position sensor (2), which is only available on engines with a fuel injection mechanism.
3. When disassembling the pump, you need to unscrew the six bolts and remove the pump cover.
4. Using two screwdrivers, you need to lift the pump housing so that the pins on the housing can come out of the holes located in the cover of the VAZ 2110 oil pump. Now remove the housing itself by disconnecting it from the cover.
5. We take the gears out of the cover: first the driving one, and then the driven one.
6. Now you need to unscrew the pressure reducing valve plug. An O-ring must be installed under this plug. Inspect the ring - if it is too compressed, it needs to be replaced.
7. Having unscrewed the plug, we take out the spring of the pressure reducing valve.
8. Now we take out the valve itself, gently tapping the body on a clean wooden stand. If the valve does not come out, it must be removed using a thin pointed object, preferably also wooden, so as not to damage the surface.
9. Now you need to carefully inspect the aluminum cover for visible signs of wear, mechanical damage, deep scratches in the contact areas of the gears. If found, the cover must be replaced with a new one.
10. Next, repairing the oil pump involves inspecting its housing. In the same way, visible signs of wear are not allowed on working surfaces - mechanical damage, scuffing. If we find any of the above, we replace the housing.11. The maximum permissible diameter of the driven gear socket is 75.1 mm, so we measure the diameter, and if it exceeds the permissible value, we will also have to replace the housing.
12. Now you need to measure the width of the body segment in the middle part. If the measured value is less than 3.4 mm, the VAZ 2110 pump housing must be replaced.
13. Check the gears. The thickness of the drive should not be less than 7.42 mm. We measure: if it is less, we replace the gear.
14. The same applies to the slave. If the thickness is less than 7.35 mm, the gear must be replaced.
15. Then we check the axial clearances of the gears. It is necessary to install the drive gear back into the housing, after which we apply a steel ruler to the housing and use a feeler gauge to measure the gap between the gear and the ruler.
16. In the same way, measure the axial clearance between the attached ruler and the driven gear. For the drive and driven gears, the maximum permissible axial clearance is 0.12 mm and 0.15 mm, respectively. In cases where these values are exceeded, the gears must be replaced with new ones.
17. Through calculation, more accurate values of axial clearances can be obtained. To do this, a micrometer is used to measure the thickness of the oil pump housing along the outer surfaces, as well as the thickness in the area of the sockets for the drive and driven gears along milled surfaces in several places. The axial clearance is calculated based on the difference between the arithmetic mean of the socket depth and the measured thickness of the gears.
18. The next stage of repair is to inspect the pressure reducing valve seat to detect rough scratches and other deep mechanical damage on the inner surface. If found, the cover must be replaced.
19. If burrs and deep mechanical scratches are detected on the pressure reducing valve itself, it must also be replaced with a new one.
20. We also replace a bent, broken/broken or cracked pressure relief valve spring. The height of the spring in its free state is normally 44.72 mm; the same parameter under a load of 4±0.24 kgf is 31.7 mm. If there is a discrepancy, the spring must be replaced.
21. Assembling the oil pump. We install the driven gear with the chamfers on the teeth towards the housing.
22. Then install the drive gear in the same way - with the chamfers on the teeth facing the body. The gears must be lubricated with engine oil before installation.
23. Now you need to install the cover on the body and tighten the fastening bolts.
24. Before installing the pressure reducing valve into the seat with the bottom down, it must be lubricated with engine oil. Then you need to install the spring and tighten the plug with the aluminum O-ring of the oil receiver tube, also pre-lubricated.
25. It is necessary to pour engine oil into the pump through the oil receiver tube.
26. At the end of the repair and complete assembly of the car’s oil pump, turn the gears several turns so that the working surfaces of the gears are well lubricated.
Video
VAZ
Removal from engine for disassembly
The video demonstrates the process of checking the VAZ 2104 oil pump. But measuring the gap between the housing and the gears, assessing the output of the drive and driven gears, the oil pump housing cover and many other subtleties are relevant for all types of oil pumps. Before disassembling, we recommend studying the structure and operating principle of the oil pump.
For a preliminary check, remove the distributor and remove the oil pump drive gear. If you find deep scuffs on the axle, you will most likely encounter knocked-down splines. Wedging of the drive gear is extremely dangerous, as the splines can be licked off. The consequence of a breakdown will be oil starvation, which for the engine ends at least with the crankshaft liners turned. You can also visually assess the play of the oil pump rod. On a working pump, the gap between the rod and housing pair should not exceed 0.1 mm.
The oil pump on classic VAZ cars is unscrewed from the crankcase. Therefore, to check, you will have to drain the oil and remove the pan, having first loosened the engine mounts (the engine needs to be raised a little).
To fully check the oil pump, arm yourself with a set of dipsticks. Don’t just try to judge by eye the production of parts with pretentious fitting requirements.
Troubleshooting
Unscrew the oil receiver cap with pressure reducing valve. Don't lose the original spring thrust washer
Also note that one of the bolts will be shorter. Therefore, be sure to remember the location of its seat.
Using a caliper, measure the length of the spring at rest (should be at least 38 mm).
Remove the cover on which you can remove the wear marks left by the gears
Deep scoring is a clear sign that the oil pump is worn out. Repairing the cover involves leveling the mating plane.
Remove the oil pump drive gear from the housing. Check the condition of the teeth and shaft. Scratches and abrasions indicate wear. In the driven gear, additionally evaluate the condition of the fixation axis hole. Check the walls of the oil pump housing and the driven gear axis. Furrows and potholes indicate that debris has entered the work area.
Clearance tolerances
- The gap between the housing plane and the gears. To measure, apply a caliper and insert a suitable feeler gauge into the gap formed. The norm is 0.066-0.161 mm. A gap of 0.2 mm is considered critical.
- Gap between gear teeth. At extreme wear, the gap is 0.25 mm. If you get values of no more than 0.15 mm, the gears are still in good condition.
- The gap between the walls of the working area of the oil pump housing and the gears should not exceed 0.25 mm; A range of 0.11-0.18 mm is considered normal.
- The optimal gap between the hole in the housing and the gear shaft is 0.016-0.055 mm. When checking the VAZ oil pump without removing it from the engine, we said that the play should not be more than 0.1 mm. As for the gap between the axle and the driven gear, it should be in the range of 0.017-0.057 mm; critical limit – 0.1 mm.
The entire troubleshooting process is clearly shown in the video.
Causes of oil pump failure
The first and most common cause of oil pump failure is a clogged oil receiver, as a result of a clogged crankcase. In case of malfunctions of this kind, it is recommended to drain the oil, dismantle the pan, and then wash it together with the oil receiver. Since the oil filter is located after the pump, unfiltered lubricant passes through the oil receiver and some other parts, which increases the likelihood of oil contamination and wear on parts.
Another common failure of the oil pump is damage or breakage of the unit body or its gears. The result of such damage is an increase in the gap between these parts. Theoretically, it is possible to replace the oil pump housing or make weld deposits with further adjustment, but this process is expensive and quite labor-intensive. Therefore, often at the first symptoms of an oil pump malfunction, worn parts are immediately replaced.
Causes of oil pump failure:
1. The oil level in the crankcase is constantly low. 2. Breakdown of devices that are responsible for controlling pressure. 3. Use of low-quality oil with inappropriate viscosity. 4. Oil and coolant are mixed. 5. Oil pump intake is dirty. 6. Contamination of oil filter components. 7. Failure of safety or lubrication valves.
Engine lubrication system design.
Oil pan
This part is designed to accommodate oil. Typically, the oil level is monitored using a sensor indicating the temperature and oil level, as well as using a special dipstick.
Oil pump.
Necessary for supplying oil from the pan to the system. This unit operates using a camshaft, engine shaft (crankshaft) or using a wired additional shaft. In most cases, gear-type pumps are used on modern car engines.
Oil filter.
Designed to clean incoming oil from carbon deposits and wear. The cleaning process occurs through the use of a filtration element, which must be replaced when changing the oil.
Oil radiator.
Responsible for cooling the oil. And this happens with the help of a special coolant molasses coming from the cooling system.
Sensor that measures pressure.
In this design it is used to control oil pressure. It is located in the oil line. An electrical signal is sent from it to the dashboard to the warning lamp. Modern cars also have an oil pressure indicator. And along with it an oil temperature sensor can be installed.
Bypass (reducing) valves.
Needed to constantly maintain pressure throughout the system. Typically, valves are installed directly into system elements: oil filter, oil pump.
How to determine if an oil pump is faulty
There are two types of pump testing - without dismantling it and with dismantling it. Without removing the pump, you can verify its malfunction only when it is already in a “dying” state, so it is better to remove it to perform detailed diagnostics.
How to check the oil pump without removing it
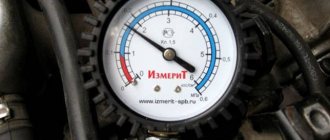
Before directly testing the pump, it makes sense to check the oil pressure in the system using a pressure gauge. This way you can make sure that the oil pressure light is working correctly and did not light up in vain. To do this, a pressure gauge is screwed in instead of the emergency lamp pressure sensor.
Please note that the pressure value often drops precisely “when it’s hot,” that is, when the engine is warm. Therefore, the test must be carried out on a warm engine and at idle speed.
The minimum and maximum pressure values will differ for different machines. For example, for a VAZ “classic” (VAZ 2101-2107) the minimum emergency pressure value is 0.35...0.45 kgf/cm². It is under such conditions that the emergency lamp on the instrument panel is activated. The normal pressure value is 3.5…4.5 kgf/cm² at a rotation speed of 5600 rpm.
Checking pressure with a pressure gauge
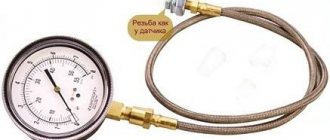
Screwing in a mechanical pressure gauge instead of the oil pressure sensor is the only reliable way to check the oil pump without removing it from the engine. You can buy a ready-made kit for measuring pressure in the oil system or assemble the device yourself. For this you will need:
- liquid mechanical pressure gauge. The device can be easily found in almost every auto parts store for domestic equipment and tractors. Any industrial pressure gauge with an adequate measuring scale will also work;
- an adapter that will be screwed in instead of the standard oil pressure sensor. The mating part must have a fitting for a hose or a thread with a landing cone for screwing in a flexible tube. Any turner can turn such an adapter. You will need to measure the diameter of the mounting hole, the thread pitch and make a sketch of the adapter. An alternative option is to bring a standard oil pressure sensor to a turner so that he can make an adapter in its likeness. Some drivers, in order to check the oil pump, drill out the insides of the old oil pressure sensor and use improvised means to make an adapter from it. It is much easier in this regard for owners of VAZ cars, for which ready-made tees are available for sale. You can simultaneously screw in both a standard pressure sensor and a mechanical pressure gauge;
- a piece of hose that will connect the pressure gauge and adapter.
The diameter of the hose and the type of connection of the flexible tube should be selected taking into account the type of outlet fitting on the pressure gauge
It is important that during the measurement process there are no oil leaks at the joints
Measuring technique
The method for checking oil pressure will be identical for all cars. The only difference is the threshold minimum value, upon reaching which the low oil pressure warning lamp lights up on the dashboard. Information about the response threshold of the pressure relief valve and the minimum operating pressure in the engine lubrication system can be found in the repair and maintenance manual for your vehicle. The data below is relevant for VAZ classic models (2101, 2102, 2103, 2104, 2105, 2106, 2107).
- Cold pressure. Before starting, the engine and oil in the sump must cool to ambient temperature. The response threshold of the emergency oil pressure sensor is 0.33 kgf/cm2. With this value, the engine must be turned off and disassembled to troubleshoot the oil pump. When the speed increases, the pressure gauge needle should rise to 4.5 kgf/cm2. At this pressure, a serviceable pressure relief valve is activated, so no further increase should occur.
- Measurements on a warm engine. As the oil temperature decreases, its viscosity increases, which has a positive effect on the performance of the oil pump. Therefore, it is best to check the oil pump when it is hot. Since the oil warms up more slowly than antifreeze, let the engine run for another 5 minutes after the coolant temperature gauge shows 90°C.
In the lubrication system of a serviceable VAZ 2101-07 engine at 5600 rpm there should be a pressure of 3.5-4.5 kgf/cm2. If the obtained values differ significantly from the nominal values, the engine will experience oil starvation in certain modes. The low oil pressure light on the instrument panel will come on. In this case, we recommend disassembling and checking the oil pump.
Causes of oil pump failure
The reason why the oil pump has failed can be determined by diagnostics. There are at least 8 main oil pump faults. These include:
- Clogged oil pickup strainer. It is located at the inlet of the pump, and its function is to coarsely filter the engine oil. Like the system’s oil filter, it gradually becomes clogged with small debris and slag (often such slag is formed as a result of flushing the engine with various means).
- Malfunction of the oil pump pressure reducing valve. Usually the piston and spring included in its design fail.
- Wear of the inner surface of the pump housing, the so-called “mirror”. Occurs for natural reasons during engine operation.
- Wear of the working surfaces (blades, splines, axles) of the oil pump gears. It happens both over time of long operation and due to rare changes of (very thick) oil.
- Using dirty or unsuitable engine oil. The presence of debris in the oil can be for various reasons - careless installation of a pump or filter, use of low-quality lubricating fluid.
- Careless pump assembly. In particular, various debris was allowed to get into the oil or the pump was not assembled correctly.
- Drop in oil level in the engine crankcase. Under such conditions, the pump operates at excessive capacity, which causes it to overheat and may fail prematurely.
- Dirty oil filter. When the filter is very clogged, the pump has to make significant efforts to pump the oil. This leads to its wear and partial or complete failure.
Regardless of the reason that caused the partial failure of the oil pump, it is necessary to carry out a detailed check of it and, if necessary, make repairs or complete replacement.
Methods for lubricating moving parts of internal combustion engines.
⇐ PreviousPage 12 of 48Next ⇒
Lubrication system.
Provides reduction of friction and wear of engine parts (Fig. 1.17; 2.25) by creating a durable thin film on the surface of rubbing parts. Performs other functions that are no less important for the performance of engines during a given resource, namely:
— preventing the breakthrough of gases from the space above the piston into the crankcase by sealing the gaps in the cylinder-piston group;
— cooling of pistons, crankshaft bearings and other parts as a result of their heating from fuel combustion and friction;
— protection of the engine from corrosion during operation and long-term parking;
-preventing the formation of soot and varnish deposits that interfere with heat removal from the pistons and the mobility of the piston rings;
— neutralization of acids formed during oil oxidation and fuel combustion;
— ensuring a rapid increase in pressure in lubricated components during a cold engine start.
Car engines use a combined lubrication system of various types.
A combined lubrication system is called
lubrication of engine parts under pressure and splashing. The pressure is created by the oil pump, and oil is sprayed onto the crankshaft and other rapidly rotating engine parts.
The most heavily loaded rubbing engine parts are lubricated under pressure: main and connecting rod bearings of the crankshaft, camshaft support bearings, oil pump drive shaft bearings, etc. Cylinder walls, pistons, piston rings, piston pins, parts of the gas distribution mechanism, its chain or gear are lubricated by splashing drives and other parts.
Rice. 2.25. VAZ engine lubrication system: 1 - shaft; 2, 4 — channels; 3 - neck; 5 - signaling device; 6 - sensor; 7 - highway; 8— rod; 9 - filter;
10— pump; 11— oil receiver; 12 - pallet
In engines with a lubrication system without an oil cooler, cooling of the oil, which heats up during operation, occurs mainly in the oil pan.
If there is an oil cooler in the lubrication system, oil cooling is carried out both in the oil pan and in the oil cooler. Depending on the location of the main engine oil supply, the lubrication system can be wet or dry sump.
In systems with a wet sump (Fig. 1.8), the main supply of oil is in the sump and when the engine is running, oil is supplied to the rubbing parts using an oil pump.
In dry sump systems, the main supply of oil is contained in an independent oil tank, from which oil is supplied to the rubbing parts, which are pumped by the oil pump. The oil flowing into the pan is completely removed by a pump into the oil tank.
Fig.1.7. Lubrication system of a ZMZ automobile engine: 1-oil radiator; 2-radiator tap; 3-safety valve; 4-centrifugal filter; 5 - main oil line; 6-upper section of the pump; 7-oil pump; 8-lower section of the pump; 9-reducing valve; 10-oil receiver; 11-oil
channels to the crankpins" 12-pressure-reducing valve.
Rice. 1.8. Scheme of a wet sump lubrication system: 1 – coarse filter; 2 – main oil line; 3 – main and connecting rod plain bearings; 4 – piston oil scraper ring; 5 – piston compression rings; 6 – cylinder mirror; 7 – camshaft support bearings; 8 – fine filter; 9 – oil intake; 10 – oil cooler; 11 – pallet; 12 – reduction valve; 13 – oil pump; 14 – bypass valve; 15 – oil pressure sensor in the system; 16 – hole in the liner and connecting rod
for supplying oil to the walls of the cylinder liner.
The different oil systems are based on the same lubrication principle. Oil from the sump or self-contained tank is sucked by the oil pump through the oil intake and forced through a full-flow filter into the main oil line, which is drilled as a longitudinal channel in the cylinder block. From the main oil line, oil is drained through transverse drillings to the plain bearings of the crankshaft and camshaft and to other points. Oil is supplied under pressure by splashing and a combined method.
In addition to the main oil circulation circle, lubrication systems can have parallel circuits: a part-flow fine filter; oil cooler; air compressor.
⇐ Previous12Next ⇒
Recommended pages:
How to Change the Oil Pump on a VAZ 2106
Replacing the oil pump on a VAZ 2101-VAZ 2107
Welcome! Oil pump. Usually called the "oil pump", it performs a very important function when the engine is running, namely, it supplies oil located in the oil pan, the crankshaft bearings and then through the air duct, distribution oil and the camshaft bearings, in most cases lubricating them.
Therefore, the oil pump plays a very large and important role in a car engine, and if it is damaged, then the lubrication system should not have the pressure it should have. (For more information about what will happen if the pressure in the lubrication system disappears, see the article “Useful information about oil pressure on a VAZ”).
The note! To replace the oil pump with a new one, you will need to stock up on: a basic set of wrenches, which will include a "10" and "13" wrench, and you will need to take the end sockets and extension cord to match the same heads, if possible, and pack your pockets with you!
Where is the oil pump located? It is located inside the engine so just by looking at the engine you won't see it, but to look at it you will first need to remove the crankcase, then you will need to remove the pan and only then will you see the oil pump with your own eyes.
READ Renault Logan Heater Fan Doesn't Work
When should I replace my oil pump? It can be replaced with:
1. Pressure drop in the vehicle's lubrication system at engine idle temperature, as shown by the oil pressure indicator.
2. As well as failure of the pump itself or its transmission, which, by the way, can be replaced individually without completely replacing the oil pump, see Article: “Oil pump repair.”
The note!
Sorry for the quality of lighting, this video shows the method of replacing the oil pump of you 2106
No.
Diagnostics and replacement of VAZ classic oil pump (LADA 2101-07)
Oil pump
the main part of any engine. And how much the engine depends on its condition. If you notice a drop in oil pressure after a hard blow to a bump that causes the crankcase to deform, it is likely that the oil pump, namely its intake pipe, is to blame for the drop in oil pressure! 3. And if your car's oil pressure is too high and outside the normal range, then most likely the culprit is a clogged relief valve, which can also be removed and replaced with a new one. (See How to remove this in the same pump repair article)
READ What is the fuel consumption of the Nissan Almera?
The note! What pressure in the lubrication system can you determine using a special indicator that shows the oil pressure in the system!
Features of disassembling the oil pump for inspection and repair
The photo below shows instructions on how to disassemble and reassemble the Priora oil pump. This process will be needed if it is necessary to check the parts of the device and replace them.
More details on how to disassemble the Priora oil pump, check it for suitability, as well as assemble and upgrade it will be described in detail in another material. You can find it on our website using the search or site map.
In conclusion, it should be noted that you should not put off checking, repairing or replacing the oil pump on a Priora. This material examined the signs of a device malfunction (both direct and indirect), its design features, purpose, and most importantly, how removal and replacement are performed. Using the instructions, you can perform the dismantling procedure yourself without the need to visit a car service center.
How to clean?
After removing the pump, it is necessary to carry out a visual inspection of the housing and individual elements. Particular attention should be paid to the condition of the internal part of the housing in which the plunger rotates.
As a result of using low-quality oil, layers of dirt may form inside. In addition, excessive wear on the plunger may occur, resulting in unstable pump operation or oil flow failures.
In order to disassemble the adjustable oil pump, you must perform the following algorithm:
- Using a flat-head screwdriver, remove the plastic plug located at the end of the pump;
- Move the drive gear to the side;
- Without releasing the gear, remove the adjusting shaft by pulling it to the side;
- Remove the plunger from the mounting hole;
After removing and disassembling the oil pump, it is necessary to inspect its internal surfaces for deformations and signs of excessive wear. If necessary, replace failed elements.
The inlet and outlet channels must be cleaned using a feeler gauge made of thin metal wire. Remaining dirt can be removed with a jet of compressed air. The oil pump elements are assembled in the reverse order.
We recommend watching the video, the author of which clearly shows how to disassemble the oil pump.
Knowing the structure and operating principle of the plunger oil pump installed on a chainsaw, you can clean and replace it yourself. This does not require the use of special skills or the use of a special tool. All work, if you have enough free time and desire, can be done on your own.