Signs and causes of oil pump failure
If the VAZ 2114 oil pump starts to malfunction, this immediately affects the oil pressure in the system (it drops sharply), as a result of which the warning light comes on. True, it’s not worth replacing the pump with a new one right away. You should first check whether the sensor itself is working? This is very simple to do - you need to take the wire coming from this device and press it to ground (motor housing).
If the sensor is working properly, the emergency light will go out immediately after pressing. In this case, the pump will still have to be repaired. If the lamp continues to glow, then the sensor itself is not working and will need to be replaced.
There can be several reasons for an oil pump failure. Most often, its gears fail (especially often when the oil is changed infrequently, which, as already mentioned, causes abrasive wear). In addition, there may be problems with the filter valve (it may get stuck), as well as with the sealing elements. In the latter case, oil leaks from the system.
Pressure reducing valve
There are practically no methods that allow you to check the oil pump pressure relief valve without the need for dismantling. But you can check it with your mouth - even experts recommend using this method. A cloth is applied to the valve fitting, through which air passes well. Next, take a sharp breath. If there is strong resistance, then the valve is working.
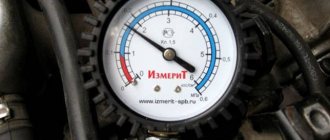
If you have a pressure gauge, then you don’t need to tell us how to check the automatic transmission oil pump. The verification principle is the same. Normal pressure level is from 2.5 to 5 Bar. But you need to understand that not only a lack of oil pressure (or rather, ATP fluid) is harmful to an automatic transmission.
How to replace the oil pump?
Tools
Before we talk about how to remove the oil pump on a VAZ 2114, we first outline the list of tools necessary for this:
- open-end wrenches “10” and “13”;
- set of socket heads;
- gimbal adapter;
- extension;
- crank/ratchet;
- highly desirable - a torque wrench.
Replacement
Before moving on to the description of replacing the oil pump, it is worth noting that according to the rules, the crankshaft oil seal is also replaced at the same time.
The replacement of the VAZ 2114 oil pump itself is carried out in the following order:
- Disconnect the negative cable from the corresponding battery terminal.
- Drain the engine oil.
- Remove the belt from the generator.
- Remove the belt from the camshaft.
- Using a pair of screwdrivers, remove the pulley from the crankshaft (after this you should pay attention to the key - if it does not sit tightly on the shaft, you should remove it and set it aside so as not to accidentally lose it).
- Remove the engine oil sump.
- Remove the pair of bolts securing the oil pickup to the main bearing.
- Unscrew the bolt securing the oil pump to the oil receiver and remove the latter.
- Unscrew the six bolts that secure the oil pump (important - there are flat washers under each bolt).
- Use a screwdriver to pry up the oil pump, resting it between the main bearing and the pump cover, and then move it.
- Remove the pump from the crankshaft.
At this point, the entire process of removing the oil pump can be considered complete.
After the camshaft drive belt is removed during the dismantling process, it is strictly forbidden to turn both the camshaft itself and the crankshaft.
Reinstalling the oil pump occurs in exactly the same order, but in reverse order. Before starting installation, you should inspect the pump and rotate its main gear so that the protrusions on it coincide with the splines located on the crankshaft, and the working edge of the oil seal must be lubricated with liquid lubricant and carefully tucked into the crankshaft journal.
After the new oil pump is installed, a new oil filter should be installed, and then oil should be added to the system. Then you should start the car engine and let it idle for at least three minutes - this is necessary to distribute the oil on its moving elements. After this, the car can be operated as usual.
Dismantling
Removing the pump yourself is not difficult. Yes, and you are quite capable of performing independent repairs.
- De-energize the car by removing the negative terminal from the battery.
- Loosen the generator mounting bolts and remove the belt.
- Prepare a clean container by draining the oil from the crankcase into it. Next, you will need to remove the engine protection and oil pan.
- Remove the camshaft drive timing belt.
- Now that the belt is removed, do not turn the crankshaft or camshaft under any circumstances. Otherwise you will damage the valves by hitting them with the pistons.
- Remove the crankshaft pulley by using two flat head screwdrivers and pulling it off the shaft. If the key does not hold well in its seat, it is better to remove it too.
- Next in line for dismantling is the oil receiver. To remove it, you need to unscrew the two fastening bolts located on the main bearing cover, as well as one fastening bolt connecting the oil receiver to the pump (oil).
- Remove the pump, held in place by six bolts.
- After unscrewing all the bolts, carefully slide the oil pump away from the main bearing cap, then remove the oil pump with peace of mind.
Dismantling the device
Replacing the oil pump on 2114
In general, this happened last summer, after my crankshaft pulley turned and it wouldn’t come off, the “incompetent workers” at the service center decided to cut it off with a grinder... in the end, of course, they cut off the pulley, but also the oil pump))) Yes, they sawed so hard that it was right at the oil seal))
In general, they repaired the whole thing for me with Poxypol, nothing seemed to be leaking and I left the service, realizing that if they also change the pump for me, I’ll end up with a bulkhead xD
Well, one winter I noticed an oil leak, first I replaced the oil seal at a normal service, then I bought a new pan with a gasket, but the leak didn’t stop and I remembered about my pump pump... as a result, 2 weeks ago it was bought and I kept waiting It's a warm day today)))
The replacement took 5 hours, this is the time from the moment you arrived at the garage until you left with all the changing clothes, jacking up the car, etc.))
It’s just that at the service they asked for as much as 3500 O_o for similar work
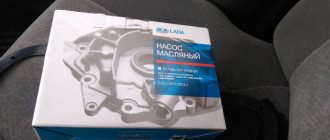
In total we bought:
Oil pump - 2000 RUR Crankcase and pump gasket + O-ring - 100 RUR The process is not complicated, everything was done without a hole on two tripods)) I attach a photo))
Well, the same question... I didn’t see a mark on the old pump for setting the timing belt, there also seems to be a mark on the box, but not clearly expressed, in the end I set it on the first cylinder when the piston is in the upper position... everything seems to be correct, but It seems to me that the idle speed has increased by 100-150 and I’m sinning on the timing belt by itself... or is this some kind of self-hypnosis and give me an increase of these 100 revolutions?) the car behaves the same)))
Purpose of the oil pump on the VAZ 2114 and VAZ 2115
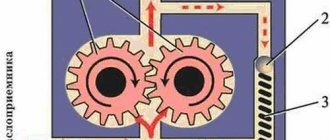
The main task of the oil pump is to create excess pressure in the engine lubrication system and ensure continuous circulation of oil in the lubrication channels.
Only rotary oil pumps are installed on the VAZ 2114
Any breakdown of the oil pump leads to a drop in lubricant pressure, after which the friction between the moving parts of the engine increases sharply. As a result, almost all engine components are damaged, and they can only be restored after an expensive overhaul.
Types of oil pumps for VAZ 2114 and VAZ 2115
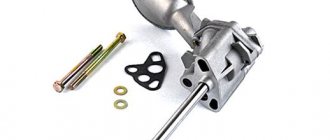
The design of the VAZ 2114 and VAZ 2115 engines is the same. Therefore, the oil pumps on these machines are also exactly the same. These are adjustable rotary pumps equipped with a pressure reducing valve.
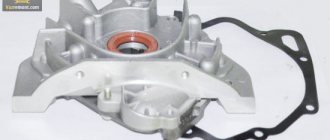
Main design elements of the rotary adjustable oil pump VAZ 2114
On earlier VAZ models, gear oil pumps were installed, but VAZ engineers gradually abandoned these devices, since the rotary oil pump has important advantages:
- rotary oil pumps, unlike gear pumps, almost never foam the engine oil in the system;
- if an adjustable rotary oil pump is installed on the car, then the car owner will not have to change the engine oil too often (since the foaming problem has been solved, the working life of the lubricant increases on average by 2.5 times);
- Due to the design features, the oil rotary pump significantly facilitates engine operation. When using oil pumps of this type, engine power increases by 35%.
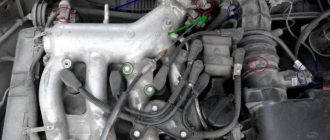
Location of oil pumps on VAZ 2114 and VAZ 2115
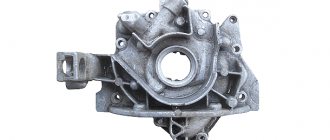
The oil pump on the VAZ 2114 and VAZ 2115 is located under the car engine. It is covered by an oil pan, and the pan, in turn, is covered by a crankcase protection. Therefore, in order to get to the oil pump, the car owner will have to remove these parts, having first driven the car onto an overpass or inspection hole.
To get to the oil pump, you will have to remove the pan and crankcase from the VAZ 2114
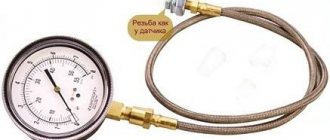
Expert advice
In order to check the operation of the oil pump, you will need a liquid pressure gauge. These devices are available in auto parts stores. You can also use any industrial pressure gauge for these purposes, but you should pay attention to the measuring scale - it must be adequate. Then you should stock up on an adapter, which should be screwed into the sensor hole. On its mating part there must be a fitting for the hose or a thread for screwing on the connecting hose. The adapter can be ordered at any turning workshop.
Causes of oil pump failure
There are a number of typical breakdowns due to which the oil pump completely or partially fails:
- physical wear of the housing, rotor or driven gear. There is a gap of 0.2 mm between the pump gears and the housing. There is also a gap between the teeth of the pump gears - 0.5 mm. As wear occurs, these gaps increase, and the pressure created by the pump at the outlet pipe drops. Since replacing and adjusting worn gears is a very labor-intensive process and not everyone can do it, car enthusiasts follow the path of least resistance and simply change the entire oil pump;
The gaps in VAZ oil pumps are checked with a special feeler gauge
- clogging of the oil receiver. If it becomes clogged, the pressure in the car's lubrication system drops sharply, and a red light comes on on the dashboard. A clogged oil receiver is a consequence of a completely clogged crankcase. The solution is to completely drain the used lubricant, remove the pan, crankcase, oil pump and thoroughly wash all these parts in kerosene;
A blockage in the oil receiver can completely damage the VAZ oil pump
- oil leak. Sometimes oil begins to leak directly from under the pump. Typically, the driver does not notice a leak immediately, identifying it by indirect signs, for example, by a sharply increased lubricant consumption and oil stains under the car. The cause of the leak is a leak in the pump gasket. Often, when replacing an oil pump, car enthusiasts do not change the gasket located under it, believing that it will serve for some time. This is an error that leads to leaks. The rule is simple: when changing the oil pump, you must also change the gasket, even if it does not look worn out.
Separate mention should be made of motor oil. Its quality also has a significant impact on the service life of the pump and its serviceability. The fact is that the oil pump is the only engine element that is lubricated with unfiltered oil (because the oil filter is installed only on the pump outlet). And if the car owner is used to saving on high-quality oil, then he may not count on long and uninterrupted operation of the oil pump.
Important points
There are a couple of nuances that you definitely need to remember when changing the oil pump:
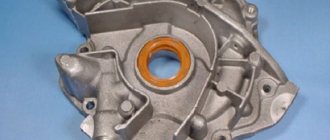
- Before installing a new oil pump, you need to remove the plastic oil seal from it and generously lubricate its inner edge with engine oil. This will make it much easier to install the pump on the crankshaft;
The inner edge of the oil pump oil seal must be lubricated with oil.
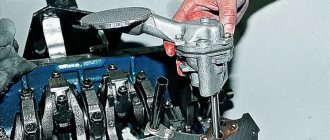
- When the pump is completely seated on the shaft, do not immediately tighten the mounting bolts. First you need to tuck the edge of the above plastic seal inside. This should be done using a pointed stick or pencil. It is strictly not recommended to thread the oil seal with a flat screwdriver or a knife: it breaks very easily, and it is almost impossible to find it on sale.
The VAZ 2114 oil pump oil seal should be filled with a pointed stick or pencil
Replacing the oil pump on VAZ 2114 and VAZ 2115 cars is a task that seems impossible only at first glance. Upon closer examination, it turns out that you can cope with it on your own, saving a significant amount on the services of a qualified auto mechanic.
In conclusion
Finally, it is worth noting another important nuance, which was mentioned above - tightening the bolts that secure the oil pump using a torque wrench. Although it is not necessary to do this, it is highly advisable, because if it is too tight, the gaskets may become displaced and oil will begin to leak. In order to avoid this, tighten the bolts securing the oil receiver with a force of 10 Nm, and the bolts securing the pump itself with a force of no more than 12 Nm.
Source of the article: https://remontvazov.com/maslyanyy-nasos-vaz-2114
How to remove and install the oil pump on a VAZ 2114
We carry out work on removing, disassembling and checking the oil pump on the engine of a VAZ 2114, 2113, 2115 car.
To perform work on removing the oil pump you will need: calipers, micrometer, metal ruler.
Removing the oil pump
First of all, remove the crankshaft timing belt.
We remove the oil intake.
Using a 10mm socket wrench, unscrew the 6 bolts securing the oil pump to the cylinder block.
Remove the oil pump.
Disassembling the oil pump
Using a 5mm hex wrench, unscrew the oil pump cover.
Remove the pump cover.
We take the drive gear out of the cover.
We take the driven gear out of the housing.
We wash all the parts of the oil pump clean with diesel fuel or kerosene. We wipe the parts and lubricate them with engine oil.
Checking the oil pump
We carefully inspect all the parts of the oil pump. They should not have cracks, chips, metal envelopment or severe wear.
Using a caliper, check the diameter of the driven gear seat in the pump housing. We check the thickness of the partition between the drive and driven gears. In this case, the diameter of the seat should not exceed 75.1 mm. And the thickness of the partition should not be less than 3.4 mm.
Then use a micrometer to measure the thickness of the drive and driven gears. The thickness of the driven gear must be at least 7.35mm, and the thickness of the drive gear - 7.41mm. If the thickness is less, then the gears must be replaced.
We place the drive gear in the pump housing. We apply a bench ruler with its edge to the mating surface of the oil pump and use a set of flat feeler gauges to check the thickness of the gap. We measure the driven gear in the same way. If the gap between the ruler and the drive gear is more than 0.12mm (for the driven gear it is more than 0.15mm), then the gears must be replaced.
Oil pump installation
We assemble the pump in reverse order. When assembling, you need to install the driven gear with the side with the chamfers and the mark facing the pump housing.
We also install the drive gear with a mark and chamfers on the teeth towards the pump housing.
Reinstall the pump in reverse order.
During installation, you need to replace the gasket between the pump and the cylinder block.
Design
Today there are three types of pumps:
- 2-gear pumps, in which one gear is connected to a shaft, which starts working from the intermediate or camshaft of the VAZ. This pump is installed inside a sump located in the lower area of the cylinder block. Typically, the rotation speed of the element is ½ the rotation speed of the motor.
- A gerotor pump has a rotating small gear inside an outer gear. This pump is located in the lower area of the motor in the sump.
The internal pump is often installed on the front cover of the engine. It begins to function from the crankshaft. Structurally, such a mechanism is similar to a gerotor mechanism, but in this situation it replaces the front damper of the engine. As a result, it is possible to generate higher oil flow with higher pressure.