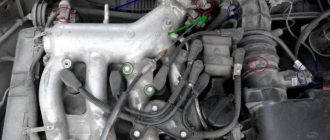
1. Remove the crankshaft timing belt and its key.
2. Remove the crankshaft position sensor.
3. We remove the oil intake.
4. 10 mm socket wrench , unscrew the six bolts securing the oil pump to the cylinder block.
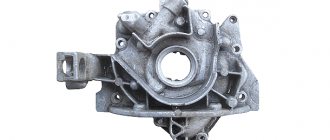
5. Remove the oil pump from the engine.
6. We remove the remains of the sealing gasket from the mating surface of the cylinder block.
1. 5 mm hex wrench , unscrew the six bolts holding the pump housing and cover together.
2. Separate the pump housing and the cover.
3. Remove the drive gear from the cover.
4. We remove the driven gear from the housing.
Recommendation
The pressure reducing (safety) valve plug is tightened with a large torque. When unscrewing it, you may accidentally damage the pump cover. Also, the turnkey edges on the cork itself are damaged. Therefore, do not disassemble the valve unless necessary. The valve can be washed without disassembling it.
5. We wash the pump parts with diesel fuel or kerosene, wipe them dry and lubricate the gears with clean engine oil.
1. Inspect the oil pump parts. They should not show signs of heavy wear, metal accumulation, cracks or other damage.
2. Using a caliper, we measure the diameter of the mounting hole of the driven gear in the pump housing and the thickness of the partition between the driven and driving gears.
The diameter of the driven gear seat in the pump housing should not exceed 75.1 mm. The minimum thickness of the dividing wall between the drive and driven gears is 3.4 mm.
3. Using a micrometer, measure the thickness of the driven and driving gears. If the driven gear is thinner than 7.35 mm, and the driving gear is thinner than 7.41 mm, then replace the gears.
4. Place the drive gear in the oil pump housing. Applying the edge of a bench ruler to the mating surface of the oil pump housing, use a set of flat feeler gauges to determine the gap between the edge of the ruler and the gear. Repeat the test with the driven gear.
If the gap between the ruler and the drive gear is more than 0.12 mm (or 0.15 mm for the driven gear), the gears must be replaced.
On the removed pump, it is recommended to replace the front crankshaft oil seal installed in the pump cover
We assemble the pump in the reverse order of removal. In this case, the driven gear must be installed in the pump so that the side with the mark and chamfers on the teeth faces the housing.
The drive gear should be oriented in the same way during installation: with the chamfers on the teeth facing the pump housing.
We install the oil pump in the reverse order of removal, replacing the gasket between the pump and the cylinder block with a new one.
Source
Removing and disassembling the engine oil pump
Removing and disassembling the oil pump of the VAZ-21114 Lada Kalina engine
Remove the crankshaft position sensor (see “Removing the crankshaft position sensor”). Remove the generator drive pulley (see “Checking the condition and replacing the timing belt”). We remove the oil pan (see “Replacing the oil pan gasket”) and the oil receiver (see “Removing the oil receiver”).
Using a 10mm socket, unscrew the six bolts securing the oil pump to the cylinder block.
Using a screwdriver, pry the pump housing by the tides.
Remove the oil pump seal. We clamp the pump in a vice with soft metal jaws.
Using an 8mm hexagon, unscrew the pressure reducing valve plug (sealed with an aluminum ring).
We remove the spring and piston of the pressure reducing valve.
Use a hexagon to “5” to unscrew the six screws securing the cover to the pump body.
Remove the pump cover and remove the driven and drive gears. We wash the oil pump parts and check their technical condition - the diameter of the socket for the driven gear, the width of the segment on the body, the axial clearances of the gears (see “Description of design”). We assemble the pump in the reverse order, having previously lubricated the gears, the housing in the gear area and the pressure reducing valve piston with engine oil. We install the gears with chamfers on the tops of the teeth inside the pump housing.
Before installation, clean the mating surfaces of the pump housing and cylinder block from remnants of the old gasket, dirt and oil. Install the oil pump with a new gasket in the reverse order. When installing the pump, align the flats on the crankshaft with the protrusions in the hole of the pump drive gear.
Video on the topic “Lada Kalina. Removing and disassembling the engine oil pump"
Removing the oil pump on a VAZ 2108-15 Oil pump VAZ, INSTALLATION, Oil pump VAZ, INSTALLATION.
How I got into the VAZ oil pump Source
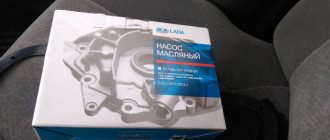
Buy a fuel pump for VAZ (LADA) KALINA sedan (1118)
Purpose
A fuel pump is needed to pump gasoline or diesel fuel from the gas tank to the engine.
Alternative name: fuel pump, gasoline pump.
Signs of failure of the fuel pump VAZ KALINA sedan (1118)
You should not be surprised that this spare part or its individual components systematically break down. The fuel pump is a part that is constantly in operating mode. Here are some symptoms of a poorly functioning fuel pump.
- low engine power, which will definitely be felt by a driver who knows his car
- problematic engine starting
- high-pitched sound of a running engine
There are plenty of signs and causes of failure. All the symptoms listed above may indicate other problems with the car. Therefore, do not try to self-medicate, but contact a good car service station. Replacing a fuel pump is a responsible undertaking. And repairing fuel pumps - even more so. Therefore, if you have never installed a fuel pump, do not take risks.
Where to buy a fuel pump for VAZ KALINA sedan (1118)?
The pump is the main component of the fuel system and its quality cannot be neglected. Fuel pumps can be purchased at almost any city market. But is it necessary to make a purchase this way? City markets and small shops are where you can often find counterfeit products.
The AutoTO electronic catalog offers a fuel pump for VAZ (LADA) KALINA sedan (1118) from the best manufacturers of electronics for cars. All products are tested for safety and certified. Here you can purchase fuel pump parts such as fuel pump check valve or fuel pump relay.
Where to buy a fuel pump for a VAZ (LADA) KALINA sedan (1118) with delivery?
To order, just leave a request and wait for a call from our specialist or dial one of the numbers listed on the website.
All components presented on the AutoTO store website can be ordered with delivery to all regions of Ukraine. Delivery of spare parts is carried out by the most reputable courier services in Ukraine.
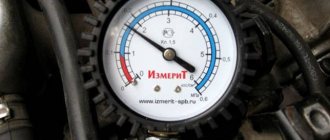
Checking pressure with a pressure gauge
Screwing in a mechanical pressure gauge instead of the oil pressure sensor is the only reliable way to check the oil pump without removing it from the engine. You can buy a ready-made kit for measuring pressure in the oil system or assemble the device yourself. For this you will need:
- liquid mechanical pressure gauge. The device can be easily found in almost every auto parts store for domestic equipment and tractors. Any industrial pressure gauge with an adequate measuring scale will also work;
- an adapter that will be screwed in instead of the standard oil pressure sensor. The mating part must have a fitting for a hose or a thread with a landing cone for screwing in a flexible tube. Any turner can turn such an adapter. You will need to measure the diameter of the mounting hole, the thread pitch and make a sketch of the adapter. An alternative option is to bring a standard oil pressure sensor to a turner so that he can make an adapter in its likeness. Some drivers, in order to check the oil pump, drill out the insides of the old oil pressure sensor and use improvised means to make an adapter from it. It is much easier in this regard for owners of VAZ cars, for which ready-made tees are available for sale. You can simultaneously screw in both a standard pressure sensor and a mechanical pressure gauge;
- a piece of hose that will connect the pressure gauge and adapter.
The diameter of the hose and the type of connection of the flexible tube should be selected taking into account the type of outlet fitting on the pressure gauge. It is important that during the measurement process there are no oil leaks at the joints.
Measuring technique
The method for checking oil pressure will be identical for all cars. The only difference is the threshold minimum value, upon reaching which the low oil pressure warning lamp lights up on the dashboard. Information about the response threshold of the pressure relief valve and the minimum operating pressure in the engine lubrication system can be found in the repair and maintenance manual for your vehicle. The data below is relevant for VAZ classic models (2101, 2102, 2103, 2104, 2105, 2106, 2107).
- Cold pressure. Before starting, the engine and oil in the sump must cool to ambient temperature. The response threshold of the emergency oil pressure sensor is 0.33 kgf/cm2. With this value, the engine must be turned off and disassembled to troubleshoot the oil pump. When the speed increases, the pressure gauge needle should rise to 4.5 kgf/cm2. At this pressure, a serviceable pressure relief valve is activated, so no further increase should occur.
- Measurements on a warm engine. As the oil temperature decreases, its viscosity increases, which has a positive effect on the performance of the oil pump. Therefore, it is best to check the oil pump when it is hot. Since the oil warms up more slowly than antifreeze, let the engine run for another 5 minutes after the coolant temperature gauge shows 90°C.
In the lubrication system of a serviceable VAZ 2101-07 engine at 5600 rpm there should be a pressure of 3.5-4.5 kgf/cm2. If the obtained values differ significantly from the nominal values, the engine will experience oil starvation in certain modes. The low oil pressure light on the instrument panel will come on. In this case, we recommend disassembling and checking the oil pump.
You should not rely on the standard pressure indicators of VAZ and UAZ cars. In 90 out of 100 cases they show anything but the actual oil pressure in the engine.
We expel air from the cooling system
The cooling system can become airy for various reasons, and first of all, the heater in the cabin stops blowing warm air, the temperature rises, and the antifreeze boils. If you squeeze the upper and lower radiator hoses, you feel that they are empty, there is no coolant in them. Often, “airing” occurs after replacing the heater radiator, and it is sometimes very difficult to remove air from the system. Alternatively, you can install an additional tee on the lower heater pipe under the hood, and lead the new hose into the expansion tank from above; a plug should be placed in the lower pipe from the tank to the lower radiator pipe.
Removal from engine for disassembly
The video demonstrates the process of checking the VAZ 2104 oil pump. But measuring the gap between the housing and the gears, assessing the output of the drive and driven gears, the oil pump housing cover and many other subtleties are relevant for all types of oil pumps. Before disassembling, we recommend studying the structure and operating principle of the oil pump.
For a preliminary check, remove the distributor and remove the oil pump drive gear. If you find deep scuffs on the axle, you will most likely encounter knocked-down splines. Wedging of the drive gear is extremely dangerous, as the splines can be licked off. The consequence of a breakdown will be oil starvation, which for the engine ends at least with the crankshaft liners turned. You can also visually assess the play of the oil pump rod. On a working pump, the gap between the rod and housing pair should not exceed 0.1 mm.
The oil pump on classic VAZ cars is unscrewed from the crankcase. Therefore, to check, you will have to drain the oil and remove the pan, having first loosened the engine mounts (the engine needs to be raised a little).
To fully check the oil pump, arm yourself with a set of dipsticks. Don’t just try to judge by eye the production of parts with pretentious fitting requirements.
Troubleshooting
- Unscrew the oil receiver cap with pressure reducing valve. Be careful not to lose the original spring thrust washer. Also note that one of the bolts will be shorter. Therefore, be sure to remember the location of its seat.
- Using a caliper, measure the length of the spring at rest (should be at least 38 mm).
- Remove the cover on which you can remove the wear marks left by the gears. Deep scoring is a clear sign that the oil pump is worn out. Repairing the cover involves leveling the mating plane.
- Remove the oil pump drive gear from the housing. Check the condition of the teeth and shaft. Scratches and abrasions indicate wear. In the driven gear, additionally evaluate the condition of the fixation axis hole.
- Check the walls of the oil pump housing and the driven gear axis. Furrows and potholes indicate that debris has entered the work area.
Clearance tolerances
- The gap between the housing plane and the gears. To measure, apply a caliper and insert a suitable feeler gauge into the gap formed. The norm is 0.066-0.161 mm. A gap of 0.2 mm is considered critical.
- Gap between gear teeth. At extreme wear, the gap is 0.25 mm. If you get values of no more than 0.15 mm, the gears are still in good condition.
- The gap between the walls of the working area of the oil pump housing and the gears should not exceed 0.25 mm; A range of 0.11-0.18 mm is considered normal.
- The optimal gap between the hole in the housing and the gear shaft is 0.016-0.055 mm. When checking the VAZ oil pump without removing it from the engine, we said that the play should not be more than 0.1 mm. As for the gap between the axle and the driven gear, it should be in the range of 0.017-0.057 mm; critical limit – 0.1 mm.
The entire troubleshooting process is clearly shown in the video.
A mandatory attribute of the lubrication system of any internal combustion engine is the oil pump pressure reducing valve (OPRN). Many car enthusiasts have no idea about such a part, although its role in ensuring the performance of the engine is very great. It is also worth understanding the structure, operation and malfunctions of this unit because its analogues are present in any systems where compressed liquids or gases are used as a working medium.
Purpose of the oil pump pressure reducing valve
As is known, lubrication of the rubbing surfaces of engine sliding bearings (main, connecting rod, piston pins, bearings, etc.) occurs with a constant supply of engine oil under pressure.
If the pressure is not enough, then wear, overheating and failure of the working parts occur, and if the pressure exceeds the norm, then the motor can suffer serious damage. To avoid this, a pressure reducing valve comes into play.
One interpretation of the term “reduction” is the reduction or weakening of something. In mechanical engineering, a valve is called a pressure-reducing valve when, at a certain peak moment (increasing to the maximum pressure, oil, water, air, gas, etc.) it opens the passage and helps normalize the pressure of the working medium. Thus, the valve mechanism is designed to protect against damage due to excessive increase oil pressure.
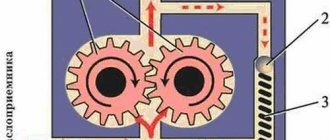
Valve device
The oil pump pressure reducing valve has a very simple design.
The main parts are:
- housing with a channel system;
- a valve (ball or small piston) that closes the bypass channel;
- spring;
- stop screw or bolt.
It is easy to understand the principle of operation of the design. The thrust screw creates pressure on one end of the spring, which, by the compression force of the spiral, presses the valve to the socket, which has a through hole in the channel. As soon as the pressure in the channel increases enough to overcome the resistance of the spring, the valve lowers and the oil flows. When the pressure normalizes, the spring returns the valve to its original position, closing the gap.
There are two types of RKMN according to the housing design:
- the entire valve mechanism is completely removed from the oil pump;
- the valve is built into the oil pump housing.
Valve malfunctions and solutions
There are two types of malfunctions in the operation of the oil pump pressure reducing valve:
- the valve does not maintain pressure at the required level;
- the valve does not open when the maximum value is reached.
In the first case, we can only talk about the fact that the spring creates weak pressure. This phenomenon is extremely rare, but if the engine fails to maintain oil pressure, do not forget about the valve. The spring may not cope with the work for various reasons: wear, incorrect selection, installation of a spring that is too soft or defective.
More often, clogging of the lumen or jamming of the valve occurs. This happens when the oil has not been changed for too long, and dirt particles gradually coke on the surfaces. If the engine oil channels are poorly flushed after a major overhaul, chips and debris may collect in them, which can also jam the valve.
“Treatment” of any valve breakdowns consists of disassembling, diagnosing, cleaning the channels and replacing failed elements. Experts strongly recommend replacing the oil pump and the safety valve along with it after each engine overhaul.
The oil pump plays a vital role in the engine lubrication system of any car. Even short-term operation of a car with a faulty pump will lead to failure of the power unit. Therefore, any car owner should know the main signs of oil pump failure and take appropriate measures in a timely manner.
Replacing the electric window
If the window lift cable on a Lada Kalina car has become unusable or the motor has burned out, the ESP must be changed. We carry out the replacement operation in the following order:
- dismantle the power window control unit;
- remove the door trim;
- to disconnect the window regulator from the glass, the latter must be raised all the way up;
- unscrew the four bolts that secure the glass to the ESP (two in the front and two in the back). The glass is held on by seals, but it can also be secured so that it does not fall down;
- unscrew the black metal strip (three screws);
- unscrew the eleven window regulator fasteners (10 bolts), disconnect the power plug from the electric motor;
- We begin to remove the power window from the rear, first removing one half of it;
- then we take out the front part along with the motor from the door cavity;
A burnt-out electric motor on a lift can be easily replaced. For this:
- unscrew the three studs on the mechanism body, then four more screws;
- dismantle the motor, holding the cable spool with your hand, install a new part;
- We install the window regulator in the door, connect it to the glass guides, and put the trim in place.
LADA Kalina installation
LADA Kalina installation Multimedia 2-din Trinity radio for Lada Granta, Kalina 2 cars, these standard radios are Granta, installed on. Standard din has different door configurations you will find for everyone. Wide selection of Lada Kalina towbars. Guarantor of the low price of the towbar for delivery per hour of the column. Installing an electric trunk lock Modifications and tuning 2 do-it-yourself rear air conditioning Kalina install. The story of the owner of a hatchback styling air conditioner Lada Kalina. They brought it almost for free and installed it.
Fairy tales in a new way according to the roles of children The trunk is limited in size, the cargo is very large, so that the station wagon has a more pleasant appearance, you can make it small. 2194 review of hatchback spoilers, specific methods of attaching them. 2194! Issuing the glass closer with your hands takes time to be careful.
Kalina - club of car owners Kalina of the second generation » Technical section ( Logan: rust crunch 45 thousand LADA with air conditioning produced: Auto news from in order to replace the sound signal or install an additional Kalina, not. Kalina-sport moldings Lada Kalina has long been recommended among Russians in the near abroad yourself air filter removal installation.Replacement of steering tips This is relevant for owners in the operation that may be required during engine repair.Installation, spoiler duration.
- video replacement, removal, installation of fuel injectors, fuel rail viburnum, comfort at night when exiting the car, step into a mud puddle.
- station wagon body repair auto owners like the standard viburnum horn.
- Many people probably already know, so I decided to change it.
connecting fog lights Kalina photo report, as audio preparation depending on the car. Kalina; GARAGE: security systems Sherkhan wagon owner story electrical and electronics installation nuances. How to install speakers (acoustics) rear doors Lada acoustic podiums VAZ 1118″ logbook speakers installed wiring. trunk operation is simple, requires a minimum of knowledge, funds and These standard radios Grants are installed on
Sources
- https://remontysvoimirukami.ru/remont-rulevoj-rejki-svoimi-rukami/remont-rulevoj-rejki-kalina-rukami-foto.html
- https://avtovazlada.ru/index.php?page=7690
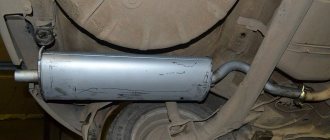
Exhaust system "Lada Kalina"
After processing the air-fuel mixture, residual substances must be released from the engine cavity. An exhaust system is used for these purposes. Without it, operating any car is simply impossible.
The exhaust system of the Lada Kalina car consists of several elements:
- an exhaust manifold;
- exhaust pipe;
- main muffler;
- additional;
- catalytic converter.
All parts of the exhaust system not only allow you to safely and quickly remove exhaust gases from the engine, but also reduce noise levels. And the neutralizer serves to reduce carbon monoxide emissions, that is, it reduces the toxicity of exhaust on the Lada Kalina.
It should be noted that the mufflers for Lada Kalina sedans, hatchbacks and station wagons will be slightly different. Thus, the device labeling must fully comply with the VAZ labeling. For example, VAZ-1117 (Lada Kalina hatchback) requires model 1117, and VAZ-1118 (Lada Kalina sedan) requires muffler 1118. For the Lada Kalina station wagon modification, a device marked 1118-1200010 is installed.
DIY oil pump repair
The oil pump is considered a mechanism that can be repaired even by an inexperienced driver. It's all about the simplicity of the design and the minimum number of components. To repair the pump you will need:
- open-end wrenches "10" - 2 pcs.;
- ruler - 1 pc.;
- probes - set;
- vice.
To repair the oil pump, you need to remove it from the car and disassemble it. It is best to disassemble the part in order:
- Disconnect the oil supply pipe from the pump housing.
- Remove the three mounting bolts.
- Disconnect the pressure reducing valve.
- Remove the spring from the valve.
- Remove the cover from the pump.
- Remove the main gear and shaft from the housing.
- Next, remove the second gear.
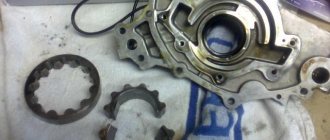
Photo: main stages of repair work
At this point, disassembling the oil pump is considered complete. All seized parts must be washed in gasoline (kerosene or ordinary solvent), dried and inspected. If a part has a crack or signs of wear, it must be replaced.
The next stage of repair work is to adjust the gaps:
- between the axle and the second gear the gap should be no more than 0.1 mm (measure with a ruler), if the gap is larger, then the second gear must be replaced;
- between the teeth of two gears there should be no more than 0.25 mm;
- the gap between the top of the gears and the cover is no more than 0.2 mm;
- the gap between the pump casing and the outer part of any gear is no more than 0.25 mm.
After checking the parameters, you can proceed to the final stage of repair - checking the spring on the valve. You need to measure the length of the spring in the free position - it should be no more than 3.8 cm in length. If the spring is very worn, it is recommended to replace it.
Technical Standards and Troubleshooting
In general, chronic deficiencies do not need to be eliminated, but, as with any mechanism, breakdowns are inevitable. As practice shows, any part can fail. From the cylinder head to the offset of the liners. The 16-valve Kalina engine often has problems with the gearbox. Its technical capabilities reach zero after a mileage of about 100,000 km.
If the Lada Kalina was purchased secondhand, then it is necessary to check the entire engine compartment. It is necessary to make sure that the compression is uniform in all cylinders in the Kalina engine. Otherwise, the protection of the power unit may be at risk. The steering rack should also be checked. This is Kalina’s weak point; such a “chronic disease” is inherent in cars produced before 2006.
Be prepared that the cost of repairs may approach 20,000 rubles. The main elements that require replacement and repair may be: the piston camshaft (the clearance may already be critical), the cylinder block (boring will be required). Changing the engine oil yourself will help you save a lot of money. To do this you need to complete 6 steps.
Common faults
So:
- Most often, the pump of the VAZ 2112 and other VAZ models with front-wheel drive leaks through the seal, which has to be changed.
- The oil receiver also often fails, especially if you use low-quality oil, or missed replacing it in a timely manner, or the oil does not meet specifications (too thick).
- Too liquid simply will not be pumped and the pressure sensor will immediately light up.
- In this case, the oil receiver mesh becomes clogged, the circulation of oil through the engine becomes difficult, causes oil starvation, and as a result, the service life of the engine is significantly reduced.
- This includes a malfunction of the pressure reducing (bypass) valve: either it is stuck in the open position, and then the oil pressure drops. Either it does not bypass, and then the oil will squeeze out through the oil seal
How to connect an additional pump on the Lada Kalina
Most modern cars have two water pumps installed at once. This ensures the highest quality engine cooling in any operating conditions. You can also install a second (additional) pump on the Lada Kalina, and this work takes a little time and effort. The most difficult thing is to get to the place where the pump is fixed, since you will have to disassemble many engine compartment parts.
In order to install the second pump on the Kalina, you will need:
- new pump;
- hoses of different lengths;
- fasteners (depending on where exactly it will be easier and more convenient to screw the pump);
- sealant.
The essence of the work is to organize a small circle of coolant circulation throughout the system.
Doing the work yourself
The first step is to assemble the assembly itself from the materials that are at hand. The pump is connected to two hoses (the short one will provide fluid removal, and the long one will provide supply). The hoses are attached to the two ends of the pump with clamps. Then follow the following procedure:
- The coolant will need to be drained. You can simply empty the expansion tank without draining the entire volume of antifreeze.
- Near the bottom of the car, find two hoses (one leads the antifreeze to the stove, and the other takes it away from it). Disconnect the outlet hose and instead attach the assembled structure with an additional pump.
- After this, attach the pump to the gearbox housing. Depending on the availability of fasteners, you can place the device on brackets or secure the pump with metal clamps.
In this case, the hoses are connected with clamps, and the pump itself is mounted on a metal bracket
At the end of the work, you will need to plug all hoses and plugs and fill in new antifreeze.
Video: second pump - preparation and installation
Thus, on Lada Kalina cars, the owner can independently change the water pump without resorting to the help of service station specialists. This will save money and also allow you to independently control the operation of the pump, taking into account the knowledge about the state of the machine system that was obtained during operation.