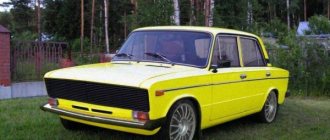
The VAZ 2107 is distinguished by a rather modest and simple, by today's standards, interior design. Therefore, car owners do their own tuning, making the appearance bright and individual. Tuning the instrument panel is probably the first way to improve its discreet and simple appearance.
Why is the VAZ 2107 dashboard given special attention when tuning? Precisely because passengers, including the driver himself, pay attention to the dashboard during the trip. Therefore, tuning the interior should begin with refining the instrument panel.
Tuning methods
Which method of tuning the dashboard to choose will depend on the skills and financial capabilities of the car owner.
- You can buy ready-made parts for tuning and install them instead of the original ones. This is not the cheapest or most original method, but it is simple and will immediately change the appearance of the panel and the entire interior. There will be no problems with installation; the connectors are designed in such a way that it is impossible to make a mistake when connecting devices.
- Purchase additional instruments (econometer, on-board computer, thermometer and much more) and harmoniously fit them into the classic design of the car’s instrument panel.
- Make tuning yourself by replacing the arrows and scale, installing backlighting on the instruments. You can buy arrows and instrument scales or make them yourself.
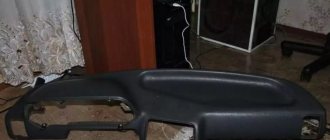
You should start by removing the panel, regardless of whether you do the dashboard tuning yourself or install ready-made devices.
Crickets, cicadas and mice - breaking up the zoo
This beast will have to be fought hard. Besides the fact that the plastic on the ten panel is not of the highest quality, sometimes the assembly presents unexpected surprises. And then the trills, creaks, rustles and knocks begin. As part of tuning the front panel and instrument panel, it makes sense to pay attention to refining the plastic surfaces and joints. There will be less noise, and in addition, one can hope for more adequate operation of the stove air ducts and deflectors, since half of the warm air goes to heating the internal crickets.
The glove compartment creaks, and the fuse and relay blocks echo it. Therefore, it is worth buying some bitoplast or modelin. Muffled boxes and drawers will completely change the overall impression of the VAZ 2110 interior.
Silence, warmth and excellent appearance. In just a few hours you can customize the interior of your top ten to the envy of your colleagues in the shop and to your own delight. Let the interior be quiet and warm, and the roads straight and smooth, everything will be fine, good luck to everyone!
How to remove the dashboard
Before removing the dashboard, you must disconnect the ground terminal from the battery.
The panel is removed in the following sequence:
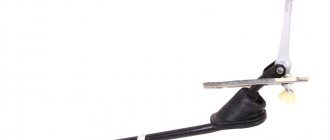
- remove the plastic handles from the interior ventilation and heating control levers;
pull out the daily mileage reset cable;
unscrew the self-tapping screw securing the instrument panel and pull out the panel; to access it, you need to remove the decorative trim;
unscrew the speedometer cable and disconnect it;
- disconnect the hose from the econometer;
- disconnect the wire connectors from the devices;
- pull out the dashboard.
Removing the instrument panel
This is the first stage of any tuning, which will have to be performed in all cases. Before you begin, please read the instructions.
The procedure is as follows:
- disconnect the negative terminal from the battery;
- remove all heater handles on the panel (tread carefully - they break easily);
- unscrew the nut holding the lever in place that resets the readings;
- push it inside;
- remove the plugs from the screws securing the dismantled element;
- unscrew them with a screwdriver;
- remove the panel from the elephant.
DIY tuning
Do the panel tuning yourself, spending a minimum amount of money. The first option is to replace the arrows and stickers on the instruments. Sets of stickers and arrows are sold freely, you can use them, or you can develop individual designer stickers - this will of course be more expensive, but for that you will have a unique tuning of the dashboard of your car.
When performing this work, you need to remember two important points:
- Mark the boundaries of the arrow on the scale at the zero position to prevent errors in the readings;
- Thoroughly degrease the surface of the instrument panel so that they do not come off during operation;
In addition to all this, a unique style of the instrument panel can be created by installing LED backlighting. This work is not very difficult; doing it yourself will not require much effort.
There are two ways to install LED backlighting:
- To the standard places of lighting bulbs;
- Illumination, from below or from above, along the perimeter of the entire instrument panel.
Glass tinting
Glass tinting is an elementary type of tuning the panel of a Lada Priora. The film is attached to the outside of the glass. You can use film No. 15 or any other depending on the driver’s preference. The main thing is to choose the right shade to make the glass look good. American film, which often has a reddish tint, is not suitable for every interior.
The film is applied as usual - degrease the glass using any dishwashing detergent, Fairy and others will do
We apply the film and cut it, paying special attention to the edges. It is better to cut off the edges so that the film does not start to bubble after installing the glass in place.
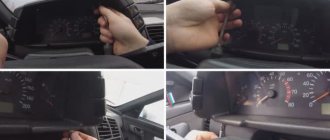
We remove the instrument panel from the VAZ 2107
First you need to carefully remove the sliders that control the stove using a screwdriver. After this, on the right side near the hazard lights button, unscrew the nut and washer. To the right of the sliders that were previously removed, you can find a round plug; you need to remove it, then unscrew the screw behind it. After all these steps, you can remove the instrument panel, then unscrew the tightening nut, and then release the speedometer cable.
Carefully disconnect all the wires, and the shield is already detached from the panel. After this, you need to remove the hands, they are quite fragile, and therefore you need to hold them gently so as not to bend the hands or the saddle where they sit. Quite often you have to reach it by force and pull the arrow towards the parallel pin.
Now let's tune the instrument panel
Tip: before starting work, you need to align the speedometer arrow and the limiter, and make a mark on the side to recognize the position after removal.
First, let's remove the old VAZ dials and install new ones. After this, we install the speedometer needles, but you need to remember that the pins bend. But you need to remember that we have drawn where the speedometer needles should be installed. After all this, carefully glue the sticker you have chosen, and before gluing it is necessary to degrease the surface. And don’t forget to glue the film correctly so that there are no distortions or balloons.
To install the LED pendant, I use two methods for installing the backlight. The first is behind the scale, the second is the illumination of the entire panel. Each driver chooses his own method, but you need to know that in the first case the backlight will be brighter than in the second, but you will have to spend more effort on soldering the LEDs.
The power supply for these LEDs must be designed for an operating voltage of 12 Volts. For the first option, you need to remove all standard light bulbs and install LEDs instead. Then we check them, for this we supply power.
For the second option, you can put four LEDs, in different places on the panel (where you need more illumination), or six, put three on top, three on the bottom. But in this case, you will need to solder additional wires to connect the LEDs. If the LEDs do not match the places for them, you can use glue.
Radio tape recorder
No upgrade of the “six” is complete without installing a speaker system or at least a simple radio. A standard place for a radio receiver in the beard of a small-sized “six”. It should be trimmed to standard 1DIN. This can be done with a metal file. Then sand the edges with sandpaper.
Installing a radio
The radio tape recorder is attached to the beard using a metal case. Radio installation steps:
- Having bent all the tabs, use special spatulas to remove the radio from the case.
- The metal base is inserted into the prepared hole.
- We fix it using special tongues.
- Then carefully insert the radio unit itself, which should snap into place.
Cables are included to connect the player. The most commonly used are:
- black - “earth”;
- red and yellow (often wound together) - ignition “+”;
- blue - power for the active antenna;
- white - front left (FL) speaker;
- gray - front right (FR) speaker;
- green - rear left (RL) speaker;
- purple - right rear (RR) speaker.
You can connect the radio to the ignition switch to the free INT terminal. Then it will only work when the engine is running and the ignition is on. This connection scheme will protect forgetful car owners from completely draining the battery.
If you twist the red and yellow wires together, the radio will no longer depend on the ignition. You can listen to music with the ignition off too.
The standard connection diagram is usually glued to the cassette player
Typically, a connection manual comes with the audio system. Following the instructions and color scheme, installing audio equipment in the “classic” will not be difficult.
Speaker installation
A good place to place the speakers would be the front door panels. If you choose the right size speakers, they will fit here very well. To install, perform the following steps:
- Remove the trim from the doors.
- On the casing we cut a hole for the speaker. A hole of the required size can be made using a template. To do this, trace the speaker on paper. You need to work carefully so as not to miss the size.
- We attach the column and screw it to the casing using the fastening that comes with the kit.
- We carefully lay the wires in the cavity of the doors so that they do not sag or fall out.
- We install the casing in place.
To give a finished look, the door cards are covered with leatherette, and a protective grille is installed on the speaker.
Additional speakers are placed on the dashboard or on the side pillars of the windshield.
For better sound distribution, high-frequency speakers are installed at the head level of the driver and passenger
If the car owner changes the entire beard, creating it himself to his own size, then he can place a 2DIN radio in it. A player with a large screen will add charm to the appearance of the car.
If the car has a 2DIN radio, then you can connect the rear view camera to it
Some craftsmen insert speakers instead of air ducts. But from personal experience I know that the standard “six” torpedo does not have side window blowing. In humid and cold weather, windows fog up and freeze. If you remove the air ducts for the windshield, the airflow will worsen even more. Therefore, I do not recommend this installation of speakers.
Content
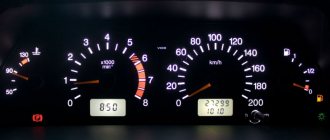
Cars of the VAZ 2107 model have a rather inconspicuous interior. Simplicity can be read literally in every detail. This fully applies to the dashboard. Therefore, many car enthusiasts strive to make some changes to make the interior more attractive and interesting. Tuning the instrument panel of the VAZ 2107 allows you to make the interior of your car individual.
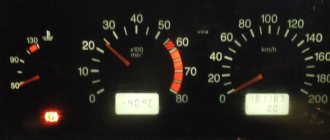
It should be noted that the dashboard lighting also needs improvement. The fact is that it is quite dim, which interferes with the night. You can get rid of this problem either by replacing the backlight, or by making the scales and arrows themselves brighter. In this article we talk about how you can modify the “Seven” dashboard with your own hands.
The easiest and most reliable way
For those who do not want to seriously engage in alterations and are ready to make some investments, ready-made kits are offered. They have everything you need to do your own tuning of the VAZ 2107 instrument panel. Each kit comes with detailed instructions. The only tool you need is a screwdriver. Also, you need to be familiar with the connector configuration.
In specialized stores you can also find ready-made dashboards for every taste, including those with electronic sensors. This is also a pretty good option for those who want to change something and not spend a lot of time on it. You can carry out the replacement yourself, since the finished panels fully comply with all the characteristics of the standard ones. The only thing is that before carrying out such an operation, you need to thoroughly study the connection process.
Installation of Europanel instead of the usual one on VAZ 2110, 2111 and 2112
Many owners who have owned a VAZ 2110 for a long time would like to change the boring panel to a more modern one. In this case, you can install a new type of panel from cars manufactured after 2006, or from the “Bogdan” versions, which are analogues of the tenth family, except that they were assembled in Ukraine.
With such alterations, basically you won’t have to change anything, but it’s worth considering that in this case you need to buy a complete Europanel:
- instrument panel frame assembly with trim;
- instrument panel (combination);
- buttons and switches;
- heater deflectors;
- new type heater control unit;
- sub-panel electrical wiring;
- steering wheel, cover and switches.
Only in this case everything becomes without any problems with minimal labor costs.
We make a unique design with our own hands
Everything is much more complicated here, but you can save money. In this case, no sets are purchased. Everything is created independently and exclusively to your taste. True, you can first look at photographs of ready-made solutions. They will help you move in the right direction.
This option is preferable not only because of saving money. You can create something truly individual and unique. First, you should replace the arrows and stickers. Here you can again go to the store or create something of your own. You can also order arrows and stickers from a studio specializing in tuning. It will cost you a little more, but the effect will be much stronger.
Installing the Euro trim without removing the dashboard
In this option, you need to have a drill and screws on hand.
Rely on the lining mounting diagram and start in order:
- Remove the dashboard.
- Open the glove compartment and unscrew the three screws from the inside (positions 1,2,3 in the diagram). Trying to unscrew the screw (pos. 9) from the inside near the windshield is difficult, but doable.
- Remove the 4 keys (next to the control module) and unscrew the screws from the inside (pos. 4.5)
- Unscrew or loosen the fastening by adjusting the backlight (pos.

- Open the fuse module and unscrew 2 screws from the inside (pos. 6 and 7)
- Now the panel overlay is held in place only by screws, positions 10 and 11. They cannot be unscrewed, so we break them out or lift the overlay by the right edge and cut them off with a file. (Note: the Euro trim will cover the entire top of the panel up to the windshield, so you don’t have to worry about the appearance when you cut or break the screws)
- Remove the old dashboard trim.
How to properly remove the dashboard
To remove the dashboard, it is recommended to carefully study the manual. After this, disconnect the wire from the negative wire on the battery. Then, remove the handles from the stove control levers. Important information! Be extremely careful when removing the instrument panel. There are a lot of brittle and fragile parts that can easily be damaged.
The next step is to unscrew the nut that secures the reset handle. After this, the handle is pushed into the space behind the dashboard. Then the plug of the screw that secures the instrument panel is removed and the self-tapping screw is removed. The instrument panel can then be removed and redesigned or replaced.
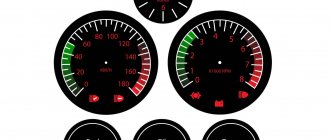
Let's start with the backlight
In principle, where exactly you start tuning the VAZ 2107 instrument panel does not matter. You can first replace the arrows or scales, and only then deal with the backlight. But we will start the description with the backlight, since it really leaves much to be desired.
Important information! The main stages of tuning the VAZ 2107 instrument panel:
- removing the instrument panel;
- replacement (refinement of scales and hands);
- installation of LED lighting;
- installation of a finished dashboard.
Most often, when tuning, car enthusiasts choose LED lighting for instruments and panels. It gives the interior a more modern look. To modernize the dashboard, you can use 10 LEDs and connect them with special cables. Next, you need to cut off the LED heads and treat their surface with sandpaper for a softer glow. You can place the LEDs as you wish.
Alternatively, there are 4 LEDs around the largest scale in the corners, one between two small sensors. The rest are located at your discretion. Once you've completed this job, it's a good idea to be sure to connect the entire system and look at the results before you put the panel back on. As for the illumination of the arrow on the instrument panel, LEDs can also be used here. By the way, you can also replace the arrows themselves. To do this, use a ready-made set or make them from plexiglass on a machine. The second option is much more labor-intensive. But you can make them unique.
Dashboard covers
Let's consider another tuning option. The standard “tens” torpedo does not have a very attractive appearance. It can be changed using special overlays. In stores today you can choose the most suitable option from several presented on the shelves. Such overlays look very impressive, significantly transforming the interior of the car, of course, for the better.
Even more impressive changes come from the combination of the trim and the change in instrument panel lighting. However, before you start tuning, you should think carefully. Despite its not very attractive appearance, the “tens” torpedo is quite practical. Many car owners have already appreciated this moment. The overlay will simply be a beautiful element of the interior. The vast majority of them have a rounded shape, so they are not very practical. Here you will have to make a choice between stylish appearance and convenience. However, many agree to sacrifice practicality in favor of attractiveness - this is a matter of personal preferences and taste.
Replacing scales
The standard dials on the instrument panel are black, and the numbers on them are faded. This design, in principle, looked good twenty years ago. But the instrument panel clearly does not correspond to modern trends. There are quite a lot of photographs on the Internet of options that car enthusiasts made with their own hands. In most cases, owners prefer white circles with black numbers. This option looks more “sporty”. In addition, it is easier to highlight.
The only thing to remember is that when working with dashboard parts, you must be extremely careful. All spare parts are quite fragile and very easy to break. Recovery will take a lot of time.
European standard panel
The question immediately arises: why is it better? Old parts are often made in haste, so they are not always functional. The material from which domestic instrumentation is made does not meet high performance standards, and therefore tuning such instrumentation is extremely difficult. Therefore, it makes more sense to install European standard devices. It has a more elegant look, better quality material, and an excellent level of ventilation.
Almost all drivers have already made a choice for themselves. Europanel will add aesthetics to the car, and driving with such a dashboard will be much more pleasant.
Adding new devices
Another important point when tuning the VAZ 2107 instrument panel is the installation of additional indicators. This could be, for example, indicators of fuel consumption per unit of time, on-board computer, temperature and light sensors, and so on. In fact, there are many options. The most important thing is that all this fits organically into your overall design. If you don’t want to do all this work yourself, you can contact a tuning studio. Here you will be offered a lot of interesting options. But of course, in this case there can be no talk of any savings.
On the other hand, if you doubt your abilities, then this is the only option to transform the dashboard of your car. Experts will help you realize your fantasies, or offer one of the options that, in their opinion, is best suited for your VAZ 2107.
Connecting the trip computer
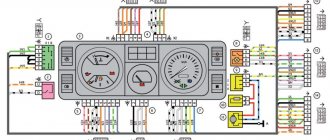
The mentioned diagram took into account only one, brown wire leading from the red block to the trip computer, but this is clearly not enough. Therefore, let's see how the pinout occurs here.
- The fuel consumption signal from the electronic control unit is indicated by a green wire;
- Orange leads to terminal “15” in the ignition switch;
- Red and white - to terminal “30” in the ignition switch;
- Black, which is common, goes to ground;
- The speed indicator corresponds to brown;
- The positive terminal of the fuel sensor is green and red;
- Responsible for lighting the dashboard white, it leads to the light control.
Make sure that the board is not damaged, on which, in fact, uninterrupted reading of information from your VAZ 2110 depends, and providing it to you through all those sensors and devices that you always see in front of you.
Source