Dashboard upgrade
The main problem of the dashboard on the VAZ 2110 is that it is very soft and can be deformed even when poked with a finger. Therefore, car owners strive to strengthen it. Here's what you need for this:
- screwdriver with a set of open-end wrenches;
- sandpaper;
- epoxy resin;
- polyurethane foam;
- fiberglass.
Sequencing
The main thing that the driver must understand is that you need to work with the panel very carefully. It's easy to break.
- Since it is impossible to work with the panel inside the cabin, it will have to be removed by unscrewing the fasteners with a Phillips screwdriver.
To modernize the dashboard it will have to be removed from the “ten” - The removed panel is thoroughly cleaned of dust and dirt. This is done using a piece of dry rag.
- A thin layer of polyurethane foam is applied to the cleaned outer surface of the panel.
- When the foam hardens, it is given the desired shape using sandpaper.
The polyurethane foam on the surface of the panel hardened and was treated with sandpaper - The resulting surface must be strengthened. To do this, fiberglass is laid on it in several layers, which is fixed with epoxy resin. After the glue has dried, the surface is sanded again.
- Now all that remains is to cover the panel with high-quality vinyl film. Its choice depends on the driver’s preferences. Many people choose film painted to look like carbon.
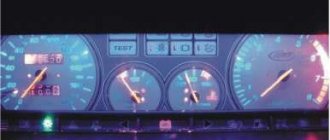
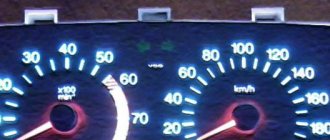
Backlight color and intensity
The color of the backlight, as well as the intensity, also plays a big role not so much in the aesthetics of the panel’s perception, but in readability and ergonomics. A bright, annoying color will not only distract you from the road at night, but also cause fatigue. Your eyes will get tired very quickly, even if bright ruby or lemon are your favorite colors.
It is simply impossible to withstand them for a long time - the reaction speed drops, the eyes get tired and watery, and bright objects overboard can merge with the lighting of the tidy and go unnoticed. It's also worth thinking about glare. Few people initially pay attention to them, but constant bright glare points on all the windows will not immediately make driving comfortable.
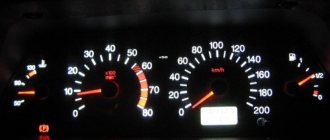
Improving instrument lighting
The dashboard lighting on the VAZ 2110 has never been bright, since it uses ordinary incandescent light bulbs. Therefore, drivers often replace them with LEDs. They are brighter. And they last longer.
Sequence of operations
To install the LEDs, you will first have to remove the instrument cluster from the panel. The light bulb sockets are located on the back wall of this unit, and there is no other way to reach them.
- The steering wheel of the car is set to its lowest position.
- Use a Phillips screwdriver to unscrew two self-tapping screws located above the devices.
- After this, the decorative trim can be pulled out by pulling it towards you.
- Below it there are 3 more screws that hold the instrument unit with light bulbs. The screws are unscrewed with the same Phillips screwdriver.
- The instrument unit is removed. All wires are disconnected from the rear panel. The incandescent light bulbs are removed and replaced with LEDs.
The arrows show the location of the backlight bulbs, which are replaced by LEDs - The block is installed in place, then the instrument panel is reassembled.
LED backlit instrument panel looks much brighter
Changing the color of the instrument panel scale
If desired, you can also change the instrument panel by changing the color of the scale. Such modification will also not take much time and effort. Let's consider the following features of performing such work:
- To begin with, as in previous cases, you need to dismantle the structure. By completely disassembling the structure, you can significantly change it.
- You can change the dial by removing the previously applied scale. This can be done using a knife. However, it is not possible to remove everything mechanically - you need to use a solvent. With a careful approach to solving the problem, you can completely remove the old scale without significant damage to the base.
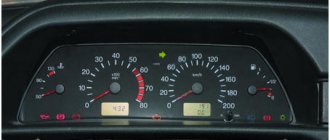
- After the base has been changed, the LED strip is attached. In our case, a green ribbon was chosen. We fasten the tape and connect it directly to the light bulb socket.
- White goes well with green. That is why it is necessary to dismantle the hands, clean them of green color and apply white varnish. If there is no special varnish, then you can use the one that is used for applying to nails.
Sidebar: Important: The tuning in question can significantly increase the readability of the dashboard: during the day, all values are quite clearly visible, at night the backlight does not hurt the eyes. That is why the combination of white and green can be chosen when upgrading the instrument panel.
Steering wheel cover
Without braiding, the steering wheel on the VAZ 2110 seems thin and slippery, which does not have the best effect on driving safety. So after buying a car, car owners usually install a braid on the steering wheel. You should choose size “M”, intended for steering wheels with a diameter of up to 39 cm (this is the standard wheel for the VAZ 2110).
The braid is sewn together with a clamp needle and nylon thread
The purchased braid is put on the steering wheel, its edges are tightly sewn together using a clamp needle and strong nylon thread.
Alternative optics
If you have a VAZ-2110 car, headlight tuning is carried out by replacing standard bulbs with alternative ones. This will not only improve the appearance of the car, but will also increase the illumination of the road. Thus, headlights are installed of drop, diffuse or beam type. All alternative optics look original. It will be a great addition to the external body kit that the VAZ-2110 has. Tuning the rear headlights is also accompanied by the replacement of these elements.
The best choice would be LED lights, which are perfectly visible at any time of the year and day. Daytime running lights are an addition to the car's optics. Tuning greatly improves the VAZ-2110 car. The photos presented in the article show a clear example of the installation of alternative and additional lighting elements.
About replacing seats
The standard seats on the VAZ 2110 have never been comfortable. Therefore, car enthusiasts replace them with seats from the following cars: Skoda Octavia A5, Hyundai i30 or BMW E60.
Domestic car enthusiasts often bet on the “tens” of seats with the Hyundai i30
All these chairs are distinguished by their thoughtful design, comfort and compactness. It is not possible to install them in a garage, since the fastenings will have to be seriously modified and reworked. So the car owner has only one option: take the car to the appropriate car service center, having previously agreed with the specialists. The price of such a service is from 40 to 80 thousand rubles.
Interior tuning
Internal tuning of the VAZ 2110 is a modification of the interior of the cabin. A special place in it is occupied by the reupholstery of the ceiling, pillars and seats. For those who like to drive, it is recommended to install Sparco or Tiro kits. They include not only seats, but also special seat belts, as well as a set of collapsible interior reinforcement bars.
Owners who have a VAZ-2110 do tuning mainly for themselves, that is, they do not take part in professional racing. Therefore, there is no point in installing kits in a salon that cost over $1,000. It’s easier to get by with standard seat upholstery in leather or Alcantara. Such a modification will cost approximately up to 30,000 rubles, depending on the studio and region.
Photo gallery: VAZ 2110 salons after tuning
Blue leatherette inserts blend seamlessly with the gray interior background
The car owner used leatherette and vinyl of the same color to decorate the interior
The interior of this “ten” is more like the cabin of a spaceship
This driver limited himself to only plastic inserts in the cabin and installing an armrest
The decoration of this interior is dominated by plastic and carpet
The panel is trimmed with red vinyl, the steering wheel is equipped with a braid of the same color
Here the emphasis is on leatherette and plastic inserts
An original and very contrasting color combination that makes the interior truly unique
This “ten” only features LED lighting for the floor and pedals
The seats have red leatherette covers, the doors have red plastic inserts
So, every car enthusiast can improve the interior of the VAZ 2110. The main thing in this matter is not to get carried away. Excess is not good for any business. And car tuning is no exception.
External tuning
The outer part is the first place where pumping of the VAZ-2110 begins. Tuning the external structure includes several elements, which we will dwell on in more detail:
- Bumpers. These decorative protective elements are subject to various modifications. Of course, there are two options for making these parts. Firstly, stamped. There are several types of tuning bumpers from different ones, "Bogdan". They are fairly standard and are not aimed at improving aerodynamic performance. Secondly, there is also an individual order. In this case, the tuning studio calculates the aerodynamic characteristics. And due to the bumper, the streamlining of the car improves and the resistance to the flow of oncoming air is reduced.
- Door sills, like bumpers, perform aerodynamic functions, which improves air flow.
- Wing. Its main function is to reduce the vehicle's ground clearance, which allows air to flow over the top of the car rather than under it.
- The hood air intake serves as an additional engine cooler. It gets very hot at high revs and speeds.
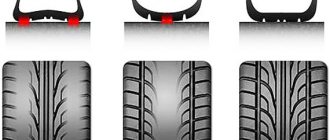
Wheels and tires
One of the essential attributes of car modification is the installation of wheels and tires. There are many varieties of them. A wide range will allow you to choose the best option for the VAZ-2110. The tuning, photos of which are presented in the article, makes it clear that motorists mainly choose chrome wheels and low-profile tires for this car.
The selection is carried out according to the technical characteristics of the fasteners. It depends on the number of bolts, the space between them, and clearance capabilities. Thus, the optimal sizes are 195/65R15 and 205/60 R14.
How to upholster a car dashboard yourself
You should not expect that all the work can be completed without disassembling the interior. The entire front panel will have to be removed to provide full access.
Tools
You will need both a standard plumbing tool for assembly and disassembly work to remove the torpedo, and a more specialized one directly for tightening operations.
- A set of screwdrivers and wrenches for working in hard-to-reach places. Mirrors, flexible holders and gimbal extensions may be required.
- A special device for removing plastic clips and latches.
- Industrial hair dryer with adjustable air temperature.
- You may need a sewing machine for working with leather.
- Marker, knives and scissors. The cutting tool must be of high quality and sharp.
- Spatulas, rollers and brushes.
You should not hope that a cheap and low-quality tool will allow you to get a decent result.
This is interesting: Replacing the front strut support bearing with and without removing the shock absorber
Even in skillful hands, they can ruin everything, after which they will have to start over, suffering material losses.
Consumables
The list of consumables is determined by the selected material. But some list items will become common to all coverages:
- liquid and wipes for degreasing surfaces, used in painting;
- sandpaper of varying degrees of grain, very fine is not required here;
- glue for the selected covering material;
- non-woven fabric for creating a model - patterns, preferably with spot application of glue;
- threads for stitching leather, here you cannot skimp on quality and decorativeness;
- directly the covering material itself, preferably with a reserve.
You will also need disposable gloves to protect your hands and antistatic wipes to remove dust from the part.
Preparation (removing the dashboard)
You must work in accordance with the repair manual for a specific car, since not all fasteners are visible to the eye.
Plastic elements, especially those that have already served, must be handled with care; they become brittle over time, and if broken fastening points are not restored, in the future this place can become a source of annoying noise. Moreover, the mass of the torpedo will increase noticeably.
Constriction technology + video
Work on the removed parprise begins with the preparation of patterns. The locations of the seams are determined, and a decision is made on the size of the pieces of material. Various options are possible, starting from a single cover and ending with pasting in small fragments.
Non-woven blanks are glued to the workpieces and seam tolerances are determined.
Non-woven fabric, unlike paper, has increased strength and is used in the sewing industry as a lining material. After complete pasting, the patterns are carefully separated from the parts of the torpedo.
Note: What does the Knock Sensor affect and how to check it
The removed patterns are placed on the wrong side of the material lying on a flat surface. The boundaries, taking into account the seams, are outlined with a marker, and the parts are cut out.
For the final check, sheets of material are once again applied to the dashboard, and the entire geometry is checked. After this, the cover can be sewn, if required by the technology of the specific material.
Before pasting, the surface of the torpedo must be prepared. The parts are sanded, degreased, and dust and other contaminants are carefully removed from them. A layer of primer is applied, which can be primer or glue. The same is done with the details of the tight material.
A layer of glue is applied to the dried material, in accordance with its technological features. After this, you can proceed directly to pasting.
It is necessary to carefully monitor the elimination of air bubbles, so it is better to work from the center to the edges. All seam locations must be aligned and located along the intended lines.
The glued parprise is blown with an industrial hairdryer to ensure uniform shrinkage and complete distribution of the glue over the surface; at this stage, it is still possible to smooth out the resulting folds and bubbles. A rubber roller is used to roll out the material. Complete polymerization of the glue usually occurs within a day.
Selecting material for reupholstering the front panel of the machine
The torpedo is constantly in sight, which means its appearance and quality will be striking both to you and to other passengers. The selection of material for reupholstering the front panel should be approached responsibly. Most often, the following materials are used in the interior design of a car:
- leather (artificial and natural);
- Alcantara (another name is artificial suede);
- vinyl.
You should not select material via the Internet. Pictures and descriptions will not give you a complete picture of the product. Before making a purchase, stop by a specialized store and feel each of the materials offered. It is also worth writing down the manufacturer and name of the shade. After this, you can order goods from the online store with peace of mind.
Genuine Leather
Genuine leather is a good choice for upholstering the front panel. This is a durable material that is not afraid of temperature changes, getting wet and fire. In addition, its surface is resistant to mechanical damage. Of course, you shouldn’t deliberately scratch the skin with a nail, but white stripes won’t appear on it by themselves either. The leather can be easily cleaned of dirt by regularly wiping it with a damp cloth. You don’t have to worry about the panel fading in the sun—it’s not afraid of ultraviolet radiation. And there’s no point in talking about the appearance of genuine leather: it will fit perfectly into the interior of even the most expensive and pretentious car.
Genuine leather gives the car interior a sophisticated look
Eco leather
If you can’t afford genuine leather, use its modern substitute - eco-leather. This type of material is called environmental because it does not emit harmful substances during operation. It doesn't look at all like the cheap leatherette of the late 90s. This is a durable, moisture-resistant and vapor-proof material that can maintain its appearance for a long time. Do not be afraid that the eco-leather coating will crack in a short time. In terms of its performance qualities, the material is not inferior to genuine leather. In addition, eco-leather is suitable for drivers with allergies.
eco-leather has good performance characteristics, but is much cheaper than natural leather
Alcantara
Recently, Alcantara has become one of the most popular materials for interior upholstery, including the dashboard. This is a non-woven synthetic material that feels like suede. It combines a velvety soft surface with easy care and high wear resistance. Just like skin, it does not fade in the sun. High humidity and temperature changes also do not affect it negatively. Many drivers prefer to cover the entire interior with Alcantara to create an atmosphere of home comfort. Others use it to design individual elements to dilute the severity of the leather. In any case, Alcantara is perfect for covering a dashboard.
Alcantara is a synthetic fabric similar to suede
Vinyl
If you want to create an unusual interior design, consider using vinyl films. There is a rich variety of textures and colors on the market today. You can choose a calm black or gray color, or you can find an imitation python fabric in an acid green color. Chrome-plated films, as well as films with a carbon or metallic effect, are very popular. They are even easier to care for than leather. Vinyl films have, perhaps, only one drawback: they are easy to accidentally scratch. But the low price allows you to re-tighten the panel as often as you want.
Components and malfunctions of the suspension
The front suspension design of the VAZ 2110 is quite complex. Its main element is the stand. It is this that ensures a comfortable ride on domestic off-road conditions. Thanks to a rotary cam mechanism consisting of a bolt and an eccentric washer, the camber of the wheels is adjusted. Also installed on the rack:
- special spring;
- a polyurethane buffer that limits the compression process;
- upper support attached with nuts;
- a bearing designed to rotate the stand together with the wheel;
- shock absorber, where there is a plunger, as well as another spring.
Tuning a VAZ suspension includes modifying or replacing all these parts, after which the mechanism will work much more efficiently.
A ball joint connects the front suspension arm of the VAZ 2110 to the steering knuckle. The extensions located along the bottom, the lower arms and the supports on the cross member are connected using rubber-metal hinges and bolts. Special gaskets (washers) regulate the longitudinal inclination of the rotary axis. The wheel hub is mounted with a radial contact non-adjustable bearing. An important role is played by the cross member, that is, the rod connecting the lower arms. In the center it is attached to the car body through rubber pads.
You can repair the front suspension of a VAZ 2110 yourself, but this requires certain skills. The VAZ 2110 front suspension diagram will also help the car owner. If you are not confident in your abilities, it is better to entrust the work to the experts at a car service center.
The most common defect of this important car part is knocking noises. If they are heard when driving even on a smooth road surface, then the reasons for this may be:
- front suspension strut wear;
- loose fastening of the cross member to the body;
- defects that have appeared in the rubber parts of the suspension, especially when the knock is clearly metallic;
- broken spring (there are several of them in the suspension);
- worn hinges;
- wheel imbalance.
If the cause of the knocking noises is determined correctly, you can deal with them by replacing the worn part yourself or tightening the fastener.
It happens that when driving in a straight line, the car tends to slide to one side. This may occur due to the fact that any spring installed in the suspension has lost its elasticity (its compression ratio has changed). A spring that has failed must be replaced immediately.
Acoustics
The last tuning option is to install acoustics. The car can accommodate up to 8 speakers. They are located in the following places: four in the doors, two on the rear shelf and the last 2 in the instrument panel. As in many other cars, the amplifier or subwoofer is installed in the trunk. Also, in some cases, you can mount an SD receiver there. Instead of a standard radio, a CD-DVD player is installed, which has a retractable screen. One common such acoustic player is Texet, which is easy to connect. In addition, in this case the price-quality ratio corresponds to reality. Although you can choose any other option at the discretion of the owner.
During installation, the wires are laid under the carpeted floor, and therefore they will be less exposed to external influences. In addition, they will not get in the way underfoot. Installation can be done either by yourself or by contacting audio professionals who can select equipment and install it.
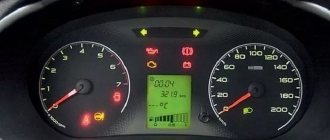
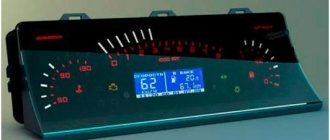
Dashboard trim, is it worth it?
An effective and radical step that can completely change the design of the tidy, right down to the arrangement of devices on it. The trim is installed in the standard place of the tidy, and there are a ton of configuration options. You can use trendy digital displays, such as in Lambo or Ferrari. Whether it makes sense is up to you to decide; they look impressive, but overall they are perceived as a VAZ 2101 with the Volvo inscription and a diagonal molding on the grille.
A useful change would be to change the color of the odometer. You can’t really see it in the standard version during the day, and even less so at night. This is where a digital scale with sane backlight would be appropriate. The color of the lining can be chosen as contrasting - white or beige like Aston Martin or Maserati, or it can be made deep black with luminous numbers and symbols.