The reverse sensor (RDS) on the VAZ 2114 ensures that the white spectrum lights turn on when the vehicle moves backwards. For the system to work correctly, a sensor is required. The signal it sends to the white lights notifies other road users that you have moved backwards. That is, the reverse sensor 2114 is necessary and useful to the owner of the vehicle on which it is installed, and to other motorists for the purposes of safety and accident-free movement. You need to ensure that the device works correctly, detect problems with it in a timely manner and take action.
Diagnosis of problems
The reverse sensor on the VAZ 2114 may fail over time as a result of non-compliance with the operating rules of the vehicle. To diagnose its condition, perform the following actions:
- turn the wheels to the left;
- looking for contact protection;
- remove protection;
- consider the device itself and a pair of contacts going to it;
- perform a “frog” closure;
- engage gear (fourteenth).
If there are no problems with the wiring, contacts and light bulbs (the performance of all these elements is important), the white lights will light up. When there is no switching on, the tester measures the voltage of the red wiring and ground. If there is voltage, check the board. When there is no light, the contact of the sensor or safety valves has probably broken, it is necessary to test the entire unit. The DZH should be located and checked using appropriate equipment.
The main reasons for sensor failure:
- the contact points of the lights at the rear have oxidized;
- the sensor itself is loose, it should be screwed in as deeply and tightly as possible;
- there is no normal contact with the wiring on the car box;
- there is no proper contact between the safety block and the plug device;
- The fuse burned out and damaged the contacts.
In theory, any fuse in the chain can blow out, which will negatively affect all contacts.
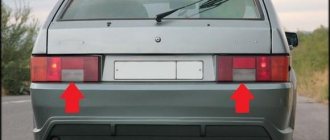
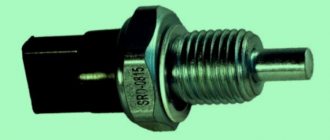
Reverse sensor VAZ 2114
As we have already found out, this device is responsible for turning on the rear lights on the car. If the white light does not appear when the driver backs up, then a pressing problem arises. It is necessary to determine the cause of the malfunction.
Not only the sensor could break, but something else as well. For example, a fuse or some kind of cable.
And without a rear light, driving in the dark is not very pleasant. It is simply difficult to inform other road users about your intentions to move back. In addition, they illuminate the path for the driver himself.
Even if this malfunction does not seem critical (like, for example, a breakdown of the knock sensor), it still needs to be corrected. And you can do this as follows.
What to do based on the cause of the breakdown
The procedure for restoring the VAZ 2114 reverse sensor will depend on the general picture of the malfunction:
- Oxidized wiring contacts must be thoroughly cleaned and then returned to their place. The negative terminal of the battery will need to be disconnected first.
- The loose sensor is screwed into place as tightly as possible.
- They test the wires, clean the problem parts or install new, serviceable elements instead of the problem ones - when there is no contact with the box.
- If there are problems connecting the plug to the block, check the contacts, clean them or change the wiring.
If a fuse blows, only replacing it will help.
Check the light bulbs themselves - they may be the reason for the lack of light if the wiring and contacts are intact. Faulty light bulbs are replaced.
Signs of sensor malfunction
To locate the device, just look at the suspension of the 14th VAZ model. There, at the checkpoint there should be two sensors - the one in question and the one indicating the speed of movement. A more labor-intensive way to get the device is to access it through the open hood.
Before diagnosing its performance, possible causes of failure should be taken into account.
These may include the following:
- oxidation of contacts;
- lack of contact with the transmission wiring;
- lack of contact with the fuse console;
- failure of one of the fuses (for example, F16);
- sensor looseness;
- broken wires;
- bulb malfunction.
The last point should not be discounted, since the lamp can also fail. It’s trivial to burn out, in other words. In this case, the reverse sensor 2114 itself will work properly. To find out the truth, you need to take matters into your own hands.
Self-replacement
You can repair or replace the signal sensor yourself or at a service station. The second option is simple but expensive. Drivers independently perform VAZ maintenance on a pit or a lift; if they cannot be used, they climb under the car from below. You need to act carefully, as there is a risk of being splashed with oil from the gearbox.
Procedure:
- Place the car on an overpass, a hole, or climb under it from below.
- Engage the handbrake and put the gearbox in first gear - this will prevent the vehicle from accidentally rolling away.
- Remove the protection from the contacts and disconnect the contacts themselves.
- Place a container to drain the oil after unscrewing the reverse sensor.
- Remove the sensor - unscrew it manually or with a 22 mm diameter head.
- Remove the broken device and install a new, working one in its place. Another option is to diagnose the dismantled sensor, perform repair work and return it to its original place.
- Remove oil from the crankcase with a dry cloth, as drips reduce the efficiency of the unit.
- Return the previously removed contacts to their place.
- Wear protection.
If a lot of lubricant has leaked out of the gearbox, top it up. Be sure to use fresh oil, since used oil has a changed aroma, color, and incorrect characteristics. You can check the lubricant content in the system using a dipstick. When the volume is below the minimum level, urgent topping up is required.
After completing the service, check the system's functionality. To do this, turn the key in the ignition system, do not turn on the engine. Then put the car in reverse and see if the lights come on. If they burn, everything is fine.
Location
First you need to understand where exactly the device is located.
You can go two ways:
- Fly under the bottom and look up at the suspension. The desired object on the VAZ 2114 is located on the gearbox. There are only two sensors - speed and reverse.
- If you don’t want to crawl under the car or can’t, try getting to the device through the engine compartment by opening the lid. Although the first option is objectively more convenient.
Device location
Self-repair price
The cost of a new reverse sensor depends on the manufacturer. The average price of a part is around 300 rubles; you can find options three times cheaper. Please note that the less a spare part costs, the lower its quality and, accordingly, reliability and service life. It is advisable to place orders in trusted stores.
Replacement will also require contact cleaner such as WD40. Many additionally replace wiring if it is deformed, kinked, or otherwise damaged. We do not recommend working with wires without proper experience; it would be better to contact a specialist.
Sensor bulbs cost up to 50 rubles apiece. It's easy to unscrew the old ones and screw in the new ones yourself.
Why the reverse lights don’t light up on a Priora: checking the 3D sensor yourself
This is often associated with the reverse sensor (light switches), but there is no need to rush to change it right away. First you need to make sure that this element is indeed faulty. There are several reasons why the reverse lights do not light up on a Priora. These include:
- Burnout of light bulbs in lanterns.
It is important to make a note here, since two light bulbs cannot burn out at once. You can, of course, check the bulbs for serviceability, but in most cases, they will be suitable. - Fuse tripping
. The power supply circuit for the rear lights is connected via a fuse. It is used in the circuit because a large current flows in the circuit, and in the event of a short circuit, the wiring may catch fire.
Which fuse is responsible for the reverse circuit on a Priora? This is a fuse F12 in the car at 10A.
Below is the photo of its location. We check the serviceability of the fuse using a tester. If it is not working, then before installing a new fuse, you should determine the reason for the failure of the old one. After all, the fuse-link melted due to increased current in the circuit, which means it is possible that the supply wire is damaged, which breaks through to ground. - The power cable is faulty.
Before you begin removing and replacing the switch, you should make sure that the wiring is in good condition. The easiest way to check it is to use a jumper.
Connect the contacts in the chip to each other and turn on the ignition. If the headlights do not light up, then the sensor has nothing to do with it, and the cause is a faulty circuit
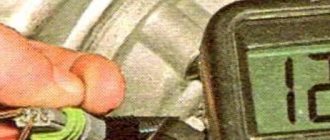
. Another way is to measure the voltage in the chip that connects to the sensor. One of the contacts should have 12V voltage when the ignition is on. Connect the multimeter as follows: one probe to one of the contacts of the chip, and the second to the ground of the car. Turn on the ignition. If there is no voltage, then touch the probe to another contact in the chip. If in this case there is no voltage, then it is necessary to look for the cause in the wire, since its core is damaged. Most often, the wire frays at the junction with the terminal. Inspect the wire and replace the chip if necessary. - Faulty reverse sensor or switch.
A multimeter will help you verify this. We turn on the device in the continuity or resistance measurement mode, after which we turn on the reverse gear (there is no need to turn on the ignition). If the tester produces a characteristic sound signal, it means the switch is working. We need to look for the reason elsewhere. The absence of a signal is a clear sign that the sensor needs to be replaced. If you check by measuring the resistance, then its zero value when the reverse speed is engaged indicates a sensor malfunction.
Having figured out the reasons why the reverse lights do not work on the Priora, you can resort to troubleshooting. However, first, let’s look at where the reversing light switch is located on the Priora.
Sensor diagnostics
First of all, an external inspection is carried out. We check the integrity of the wiring and the condition of the contact group. It is better to test the wiring with a multimeter from the removed connector to the nearest input into the car's distribution contact box. Next, we test the sensor itself:
- We put the car on a pit or on a lift.
- Disconnect the connector and move it to the side.
- Turn on the ignition without starting the engine.
- We connect the multimeter probes to the sensor and ask an assistant to engage reverse gear.
- A working sensor will show zero resistance between the contacts.
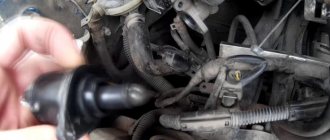
If the test fails, the sensor must be removed from the transmission. In this case, some of the transmission oil will leak out of it, so it is better to prepare a plug in the form of a bolt with the same thread or temporarily screw in another sensor.
Tip: Do not throw away the broken sensor; it may be useful for temporarily closing the hole.
After washing the outside of the housing and cleaning the contacts, you can check the sensor with the same multimeter. The pressing force on the rod is small, provided that it is not blocked by corrosion. Therefore, just press it with your finger and look at the results of measuring the resistance.
Replacing the reverse frog on a VAZ 2110-2112 and video review
To show this process in the most accessible and visual way, a video was shot that shows all the intricacies of diagnosing and replacing this switch. If you cannot open the video, regardless of the reason, then below is a photo report of this repair.
First of all, we drive the car into a pit, remove the engine protection and find our frog for turning on the reverse light there.
Everything is shown clearly below:
- Disconnect the plug from the connector and move it to the side.
- And now you can unscrew the frog itself using a 22 key, it is advisable to use a carob or cap:
- And finally unscrew this switch by hand.
Please note that when you finally unscrew this part, oil will flow out of the gearbox. Therefore, the following measures must be taken:
- Or do everything at a very high speed so that oil loss is minimal
- Or substitute the container and after all the repairs, add the losses back to the gearbox
In principle, if you do everything quickly, then the oil practically does not have time to flow out and no more than 10-20 ml can spill out, so place the container and go ahead. When everything is screwed into place, we connect the plug and that’s it. This procedure can be considered complete.
The price of a new frog for a VAZ 2110-2112 is about 100-200 rubles, so in essence, this repair can be considered cheap.
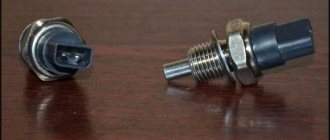
Types, design and principle of operation of the reverse switch
Reverse sensor VAZ 2114
Currently used reverse switches have a fundamentally identical design, differing only in some details and characteristics. The basis of the device is a metal case made of bronze, steel or other corrosion-resistant alloys. The housing has a hex key and a thread for installation in the gearbox housing. There is a button on the thread side, a contact group connected to the button is installed inside the case, and the back of the case is covered with a plastic cover with terminals. Also on the housing, on the terminal side, a second thread of increased diameter can be made, used for connecting other components.
Switch with cylindrical button
Switch with spherical button
VZH buttons can be of two design types:
- Spherical (short-stroke);
- Cylindrical (long stroke);
In devices of the first type, the role of a button is played by a ball made of steel or other metals, partially recessed in the body; usually such a button has a stroke of no more than 2 mm. In devices of the second type, a metal or plastic cylinder (from 5 to 30 mm or more in length) acts as a button; usually its stroke reaches 4-5 mm or more. A button of any type is located in the protrusion of the metal body of the switch; it is rigidly connected to the movable contact of the contact group. The button is spring-loaded, which opens the circuit when reverse gear is turned off.
The switch is connected to the vehicle's electrical network using a standard connector (both regular and bayonet-rotary) with blade/pin contacts, using screw terminals or single pin/blade terminals. Devices with connectors of the first type are connected to standardized blocks, devices of the second type are connected to wires with stripped insulation, and devices of the third type are connected to single female mating terminals. There are also VZH with electrical connectors located on the wiring harness.
Of the main characteristics of the VZH, it should be noted:
- Supply voltage - 12 or 24 volts;
- Rated current - usually no more than 2 amperes;
- Thread size - the most widely used series are M12, M14, M16 with a thread pitch of 1.5 mm (less often - 1 mm);
- The key sizes are 19, 21, 22 and 24 mm.
Finally, all VZH can be divided into groups according to applicability - specialized and universal. In the first case, the switch is mounted only on the gearbox and serves to switch the reverse light circuit (as well as the corresponding sound alarm). In the second case, the switch can be used to switch various circuits - reverse lights, brake lights, divider and others.
Installing the reverse switch on the gearbox through the O-ring
The VZH is screwed into the threaded hole provided for it, made in the gearbox housing; the connection is sealed using a metal washer, rubber or silicone ring. The switch button is located in the cavity of the gearbox housing; it is in contact with the moving parts of the gear selection mechanism - most often with the reverse fork rod. When reverse gear is turned off, the fork rod is at some distance from the switch, due to the force of the spring, the button is pulled out of the housing, the contact group is open - no current flows through the reverse light circuit and the light does not light up. When reverse gear is engaged, the fork rod rests against the button, it is recessed and causes the contacts to close - current begins to flow through the circuit and the lamp lights up. Thus, the reverse switch operates like a simple push-button switch without detent, but is designed to withstand transmission oil, high pressures, temperatures and mechanical stress.
Functionality check
If a breakdown is detected, you need to check:
- switch on sensor;
- switching wiring.
Frog sensor
The following algorithm is used:
- Place the car on a viewing hole or overpass.
- Stop the engine and secure the vehicle with the parking brake or wheel chocks.
- Inspect the gearbox housing; the sensor is located on the rear wall. On some of the units nearby, a speed detection sensor is installed, which transmits a signal to the electronic speedometer.
- Remove the plug from the sensor connector and inspect the contacts.
- Using a piece of wire or a paper clip, close the metal elements inside the block.
- Turn on the ignition circuit. If the wiring is in good condition, the warning lights should light up.
To test the sensor, a lamp rated for 12 V is used, installed in a socket with patch cables. The indicator is connected to the sensor terminals when reverse gear is engaged and the ignition is active. If the lamp does not turn on, the sensor needs to be replaced or adjusted.
Circuit integrity
To test the continuity of the circuit, use a multimeter set to cable testing mode. When checking the wires, be sure to remove the flashlight or dismantle the cover, which allows you to get to the contact pad of the lamp. The device is connected to the beginning and end of the wire; if the circuit is closed, a buzzer sounds. You can use a control light with a battery that is connected through a wire running from the sensor to the lamp. The damaged wire must be replaced with a copper stranded cord with the appropriate cross-section.
Adjusting the gearbox switch
Some machines provide the ability to adjust the position of the sensor depending on the location of the shift knob. There is a lock nut on the sensor body that needs to be loosened. Then the reverse speed is switched on, and a warning lamp is hung on the sensor contacts. The housing is screwed into the box housing until the contacts are closed and power is supplied to the thread. The sensor is fixed in the found position with a lock nut, and then the electrical wiring plug is connected.
On automatic transmissions there is a reverse sensor combined with a neutral or parking position indicator. Additional indication is necessary to allow the engine to start only when the kinematic chain is open. A similar design is used on some transmissions; there is also a switch in the selector that cannot be adjusted.
Brief algorithm for setting up the sensor:
- Remove the plug and determine the purpose of the contacts according to the markings or electrical diagram of the car.
- Turn on the ignition and move the selector lever to the reverse gear position.
- Rotate the sensor until the signal lights turn off and mark the position of the sensor body relative to the crankcase with chalk marks. To check, a test lamp with an external power source is used, which is connected to the reverse contacts.
- Connect the lamp to the remaining contacts and slowly tighten the housing until the filament turns on. Mark the position with chalk on the sensor housing and the box housing.
- Set the switch to an intermediate position between the found positions. With correct adjustment, when the lever is moved to position R (reverse movement), the lighting equipment at the rear of the machine will turn on, and in positions P and N it will be possible to start the engine.
Repair methods
To repair the reverse signal, you can proceed in two ways. They differ in the way the sensor is accessed.
- Drive the car onto a lift or pit.
- Do the work by climbing under the car.
If you have already encountered a similar problem, then you will probably agree that replacing the DZH is best done using a pit or overpass. This makes access to the sensor as comfortable as possible, plus you minimize the risk of being splashed with oil from the gearbox.
Replacing the DZH is not the cleanest job
Of course, there is another cleanest way - sending the car to a car repair shop. But then you will have to pay not only for the sensor, but also for the services of the specialists. And this is another 2-3 times the cost of the sensor. The choice is yours anyway.
Self-replacement
It’s not difficult to get to and replace a failed DZH on your own. Follow the instructions, do not break the sequence of operations, and then the process will not take you much time and effort.
- Place the car on a pit or overpass. Be sure to apply the handbrake and place the transmission in first gear. This will help prevent your car from accidentally rolling away.
- Remove the protection from the contacts of your sensor, disconnect the contacts.
- Prepare a container into which the oil will be drained when unscrewing the DZH.
- When the container is ready, remove the sensor. In some cases, it may not be unscrewed by hand. In such a situation, use a 22 mm socket.
- Very rarely even the key cannot help, since the sensor becomes stuck to its location. Here you will have to arm yourself with a hammer and chisel and try to remove it as carefully as possible.
- Take out the failed device and insert a new one in its place.
- If oil gets on the gearbox housing, remove it with dry rags. There is no need for extra dirt. Plus, it can lead to a decrease in the efficiency of the device.
- Return all contacts to their places, put the protection back on.
- If a decent amount of lubricating fluid has spilled out of the box, be sure to top it up. Just use fresh ones. By the way, this is one of the reasons to completely change the oil in the gearbox if it has been there for more than the first season.
- The decision to change the oil will simplify the task when removing the sensor. If the liquid is drained in advance, it will not flow in different directions when the sensor is unscrewed. The work will be cleaner, plus you will kill two birds with one stone - replace the sensor and gearbox oil.