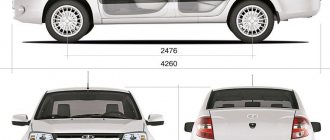
March 20, 2019 Lada.Online 11 493 0
According to the maintenance regulations for Lada Granta, Kalina and Priora cars, inspection and testing of the steering must be performed every 15,000 km. mileage The article describes possible steering malfunctions, their causes and solutions.
How to identify faulty or worn steering tips?
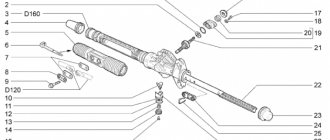
A rack or gear mechanism is responsible for turning the front wheels of the car. The unit simultaneously transmits force to both steering knuckles through rods with hinges at the ends. These 2 parts are the weak link of the control system - the service life is 20–80 thousand km, depending on the make of the car and operating conditions. Car enthusiasts should learn to recognize the signs of faulty steering tips in time, since their technical condition is directly related to the safety of passengers.
Characteristic
Tips are a component of a car's steering system. This element ensures the rotation and mobility of the wheels to the desired angle. The design of the tip is based on a ball joint. The element is attached to the steering rod on one side, and on the other it is connected to the steering knuckle.
Depending on the type of steering, a car can use from 4 to 6 such mechanisms, which, due to their special location (under the wheel arches), are constantly exposed to external factors. They get dirt, water, snow, dust, etc. The service life of these elements may differ significantly from operating conditions. That's why it's so important to know how to check tie rod ends. The VAZ-2110 is also equipped with this design. Well, let's move on to the inspection.
Tie rod design
In order to independently determine the degree of wear of the tips, you need to at least understand their structure in general terms. The rod is a metal rod with a thread at one end and a hinge at the other. The threaded part is used to connect to the rack or gearbox, and the ball pin is inserted into the eye of the steering knuckle and secured with a nut.
The wear of the steering tips implies the wear and tear of the hinge itself, which consists of the following parts:
- cylindrical body, closed on one side with a plug;
- a ball pin resting its lower part on the supporting heel;
- a spring is installed at the bottom between the fifth and the plug;
- An insert made of wear-resistant plastic is provided between the body and the ball;
- The top of the case is covered with a rubber or silicone cover.
Note. Depending on the design of the rods for a particular car brand, the metal rod can be welded to the hinge body or screwed onto a thread.
The plastic liner allows the ball pin to rotate in different directions, and the spring selects the play that appears during operation. When a fault is detected in the steering tips, the parts are usually replaced, preferably in pairs. There are also collapsible hinge designs that allow you to change a worn-out insert, but they are unreliable in operation.
Preparatory activities
Many experts advise taking certain steps to prepare for the replacement so that everything goes easier and faster. These actions include the following.
- Treat all nuts and fasteners with penetrating liquid. WD40 works great.
- If the tips last longer than one winter, to remove their fist you will need to use a 17 socket to unscrew the nuts.
- If the nuts stick, try heating them with a hair dryer. A gas burner is also suitable, but you need to be as careful as possible with it.
- Prepare tools for removing tips.
Causes of joint wear
During operation, the working pair of the tip (plastic insert and ball pin) experiences loads from the steering rack, which pulls or pushes the steering knuckle depending on the direction of movement of the car. Another type of load affects the element from the side of the wheel falling on uneven road surfaces.
In the first case, the force is applied perpendicular to the axis of the ball pin and acts on the fracture; in the second, the forces tend to pull the part out of the socket. There is a third type of load - the friction force that arises in the unit when the wheels turn. Since the finger is rigidly fixed in the eye of the fist with a nut, it rotates inside the plastic bushing and rubs against its walls.
Due to the impact of these loads, the hinge joint wears out as follows:
- Over time, the walls of the liner wear out, a gap forms between them and the ball, which is why a quiet knock is heard when moving over small uneven surfaces.
- Abrasion of the side walls of the bushing leads to loosening of the pin, because it is pressed by the spring only from below.
- When the spring and heel are unable to remove the play resulting from wear of the plastic, the ball pin moves easily in the bushing, causing the steering tip to knock heavily.
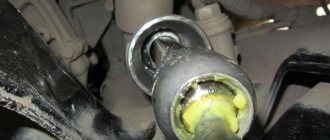
Important point! Hinge joints have an external enemy that significantly reduces the resource of the working pair. This is dust and moisture that penetrates between the rubbing surfaces as a result of the rupture of the upper rubber cover.
Such defects must be identified in a timely manner, otherwise the damaged tip will quickly become unusable.
In cars equipped with a double-wishbone front suspension, sometimes a breakdown occurs that is not related to the operation of the hinge. Since the rod is located low, if you drive carelessly on bad roads, the metal rod can bend when it hits a stone or other obstacle. In this case, knocking does not occur, but other symptoms are observed, described below.
Symptoms of malfunctions
If you do not pay attention to the wear of the tie rod ends, the ball pin will become loose and jump out of its socket at the first decent bump. There is no need to explain for a long time what this entails: the wheel will become uncontrollable, and the driver will lose control of the car. How to determine that there are problems with the hinges and the car’s chassis needs to be checked:
- the first sign is a dull, frequent knocking sound when driving over small bumps, especially in turns;
- as a rule, extraneous sounds are heard from one side, but simultaneous wear of two tips also occurs;
- the free play of the steering wheel increases;
- when negotiating a turn on an uneven road, you can feel a tapping sound on the steering wheel;
- At the last stage of wear of the tips, the car has to be literally “caught” on the road, since due to the play of the ball pins, the wheels can deviate by 2–3° from the straight line.
Note. Unfortunately, such signs are observed not only as a result of problems with the steering rack, but also as a result of wear of the bearing of the rotary bipod and the pendulum. The exact result will be shown by a check performed by car service employees or independently in a garage.
If you find one of the listed symptoms in your own car, you should not delay diagnosis. Especially if the tips have served more than 40 thousand kilometers. To perform the check, you will need an inspection ditch; hanging the car on a jack will not allow you to swing the rod in the desired direction.
To check the tie rod ends yourself, use the step-by-step instructions:
- Drive the car exactly in the center of the inspection hole so that you can easily reach the hinges. If the ditch is too narrow, the car will have to be moved twice in different directions.
- Support the rear wheels with wheel chocks.
- Grab the rod with your hand as close to the tip as possible. Rock the hinge up and down to feel the play.
- A small elastic resistance indicates that the spring is working and there are no critical gaps. Significant play is felt immediately.
- Rotate the rod several times around its own axis. If it flows easily, literally dangling on the ball pin, the tip should be replaced.
Advice. When swinging the rod, do not confuse the hinge play with free play of the steering rack or a broken pendulum bearing.
To check the integrity of the anthers, an inspection hole is not needed. It is enough to turn the wheel and lift the car with a jack. The hole in the rubber boot is discovered thanks to thick lubricant, which is squeezed out from the inside through a gust.
Replacing the steering tip is also not a big problem; the only special tools you need are a puller to push the ball pin out of the steering knuckle eye. Please note an important nuance: after replacing the linkage, the camber angles of the wheels must be adjusted. You cannot make the adjustment yourself, so you will have to visit a car service center.
Checking the steering condition
We check the condition of the steering in accordance with the maintenance regulations every 15 thousand km. There should be no mechanical damage to the steering control elements. To check the free play of the steering wheel (steering play), set the front wheels in a position corresponding to the straight-line movement of the car. We attach a screwdriver with a long shaft to the instrument panel with tape so that its blade is directed towards the steering wheel. We turn the steering wheel until the wheels begin to turn (the wheels must remain stationary), first in one direction and then in the other direction. At the moment the wheels begin to turn, use chalk or thread to mark the boundaries of the free play of the steering wheel on its rim. Having measured the distance between the marks, we determine the free play of the steering wheel, which should not exceed 5° (corresponding to a distance between the marks of 15 mm) provided that the steering mechanism, tie rods, front wheel hub bearings and telescopic struts are in good condition. When turning the steering wheel sharply from side to side at a small angle, we make sure that there is no knocking in the universal joints of the steering column and the steering mechanism. Otherwise, we tighten the loose fastenings of the steering elements or replace faulty parts and assemblies. An assistant is required to assess the condition of the outer tie rod ends. We hang the front wheels and securely fix the car on factory-made support stands.
How to check the steering
When inspecting the steering, pay special attention to the condition of the protective covers and threaded connections. Be sure to replace torn, cracked or lost elastic rubber covers, otherwise water, dust and dirt that get into the units will quickly damage them.
Check the location of the steering wheel spokes, which, when the front wheels are in a straight position, should be located symmetrically relative to the vertical axis. Otherwise, determine the cause of the problem and correct it.
Turn the steering wheel from lock to lock and check visually and audibly:
- reliability of fastening of the steering mechanism and steering wheel;
- absence of play in the steering rod joints and ball joints of the steering rod ends;
- no jamming or interference preventing the steering wheel from turning.
If you notice knocking or binding, disconnect the tie rods from the steering knuckles and recheck. If the knocking and jamming continues, remove the steering gear from the vehicle and have it repaired.
1.
Check the condition of the tie rod end protective covers. Replace covers that are torn, cracked, or have lost their elasticity.
2.
While turning the steering wheel sharply in both directions (this should be done by an assistant), check visually and audibly for the fastening of the steering mechanism. Movement of the mechanism and knocking are not allowed.
3.
Check for play in the ball joints of the tie rod ends. Replace the tips and hinges that have noticeable play. Also check that the tie rod end ball joint nuts are securely tightened and that they are secured with cotter pins.
4.
Check the condition of the steering gear protective boot (shown with the intake pipe removed for clarity). Replace the damaged cover with a new one.
5.
Check the presence and condition of the left and right steering gear protective caps. Replace the damaged cap with a new one.
Adjustment
The adjustment is performed in this way: you can remove the rack from the vehicle or adjust it on it. The first method is used after repairing the machine, before installation. To simply adjust the rack, the work is done directly on the machine.
Tightening the rack with a key
To carry out the work, you must have a 17 mm universal octagon and an adjustable wrench. All work related to troubleshooting is carried out on a lift or inspection pit:
- First, the car must be put on the handbrake, some kind of support must be placed on the rear wheels;
- Then you need to lock the steering wheel and turn off the power to the car’s on-board network (remove the negative terminal from the battery);
- Then you need to find the nut with which the steering rack is adjusted. It is located on the opposite side, facing the body, of the rack mounting side. Sometimes it is mistaken for another part;
- First you should wash the bottom of the car. In this case, use a suitable device (Kärcher, for example). This is done in order to clean the nut from a layer of dirt. After cleaning the part from contamination, a wrench is inserted into it to tighten the rack and its position is adjusted. The tool rotates clockwise.
Thus, the adjustment is considered complete. If, after the work done, the control of the car is unsatisfactory, the play and knocking does not disappear, you should check the condition of the steering tips; they may need to be replaced.
How to check the steering tips on a Priora
A rack or gear mechanism is responsible for turning the front wheels of the car. The unit simultaneously transmits force to both steering knuckles through rods with hinges at the ends. These 2 parts are the weak link of the control system - the service life is 20–80 thousand km, depending on the make of the car and operating conditions. Car enthusiasts should learn to recognize the signs of faulty steering tips in time, since their technical condition is directly related to the safety of passengers.
When to change
how to adjust the clutch on a Priora if there are not enough threads. It is important for the motorist to know. The structure of the elements is such that they are located at the ends of the steering rods. Hence the name - tips
The rods themselves have a fairly impressive service life, so they are changed quite rarely. The same cannot be said about the tips.
If you follow the instructions provided in the instruction manual, then replacement should be performed approximately every 40 thousand kilometers. But still the figure is average. Depending on the situations, operating conditions and the quality of the currently installed elements, repairs may be required later or earlier.
The following factors influence the degree of wear of steering system components:
- Vehicle operating conditions;
- The quality of the tips used;
- Driving style of the car owner;
- Quality of roads, etc.
Signs of breakdown
At the first signs of a malfunction of the limit switches, appropriate measures should be taken to eliminate them.
You can determine that the elements are damaged and no longer perform their job as efficiently as before by the following characteristic signs:
- The car is difficult to control. This is especially noticeable when entering sharp turns;
- On tires, the tread pattern begins to wear unevenly;
- Uncharacteristic sounds are heard from the front of the car. Moreover, they can come from one side or from two simultaneously.
These signs of breakdown may indicate not only faulty steering tips. Therefore, mandatory verification is required.
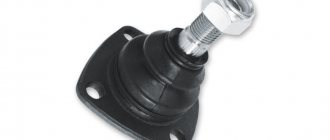
Rubber boot
Tie rod design
In order to independently determine the degree of wear of the tips, you need to at least understand their structure in general terms. The rod is a metal rod with a thread at one end and a hinge at the other. The threaded part is used to connect to the rack or gearbox, and the ball pin is inserted into the eye of the steering knuckle and secured with a nut.
The wear of the steering tips implies the wear and tear of the hinge itself, which consists of the following parts:
- cylindrical body, closed on one side with a plug;
- a ball pin resting its lower part on the supporting heel;
- a spring is installed at the bottom between the fifth and the plug;
- An insert made of wear-resistant plastic is provided between the body and the ball;
- The top of the case is covered with a rubber or silicone cover.
Note. Depending on the design of the rods for a particular car brand, the metal rod can be welded to the hinge body or screwed onto a thread.
The plastic liner allows the ball pin to rotate in different directions, and the spring selects the play that appears during operation. When a fault is detected in the steering tips, the parts are usually replaced, preferably in pairs. There are also collapsible hinge designs that allow you to change a worn-out insert, but they are unreliable in operation.
Causes of joint wear
During operation, the working pair of the tip (plastic insert and ball pin) experiences loads from the steering rack, which pulls or pushes the steering knuckle depending on the direction of movement of the car. Another type of load affects the element from the side of the wheel falling on uneven road surfaces.
In the first case, the force is applied perpendicular to the axis of the ball pin and acts on the fracture; in the second, the forces tend to pull the part out of the socket. There is a third type of load - the friction force that arises in the unit when the wheels turn. Since the finger is rigidly fixed in the eye of the fist with a nut, it rotates inside the plastic bushing and rubs against its walls.
Due to the impact of these loads, the hinge joint wears out as follows:
- Over time, the walls of the liner wear out, a gap forms between them and the ball, which is why a quiet knock is heard when moving over small uneven surfaces.
- Abrasion of the side walls of the bushing leads to loosening of the pin, because it is pressed by the spring only from below.
- When the spring and heel are unable to remove the play resulting from wear of the plastic, the ball pin moves easily in the bushing, causing the steering tip to knock heavily.
Important point! Hinge joints have an external enemy that significantly reduces the resource of the working pair. This is dust and moisture that penetrates between the rubbing surfaces as a result of the rupture of the upper rubber cover.
Such defects must be identified in a timely manner, otherwise the damaged tip will quickly become unusable.
Symptoms of malfunctions
If you do not pay attention to the wear of the tie rod ends, the ball pin will become loose and jump out of its socket at the first decent bump. There is no need to explain for a long time what this entails: the wheel will become uncontrollable, and the driver will lose control of the car. How to determine that there are problems with the hinges and the car’s chassis needs to be checked:
- the first sign is a dull, frequent knocking sound when driving over small bumps, especially in turns;
- as a rule, extraneous sounds are heard from one side, but simultaneous wear of two tips also occurs;
- the free play of the steering wheel increases;
- when negotiating a turn on an uneven road, you can feel a tapping sound on the steering wheel;
- At the last stage of wear of the tips, the car has to be literally “caught” on the road, since due to the play of the ball pins, the wheels can deviate by 2–3° from the straight line.
Note. Unfortunately, such signs are observed not only as a result of problems with the steering rack, but also as a result of wear of the bearing of the rotary bipod and the pendulum. The exact result will be shown by a check performed by car service employees or independently in a garage.
If you find one of the listed symptoms in your own car, you should not delay diagnosis. Especially if the tips have served more than 40 thousand kilometers. To perform the check, you will need an inspection ditch; hanging the car on a jack will not allow you to swing the rod in the desired direction.
To check the tie rod ends yourself, use the step-by-step instructions:
- Drive the car exactly in the center of the inspection hole so that you can easily reach the hinges. If the ditch is too narrow, the car will have to be moved twice in different directions.
- Support the rear wheels with wheel chocks.
- Grab the rod with your hand as close to the tip as possible. Rock the hinge up and down to feel the play.
- A small elastic resistance indicates that the spring is working and there are no critical gaps. Significant play is felt immediately.
- Rotate the rod several times around its own axis. If it flows easily, literally dangling on the ball pin, the tip should be replaced.
Advice. When swinging the rod, do not confuse the hinge play with free play of the steering rack or a broken pendulum bearing.
To check the integrity of the anthers, an inspection hole is not needed. It is enough to turn the wheel and lift the car with a jack. The hole in the rubber boot is discovered thanks to thick lubricant, which is squeezed out from the inside through a gust.
Replacing the steering tip is also not a big problem; the only special tools you need are a puller to push the ball pin out of the steering knuckle eye. Please note an important nuance: after replacing the linkage, the camber angles of the wheels must be adjusted. You cannot make the adjustment yourself, so you will have to visit a car service center.
If knocking occurs in the front suspension of a Priora, you should pay attention to the following parts and components:
- racks
- strut supports and bearings
- ball joints
- steering rack
- steering tips
And in this article we will look at repairs related to tie rod ends. If the knocking noise appears specifically from the tips, and the play when turning already exceeds the permissible limit, it is necessary to replace the tips. for new ones. To perform this repair, you will need the following tools and accessories:
- Ball Joint or Steering End Puller
- Crowbar and hammer (if puller is not available)
- Pliers
- 19 mm wrench
- 13 mm wrench
- Torque wrench
- Penetrating lubricant
Preparatory activities
Many experts advise taking certain steps to prepare for the replacement so that everything goes easier and faster. These actions include the following.
- Treat all nuts and fasteners with penetrating liquid. WD40 works great.
- If the tips last longer than one winter, to remove their fist you will need to use a 17 socket to unscrew the nuts.
- If the nuts stick, try heating them with a hair dryer. A gas burner is also suitable, but you need to be as careful as possible with it.
- Prepare tools for removing tips.
Today, two methods are used to dismantle steering tips - modern and traditional. The first involves the use of a special puller, and the second - a sledgehammer.
Jack and WD40 at the ready
The traditional dismantling method involves the following actions:
- The steering wheel is turned all the way;
- Several strong blows are applied to the steering knuckle;
- Vibration causes the tip to pop out.
But the method has two serious drawbacks.
- It will take special skill to deliver precise, but at the same time accurate and strong blows.
- This method can reduce the service life of steering racks.
Therefore, the best option is a puller. You can literally buy it for 200-300 rubles, but it will be useful in the future and will significantly preserve the integrity of the remaining parts when replacing the launch vehicle.
Dismantling works
Replacement
The replacement procedure is quite simple. Especially if you have prepared the connecting elements in advance and acquired a puller.
- Using a jack, lift one of the sides where you will begin to change the tips.
- Turn the steering wheel to such an extent that it is convenient for you to replace damaged elements.
- Treat the elements again with a penetrating liquid.
- Unscrew the fastening nut.
- Remove the tip from the steering knuckle hole. Here you just need a puller or the traditional old-fashioned method using a sledgehammer.
- Check the condition of the steering rods. Sometimes it is better to replace them in the first couple of wears. Besides, you still got into this knot.
- Replace damaged tips with new ones.
- Perform the reassembly procedure.
Assembly
- Do the same with the second wheel.
- We recommend that you think additionally about protecting threaded fasteners from moisture and dirt. To do this, the threads can be lubricated with lithol, graphite grease, a tube of a suitable diameter can be put on, or heat shrink can be used.
- After completing the replacement of the steering tips, visit a service station to adjust the wheel alignment.
- If you don’t want to go to a service station, then count in advance the number of revolutions when removing the old tip. The new one is twisted by the same number of revolutions.
- Drive onto a straight road and check whether the car does not skid to the sides when driving in a straight line.
One of the main conditions for a successful replacement is the choice of quality parts.
New part
What to choose
Finally, we will present several options for the most popular steering tips, which are used today when replacing a VAZ 2114. So you can decide for yourself what to choose and which ones are better.
It is known that road safety depends entirely on the serviceability of the vehicle.
Most car systems are subject to self-repair, therefore, it is very important to know the signs of their malfunction, which will help determine, for example, when to change the steering tips? Let's consider this issue in more detail. Unfortunately, within the framework of this publication it will not be possible to fully describe all methods for identifying problems, so we will focus only on the main and most effective
Replacing tie rod ends on a Priora with your own hands
1. First of all, remove the wheel bolts and lift the front of the car with a jack.
2. Apply penetrating lubricant to all threaded connections:
3. Now, using pliers, we align and pull out the cotter pin from the tip pin, as is clearly shown in the photo below.
4. Now loosen the coupling bolt that presses the tip to the rod:
5. Then, using a puller or a pry bar with a hammer, you need to press the tip out of the hole in the rack.
The result of this action is shown clearly below.
6. Next, you need to unscrew the steering tip, twisting it from the rod. To do this, you may need an additional lever, for example, a small piece of pipe or a deep socket. It is worth noting that the left tip unscrews clockwise, and the right one counterclockwise. The photo below shows everything using the left side as an example:
The result can be seen below.
7. If you want to maintain the alignment of the front wheels, at least at approximately the desired angle, you need to count the number of revolutions made when unscrewing the tip. The new one should be wound at the same number of revolutions.
8. After replacing the tip, screw on all the nuts and bolts, and also install the cotter pin in place.
9. We do the same with the second side. Of course, the ideal option is to definitely go to a service station after replacement and have the front wheels wheel aligned. There is no need to save money on this procedure; it may cost more if the wheel angles are disturbed after the repair.
If there are any unclear points, the video below will tell you everything more clearly! The price of new tips for Priora is from 700 rubles per pair, of course, from 350 rubles. a piece.
Removal
Required
: new steering tips (articles for Granta and Kalina: 11180-3414052-10, 11180-3414052-11 and 11180-3414053-10, 11180-3414053-11, for Priora 21100-3414056 and 21100-341405 7), pliers, key " for 13", "for 19", "for 22" "for 27", ball joint remover.
- Remove the wheel.
- Unscrew the lower nut securing the tie rod to the steering knuckle, removing the cotter pin.
- Loosen the clamping bolt of the outer lug terminal connection.
- Press out the ball joint pin using a puller (if it is not available, insert a mounting blade between the swing arm and the outer tip, press the tip away from the lever and, striking the end of the swing arm with a hammer, press the ball joint pin out of the lever).
- Hold the adjusting rod by the hexagon and unscrew the tip, rotating it clockwise or counterclockwise (depending on the side of the car). We count the number of revolutions when unscrewing the tip in order to approximately maintain the toe angle when installing the wheels.
Video review of replacing steering tips on a Priora
Since the procedure for replacing tips is practically no different from the tenth family, it is with the example of 2110 that everything will be shown.
If you have any questions, please discuss them below in the comments.
How to check tie rod ends? Some useful tips
The steering mechanism includes rotary rods, levers with steering tips located at the ends. The correct controllability of the machine is affected by the entire mechanism as a whole, however, the greatest wear
It is the tips of the steering mechanism that are affected.
A separate steering tip is a spherical joint. The wear and durability of this joint depends on the speed of movement, the quality of the roads, and driving style. All these factors leave a strong impact on the body of the tip, due to the impact of enormous loads on local areas of the mechanism.
If a worn tip is not given proper control, at some point the linkage may fail and loss of control may occur.
The answer to the question of how to check tie rod ends
, not difficult. The inspection itself is not difficult. Initially, you can assess the degree of wear of the tips when driving on uneven roads or when accelerating (braking). In this case, it is possible to feel play on the steering rack and a slight kickback in the fuel adjustment pedal.
To conduct a more detailed inspection, you need to jack up the car and remove the wheel. Then, having reached the steering rod, find the tip. The first step is to press the hinge from above, resting your fingers on the nut from below.
If it can be compressed and play is felt, then it means that the spherical part is already worn out and the element needs to be replaced. But this play when pressed may not be detected the first time. It is necessary to turn the steering wheel to different positions and repeat the procedure until the steering wheel is in almost all positions. It happens that it can dangle up and down only every other time.
You also need to check the anthers
. In order to check the serviceability of the ball joint without removing the wheel, you need to rock the wheel in different positions with your foot; if you feel wobbly and metallic sounds, then you need to remove the wheel and inspect the steering joint in detail.
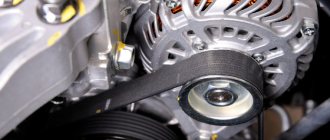
Main components of the ESD and their interaction
Thanks to the process performed by the electric power steering, the load when turning the car is reduced. Driving a Priora car becomes much easier - the system prevents dangerous maneuvers at above average speeds.
Main components of the EUR:
- steering wheel;
- column;
- shaft;
- electric motor;
- mechanism for turning the steering wheel;
- ECU (electronic control unit);
- torque sensor
When the car makes a turn, the electric booster is activated, and torque is provided with the help of the electric motor. After which the sensor takes measurements and sends them to the electronic control unit. Based on the degree of rotation and its sharpness, the unit calculates the required power and supplies it.
Previous VAZ cars had power steering; it produced the same power both when driving straight and when turning (this is unsafe). Electric power steering in this case is a more reliable system, as it senses all changes in the movement of the vehicle
However, with kilometers traveled or careless driving, this unit can quickly fail. Failure to detect a breakdown in a timely manner can result in death - the wheels will simply stop working.
As a result, an emergency situation arises. There may be different malfunctions, the methods of elimination depend on the characteristics of the breakdown.
avtoexperts.ru
There are several types of steering mechanisms, but there is always a common part - this is the steering tip. The main task is to transfer a certain movement from the steering rod to the steering knuckle. Depending on the configurations, there can be from 4 to 6 parts.
For example, if the type of steering system is rack and pinion (the majority of them), then there will be four tips, 2 per rod (2 rods). If the mechanism is of the so-called “worm” type, there will be six, two per rod (rod 3).
Device
Please note that depending on the steering system configuration, they may vary in shape and size. The rod can be of different lengths or have bends, both in horizontal and vertical positions. Therefore, it is important to remember that if there is a bend, then the part is not interchangeable with the same one, but on the other side.
If they are initially the same in shape, there are no bends, then they can be replaced from one side to the other without consequences.
Remember, the main components:
• Directly the housing into which the steering rod is screwed.
• “Finger”, as a rule, on most models there is a thread or another type of connection, for example, a stud.
• Hinge housing uses wear-resistant metal for long service life.
• Various locking rings that prevent the pin, spring (to securely hold the liners) and liners from popping out.
• The “finger” nut is a fairly important part; without it it is impossible to secure the tip to the “fist”.
• Anther. Rubber pad that protects the device from dirt, dust, sand, and moisture.
Looking ahead, I would like to clarify the importance of maintaining this anther in an intact state. Otherwise, failure is inevitable. As a rule, in most cases, breakdowns occur due to a collapsed boot and the entry of foreign objects into it.
Almost all devices have the same shape, regardless of the car model. The only exceptions may be based on the format of the material used for production. For example, SUVs require more wear-resistant parts with increased protection due to the special conditions of possible operation.
Types of steering tips
Depending on what type:
It depends on whether there is a special hole on the support cover for pouring lubricant. As you understand, those being serviced have such a hole, which allows you to periodically add lubricant. The second option does not have this option, so after the lubrication is complete, they are thrown away because their maintainability is zero.
There is a second subdivision group:
Collapsible ones have a thread on the bottom cover (under the “finger”), which allows you to replace the hinge mechanism itself or the liner separately (a rubber or Teflon part that tightly fixes the “finger” in the “cup”). In modern cars, this principle is already difficult to find, because in terms of safety they are seriously inferior to non-separable parts. If the tip has failed in the car, you should inspect whether there is a thread on the cap or a retaining ring. If you do not find something like this, you can safely throw such a part into the scrap yard.
Malfunctions
Often, there are no problems with them, especially if they are new, which cannot be said about worn-out parts. During operation, the liners are necessarily worn down or deformed, causing a noticeable backlash to appear. Apparently the “finger” is already quite loose in the body. If the situation worsens, he can simply pull out the “stopper” and jump out.
Keep in mind that the tip can lead to quite serious consequences; the rod may break, which will lead to more dire consequences, including an accident. You basically lose control of the car, without even being able to turn the wheels.
As a rule, the resource with proper operation is quite long, but one should not forget about the characteristics of the road surface, which directly affects the durability. The service life, on average, does not exceed 100,000 km; it is not uncommon, as on new cars, for parts to break.
Signs of malfunctions and how to check?
• Significant deterioration in controllability.
• The appearance of dull knocks, especially when turning.
• Feedback in the steering wheel, even with the smallest irregularities.
If you notice something from the list, do not aggravate it, check if everything is in order with the node. Doing this at home is quite simple. It is better to carry out the operation with an assistant. So, you need to have a hole, an overpass, or simply place the “front” on some hill so that you can crawl under it. We put the handbrake on, be sure to turn off the car. The person in the cabin turns the steering wheel, the second one at this time, carefully monitoring the movement of the tip. The play will be noticeable even visually, not to mention tactile touches.
In addition, when checking, pay attention not only to the presence of play, but also to the integrity of the anthers, connections to the “fist”, and also pay attention to the bushing (axis) itself, into which the rod is screwed. It is not uncommon for a “break” to occur in that place or a crack to appear.