- Tuning
- Car audio
Apr 25, 2014
Before you start designing and assembling the box, you need to decide on the choice of speaker. We recommend choosing 10-12 inch imported speakers, as they are most often used in car subwoofers and are best suited. We described in detail how to choose a speaker for a subwoofer in a previous article. The design of the box is also important: the quality and volume of low-frequency sound depends on it.
Material for making a box for a subwoofer
Material for making a box for a subwoofer
The most suitable material is multi-layer plywood. But out of the wide variety of plywood varieties that exist, not all of them are suitable for making a subwoofer enclosure. So, when using ordinary plywood with insufficient density for these purposes, sound distortion is guaranteed. Another situation is when we are dealing with multi-layer (12 layers) plywood, in the manufacture of which ship wood or Russian birch is used. It is an excellent material for making small sound systems. Such plywood has sufficient density, at the same time, in comparison with such dense materials as particle board (chipboard) and fibreboard (MDF), it is much lighter. Multilayer plywood is easy to process; when screwing in screws, there is no fear that it will delaminate. In a word, plywood is a good subwoofer material for a small volume.
Subwoofer material
–
Plywood or chipboard
It turns out that a plywood sheet with a thickness of 12 mm has better resonance characteristics than boards with a thickness of 16 mm of different types of wood. But it is necessary to take note that large cases made from this plywood ring.
It is simply not acceptable in the manufacture of buildings with large flat spans.
Particle boards. These products are among the most common materials today. In stores and on the market you can find different types of DS boards, but when making cabinets it is recommended to use chipboards
that have the highest density.
True, such slabs are heavier than others, but they are easier to process and sound better. Chipboard with a thickness of 16 mm is perhaps the best material when making powerful low-frequency speaker systems, due to its high density and weak resonant qualities.
Chipboard is one of the inexpensive, readily available materials. True, this material has a significant drawback: it is afraid of moisture, easily absorbs it and swells. Therefore, the chipboard body should be painted immediately after manufacturing. Also, chipboard is very difficult to process with circular or band saws.
— Plywood is a good material, but it is expensive, and with large volumes it makes noise, you need to install stiffening ribs. — Chipboard is cheaper and has greater rigidity.
Source
Operating principle
Motorists may be familiar with a resonator, another example of which is the CV box, in a completely different area. For example, it is used as a functional element of a muffler. In this case, the hollow structure has its own characteristics and another purpose.
From a technical point of view, a resonator is an oscillatory system that accumulates vibrations due to frequency resonance. Typically, the design involves “working” with a limited set of frequency characteristics. Depending on the design, resonators of cumulative and instantaneous action differ.
Homemade wooden box
The storage resonator accumulates external energy by reducing the frequency of internal oscillations. In a mathematical context, any resonator design whose oscillation frequency is greater than the oscillation frequency of the external influence is cumulative. This happens whether the diameter is 10 or 12 inches, but you need to choose a different volume.
Instantaneous action implies the correspondence of the internal oscillatory force in period to external oscillations. Such resonators increase the sound power due to thermal absorption of the surrounding space, shifting the frequency at the input power - changes due to an increase in the playback interval.
The common CV box has a rectangular shape with partitions resembling a caterpillar in arrangement. The appearance will depend on the speaker and its features, size – 10″ or 12 inches. At the moment, you can find drawing diagrams for any frequency device and make a resonator at no extra cost. It will differ slightly from the brand name.
You can make a resonator in a mini version. This solution is shown in the figure.
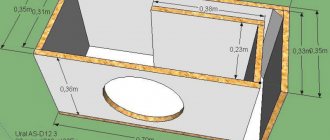
Drawing of a CV box for 12″
To obtain drawings of 10, 12 and 15″ HF boxes, you can use a search engine or our resonator database or calculation program. The easiest way is to search by type of speaker and required volume. For example, a 12″ CV box can be implemented in several versions, depending on the technical features described and demonstrated below.
Materials for making a subwoofer
The choice of material for construction is an important step in the construction process. On this page we will look at what is the best material for a subwoofer enclosure and how to choose it correctly. The main requirements for the box are that it must be rigid, airtight and free of resonances. For example, premium home speakers are very heavy for their type, this is precisely to enhance these three qualities.
The ideal material for a subwoofer would be granite or something similar, but of course car audio cannot afford this - this concerns the weight and complexity of processing. Therefore, the materials used are: chipboard, plywood, MDF, fiberglass. The thickness of the material should be selected based on the volume of the case - the more, the thicker to maintain strength, while for sheet material take 18 mm as a minimum. An exception may be the CV, in which, thanks to a large number of partitions, good rigidity is gained; for it, material from 16 mm can be used.
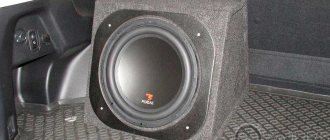
Volkswagen Polo Hatchback Malolitraжka › Logbook › Installing a subwoofer under the seat
Installing an active subwoofer under the passenger seat
This is probably the most interesting section in my blog (at least for me). I'll try to write a mini essay. I myself haven’t seen much information on this topic, even on the drive, apparently due to its unpopularity. I have always been a fan of good sound and approached this issue responsibly everywhere.
So, a little technical part is the Fly audio head with 6 speakers and all sorts of bells and whistles, in principle the sound suited me quite well, but the stock one was significantly lacking in low purity.
I spent 5 months thinking about how I could implement the idea of a subwoofer. There were many options: subwoofer + amplifier, active subwoofer in the trunk. Then the sound engineers suggested the option of a subwoofer under the seat, and due to my 2 cubic meters of interior space, everything should have been fine. Well, the owner of small cars is familiar (big brothers may not understand), any box in the trunk and there is no trunk, but I, as a lover of active sports and also an “exemplary” son, who sometimes goes to Auchan, could not donate. Although everyone urged me to install a crazy sub and put it on the trunk altogether.
As a result, I found options for a subwoofer under the seat. Although experts and special music lovers say that it doesn’t really pump. I spent a long time choosing, the choice fell on the Pioneer (active sub), I liked the compactness, the control panel and the rated power, and experts say that this is one of the best devices in its class. It fit like a glove, the space under the seat, as it turned out, is catastrophically small, it is almost impossible to put anything larger there without any “bulging” and collective farm, so if you decide to put it very well, measure everything. The control panel led into the salon.
Power 150W, I think it’s enough for a car of this class.
Of course there were some downsides too
, after all, there is less legroom for the front passenger, the passenger also receives a free prostate massage, when washing and cleaning the interior you need to be especially careful, and of course, no matter how much I praise it, this sub is not those luggage monsters of 300W+ and above.
Let's see how it plays after build-up and fine-tuning; to reach peak power you need 120 hours of active use.
CONCLUSIONS:
I consider the most important achievement to be the preservation of ease of use, and an empty trunk, at the end I got what I wanted and was even pleasantly surprised, there is enough power to spare. It’s not even the music that rocks, it’s the car itself that rocks :) in general, I advise everyone who appreciates the ergonomics of their car, I think I described it objectively, if you ask anything, I’ll help you in any way I can or express your opinion, I treat criticism normally. I hope I didn’t take up a lot of your time, Whoever read to the end like, I tried.
In the photo, I tried to display everything as informatively as possible and show what it really looks like
I also recorded aux, iphone and usb, but that’s in another article
source
Plywood
Plywood (laminated wood board) is a multilayer material that is made by gluing prepared veneer. To increase strength, layers are applied so that the wood fibers are strictly perpendicular to the previous sheet.
The most popular material for making your own subwoofer. It happens: construction, industrial, packaging, furniture and structural. It’s better to use furniture; if you’re lucky enough to find a structural one, it’s generally great.
Plywood has high strength, is easy to process, and with sufficient thickness gives good rigidity to the body, but can delaminate during assembly.
Medium Density Fiberboard (MDF) - made by dry pressing small wood chips at high pressure and temperature. It is very well suited as a material for subwoofer housings and acoustic speakers in general, as it has a homogeneous structure, absorbs sound well and is easy to process. It has a high density and holds screws well. An MDF box of sufficient thickness is dull, durable, and has no resonances.
Preparation
Let's figure out how to make a subwoofer enclosure! To make a subwoofer with your own hands you will need:
- Drawing;
- Materials: plywood or MDF, glue, screws, terminal block, wire for connection;
- Tools - jigsaw, screwdriver, pencil, template for mounting hole or compass.
Drawing
Having the housing parameters for the subwoofer in hand (volume, area and length of the port), you can make a drawing yourself using special programs (in my opinion, SketchUp from Google is the most convenient for this). But if you make the box for yourself, then there is no point in wasting time learning the software and doing everything the old fashioned way - by hand.
If you do not know how to calculate the enclosure, then read the material “How to calculate the enclosure for a subwoofer.” You can also order a paid estimate on the Internet; as a rule, it is accompanied by a clear drawing for manufacturing.
An example of a drawing of a housing with a bass reflex (FI)
Materials and fasteners
Housing material
In order to make a box for a subwoofer, you need a material that should vibrate as little as possible. From experience, it is best to use MDF (not painted, not laminated, etc.)
MDF (MDF - Medium Density Fiberboard). In Russian - medium density fiberboard.
MDF is easy to process, has good density, due to its structure it has no resonances and does not delaminate - the bass in such a box is soft and dense. MDF is more expensive than plywood and is “afraid” of moisture.
Plywood is the most common option and costs less than MDF.
Do not use chipboard or old furniture to make subwoofer boxes. A plywood or MDF body will always sound better.
Do not use material thinner than 18 mm. and the larger the volume of your case, the thicker the walls should be.
Many large stores that sell sheet material offer a cutting service to your dimensions, where they will cut the perfect parts for you on a machine, all that remains is to assemble the body.
Fasteners
For fastening, it is best to use yellow self-tapping screws with a length at least 2 times the wall thickness. The heads of black ones often break off; they are thinner and not as strong. An advanced solution is furniture bolts, but if this is your first sub, then it will be easier with self-tapping screws.
Yellow screws, black screws, furniture bolts.
Cage nuts for attaching the subwoofer to the cabinet are cool! The sub can also be secured with self-tapping screws, but with bolts in the mountings, the speaker is attracted as tightly as possible, and if necessary, it can be removed and installed as many times as necessary without damage. And the polished hex bolts look really cool.
Bolt with cage nut
Video about installing cage nuts (a more convenient option):
Glue
If you are sawing the walls with a jigsaw or a hand-held circular saw, then the glue will additionally act as a sealant between the uneven edges; any liquid wood nails will do for this. If you unraveled the material on the machine and the edges of the body walls are perfect, then apply the glue in a very thin layer, but still do not forget to coat the joints from the inside.
Terminal block
You can route the wires directly, but it is better to make a box for the subwoofer with a terminal block.
Terminal block for housing
Use threaded options - they are more reliable. For round seats, it is convenient to cut a hole using a nozzle.
Wires
You will need a piece of wire to connect the subwoofer coil to the output terminal block. Take any copper wire no thinner than 4 mm. in most cases this will be sufficient.
Tools
You will need:
Circular saw - for cutting material, it can be either manual or stationary, it all depends on your capabilities. It is better not to cut with a jigsaw, the edges will be too uneven, even if you attach a guide bar, since the file can still wander.
Manual circular
- A jigsaw is for cutting out holes for the speaker and for the terminal block, it can also be a router, with its help the holes will be smooth and neat. To cut out the wall for a round terminal block, you can use a saw attachment. Select the right jigsaw blade for the job at hand.
- Screwdriver - for tightening screws and drilling holes.
Glass fabric
Fiberglass is used to make stealth subwoofers or to give non-standard shapes to parts of the housing. The mold is covered with fabric, impregnated with polyester resin. Using such material it is quite difficult to achieve the required thickness, so additional stiffening ribs must be used. In general, making such a case is a labor-intensive process, but the result is aesthetically worth it.
The question is often asked: “Does it make sense to remake a factory subwoofer enclosure?” If you remake the factory housing of a budget sub, there will be an improvement and it will be audible. But since the speaker is most likely bad, it will limit the degree of improvement.
For a high-quality subwoofer, choose the right material. Good luck with your builds!
What is the best way to make a subwoofer box with your own hands?
What is the best way to make a subwoofer box?
What is the best way to make a subwoofer box with your own hands? Readers often ask. Let's try to figure it out. This article was written precisely for this purpose. In addition, the reader will receive valuable instructions on how to make a cabinet for this speaker with their own hands. Having found out what would be the best material to make a subwoofer box from, you can safely proceed to the operation.
Which material is better
What is the best way to make a subwoofer box?
In principle, there are many materials from which a housing for such a speaker can be made. It can be plywood, MDF, chipboard and so on. Each of these materials has not only advantages, but also disadvantages.
Note. The best material for making a subwoofer enclosure, according to many experts, is shipboard laminated plywood.
Finding ship plywood is not as difficult as it seems at first glance. Construction sites and other manufacturing enterprises have such material. Formwork is often made from this plywood. This material is always moisture resistant, very durable and tough. In a word, for a subwoofer body this is what you need.
Note. It will be useful to know that in the West, where the manufacture of homemade enclosures for subwoofers is highly encouraged, they prefer MDF. They don’t have any marine plywood at all, and many experts see this as the reason for their love for MDF.
Chipboard is also a good material, but it doesn’t like moisture at all. In addition, when processed, chipboard tends to crumble. On the other hand, if you take thicker material, the problem can be solved.
What to make a subwoofer box from
Some experts also recommend other materials, but they are, as a rule, not so popular - for example, glued laminated boards.
What is the best material to make a subwoofer box from?
Where to install: in the trunk or under the seat
If an active subwoofer can be placed almost anywhere, then the purity and power of its sound at low frequencies will directly depend on the location of the passive device. Depending on the preferences of the car owner and the availability of free space in different types of cars, several installation locations are offered:
- in the center in front is the optimal position for communication with the front speakers, which will ensure almost perfect sound of tracks in the cabin. However, most cars don't have room in the front to accommodate any large devices, so a center front location is more suitable for minibuses;
- in the trunk, with the speaker directed forward - one of the most popular ways to place a subwoofer among drivers. Suitable for all types of vehicles;
- in the trunk, with the speaker directed backwards - more suitable for a car in a hatchback body, since the sound wave does not encounter obstacles in its path. The location in the trunk back is unacceptable for cars in a sedan or coupe, since the sound will be greatly deformed due to the specific design of the luggage compartment;
- on the floor under the seat is another option, which, however, is not widely popular among drivers. Due to the fact that the subwoofer is located flush with the floor, and the housing is located under the seat, the sound encounters many obstacles in its path;
- on the rear parcel shelf is one of the best options for placing a subwoofer in all types of cars. The main condition is that the shelf must be wide and strong enough to withstand low-frequency bass.
Photo gallery: main places to place the device in a car
The optimal location for a subwoofer in a car is the trunk of your car. The sound quality of a subwoofer located under the front seat will be slightly lower. One of the simplest and most practical places for a subwoofer is the rear parcel shelf of a car.
When choosing a place to install a subwoofer, you need to accurately calculate how safe the bass energy will be. for surrounding objects. The fact is that resonance from the housing can, in some cases, damage both the installation site and the glass in the car.
Purchased or made yourself
Making boxes for a subwoofer
Making a subwoofer box is a responsible process, but at the same time very interesting. Of course, you can always go to the store and buy a ready-made sub in a housing. But this is a matter for beginners. A professional always buys a subwoofer head separately and then makes the box with his own hands.
Note. The latter option is suitable not only for professionals, but also for people who are passionate about car audio and want to get the most out of the speaker. A subwoofer head placed in a homemade box will produce incredibly strong low-frequency sound.
Before we move on to the manufacturing process, let’s again dwell a little on the topic of purchased subwoofers complete with a housing. As has already become clear, there is no hope for quality here, but the price can attract a buyer. For some models of ready-made cases, the price is only 1 thousand rubles. Needless to say, the material of such a box cannot be expensive. The plywood is always thin, and the box itself cannot even boast of rigidity.
Note. A purchased subwoofer will not give you the right sound. And the same head, if you move it to another box you made yourself, you can connect it so that it sounds much stronger and of better quality.
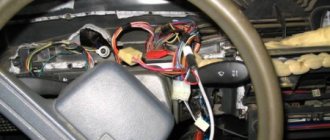
How to properly install and connect a subwoofer in a car
Installing a homemade device in a car, as well as connecting it, will require a certain tool. So, in addition to the fact that you need a subwoofer and an amplifier for it, you will have to worry about the following devices in advance:
- fuse;
- wires (three wires in one winding - for power, for “+” to the battery and a wire to the radio);
- capacitor;
- wire cutters;
- insulating tape;
- plastic clamps;
- set of wrenches.
The wires are connected according to the following diagram:
- Initially, the subwoofer wire is routed to the amplifier.
- From the amplifying device, the wire is connected to the car radio.
- The “+” power cable must be protected from damage - for example, wrapped in corrugation.
- The fuse is placed on the same “+” wire at a minimum distance from the battery.
You can connect the subwoofer yourself, based on the parameters of this circuit
Video: connecting and setting up a subwoofer
Independent design, manufacture and connection of subwoofers in a car is available to almost every driver. The key to success will be both a competent calculation of the dimensions and volume of the product, and careful assembly of the case. At the same time, the car enthusiast can independently select the desired size of speakers in order to create in the cabin the low-frequency sound that suits him most.
Home →
Tuning →
Manufacturing
Make a box for the subwoofer
What to make a subwoofer box from
Note. When choosing plywood, the main thing is to pay attention to its thickness. Try to select thick plywood, because the rigidity of the entire structure will depend on this, which will ultimately affect the sound. Thus, the optimal thickness for a subwoofer box is considered to be 18 mm. This is quite reasonable: you won’t have to spend a lot of money (the thicker the plywood, the more expensive it is) and the quality will remain at the same level. On the other hand, everyone decides for themselves and sometimes the weight of a homemade box can reach more than 50 kilograms.
Note. Don’t forget to buy a piece of carpet, which we will use to cover the box at the last stage of production.
We are building a building
First of all, we start making the body of the box. Started:
Note. You can do it differently. A hole of normal size is made in the first sheet, and a larger hole is made in the second sheet, which is on the outside. Thus, the subwoofer head will be recessed into the body, which has a positive effect not only on technical capabilities, but also on aesthetic components.
Note. In other words, it is advisable to tighten the screws every 3-5 cm.
Note. Over time, furniture screws do not become loose, even from constant shaking and vibrations.
We protect and modify the hull
Note. It is believed that a closed type of subwoofer box should not have any holes at all. And some experts even recommend checking the tightness of the box by pouring water inside. But this is already overkill and it is unlikely that this should be done.
How to make a box for a subwoofer
At this point, the process of making a subwoofer box with your own hands can be called complete. The instructions should not be ignored under any circumstances. Video reviews and photos are of no small importance - materials that also need to be given attention (see How to cover a subwoofer with carpet: we do it ourselves). Thus, the price of the subwoofer housing will be the lowest, since you will only need to spend money on consumables.
Source
Features of homemade models
If you want your neighbors to envy you just because you have super-powerful semi- or professional acoustics, then it makes sense to complement your main stereo speakers with a powerful subwoofer that is ten times stronger than them. The peculiarity of low frequencies is that, unlike mid and high frequencies, they are not subject to stereo sound. This means that there is no point in making two broadband speakers in which the low-frequency speakers are separate.
Other consumables cost pennies compared to them.
By paying special attention to quality, the user can actually assemble speakers with his own hands that will serve for decades without any problems. Basically, only semiconductor radioelements (diodes, transistors, microcircuits) age.
Almost unlimited imagination in design will allow you to make any column - cube, “parallelepiped”, any other polyhedron. Round columns - cylindrical, ovoid, are also especially popular. Of specific details - for example, an “egg” may have four bass reflexes, which also matters in terms of design solutions.
What material to use to make the subwoofer box.
How to assemble a box for a subwoofer? And most importantly, what? You need to clearly understand one simple thing, the pressure created inside the case when the speaker is operating is similar to water that penetrates into any crack. The point here is that we need to prevent water from seeping in, but instead of water we have air.
First of all, you need to figure out what material the box will be made from. Only one material is ready to suit us and, of course, this is wood. The best option is plywood. Easily processed, not subject to external influences in comparison with chipboard. Namely, swelling when exposed to large amounts of water. Of course, no one is going to pour water on the box, but this is an advantage. The most important thing is that plywood is physically stronger than particle board. Chipboard:
Plywood:
The next option is chipboard. Plywood is sheets glued together, and chipboard is chips that are converted into a slab under a press. The fact is that such a slab is chosen because of its availability. Firstly, it is cheap, secondly, almost all the furniture is made from it, besides, you can simply disassemble the unnecessary cabinet and use the sheets. This is an ideal option for budget systems. In terms of sound properties, chipboard is better than plywood, but as soon as more powerful systems come into play, plywood comes out on top.
Unfortunately, the particle board bends at high power. Sometimes it breaks and crumbles the joints of the bolts that secure the basket. The approximate power of the speakers used in chipboard boxes is eight hundred to nine hundred nominal watts. Roughly speaking, up to a kilowatt maximum. No one can guarantee that even with such power everything will work at the proper level, so if you have plywood, it’s better to use it.
The thickness of the walls is at least one and a half to two centimeters. The front part on which the speaker is located should be made double. If the box is large, and when turned on, one of the walls begins to vibrate, then spacers should be placed inside. Typically the vibration will be where the wall is not supported. Be sure to seal all joints, near the pipe (if the port is a pipe) the same.
How to fasten the walls:
Needs to be secured with screws. Before doing this, we drill a hole with a thin drill so that the screw tightens evenly. If desired, you can recess the hat.
To achieve the strength of the box, we fasten two walls: the front (front) and the back as follows as shown in the figure:
The front side consists of two walls fastened together. This is done to increase durability. If the speaker is low-power, it is permissible not to make the front side of two walls; you can get by with just one.
Source
Cutting parts
So, you have decided on the shape for the sub box and you have a drawing.
Mark the sheet according to the parts and cut according to the marked dimensions. Use a disk with a large number of teeth; the smaller the tooth size of a circular saw blade, the fewer chips you will get, and their size will be insignificant.
If you use a manual circular saw and your hand is not full, it is better to use a guide so as not to accidentally “fill up” the cut.
It is better to do this work together, since it is quite inconvenient for one person to turn large sheets and hold them while working.
Below is a good video from Rockford Fosgate, albeit in English, but everything is clear here without translation - choosing the shape of the body, lining up the parts, cutting.