Basic design of DAAZ parts for classic VAZ models
The operation of any automobile internal combustion engine directly depends on the quality and quantity of the mixture of fuel and air. This very mixture is prepared directly by the carburetor. In addition, this device evenly distributes the mixture throughout the combustion chambers.
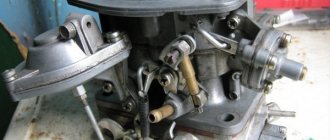
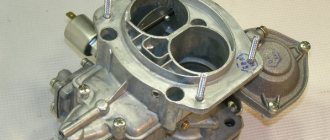
The carburetor (VAZ 2107 DAAZ) consists of several main parts. This is a diffuser, a throttle valve, as well as a jet and a float chamber.
Device types
If the car has an old engine, then such cars are equipped with DAAZ 2107 - 1107010 carburetors. With new engines and a vacuum corrector, a new model or modification is used. This is the DAAZ 2107 1107010-20 model.
These products are produced at the Dmitrovgrad Automotive Units Plant. This company has been producing various equipment for classic VAZ models for many years. DAAZ 2107 (carburetor) has earned special trust among drivers as being quite reliable.
Complex and high-precision device
A carburetor is a complex device consisting of many different components. But the complete device is necessary only for those who professionally configure and adjust these devices.
However, despite all the difficulties and a large number of details, let’s take a closer look at how this device works.
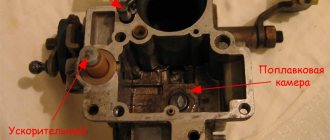
So, what kind of device does the DAAZ 2107 1107010 carburetor have? This device consists of a float chamber into which fuel flows in limited quantities. The access to gasoline is closed by a needle valve, as well as a float, which in appearance resembles a barrel. Gasoline is mixed in a special mixing chamber. The carburetor also consists of a throttle valve as well as an air valve. In addition to them, the device also includes jets. The fuel is atomized through a sprayer. One of the important components of a carburetor is diffusers. They work like nozzles and create an air flow configuration.
Adjusting the second chamber of the Solex carburetor
Let's start with the fact that when adjusting the carburetor, the second chamber is usually not touched, since often standard jets will be sufficient. The carburetor also has an econostat that can correct possible nuances. The econostat is a tube located in the second chamber at a slight angle.
The purpose of the econostat is that when the throttle is fully opened, the vacuum in the carburetor allows fuel to be sucked through the econostat. The econostat is activated when the engine is running at high speeds and allows the fuel-air mixture to be enriched. To refine the second chamber, which allows for “pick-up,” jets are installed to enrich the mixture. The selection of jets in this case is no different from the selection for the first chamber.
DAAZ 2107 carburetor: operating principle
When fuel enters the float chamber, the volume of fuel is regulated by the float. If it floats up, the needle mechanism will block the access of gasoline to the chamber. So, the camera in this case resembles a toilet cistern. Everything is the same here. But fuel is not supplied immediately. First it will go through a special filter to clean it.
Next, the device supplies flammable liquid to the first and second fuel chambers. The DAAZ 2107 carburetor (device) provides for the presence of main fuel jets through which fuel passes.
In addition to gasoline, air is supplied to the chambers through air jets, which has previously been cleaned in air filters. The air then forms a mixture with gasoline using special tubes and wells. Thus, a so-called emulsion is obtained.
But that is not all. Before entering the combustion chambers through a spray, the mixture passes through an econostat. Here the mixture undergoes additional enrichment.
Next, using sprayers, the mixture enters the diffusers. This is where the final preparation of the mixture takes place. The carburetor of the VAZ 2107 car (DAAZ produced by DAAZ) is designed in such a way that fuel droplets in the diffusers are drawn into a high-speed air flow. Thus, the air-fuel mixture enters the center of the mixing chamber.
The gas pedal on VAZ cars regulates the position of the throttle valve, which is designed to supply the mixture directly to the engine cylinders.
What else is special about the DAAZ 2107 carburetor? Its design includes idle jets. In this mode, the mixture is taken only from the first fuel chamber. The principle and scheme of operation of the fuel chambers activates the second chamber only when the engine reaches operating temperatures. Camera II also turns on if you need to quickly gain momentum and high speed.
Setting up Solex systems
Fuel level in the float chamber
Adjusting the fuel level. In factory conditions, adjustments are made using templates with a test float; in garage conditions, be patient; you will have to unscrew and tighten the carburetor cap several times.
You need to start and warm up the engine. Remove the hose from the carburetor. It is important to know! Gasoline here is under pressure, a little. So somehow be prepared for this. The main thing is to remove the hose, otherwise a small portion of gasoline, when unscrewing the cap, will spill into the float chamber and the level will not be accurate.
We unscrew the lid, VERY CAREFULLY, HORIZONTALLY remove it along with the floats.
We measure the distance from the Solex carburetor cover to the surface of the fuel. There are two chambers and two floats, you need to measure in each. The distance should be 25-35 mm. Adjustment is made by bending the float in one direction or another. The overflow must be drained from the float chamber.
IMPORTANT! It is necessary to adjust the fuel level while starting the engine to fill the float chambers.
Idle speed adjustment
IMPORTANT! Warm up the engine to operating temperature – 90 degrees.
We turn off the mixture and look for the mixture quality screw, it is located below, at the junction with the manifold. In the presented diagram it is numbered 11.
Tighten until it stops, but without tension. We start the car, the choke should be removed (air damper 4 is open). We unscrew the quality screw, achieving stable operation of the engine when the gas pedal is released. The speed should not exceed 1200 rpm.
Then we tighten it until the moment when it begins to twitch, giving out unstable revolutions. As soon as this starts to happen, make 1-2 turns back. GREAT! The engine runs steadily!
And now to each his own! We set fine settings to suit our personal requirements, who likes what speeds. Although according to the manufacturer's instructions 800-900 rpm. Optimal mode.
Force majeure circumstances of Solex
The engine does not change speed when turning the quality screw. This means that gasoline enters the carburetor and the quality screw does not close it.
- the plug is not tightened tightly;
- jet with a large hole diameter;
- jet deformation
We will perform test diagnostics. With the engine running, disconnect the wire connector for solenoid valve 21 . The engine will stall. If it stalls, it means the jet is too big.
If the engine does not stall, this means that gasoline is still coming from somewhere else. Most often, the idle mixture screw is overtightened. 8.
Differences in modifications
As you know, the latest models of VAZ 2107 and other versions are equipped with a new carburetor DAAZ 2107 1107010 20. Let's see what the difference is between this modification and the old carburetor 1107010.
According to information received from AvtoVAZ specialists, these two modifications are based on the same model. Here the fundamental difference between them is the economizer for forced idling. Model 1107010 has EPHH, and the new modification is not equipped with this unit.
Although the DAAZ 2107 20 carburetor was not equipped with an economizer, it is equipped with a special nozzle for supplying fuel. The difference is that here the idle speed is controlled by a solenoid shut-off valve. So, if the ignition is turned off, the fuel supply is cut off.
Modifications of carburetors installed on the VAZ 2105
On the “five” or VAZ 21053, 3 types of carburetors can be installed. All models are supplied in an unfinished form. Let's look at how they differ from each other.
DAAZ
The DAAZ or Weber carburetor is probably the sportiest type of carburetor, as it is equipped with large and maximally open, non-clamped jets. Car service experts say that this model is affordable and very reliable. There are no unnecessary bells and whistles here. With it, the car starts perfectly, drives well, and the idle system is easier to adjust.
"Ozone"
An improved model of the old, classic DAAZ. It received the name “Ozone” due to its environmental friendliness, because a perfectly tuned carburetor of this type allows you to reduce gasoline consumption to 7 liters per 100 km.
The downside of Ozone is its complex design, which often leads to problems with the secondary chamber. This malfunction is associated with the fact that the additional camera is activated not mechanically, as on Webers, but using a pneumatic valve. Also, Ozone carburetors are highly sensitive to contamination. As a result, the adjustments are disrupted, the second chamber begins to open with a delay or does not close completely. What does this lead to? Acceleration dynamics deteriorate, engine output decreases, and maximum speed decreases.
"Solex"
Licensed products from Solex. A carburetor of this type has proven itself on the VAZ 2105, 21054 and other classics only on the good side. It turned out to be economical and at the same time dynamic. The design is completely different from DAAZ. There is a “return” - a fuel return supply system, as well as a number of additional auxiliary electronic systems.
Despite such advantages, the Solex carburetor, especially found in the CIS, turned out to be somewhat problematic. For example, the fuel channels on it quickly become clogged, since they are narrow. If this model is not serviced in a timely manner, failures in the neutral system will begin.
In some cases, a carburetor of a non-standard or non-standard type may be installed on the “five”. This installation requires certain modifications followed by proper adjustment. For example, such options are carburetors 21073 and 21083.
Basic faults
In order to make adjustments, you need to know several typical faults. Since this unit is responsible for dynamic characteristics, breakdowns include:
- Problems starting the engine, engine sneezing.
- Jerks, jerking, frequent failures on the accelerator pedal.
- Lack of overclocking options.
- Increased fuel consumption.
So, if while operating your car you were able to detect one or more faults from this list, then the part needs repair.
You need to know that the maximum adjustment of the DAAZ 2107 1107010 carburetor is possible only with the unit removed. The process does not involve cleaning this device with lint or woolen rags. You also won’t need any wires to clean the jets.
When making adjustments yourself, you must first remove the cover from the assembly. Then you can proceed to adjusting the float chamber. It's comfortable.
Removing the carburetor
Sometimes the carburetor needs to be removed, for example, for replacement, repair or cleaning. For such work, you need to prepare a set of tools consisting of open-end wrenches, screwdrivers and pliers. If the damage is minor, then there is no need to remove the device.
For safety reasons, it is recommended to dismantle the carburetor on a cold engine.
Then we perform the following sequence of actions:
- In the engine compartment, loosen the clamp on the corrugated pipe and tighten it.
Video: how to remove the carburetor on the “seven”
Adjusting the float chamber
The float has free movement. The stroke size should be between 6.5 mm on one side and 14 mm on the other side. The stroke is adjusted using a special template.
If your chamber has a smaller distance, you will need to bend the needle valve tongue slightly.
Now you can adjust the operation of the needle valve. When the float rises, less fuel flows. If the throttle valve opens, the fuel consumption is higher and the float moves down. To adjust the float on the other side, you need to move the float back as far as possible and use the same template to check this parameter. If the distance is not 14 mm, then the fastening stop should be bent.
Adjusting the float mechanism
The operation is carried out in three stages. First, the float is checked to ensure its correct location in relation to the walls of the chamber and its lid. This procedure makes it possible to achieve “ideal” immersion of the float by eliminating the phenomena of deformation of the bracket on which it is mounted. Deformation can be eliminated simply by straightening the fastening element with your fingers.
Secondly, close the needle valve and begin to adjust the 2107 carburetor: put the lid in a vertical position, move the float to the side, and bend the bracket tongue (using a screwdriver). All these operations are performed in order to achieve a gap between the float and the cover at a level of 6–7 mm. Thirdly, open the valve, move the float to the side, and achieve a gap of 15 mm between the needle seat and the float.
As you can see, adjusting the float cannot be considered a very difficult task. Dealing with it is not so difficult, the main thing is to be very careful and careful and not try to do everything quickly.
Setting up the launcher
Adjustment includes the process of adjusting the starting device. For older devices, it operates at a frequency of 1500 rpm. If you examine the DAAZ 2107 (carburetor for the “seven”) from the other side, you can see a special channel. If you remove the assembly and inspect it from behind, you can see the air supply channel.
To adjust, you first need to remove it. Then you need to turn the lever so that the air damper is completely closed. Next, you should turn the device over, and then measure the gaps between the damper and the wall. For our carburetor, the gap should be 0.85 mm. To adjust the gap to the required size, it is necessary to bend the drive rod.
Next you need to adjust the gap A. You can find it between the wall of the channel and the edge of the damper below. So, you need to close the damper and recess the starter rod. As a result, it will open, and the gap should be from 5 to 5.4 mm. To adjust, you need to turn the adjusting screw with a screwdriver.
How to adjust the carburetor and when to do it
Do-it-yourself carburetor adjustment is done after using low-quality gasoline or when engine operation is no longer stable. For prevention, the manufacturer recommends flushing the carburetor with a special compound every 6-7 thousand kilometers.
Possible malfunctions in the carburetor:
- Fuel leaks on the carburetor. In this case, you need to measure the fuel pressure. This is done using a special pressure gauge. The operating instructions will tell you what the pressure should be. Typically it ranges from 0.2 to 0.3 atmospheres. If the pressure is normal, the problem is in the float chamber and the fuel level needs to be adjusted;
- Carbon deposits on spark plugs with the smell of gasoline. This clearly indicates a problem with adjusting the carburetor floats or a burnt valve;
- Rough engine idling may not only be due to the carburetor. This often happens due to incorrect adjustment of the throttle cable. To check, you need to disconnect the cable and turn the valve manually.
Before you adjust the carburetor correctly, you need to clean it thoroughly. It is recommended to use special liquids for cleaning. The jets cannot be cleaned with toothpicks or needles. Damage to the jets will lead to calibration failure. If the holes cannot be cleaned with aerosols, you can carefully clean them with a soft wire. When cleaning, do not use rags. Threads can clog the holes, which will lead to malfunction of the carburetor. If the aerosol does not remove all contaminants the first time, you need to repeat the procedure.
Setting up idle speed
First, you should make sure that the ignition adjustment is correct. The engine must be at operating temperatures. To adjust, you need to rotate the fuel mixture quality adjusting screw until the engine speed reaches maximum.
Next, you need to rotate the fuel quantity screw counterclockwise. An even higher speed should be achieved.
Now it’s worth turning the quality screw to add a little more speed.
The point of these operations is to ensure that the quality of the mixture is minimal, and the idle speed is from 850 to 900. These are the most optimal values for carburetor engines of cars of the “Classics” family. You should not make revolutions more or less than this value, as they will be considered unstable and will entail increased wear of the crankshaft parts.
We looked at several possible adjustment methods that you can do yourself. But if you are not confident in your actions, it is better to entrust your DAAZ 2107 (carburetor from the “seven”) to a specialist who is well versed in them.
About the main jet
Device repair and adjustment of the carburetor for 151C
The desired composition of the mixture with the throttle valve fully open is determined by the correct selection of the main jet. The workers at the carburetor plant, of course, did this job quite accurately. All jets usually have markings indicating their capacity (you can read more about this in No. 9 “Behind the Wheel” for 1970).
The main jet is made to the first class of accuracy, so before you pick up a drill and drill it out (if you suddenly want to), make sure that you have at least one “normal” jet in stock! A seemingly small increase in diameter often leads to an irreparable enrichment of the mixture, a drop in power and excessive consumption of gasoline.
The throughput of the nozzle is also reflected in the condition of its inlet and outlet holes and their chamfers, the cleanliness of the channel processing, so the nozzle must be handled very carefully; it is strictly forbidden to clean it with hard metal objects. During operation, the main jet practically does not wear out, but resins released from gasoline and oil may be deposited in the calibrated hole, and debris may also be retained here
Resin deposits are easily washed off with acetone, solvents “647”, “649”, and alcohol. If a motorcyclist does not know that the gas tank needs to be thoroughly flushed at least once every three to four years, he will have unpleasant adventures. As a rule, the engine “likes” to fail during risky overtaking, when all hope is on it, on a steep climb along a mountain path, over a cliff, or, no less exciting, somewhere at the intersection of two wide streets during rush hour. This often happens at night too.
During operation of a road motorcycle there is usually no need to replace the main jet. But in some cases, for example, when preparing a forced engine, when installing a different type of carburetor or air cleaner, a different performance of the main jet is required. In these cases, it is necessary to select it experimentally. The main indicator of the correct choice is the maximum speed of the motorcycle. In addition, the engine should not experience interruptions and “choke” when the throttle valve is opened sharply and completely. When selecting the main jet, always go from a rich mixture to a lean one (otherwise you can easily damage the engine). A mixture that is too lean sharply increases the engine temperature, which often ends in jamming of the piston and leads to burning of its bottom or wall at the exhaust port, where the piston is most in contact with hot gases. The best jet is the one that achieves the highest speed. Sometimes, to ensure better lubrication of a two-stroke engine, they stop at a jet, which even gives a slightly greater (5-10 percent) enrichment. Simultaneously with checking the speed, the quality of the mixture is assessed by the state of the spark plug immediately after the engine is running at maximum load and high speed. With the correct composition, the ends of the spark plug electrodes are velvety, from dark gray to light black, and the insulator of the central electrode is brown. If the electrodes and central insulator are black, the mixture is rich. Light gray or white color of the electrodes is evidence of a lean mixture.
The required jet flow rate depends on the type of air cleaner and its cleanliness. The less resistance it provides to the air flow, the weaker the vacuum above the spray nozzle and the leaner the mixture, and vice versa. This should not be forgotten during any alterations. Some air purifiers, especially those with a microfiltering paper element (like on the Java), are very sensitive to dust accumulating in them. On a Java motorcycle, for example, it is necessary to periodically replace the filter, otherwise the mixture, constantly enriching, begins to noticeably reduce engine power.