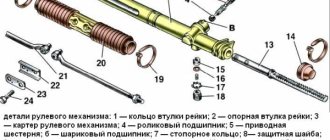
There are hundreds of different parts on a car, the cost of which can range from several hundred to several thousand rubles. Each of them plays a role in the ability to move along the road.
One of the inexpensive parts of VAZ cars is the steering rack boot. The same protective parts are installed on steering rods. Their failure leads to premature wear of the protected hinge.
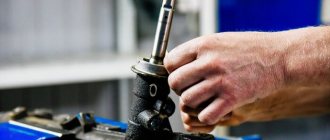
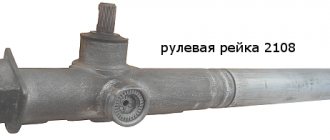
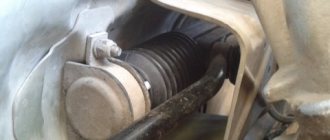
The boot on the steering rack looks like a corrugated hose. As soon as the driver discovers that it is torn, replacement should begin. This operation is not classified as complex or time-consuming, so almost all car owners can perform it.
Monitoring the condition of these parts is not difficult. It is enough to periodically inspect the steering rack, rods, and other parts with protective covers. As soon as it is discovered that one of them is torn, it should be replaced.
Why replacement is necessary
The boot should not be allowed to tear, because road dust, dirt, moisture and other foreign objects penetrate into the joint through the damage. They, mixed with lubricant, begin to act as an abrasive.
Abrasion of the surface leads to an increase in the gap in the connection, and this worsens the car's handling. If you put off work until “later” and change the torn cover of the steering rack or tip late, then this will require additional costs to restore worn-out components.
It will be much easier and less expensive to change one or more boots than to wait for the tie rods to wear out.
With steering racks it is even worse, where the penetration of moisture and dirt can “eat” the worm pair, leading to jamming of the mechanism, which can create preconditions for an emergency.
The safety of the driver, passengers and other road users must be paramount. Therefore, pay close attention to the condition of all parts of the car’s steering mechanism.
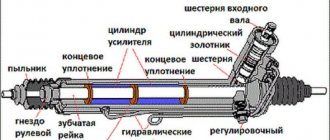
Boot - what kind of part is it, what is its purpose?
This spare part looks like a corrugated tip that is sealed on both sides of the working units and holds liquid (oil) inside. Damage or wear of a part can cause failure of the entire assembly. And if the cost of the rubber element is cheap, repairing the steering rack is a matter that will burden the budget. Therefore, it is worth periodically checking the condition of the boot and replacing it immediately if:
- visible damage, cuts, cracks;
- the rubber has become hard and inelastic;
- oil appeared on the surrounding elements of the car;
- when driving on an uneven surface, tapping on the steering wheel is noticeable;
- The steering wheel jams periodically and there is play when it rotates.
It would seem like a simple rubber part, but its untimely replacement can lead to more serious consequences. For example, at high speed the steering wheel may jam, so it is worth checking the condition of the steering rod boot and oil seal at every opportunity.
The rack has two elements on the rod at both ends, so when replacing it is best to buy two spare parts at once.
Preparing for replacement
Replacing the steering rack boot is done differently for different cars. It would be good if it is possible to use a lift or inspection hole. If this is not possible, you will have to be content with a car jack.
Some car models require removal of the engine compartment protection from the bottom of the car. On other machines it will be necessary to dismantle the generator and battery. On VAZ cars with front-wheel drive, you will have to remove the air filter housing and adsorber.
Any work on parts of the steering mechanism of the car leads to violations of the installation angles of the front wheels. If you want to minimize wear on the rubber of the steering wheels, make visible marks for the tip, linkage, and steering rack so that they can be aligned during assembly. Upon completion of work, check the installation angles on the stand.
Replacing the tie rod boot - nuances
To clean the element, use a special brake cleaner in an aerosol.
Carefully treat the areas between the teeth. Litol 24 or BLUE is suitable as a lubricant. Some people prefer to use “AZMOL FIOL-1”. There is a recommendation to use solid oil if there is no other at hand (we recommend using special compounds). Materials differ in viscosity at different temperatures - refer to the NLGl marking and the number next to it. You can easily find the transcript on the Internet. Before purchasing, study the forums of car owners of your brand of car, consult with professionals and study the technical characteristics of the products. The brands mentioned are just examples for reference - the car market offers a wide range with different properties.
Reinstalling the clamps is possible if you don't want to spend money on new ones. Try it by squeezing them well while installing with pliers. If the “trick” doesn’t work, you’ll have to worry about purchasing fasteners.
How to change the boot
First of all, it is necessary to purchase new anthers to replace the failed ones and clamps to secure them. Tools you will need:
- car jack;
- car body stands;
- a set of wrenches, screwdrivers, hammer, pliers;
- joint lubricant.
When the steering rack boot is changed, the clamps securing the protective cover are usually changed. It is advisable to carry out the work on a cold engine, otherwise you can burn your hands.
After jacking up the car, be sure to install stands for safety. This will prevent the machine from lowering inadvertently. VAZ cars with front-wheel drive have a steering rack and two tips, and the VAZ “classic”, for example 2107, already has four tips and a longitudinal rod with protective covers.
For convenient replacement, access to the mechanism should be provided. On a VAZ, this is prevented by the protective cover of the rack from the exhaust manifold. The adsorber, which will have to be removed, will also interfere.
There may be a problem with removing the clamps that secure it. They are not expensive, so many owners simply eat them and install new ones during assembly. The next procedure will be something like this:
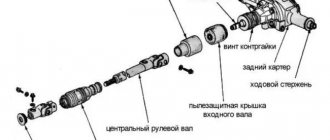
- A hammer with a screwdriver and pliers come into play. With their help, the tie rod locking pin is removed;
- after this, use a 22mm wrench or a socket to unscrew the nut on it and remove it from the mechanism;
- The boot is torn and needs to be removed. To do this, remove the steering rack mount from the right side of the mechanism. It is secured with two nuts that are unscrewed;
- Now it is possible to remove the damaged boot for replacement.
Before installing a new part, be sure to thoroughly clean the opened part of the steering rack from any dirt that has got there and apply new lubricant. Lubrication also makes installing the new cover somewhat easier.
It is necessary to pay attention to the correct installation of the boot so that it does not twist.
Sometimes the steering wheel turns, this does not make it possible to install the tip in its place; you should turn it a little and the rods will take their places in the steering rack.
Next, screw a nut onto the screw part, tighten it with a wrench, lock it with a cotter pin, and straighten its antennae with a screwdriver. After the nut is tightened, install the rail in its place, install the fastener and tighten it.
At the same time, check the clamp on the left side of the mechanism and, if necessary, tighten the nuts. Then you can put the removed parts back in place. Taking advantage of the fact that the car is raised and partially disassembled, check the rods, their condition and the integrity of the protective covers. If the slightest damage is noticeable, replace the anthers, otherwise you will have to replace the entire rods.
The operation of replacing the traction boot is similar to the process of working on other VAZs, for example, 2107 and the like.
It should be remembered that some VAZ models have power steering. There, the operation of replacing the boot is somewhat different from the process described.
Features of the steering rack with power steering
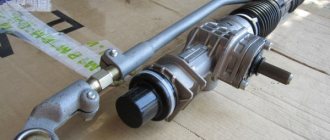
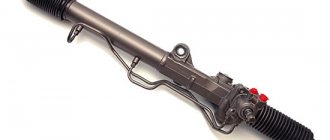
On a small part of VAZ-2110 cars, the steering rack was equipped with power steering (power steering). Structurally, it is slightly different from a regular rack (without power steering). The photo shows the hoses that ensure the operation of the hydraulic booster.
Steering rack with power steering complete with rods
Therefore, the procedure for replacing the boot on cars that have a steering rack with power steering has its own characteristics.
Preparing tools and materials
In addition to what was stated above, to remove the boot on the power steering racks, additionally prepare the following tools and materials:
- 1 liter of fluid for power steering VAZ;
- container for draining old fluid;
- wooden plugs for closing the hole in the power steering reservoir and the high pressure hose;
- bolt to close the return hose.
In addition, you will need keys for 17, 19 and a hexagon for 6.
Note. When replacing the boot, it is recommended to change the rubber mounts of the steering mechanism, left and right. Therefore, they should also be purchased in advance.
Drain the fluid from the power steering
Replacing the steering rack boot of a VAZ-2110 with power steering is carried out by first draining the fluid from the power steering reservoir. To do this you need:
- use a syringe to pump out fluid from the power steering reservoir;
- remove the fluid supply hose to the pump;
- plug the hole in the tank;
- lower the hose into a previously prepared container;
- turn the steering wheel and wait for the fluid to drain;
Warning! It is strictly prohibited to start the engine to turn on the pump in order to speed up the process of draining the liquid.
- use a screwdriver to remove the clamp securing the return hose and quickly plug it with a bolt, which should be prepared in advance;
- Using keys 17 and 19, unscrew the supply hose (high pressure) and plug it with a wooden plug.
Remove the rack
- in the same order as indicated above, we dismantle the engine and steering rack protection;
- Using a 13mm wrench, unscrew the four bolts securing the rack;
- use a 13mm wrench to unscrew the bolt securing the lower coupling flange, which is located under the steering wheel;
- remove the rack using a screwdriver if it has not fallen on its own;
- We take the rack shaft out of the cabin and turn it over;
Changing the boot
To replace the boot, unscrew the power steering pipes from the rack and remove it through the hole (window) under the car's wing. We change the boot and reassemble in the reverse order.
Note. If you cannot disconnect the pipes, try disconnecting the right link and pulling out the rack from above.
Guided by the advice outlined in this article, replacing the tie rod boot will not be difficult. In addition, you can additionally watch the video, which is easy to find on the Internet today by entering the appropriate query in any search engine.
Preparing the car
The preparatory work in our case is very simple and consists of providing convenient access to carry out the necessary work. On some cars you will have to remove the engine protection, jack up the front end and remove the wheel. On others, you may need to remove the alternator or battery. If it is possible to park the car on a pit or overpass, this will make the task much easier. If you use a jack, do not forget to put stops under the rear wheels to prevent the car from falling. No one wants body damage and possible injuries.
Boot deformation and manufacturer choice
If you notice a change in the shape of this part when examining it, check the bypass channel. Along it, air from the left moves to the right and in the opposite direction. Most often, the channel is located inside the rack rod. May be a separate tube. Clean it so that the rubber casing folds normally. The grease channel becomes clogged due to excess application to the steering support.
Choose trusted manufacturers, for example, Lemforder. This recommendation is understandable, but it is better to repeat it. Counterfeit products are less often mentioned. Therefore, we advise you to also take your choice of seller seriously. It is better to choose suppliers who value their reputation.
What else should you look for when choosing? The product must meet the following requirements:
- wear resistance;
- heat resistance;
- lose elasticity in cold, but not in heat;
- support torsional and fracture loads.
Rubber was previously often used as a material for the manufacture of the part in question. Today, silicone is used, which better fulfills the protective function of the listed requirements.
Replacement under light operating conditions is recommended every 120 thousand km (check this value specifically for your car in the manufacturer’s instructions). If the car is often used on untreated, bad roads, it can be additionally reinforced with metal protection. Otherwise, the service life may be reduced to 3 thousand km.