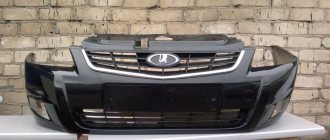
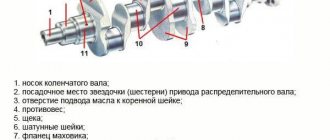
Removing the VAZ rear bumper
To carry out this operation, you will need a 10 mm wrench. Removal work is carried out in the following order:
- Using a 10mm wrench, unscrew the two nuts securing the bottom to the body.
- We do the same with the two upper screws located at the rear lights.
- Disconnect the license plate light power connector.
- We unscrew the terminal of the negative wire attached to the threaded point of the body inside the trunk.
- We derive the structure from technological hooks.
Photo gallery: the main stages of work on detaching fasteners and replacing parts
Video: how to replace a rear bumper without involving specialists
Information about the rules for replacing the front and rear bumpers of a VAZ 2110, 2111, 2112 car will expand the technical horizons of a novice car enthusiast. With minimal knowledge and skills in servicing your car, you can replace the bumper yourself if necessary. The ability to remove and install this part without involving car service specialists will save time, money and nerve cells of the owner.
Preparatory stage
Content
Removing the front bumper of a VAZ 2110 is mainly done from the bottom of the car. Therefore, it is necessary to provide a dry area for dismantling/installation work. It is possible to carry out the removal in the inspection hole, this makes the task easier.
To work, the car owner will need a tool such as:
- Phillips screwdriver;
- open-end wrenches: 10, 13 mm;
- spanners or heads: 8, 10 mm;
- liquid key.
Removing and replacing the front bumper of a VAZ 2110 may require the help of a partner. This is necessary to avoid unwanted damage in the form of scratches or chips on the freshly painted part.
On a note! It is possible to cover the surface of the bumper with paper tape; this will also protect the paintwork during installation.
Work progress
- Since the wiring (license plate light) is connected to the rear bumper, it would be better to disconnect the negative terminal of the battery to avoid a short circuit;
- Open the trunk and fold back the rear trunk trim, then fold back the edge of the side trim on the left side to expose the wiring harness that goes to the license plate light. Disconnect the wire block;
- Unscrew the nut and disconnect the license plate light wire going to ground;
- After this, unscrew 1 bolt of the upper fastening of the bumper mount on both sides;
- Next, unscrew 1 bolt of the lower bumper mounting on both sides;
- Now we remove the bumper itself, pushing it back and passing the wires through the hole in the rear panel of the body;
Replacing the rear bumper on a VAZ 2112
An article about how to independently and inexpensively remove and replace the rear bumper on a VAZ 2110, 2111 and VAZ 2112.
1. Disconnect the wire from the “–” terminal of the battery.
2. Open the trunk lid, fold down the rear trunk trim, and then the edge of the side trim on the left side to gain access to the license plate light housing. Disconnect the license plate light connector from the wiring harness.
3. Unscrew the nut and disconnect the ground wire of the license plate lights.
4. Unscrew one bolt of the upper bumper mounting on both sides.
5. Unscrew one bolt of the lower bumper mounting on both sides.
6. Remove the bumper by pulling it out towards you.
7. Pass the wires through the hole in the rear panel of the body.
8. When replacing the bumper, unscrew the three screws securing the license plate light housing and the screws securing the three clamps. Remove the housing with lights from the old buffer and install it on the new one.
How to put it in its place
Installation of the rear bumper (standard type) is carried out in the reverse order of dismantling. Before finally putting the part in place, it is necessary to set uniform gaps between the bumper and the body of the VAZ 2110 car. After this, all fastening points are tightened.
If it is intended to install a cladding of a different shape, the attachment points may differ. Such a part is adjusted to the VAZ 2110 car locally, modifying the standard attachment points.
Selection of new bumpers
Plastic body parts for the “ten” are sold in two versions:
- bare plastic without paint coating;
- painted in a specific color and completely ready for installation.
This body kit is cheaper, but it still needs to be painted
The first type is worth purchasing when you need to repaint the entire car or its color is so unique that it is difficult to find a painted bumper. A coated part will cost more, but it can be immediately installed on the car without unnecessary worries about painting. Prices for standard and some styling products for VAZ 2110-2112 are presented in the table.
| Type of body kit for VAZ 2110 | Front factory | Front AVR | Front "Sniper" | Rear factory | Rear AVR | Rear E-4 | Rear Brooklyn |
| Cost of an unpainted element, rub. | 2630 | 3860 | 3490 | 2760 | 3855 | 4000 | 4150 |
| Price of painted element, rub. | 3250 | 5260 | 5460 | 3250 | 5265 | 5770 | 5920 |
Note. The rear bumpers of the VAZ 2110 and VAZ 2112 are not interchangeable, although they have a similar shape and are attached to the body in almost the same way.
VAZ 2110 with front styling bumper AVR
If you analyze the prices given in the table, it becomes clear that buying an unpainted product rarely justifies itself, since you still have to pay extra for painting and waste time. When choosing new parts, you should pay attention to the following points:
- the quality of the paintwork, the absence of manufacturing defects and small chips along the edges that may occur during transportation;
- front elements can be sold with or without a plastic amplifier, choose the appropriate option for yourself;
- it is better to choose products where the manufacturer has provided additional internal ribs that strengthen the structure;
- The plastic should be flexible, not hard and brittle.
Styling bumper Sniper gives an aggressive appearance
How to remove the front and rear bumper on a VAZ 2110 and 2112 Simple methods
- The bumper is damaged. If scratches and chips appear, it makes sense to carry out restoration work or replace it with a new one;
- Tuning. Many car owners change their bumpers to more beautiful ones. Replacing the body kit, the most common modification;
- Installation of non-original optics.
- “How to remove scratches on a bumper”;
- “How to paint the bumper yourself.”
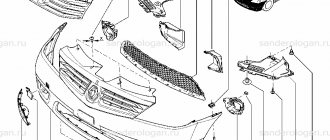
- First, remove the decorative radiator grille. To do this, you need to unscrew the top mounting screws using a 10mm tube. Next, release the clamps of the lower grille fastening, and remove it;
- If there are installed fog lights, remove the connectors from them;
- Loosen the nuts securing the engine protection;
- Using a Phillips screwdriver, unscrew all the screws securing the fender liners to the bumper;
- Use a 8mm socket to unscrew the screws securing the bumper to the brackets;
- The body kit is also attached to the front of the car; here you will need to unscrew 2 10mm screws;
- After this, the bumper is moved forward and removed from the car.
Open the trunk and disconnect the wires that power the license plate lighting. To do this, you will need to fold back the rear trunk trim. It is usually attached with clips. Next, remove the connector. And unscrew the negative wire from the stud; We unscrew the screws of the upper bumper fastening, they are located at the edges; The screws securing the lower part of the body kit are unscrewed; Move the bumper back and remove it
At the same time, it is important to pass the wires through the holes in the body panel; The next step is to remove the casing that mounts the room lights. To do this, unscrew the 3 fixing screws.
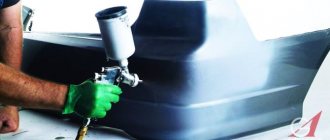
If there are scratches, first of all, clean the damaged area. Next, level the surface using putty.
When choosing it, pay attention to compatibility with plastic. After the leveling layer has dried, the bumper is primed and painted; Cracks are usually sealed using a soldering iron.
But there is one caveat here. To avoid further growth of the damage, you need to drill holes slightly away from the ends of the crack. Soldering is best done on the back side of the bumper. This will preserve the appearance of the body kit. After repairing the damage, the part is puttied and painted; In case of chips and holes, you will have to restore the damaged piece. This can be done using fiberglass and epoxy glue. If everything is done carefully, then there will be no problems with the appearance.
Replacing the rear bumper on a VAZ 2111 station wagon
For the work you will need: 10 and 13 socket wrenches, a Phillips screwdriver.
- Unscrew the 2 screws of the upper fastening of the rear bumper to the body on the left and right sides;
- After this, remove the tailgate stops from the bolts of the upper mounting of the bumper to the body on the left and right sides;
Now you can remove the bumper by sliding it back and removing the bumper tabs from the bracket on the body.
Install in the reverse order, making sure that the tabs on the bumper on both sides fit into the brackets on the body.
I hope this article was useful to you, stay tuned :)
Recent Entries
BMW 530e Hybrid revised for 2022
The BMW 530e PHEV has been updated with a new battery, improved efficiency, lower emissions and increased electric power range. The hybrid BMW 530e was
Watch a plane crash land on a public road, caught on police dash cam
Starman Adventures Is a Big Hit Among Teslas - SpaceX Fans
New deal offers drivers a free car - life-saving brakes for drivers up to £1,600
Categories
Test Drive
Why are they replacing?
The reasons for replacing bumpers are different for everyone. But a few basic examples can be given.
- The driver is a fan of tuning, so he decided to change these body elements.
- The old body kit is covered with scratches and chips, so it needs updating and painting. This work is complicated, so it’s easier to just replace it.
- As a result of an accident or an accident, the old bumpers have become unusable, so they need to be replaced with similar or more exclusive, original ones. Depending on the wishes of the car owner.
- There was a desire to install original optics in order to provide a visual effect and improve the quality of the headlights. But the old bumper is not suitable for these purposes. We have to dismantle it.
Removing the front bumper
So, you have made the appropriate decision, because the old body element will go to its well-deserved rest, and a new structure will take its place. Whether it will be a factory bumper or whether it will be about tuning is up to you. The main thing here is to dismantle the old structure and install another in its place - a matter of technology. More precisely, the reverse sequence of dismantling.
For removal you will need a certain set of tools and materials, which include:
- Open-end wrenches 10 and 8 millimeters;
- Socket wrenches 10 and 8 millimeters;
- A set of screwdrivers or one double-sided screwdriver;
- The almighty WD40;
- Dry, clean rags;
- New body parts, linings, etc.
Further, the set of tools and materials depends entirely on the front and rear body kit element you choose. Some bumper models require certain tools or attachments. It is best to ask the seller about this.
Now we can proceed directly to the task at hand.
- If you have fender liners, be sure to remove them. To do this, simply unscrew the fasteners along the entire line of the wheel arch.
Removing the wing fenders
- The left and right sides of the front bumper are held in place with one bolt each. The factory bolt requires an 8mm wrench.
- It is not uncommon for these bolts to rust and the heads to fall off under strong pressure when unscrewing. If the bolt remains there without a head, it will be difficult to reinstall the new bumper.
- Therefore, we recommend treating the bolts with WD40. An alternative is regular brake fluid. After treatment, allow the product to react. It is enough to wait about 5-10 minutes.
- Now carefully and gradually unscrew the bolts counterclockwise. If it still doesn’t budge, return the bolt to its original position, treat it again with the product, and finally remove it.
- It is not uncommon for the head to eventually fail, which leads to the need to drill out the old bolt and then cut a new thread. The task is not an easy one, so let’s hope that you can get by with little blood, as they say.
- Further it is not better, since the apron studs with 10 mm turnkey fasteners holding the bottom of the bumper are also characterized by similar properties of rusting and complicating dismantling work. Often this element of the apron is crumpled, deformed due to impacts on holes, curbs, as a result of off-road travel, and so on. At the same time, the bumper stubbornly continues to hold strong. This is what VAZ 2110 means.
- Be sure to carefully unscrew these nuts and treat with WD40 if necessary.
- Ahead of you are the last bolts holding the bumper, this time from above. There are two of them, they require a 10 mm wrench. But the problem is that to dismantle these very last two bolts you will have to remove the radiator grille. On the other hand, this is an excellent opportunity to tune the front of the car by installing not only bumpers and trims, but also a new grille.
- To remove the grille, lift the hood and unscrew the two screws on both sides of the radiator grille. Here you will need an 8mm wrench.
- Now we release the lower fasteners of the grates. Hook them with your fingers and slightly pull all four teeth towards the radiator itself. Just take it one at a time.
- Now you've reached the cherished last two bolts. It is not necessary to unscrew them completely. Unscrew a little, which will allow the fastener washers to release the edge of your bumper.
Removing the rear bumper
If you additionally plan to replace the rear bumper, you will also have to remove it first. The work is not difficult, it will take you about an hour.
Rear bumper
- Disconnect the negative terminal from the battery. This is necessary for the reason that the wiring from the license plate light goes to it. We don't need short circuits.
- Open the trunk and remove the rear trim. Not completely. It is enough to simply fold the part that interferes with work deep into the trunk.
- Move the trim on the left, which will allow you to get to the wiring block and disconnect the connector that goes to the license plate light.
- Unscrew the fastening nut and disconnect the wire going to ground, that is, the car body.
- Now unscrew the upper bumper mount. For this purpose, the VAZ 2110 has one bolt on each side.
- The two lower mounting bolts are unscrewed in the same way. One on each side.
- Next, the bumper is removed and brought back. Don't forget to pass all the wires through the back panel, where there is a hole.
- Unscrew the three mounting screws on the license plate illumination housing, as well as the three fasteners from the wiring harness clamps. The housing with optics is removed from the old body element and installed on the new one.
Removing the rear
Removal process
Before we remove the bumper from the front of the car, the battery on the VAZ 2110 should be disconnected. This is a mandatory rule stating that plumbing work must be performed on a de-energized machine. Leave the hood open. Turn the steering wheel in any direction. This gives improved access to the two screws that secure the fender liner to the bumper. Unscrew the screws with a Phillips screwdriver. We turn the steering wheel in the opposite direction and perform a similar operation with the fender liner on the other side.
On a VAZ 2110, when replacing front bumpers, it is not necessary to remove the lockers. But this can be done quickly without removing the wheel by unscrewing just one nut with a 10 mm wrench and 5 self-tapping screws.
Let's move on to the bottom of the fasteners. Disconnect the fog lights (if installed). The inner side parts of the buffer are secured to the guide brackets, one screw on each side. We turn them out with an 8 mm head. Take a 10 mm spanner or socket wrench and unscrew the five nuts securing the bumper between the engine protection and the lower panel of the radiator frame (TV). Then, you need to unscrew two 13 mm bolts connecting the buffer to the supporting frame of the body, the side members. Next, move on to the top part.
On a note! It is recommended to pre-treat the steel fasteners of the front bumper with liquid key, since the lower studs on the VAZ 2110 often break.
Unscrew the two screw bolts of the false radiator grille. Its lower part is attached to groove joints. We remove the grille from its seats. There is access to two bolts connecting the bumper to the channel (steel buffer amplifier). Using a socket wrench or 8 mm socket, unscrew the fasteners. The bumper is completely unscrewed. It can be removed by pulling the element towards you from each side one by one.
Withdrawal algorithm
First, let's select the necessary tool. We will need a 10 and 13 wrench, 8 and 10 sockets, and a Phillips screwdriver. Just in case, it is better to have penetrating lubricant (WD-40) and a rag on hand.
Keys and screwdriver.
WD-40 lubricant.
We carry out the work in this order:
- If the car has fender liners installed, you need to remove them: a 10 nut and two 8 screws in the far part of the fender liner (closer to the door). Then unscrew the two screws on top and the three screws securing the fender liner to the lower edge of the bumper. You can not remove the fender liner completely, but release only the front part, but this is not so convenient.
Unscrew the 2 screws of the lower fastening of the fender liner to the bumper.
We also unscrew the screws of the upper fastening. - Remove the false radiator grille. Under the hood, unscrew the two bolts along the edge and remove the grille from the grooves below.
Using a 10mm wrench, unscrew 2 screws.
Having released the lower clamps, pull the grille up. - Remove the negative terminal from the battery.
- If fog lights are installed, turn them off by removing the contact blocks on each headlight.
We disconnect the fog lamp blocks.
- From below, the bumper is attached to the vehicle's load-bearing frame with two bolts - on the left and on the right.
- From below, unscrew the five points attaching the bumper to the mudguard.
- Lastly, unscrew the two bolts of the upper fastening of the bumper to the power frame. Now the bumper is supported only by the side clamps.
Unscrew the bolts securing the bumper to the bracket from below.
From above, unscrew the bolts securing the bumper to the front panel. - Carefully and evenly push the bumper towards you from each side and remove it from the car.
Use a 10mm socket to unscrew the mudguard screws.
Remove the bumper by sliding it forward.
Installation of a new or repaired bumper is carried out in the reverse order. Good luck and keep your bumpers away from curbs!
The car bumper acts as a protective buffer. It is he who suffers primarily in collisions and touches. It is possible to repair a part locally in rare cases. Therefore, removing the front bumper of the VAZ 2110 for restoration work will be the most correct solution. If you have minimal plumbing tools, the entire operation will take no more than 1 hour.
Required tools and accessories
The mounting scheme for bumpers on the VAZ-2110 is quite simple and does not require any special knowledge or equipment. At the same time, the procedure for dismantling and reinstalling standard plastic bumper covers is the same for cars with a sedan body (VAZ 2110), hatchback and station wagon. In order to remove the VAZ 2110 bumper, you will need the following tools or devices:
- 10 mm and 8 mm wrenches (preferably open-end and socket types).
- Flat head screwdriver.
- Phillips head screwdriver.
- A container of WD-40 liquid for soaking rusted hardware.
- Rags for wiping.
- Protective gloves.
Rear bumper
The rear bumper suffers when parking unsuccessfully, when the VAZ 2110 hits a fence or other obstacle. In this case, the cladding cracks and loses its appearance, and the owner has no choice but to change the part. To perform bumper dismantling work you will need:
- 10 mm and 8 mm wrench (preferably open-end and socket types).
- A container of WD40 liquid for soaking rusted hardware.
- Rags for wiping.
- Protective gloves.
Conversion of VAZ 2110 into Priora
Salon:
- Priorovsky salon in a VAZ 2110 - installation of wiring, panels (dashboard), door trim, ceiling trim, airbags, tunnel (beard), interior lighting, plastic elements of door pillars, seats.
- Review of armrests - among other options, there is also the installation of an armrest from Priora.
- Priora steering column switches on the VAZ 2110 - installation of Priora/Kalina/Niva-Chevrolet steering column switches.
- Pockets in the door trim of the VAZ 2110 - among other options, there is the installation of Priora door pockets.
- Heater unit knobs - installation of heater unit adjustment knobs from Priora without air conditioning.
- Gear shift drive n/o - installation of a new model of the backstage from Priora.
- Instrument panel with navigation from Priora on VAZ 2110 and Kalina 1
- The steering wheel is from a new Priora model in the top ten without any modifications.
Body, external parts:
- Bumper from Priora for VAZ 2110 - modification of the bumper or crossing.
- Semi-Priora, semi-VAZ 2110 - interchangeability of body parts of Priora and "Tens".
- Priora windshield for VAZ 2110 - installation of a frill.
- Priorovsky rear-view mirrors on the VAZ 2110 - installation of mirrors.
- Euro handles for the VAZ 2110 - among other options, there is the installation of Priora door handles.
- Door sills from Priora - installation of Priora decorative door sills on a VAZ 2110.
- Windshield wiper trapezoid - installation of a wiper trapezoid from Priora on a VAZ 2110.
Engine compartment:
- Priorovsky expansion tank for VAZ 2110 - installation of the tank.
- VUT and GTZ Priora on VAZ 2110 - installation of a vacuum brake booster and master brake cylinder.
- Priorovsky adsorber on VAZ 2110 - installation of an adsorber.
- Priora front suspension on the VAZ 2110 - installation of shock absorbers, struts and suspension springs.
- Air conditioning on a VAZ 2110 - installation of an air conditioner or some of its elements.
- The best engine cooling radiator for a VAZ 2110-12 - which Priora cooling radiator is suitable for the “Ten”.
- Replacing the alternator belt, if there is power steering - installing the Priora alternator belt.
- Engine from Priora - installation of engine 21126 on a VAZ 2110
- Expansion tank - installation of a coolant reservoir from Priora.
- Crankcase protection - installation of protection for the internal combustion engine and gearbox from Priora.
Noise, vibrations, seals:
- Door window seals and Priora velvet guards on the VAZ 2110 - installation of velvet guards and edging for the side windows of the Priora on the “Ten”.
- Priorovsky gutters on VAZ 2110 - installation of Priora windshield gutters.
- Additional door seals for VAZ 2110 - among other options, there is the installation of Priora door seals.
Electrical:
- ESD on VAZ 2110 - installation of Priora electric power steering.
- Electric drive of the heater damper on the VAZ 2110 - installation of a stepper electric drive of the dampers and the SAUO Priora unit.
Front bumper
You will need: socket wrenches (heads) “8”, “10”, a screwdriver with a Phillips blade.
1.Remove the radiator trim.
2.If front fog lights are installed, disconnect the wire from the “-” terminal of the battery and the wires from the fog lights.
3.Unscrew one bolt from the bottom of the side fastening of the bumper on both sides.
4.Loosen the five nuts securing the crankcase protection to the bumper from below the car.
5.Remove the two front bumper mounting bolts.
6.Remove the bumper by sliding it forward.
7.Install the bumper in reverse order
removal In this case, the guides on the bumper must fit into the guides on the body on both sides of the car.
Rear bumper
You will need: a socket wrench (head) “10”, a screwdriver with a Phillips blade.
1.Disconnect the wire from the “-” terminal of the battery.
2.Open the trunk lid, fold down the rear trunk trim, and then the edge of the side trim on the left side to gain access to the license plate light housing. Disconnect the license plate light connector from the wiring harness.
3.Unscrew the nut and disconnect the ground wire of the license plate lights.
4.Unscrew one bolt of the upper bumper mounting on both sides.
5.Unscrew one bolt of the lower bumper mounting on both sides.
6.Remove the bumper by pulling it out towards you.
7.Pass the wires through the hole in the rear body panel.
8.When replacing the bumper, unscrew the three screws securing the license plate light housing and the screws securing the three clamps. Remove the cover with lights from the old bumper and install it on the new one.
9.Install the rear bumper in the reverse order of removal. In this case, make sure that the two tabs on the bumper on both sides fit into the brackets on the body. To do this, guide the tongues into the brackets, press the edge of the bumper to the body and push it forward until it stops.
Search and find other questions in the section: VAZ 2110 car body. >>>
If you liked it?! Share with a friend or girlfriend or a plus from the heart. Thank you so much, friends. (Social networks connected in August 2013)
Your reviews, comments, questions and answers on LADA-10.ru
Everyone is welcome to participate in the discussion about the causes of the malfunction and other problems. If you know what to answer, write and thereby help other VAZ 2110 owners in searching for the truth.
Replacing the front bumper of VAZ 2110, 2112
We present to you brief instructions for removing the front bumper on cars of the tenth LADA family. The instructions may be useful to those who are modifying or tuning their car, as well as to those who simply want to replace it with a new one.
1. Remove the radiator trim (see here).
2. If front fog lights are installed, disconnect the wire from the “–” terminal of the battery and the wires from the fog lights.
3. Unscrew one bolt from the bottom of the side mounting of the buffer on both sides.
4. Loosen the five nuts securing the crankcase protection to the buffer from below the vehicle.
5. Remove the two front buffer mounting bolts.
6. Remove the buffer by sliding it forward.
7. Install the buffer in the reverse order of removal. In this case, the guides on the buffer must fit into the guides on the body on both sides of the car.
8. To install the front fog lights, you need to remove the plugs. To do this, unscrew two screws securing the plugs on the inside of the buffer and remove the plugs out.
Video on removing the front bumper:
Bumper repair technique
To use this repair technology, it is necessary to collect fragments when the bumper is damaged. Repairing chips on the bumper requires a soldering machine. Collected fragments or purchased plastic strips are soldered to the area where the bumper is damaged. Adhesion depth - 80%.
The technique is similar to the first one. The difference is in the soldering material - instead of fragments, wire and nails without heads are soldered in. Solder on the back side of the bumper.
The soldering material is copper wire. Solder from the inside of the bumper. Soldering from the outside is allowed if there is no access from the rear.
A decorative radiator grille will be required. Connect the bumper at the damage site using the soldering method. The technology differs from previous ones in its high reliability of fastening.
The methods are suitable for repairing the rear bumper and the front. Pay attention to the material the bumper is made of. It is indicated on the inside of the bumper.
Installing the front bumper
When reinstalling the bumper, you must first insert it into the guide brackets on the sides of the VAZ 2110. Then the trim is attached in the reverse order. All fasteners should be replaced with parts that have new threads. Before installation, it is advisable to lubricate the hardware, thus providing minimal protection against corrosion.
The fastening of the cladding should not be immediately tightened until it stops. It is necessary to align the part as evenly as possible, achieving gaps across the body of almost the same width. After this, you can finally secure the cladding by tightening all the fixing bolts and screws.
How to remove the front bumper on a VAZ-2110
Before starting work, it is advisable to place the car in a garage or enclosed area with good natural or artificial lighting. For ease of dismantling the lower attachment points, work should be carried out above the inspection hole. The procedure for replacing the front bumper of a VAZ 2110 is performed according to the following sequential steps:
- Using a Phillips screwdriver, unscrew the screws securing the bumper to the arch liners (carry out the operation on both sides).
- Unscrew the 2 screws that connect the bumper body kit to the lower edge of the fender liner.
- Moisten the two side mounting bolts with WD-40 and wait a few minutes until the liquid gets into the threads.
- Unscrew the hardware with an 8 mm wrench, turning the bolts counterclockwise. In this case, you should not apply much force, since you can bend the bolt head. If the use of WD-40 does not help, you need to rinse the bolt with this liquid again and try to swing it out of place with a wrench.
- Using a similar pattern, tighten the 10 mm nuts securing the lower side of the bumper. If it is difficult to move the nut, it is necessary to tighten and unscrew it along the threads, applying WD-40 to the contact point.
- Then you will have to remove the decorative radiator grille of the VAZ 2110.
- There are 2 8mm hex head screws on the top of the grille that need to be removed.
- Use your hand to pry the 4 plastic clips on the lower edge of the grille and pull them towards the radiator. Set the grate aside.
- Unscrew the last two bolts by 10 mm, which tighten the upper edge of the VAZ 2110 bumper.
- Disconnect the fog lamp wiring harness plugs.
- Pull the corner of the body kit towards you and remove it from the grooves of the metal bracket. Similarly, disengage the other corner and remove the bumper from the VAZ 2110 for further repair or replacement.
- The removed bumper can be disassembled by dismantling the headlight (left and right). If they are in good condition, these parts can be installed on the entire cladding.
Removing the component from the front
Replace the front bumper of VAZ 2110, 2111 and 2112 as follows:
- disconnect the negative terminal from the battery, as well as the wiring from the fog lights. Prepare a screwdriver and keys;
- dismantle the radiator grille of the front bumper of the VAZ 2112;
Unscrew the two screws of the upper radiator grille mounting
- unscrew a couple of screws from the grille;
- release the clamps on the lower mount of the radiator grille and remove it;
- loosen the 5 nuts that protect the engine;
- Unscrew one screw on both sides, where the front bumper on the VAZ connects to the fender liners. In its upper part, unscrew a couple of screws;
- unscrew a couple of bolts to secure the front bumper of the VAZ 2112 to the brackets using a size 8 wrench;
- unscrew the two fasteners to the front panel using a 10mm wrench and remove the VAZ 2111 bumper.
Installation of the VAZ front bumper proceeds in the reverse order.
Working with the front bumper of Lada
The most common reason for replacing bumpers and fenders is damage. Often the front structure suffers from potholes on the road, frontal and side collisions, the rear from unsuccessful parking maneuvers, as well as drivers who do not comply with the speed limit and driving distance. Bumpers are also removed for tuning installation of additional headlights, parking sensors or a video camera.
Before starting work, prepare the necessary set of tools: a Phillips screwdriver, an 8x10 mm open-end wrench or a socket wrench with 8 mm and 10 mm heads (bits).
To dismantle the radiator, use a key to release the upper grille fastenings
Using a 10 mm open-end or socket wrench, unscrew the fastening screws on the top side of the radiator grille.
We remove the grid from the lower hooks and separate it
Lifting it up, release the grille from the sockets of the lower fastenings and completely separate it.
We attach the front bumper to the body from above with two 8 mm screws. From below it is attached to the engine protective casing with five 10 mm bolts. Additionally, we use two self-tapping screws to attach the structure to the fender liners on each side. The cavity also has two side projections with mounting holes together with 8 mm screws, which are used for fixing in the body brackets.
How to remove the bumper yourself
The structure is dismantled in the following way:
- Using a 10 mm socket wrench, loosen the tightness of the bottom side to the engine protective casing at five points.
- Using a Phillips screwdriver on each side, unscrew the screws securing the bumper to the fender liners from the bottom.
- In the same way, we free the upper part from the attachment to the fender liners.
- Using an 8 mm socket wrench, unscrew one screw on each side.
- Using the same key, we disconnect the fastenings on the front panel of the hood.
- We move the bumper forward, disengaging the technological protrusions.
Installation of the Rear Bumper of a VAZ 2110
Rear Bumper Replacement Guide
In the last article we looked at the process of replacing the front bumper, now let's see how to change the rear bumper on VAZ 2110 and 2112 sedan and hatchback cars.
Over time, the entire process will take about an hour.
For work we will need: a 10mm wrench or socket, a Phillips screwdriver.
Progress
- Since the wiring (license plate light) is suitable for the rear bumper, it is better to disconnect the negative terminal of the battery to avoid short circuits;
- Open the trunk and fold down the rear trunk lid, then fold the side trim panel to the left to reveal a wiring box suitable for the license plate light. Disconnect the wiring block;
- Unscrew the nut and disconnect the light marking wire going to ground;
- Then unscrew 1 bolt of the upper mount of the bumper mount on both sides;
- Then unscrew 1 lower bumper bolt on both sides;
- Now shoot yourself the bumper, push it back and feed the wires through the hole in the back of the housing;
- To replace the rear part, the bumper should be unscrewed using the 3 screws securing the license plate light housing and the 3 mounting screws of the wiring harness clamps and remove the light housing from the old bumper and install it on the new one.
Dilution installation of the rear bumper VAZ 2110.12.
Without removing the towbar, install the rear bumper
Removing the rear bumper of a VAZ 2110
In this video I will show and talk about various problems associated with the front bumper of a VAZ
Installing the rear bumper must be done in reverse order. Please note that the 2 oaks on the bumper on either side fit into the brackets on the body. To do this, insert the tabs into the brackets, press the edges of the buffer against the body and pull it all the way.
Replacing the rear bumper on a VAZ 2111 station wagon
You will need: 10 and 13 wrenches, Phillips screwdriver.
- Unscrew the 2 screws securing the upper rear bumper to the body on the left and right;
After this, remove the rear door locks from the bumper bolts to the body on the left and right sides;
- Unscrew 1 upper bolt of the mounting bumper Left and right;
- Then remove 1 lower and lower buffer mounting bolt;
- You can now remove the bumper by sliding it back and removing the bumper clips from the bracket on the body. Install in reverse order; Note that the bumper tabs on both sides fit into brackets on the body.
I hope this article was helpful to you, please stay with us
Installation process
After body repair and painting, the bumper is reinstalled in the reverse order. If the owner plans to replace the bumper on his VAZ 2110, then certain difficulties may arise with the new buffer. Mismatch of fasteners with seats is the most common problem with purchased elements. Moreover, some parts may not fit as they are defective. You should exchange the defective buffer in the store or make adjustments before painting to avoid damage to the paintwork.
As described above, attaching the front bumper to a VAZ 2110 is easy. But it is better to do the installation with a partner. It is very difficult for one person to insert the side fasteners into the seats and exert a certain force on the buffer. As a rule, its central part is difficult to fit onto the channel and the side parts will jump out of the brackets.
Upon completion of installation, you should check whether the bumper fits into the seats everywhere. It happens that the owner screws the front part, but the side guides remain free. In this case, you have to unscrew the fasteners, remove the part and reinstall it.
If the inspection gives a positive result, then the fastening sequence looks like this:
- screw the two upper bolts into the steel channel;
- then, install the lower part of the buffer on the five lower studs;
- We press the buffer with the crankcase protection and secure it with nuts;
- screw 2 fasteners to the side members (head 13 mm);
- screw the bolts into the side internal mounts (under the wings).
- connect the fog lights.
- fasten the fender liners in place;
- Installation completed.
On a note! If you have autoplasticine available, it is recommended to apply it to the surfaces of the fasteners. Thus, studs, nuts and screws will be perfectly preserved, and the processed edges will not be destroyed during the next dismantling.
Summarizing the material of the article, it becomes clear that removing the front bumper of a VAZ 2110 is not a difficult task. It is worth adding one point: it is advisable to carry out work in a warm room. Cold plastic is difficult to bend and the fragility of the material increases.
Welcome! The front bumper - it basically constantly suffers on the road, then I wanted to park but it didn’t work out well, then the brakes didn’t work very well and thereby caught up with the car in front, etc. Therefore, you have to change the front bumper many times while you are using the car, but not everyone knows how to do this, so we wrote this article especially for such people, in which we tried to detail the process of replacing the front bumper on cars of the tenth family.
Note! To replace the bumper, you will need to stock up on: Various types of wrenches, you may also need sockets with an extension, or a wrench, and you will also need to take a screwdriver with you!
Summary:
Choosing a new bumper
Body parts made of plastic are available for sale in 2 types:
The first version should be purchased if you need to repaint the car completely or its tone is unique and it is difficult to find a painted bumper. A coated part will be more expensive, but you can immediately install it on the car and not have to think about painting.
Note that the rear bumper on VAZ-2110 and VAZ-2112 cars will not be interchangeable, even though they have a similar shape and are fixed to the body in almost the same way.
If you compare prices, it is noticeable that purchasing an unpainted bumper is very rarely justified, since in any case you will need to pay for painting and waste time. When choosing new parts, pay attention to the following nuances:
- what is the quality of the paint base, carefully inspect for defects and minor chips;
- front parts are sold both with a plastic amplifier and without (choose the appropriate one);
- give preference to products where the manufacturer provides additional internal ribs (to strengthen the structure);
- the material (in this case plastic) should be elastic and not brittle/hard.
Note. If the parts are improved or painted in expensive colors, then the cost may differ by 1-1.5 thousand rubles.
Removal instructions
To remove the rear bumper of a VAZ 2110 or 2112, you must first turn off the power to the on-board network by removing the ground wire from the battery terminal. The rest of the work is carried out at the rear of the machine:
- Open the trunk lid and fold the rear trim to the side.
- On the left side there is a wiring connector for the license plate lamps that needs to be disconnected.
- Unscrew two 10 mm bolts that serve for the lower fastening of the side parts of the VAZ 2110 bumper. These bolts are highly susceptible to corrosion and are difficult to unscrew.
- Similar mounting points are located under the lower edge of the trunk lid near the rear lights.
- Pull the trim off the guide brackets. In this case, it is necessary to monitor the tension of the wiring of the backlight lamps to prevent it from breaking.
- Unscrew 3 cross-shaped screws securing the electrical wiring and 3 more for the housing of the backlights.
- Detach the light housing from the trim.
- The cladding has been completely removed and is ready for repair or replacement.
Removing the rear body kit
To disassemble the rear part of a VAZ 2110-2112 car, the same set of tools is enough. The presence of an inspection hole is not necessary; here you can cope without it. But the services of an assistant will definitely come in handy when removing an unscrewed element so that it does not fall and hit the floor.
Considering that a license plate light is installed inside the bumper, you also need to disconnect the battery before disassembling. Then follow this algorithm:
- From below, the element is attached to the bottom with two bolts located along the edges of the part. Treat these areas with WD-40.
- Open the trunk lid and use a 10 mm wrench to unscrew the 2 upper mounting bolts. They are located on the sides of the threshold of the loading opening.
- Using the same key, unscrew the 2 lower bolts that you previously treated with grease.
- Together with an assistant, remove the body kit. To do this, you need to disengage the plastic latches holding it on the sides. Pry the edge of the plastic with your hands and pull it to the side, and then back.
- Holding the bumper suspended, remove the rubber plug from the hole where the power cord for the lamp comes out. Pull it and pull out the connector you want to disconnect. This completes the dismantling of the body kit.
If you plan to replace the part with a new one, then you will have to remove the backlight and its wiring, which is attached from the inside with plastic clamps, from the old element. After which they need to be moved to a new bumper, installed in the reverse order. It also doesn’t hurt to check the condition of the metal at the joints before assembling the rear of the car.
As you can see, replacing bumpers on VAZ 2110–2112 cars is not difficult. Some difficulties arise only when unscrewing the lower nuts holding the front body kit on the studs. But if you approach the issue scrupulously and without haste, then these problems can be easily solved, and the rest of the work is not worth taking the car to a service station and paying money.
Sources
- https://sto-AvtoStroy.ru/hodovaya-chast/ustanovka-bampera-2110.html
- https://andresanda.ru/tehobsluzhivanie/kak-snyat-zadnij-bamper-2110.html
- https://avto-idea.ru/remont/peredniy-i-zadniy-bamper-na-vaz-2110-kak-snyat-i-skolko/
- https://AirBrush-master.ru/hodovaya-chast/zamena-zadnego-bampera-2110.html
- https://ladafakt.ru/kak-snyat-zadnij-bamper-vaz-2110.html
- https://vianor14.ru/kuzovnye-raboty/kak-snyat-zadnij-bamper-na-vaz-2110.html
- https://AlanSpb.ru/tehservis/snyatie-zadnego-bampera-vaz-2110.html
- https://rezina48.ru/servis/snyatie-zadnego-bampera-2110.html
[collapse]
How to remove the front bumper on a VAZ-2110 - video and photo, number
It will be useful for a novice car enthusiast to learn how to remove the bumper on a VAZ 2110, 2111, 2112. This information will be useful when replacing, repairing or tuning it.
Working with the front bumper of Lada
The most common reason for replacing bumpers and fenders is damage. Often, the front structure suffers from potholes on the road, frontal and side collisions, the rear – from unsuccessful parking maneuvers, as well as drivers who do not comply with the speed limit and driving distance. Bumpers are also removed for tuning installation of additional headlights, parking sensors or a video camera.
Before starting work, prepare the necessary set of tools: a Phillips screwdriver, an 8x10 mm open-end wrench or a socket wrench with 8 mm and 10 mm heads (bits).
To dismantle the radiator, use a key to release the upper grille fastenings
Using a 10 mm open-end or socket wrench, unscrew the fastening screws on the top side of the radiator grille.
We remove the grid from the lower hooks and separate it
Lifting it up, release the grille from the sockets of the lower fastenings and completely separate it.
We attach the front bumper to the body from above with two 8 mm screws. From below it is attached to the engine protective casing with five 10 mm bolts. Additionally, we use two self-tapping screws to attach the structure to the fender liners on each side. The cavity also has two side projections with mounting holes together with 8 mm screws, which are used for fixing in the body brackets.
How to remove the bumper yourself
The structure is dismantled in the following way:
- Using a 10 mm socket wrench, loosen the tightness of the bottom side to the engine protective casing at five points.
- Using a Phillips screwdriver on each side, unscrew the screws securing the bumper to the fender liners from the bottom.
- In the same way, we free the upper part from the attachment to the fender liners.
Using an 8 mm socket wrench, unscrew one screw on each side.
Using the same key, we disconnect the fastenings on the front panel of the hood.
We move the bumper forward, disengaging the technological protrusions.
Photo gallery: step-by-step instructions for dismantling the structure
Remember that only the presence of high-quality tools will ensure excellent results.
Video: how to change a radiator grille
Installing the bumper is also easy. It is enough to follow the reverse sequence of actions performed during dismantling.
Video: what is the difference between the process of installing a front tuned bumper
When do you have to remove body kits?
Most often, motorists have to dismantle the front bumper of the VAZ 2110-2112, since it is the first to reflect impacts from stones, unsuccessful runs onto curbs and other obstacles. The element is especially often damaged in winter due to unremoved snow, which turns into an icy mess. In the best case, the paint is scratched from contact with ice; in the worst case, the bumper simply breaks, because the plastic becomes brittle at low temperatures.
For repairs, it is better to remove such a body kit from the car.
Reference. The rear and front body kits of the VAZ 2110, 2111 and 2112 models differ little in shape and are attached to the body almost identically. At the same time, the rear one from the tens cannot be replaced with a part from the VAZ 2112, but the front one can.
As a rule, such problems plague inexperienced drivers who have little sense of the dimensions of their “ten”. The paintwork of the rear bumpers does not suffer as much; cracks usually appear on them due to collisions with various obstacles when reversing. An extreme case is damage as a result of an accident.
It is very difficult to repair such a crack.
Removal of the rear and front body kits on VAZ cars of the “tenth” family is carried out for the following reasons:
- When you need to get to the main body parts covered by a plastic bumper.
- For complete painting or polishing of a car.
- You can remove small chips and scratches on the coating of elements directly on the car, but for more serious repairs and repainting it is better to remove them.
- In case of replacing standard parts with more attractive styling body kits, giving the car an original appearance.
- For mounting and connecting fog lights.
This is what the Brooklyn styling rear element looks like
Note. The rear element of the VAZ 2110 has a license plate illumination lamp built into it. Sometimes the bumper has to be dismantled to deal with the wiring or other problems with this light.
Selection of new bumpers
Plastic body parts for the “ten” are sold in two versions:
- bare plastic without paint coating;
- painted in a specific color and completely ready for installation.
This body kit is cheaper, but it still needs to be painted
The first type is worth purchasing when you need to repaint the entire car or its color is so unique that it is difficult to find a painted bumper. A coated part will cost more, but it can be immediately installed on the car without unnecessary worries about painting. Prices for standard and some styling products for VAZ 2110-2112 are presented in the table.
Note. The rear bumpers of the VAZ 2110 and VAZ 2112 are not interchangeable, although they have a similar shape and are attached to the body in almost the same way.
VAZ 2110 with front styling bumper AVR
If you analyze the prices given in the table, it becomes clear that buying an unpainted product rarely justifies itself, since you still have to pay extra for painting and waste time. When choosing new parts, you should pay attention to the following points:
- the quality of the paintwork, the absence of manufacturing defects and small chips along the edges that may occur during transportation;
- front elements can be sold with or without a plastic amplifier, choose the appropriate option for yourself;
- it is better to choose products where the manufacturer has provided additional internal ribs that strengthen the structure;
- The plastic should be flexible, not hard and brittle.
Styling bumper Sniper gives an aggressive appearance
Reference. Products whose design has been improved or painted in more expensive colors may differ in price upward (by 1,500–2,000 rubles).
Sequence of work for removing the front bumper from a VAZ 2110
Removing the bumper
in the following sequence:
- We unscrew the five nuts securing the engine mudguard to the body.
- Using a Phillips screwdriver, unscrew the two screws (one on each side) of the lower fastening of the fender liners to the bumper and the two self-tapping screws of the upper fastening of the fender liners.
- From below, using a “8” head, unscrew the two bolts securing the bumper to the brackets.
- Having removed the radiator grille, use a 10mm head to unscrew the two bolts securing the bumper to the front panel.
- Move the bumper forward and remove it.
What is needed for disassembly
To remove body kits from a car, you will need the following tools:
- socket wrench or socket wrench size 8 mm;
- the same, size 10 mm;
- Phillips screwdriver;
- WD-40 aerosol lubricant, which facilitates the rotation of rusted threaded connections.
Minimum set of tools
Additionally, you should prepare the usual set of plumbing tools. They are useful for unscrewing the lower fastening of the front bumper, consisting of nuts and studs. The problem stems from the unfortunate design of this unit, where it is stipulated that the studs stick out 2-3 cm under the front overhang of the car. As soon as the driver slightly catches a curb or drives into an ice snowdrift, the ends of the studs bend or even break off completely. You'll probably have to tinker with them when disassembling them.
Advice. A bent stud can be straightened by screwing a second nut onto the end of the stud to grasp with a tube wrench, and then bending the threaded portion by hand. Another way is to gently tap the screwed nut with a hammer.
For the same reasons, removing the front one will require an inspection ditch. It is extremely inconvenient to twist rusted lower and side fasteners while lying under the car.
Very useful lubricant for rusty bolts and nuts
To replace the stock body kits that were on your car from the factory with beautiful styling products, you also do not need any special tools or equipment. Elements of a different shape, but intended for installation on the “ten”, are mounted on existing mounts. It’s another matter when you want to install the body kit you like from another car, for example, from a Lada Priora. In this case, the fasteners will need to be modified.
Removing the rear body kit
To disassemble the rear part of a VAZ 2110-2112 car, the same set of tools is enough. The presence of an inspection hole is not necessary; here you can cope without it. But the services of an assistant will definitely come in handy when removing an unscrewed element so that it does not fall and hit the floor.
Considering that a license plate light is installed inside the bumper, you also need to disconnect the battery before disassembling. Then follow this algorithm:
- From below, the element is attached to the bottom with two bolts located along the edges of the part. Treat these areas with WD-40.
- Open the trunk lid and use a 10 mm wrench to unscrew the 2 upper mounting bolts. They are located on the sides of the threshold of the loading opening.
- Using the same key, unscrew the 2 lower bolts that you previously treated with grease.
- Together with an assistant, remove the body kit. To do this, you need to disengage the plastic latches holding it on the sides. Pry the edge of the plastic with your hands and pull it to the side, and then back.
- Holding the bumper suspended, remove the rubber plug from the hole where the power cord for the lamp comes out. Pull it and pull out the connector you want to disconnect. This completes the dismantling of the body kit.
Reference. The dismantling algorithm is the same for all types of bodies - sedan, hatchback and station wagon.
If you plan to replace the part with a new one, then you will have to remove the backlight and its wiring, which is attached from the inside with plastic clamps, from the old element. After which they need to be moved to a new bumper, installed in the reverse order. It also doesn’t hurt to check the condition of the metal at the joints before assembling the rear of the car.
Advice. Inspect the rubber plug through which the wires go to the lamp. If it is cracked and “stiff,” be sure to replace it, because due to the leakage of the rubber, water gets into the luggage compartment through the hole. It accumulates in a closed recess on the left side, causing corrosion to form in this area of the body.
Photo instructions for disassembling the rear part
Removing the rear bumper of a VAZ 2110 - video
As you can see, replacing bumpers on VAZ 2110–2112 cars is not difficult. Some difficulties arise only when unscrewing the lower nuts holding the front body kit on the studs. But if you approach the issue scrupulously and without haste, then these problems can be easily solved, and the rest of the work is not worth taking the car to a service station and paying money.