08.05.2012
As mentioned earlier, the crankshaft is a cast iron five bearing mechanism. It is possible to regrind the crankshaft journals during repairs by reducing the diameter by 0.25; 0.5; 0.75 and 1 mm.
Crankshaft
Two support half-rings limit the axial displacement of the crankshaft:
- A yellow ceramic-metal half-ring is placed on the rear side of the middle main bearing.
- The steel-aluminum half-ring is installed on the front side of the middle main bearing. There are two types of half rings: standard and enlarged half rings, the thickness of which is 0.127 mm.
The dimensions of the crankshafts are shown in the figure.
Crankshaft sizes
The crankshaft bearing shells are a steel-aluminum thin-walled curved semicircular plate:
- The upper crankshaft bearings have a kind of groove, while the lower ones have nothing.
- The connecting rod bearings, both upper and lower, also do not have any grooves.
Purpose and principle of operation
This sealing collar began to be used in the very first cars and, due to the simplicity of its design, is used in the modern automotive industry to this day. During operation, the oil seal practically does not touch the surface of the rotating surface; the gap between the parts is sealed due to the vacuum created by special notches on the end of the sealing collar.
Replacing the front crankshaft oil seal on a VAZ 2109
Diagnostics
Reasons for failure of crankshaft oil seals
Since oil drips are the first and main sign of wear on the crankshaft seals, they also tell us that the tightness of the engine lubrication system is compromised. Therefore, at the beginning of troubleshooting, we will have to make sure that it is the sealing collars that are causing the oil leak:
- First, we check the oil level in the engine (there is no need to rely entirely on sensors), top up if necessary and check every day until we find out the cause of the leaks;
- We check the crankcase ventilation system in the engine (clogged ventilation contributes to the accumulation of crankcase gases which, in turn, push oil through the sealing cuffs);
- Check the oil pipe hoses for kinks;
- We check the pressure in the lubrication system.
As a rule, replacing the crankshaft oil seal on a VAZ 2109 is a rather labor-intensive procedure, however, it can be done with your own hands. Therefore, before replacing the crankshaft oil seal of the VAZ 2109, we need to know the reasons why it fails in order to delay this unpleasant moment as long as possible. There are several reasons for the destruction of oil seals:
- First of all, this is, of course, its natural wear and aging (coarsening) of rubber;
- Due to improper installation and, as a rule, internal stresses, cracks appear on the working surface of the cuff;
- Mechanical damage;
- Poor quality tires (fake).
Advice! When purchasing new oil seals, check their working surface, namely the edge, for its sharpness - the sharper it is, the longer the seal will work. In this case, the edge should be smooth and elastic.
Replacing crankshaft oil seals on a VAZ 2109
It should be noted that most often the front radial crankshaft cuff is the first to fail, since it is more exposed to the external environment (dust, sand, dirt) and vibration loads from the car engine. And although the rear oil seal is in more favorable conditions, it is advisable to change the oil seals as a set, since their working life is almost the same.
Signs of wear of the crankshaft seals and its consequences
Replacing the front crankshaft oil seal of a VAZ 2109 is relevant if oil leaks appear on the front cover of the engine block, in the area of the crankshaft pulley, which become more and more progressive as the “disease” develops. Since it is practically impossible to see the beginning of wear of the rear oil seal, replacing the rear crankshaft oil seal on a VAZ 2109 takes place if, when the car is moving, clutch slipping is observed, which is caused by the leaked oil spraying onto the clutch basket and onto its release plate as well. If you notice at least one of the listed signs on your car, then I would not advise you to delay the repair procedure, since the price of a new repair kit is not comparable to the cost of engine repair. What does the engine have to do with it, you ask? The thing is that leaks of lubricating fluids lead to their uneven distribution to the mating surfaces, which is fraught with possible oil starvation of individual engine parts. In the first category of risk of oil shortage is the engine crankshaft itself, which manifests itself in scuffing on its working surface.
Consequences of oil starvation
Also, a consequence of oil leaks through the crankshaft seals is the passage of solid mechanical particles into the oil seal, which, like an abrasive, wear out the working surface of the oil seal on the crankshaft, which already leads to more complex and costly repairs.
Front cuff workplace
Removal
4. We screw the crankshaft pulley mounting bolt into place and use a 17 mm
(on some cars
19 mm
) by turning the crankshaft clockwise, set the piston of the first cylinder to the lower position.
Tip: When unscrewing the nuts of the connecting rod caps, you can accidentally damage the oil level sensor, so it is advisable to remove it (see “Insufficient oil level sensor - check and replacement”).
14 mm socket wrench
unscrew the two nuts securing the connecting rod cover of the first cylinder.
6. Remove the connecting rod cover.
7. Having rested the hammer handle on the connecting rod, push it up.
8. Remove the piston assembly with connecting rod from the cylinder.
9. Remove the liners from the connecting rod and its cover.
Warning! When disassembling the connecting rod, do not press the bolts out of it.
10. Clamp the piston by the connecting rod in a vice.
11. Slightly spreading the ring lock, remove the upper compression ring.
12. Similarly, remove the lower compression ring.
13. Remove the oil scraper ring.
. and its expander.
Warning! The advisability of replacing the rings depends on the degree of wear of the cylinders (see “Piston and connecting rod - replacement”).
Replacing the front cuff
As mentioned above, replacing the front crankshaft oil seal on a VAZ 2109 is the most common and popular procedure, therefore, when carrying out repair work, it is very important to strictly follow all the recommendations of the manufacturer and be extremely careful, since the properties of the rubber from which the oil seal is made are such that it is very easy to damage during installation. There are two ways to replace the front crankshaft cuff: quick - “homemade” and recommended by the manufacturer.
Symptoms of a problem
Signs of a malfunction of the DPKV can be different. Often, dirt adheres to the end of the sensor itself, which can interfere with reading. Also, symptoms of a faulty crankshaft sensor may be as follows:
- The idle mode is unstable;
- Engine speed rises or falls spontaneously;
- Power drops;
- During acceleration, a “failure” is felt;
- The car doesn't start well.
In these cases, for the most part, the VAZ 2114 crankshaft position sensor is replaced.
In addition, the VAZ 2114 crankshaft sensor may well be in good working order. And on the “tidy” the DPKV error will appear (0335 or 0336). The reason for this may be a broken wire near the connector. This is easily determined visually; then it is enough to replace the connector without replacing the sensor itself.
If the owner notices signs of a malfunction of the crankshaft sensor on his car, then this is a “signal” about the need for diagnostics.
It’s not difficult to guess where the crankshaft sensor is located on a VAZ 2114 . Like many other VAZ models, it is attached to the engine, and more specifically to the oil pump, near the generator drive pulley, on its cover. The sensor is attached with one bolt, which is typical for many models of this family.
Typical causes of failure:
- Physical damage to the case;
- The interturn closure of the winding turns entails a change in the generation frequency transmitted to the control unit (frequency type sensors);
- Emergency wear or loss of pulley teeth.
Replacing the back cuff
As a rule, along with replacing the front seal, the rear seal is replaced, which significantly prevents the possibility of its sudden destruction, especially since the degree of wear of the seals is almost the same, while detecting a leak in the rear seal is much more difficult. Before replacing the crankshaft oil seal on a VAZ 2109, you need to make sure where the leak is coming from - from the gearbox or from the car engine. Unfortunately, these instructions will not help you in this case, since the difference between engine and transmission oil can only be determined experimentally and with some experience - by smell. Yes, in principle, it doesn’t matter - we’ll analyze it and figure out the “culprit” of the leak.
- We remove the engine flywheel by first unscrewing the bolts (six in number) securing it to the crankshaft, while using a screwdriver to keep it from turning (to do this, we screw in the bolt securing the gearbox);
- Unscrewing the last bolt securing the flywheel, remove the locking plate, and then the flywheel itself;
- We remove the rear clutch shield from its guides and unscrew the eight bolts of the rear cover of the engine block, after which we remove it;
Removing the back cover
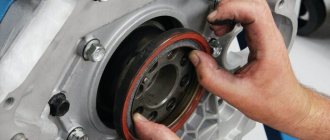
- We dismantle the oil seal housing, carefully prying it away from the cylinder block with a screwdriver;
- We take out the old cuff from its seat...;
Pull out the back cuff
- ...in its place, using a mandrel with a diameter of 99 millimeters, we press a new radial cuff;
Attention! The working edge of the new oil seal should be positioned inward.
Advice! To make pressing easier, it is advisable to slightly grind down the edge on the outer side of the edge to a cone, which will allow the oil seal to fit into the seat more smoothly.
- We replace the old gasket of the cuff body;
New housing gasket
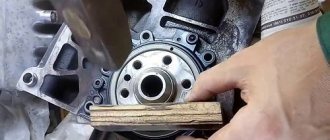
- Having applied a thin layer of engine oil to the working edge and the crankshaft flange, we install the crankshaft seal housing in place, while adjusting the edge of the oil seal with a wooden spatula (shown in the photo);
Reinstalling the cuff body
At this point, the procedure for replacing oil seals on a VAZ 2109 is considered complete. I hope that in this manual everything is described and illustrated quite clearly and no additional video is required. I hasten to say goodbye to this, and all you have to do is collect everything that you took apart in reverse order and continue to exploit your iron horse.
How to replace the front cuff
Regardless of whether your VAZ-2109 has a carburetor or is driven by an injector, the work of replacing oil seals follows the same principle. The front oil seal wears out the fastest. It is easier to change, since it does not require dismantling the clutch system.
To carry out the work you will need to have on hand:
- standard sets of keys and screwdrivers;
- clean container;
- rags.
Since the work is carried out on the engine, disconnect it from the power system - remove the negative terminal from the battery. If you are not confident in your abilities, watch the video instructions in advance.
After such preliminary preparation, you can begin work on replacing the front oil seal:
- Loosen the generator mounting bolts.
- Remove the belt drive.
- Drain the engine oil into a prepared container.
- Remove the protective casing from the power unit.
- Remove the oil pan.
- Gently and carefully remove the belt from the camshaft. Make sure that the crankshaft or camshaft does not rotate while removing the belt. Otherwise, the pistons will hit the valves and deform them. This will result in the need to install new valves.
- Using two screwdrivers, remove the crankshaft pulley.
- Remove the key.
- Find the 2 oil pickup bolts, unscrew them and remove this unit.
- The oil pump is held in place by 6 bolts, remove them before removing this unit.
- Use a flathead screwdriver to remove the old seal from the crankshaft. It is important that it has a fairly impressive size and is made of durable metal. Otherwise, the blade of the screwdriver may break off while performing this procedure. Remember that work with the shafts must be carried out carefully, avoiding rotation.
- Clean the oil seal location and lubricate it.
- Place the cuff, tucking its working part inward.
- Crimping is carried out using a frame of the required diameter.
- Wash the oil pump cover with gasoline and return it to its place.
- Starting with the oil pump, reassemble the mechanism in reverse order.
Why do you need a phase sensor (PF)?
Before talking about repairs, you need to find out what this sensor is needed for. It determines the operating cycles of the internal combustion engine. The camshaft cams drive the valves, and the DF determines which valve is open.
This is an integrated control unit, that is, it includes a sensitive element and a signal conversion system. There is a Hall element there - data is taken based on changes in the magnetic field.
The converter has a bridge circuit, a converter block, and an output stage. The work is that the DF determines the intake and exhaust phases of the 1st cylinder.
For carburetor engines it is not needed because the spark is supplied at the moment of compression and at the end of the exhaust gases. DPKV is sufficient for this.
Roughly speaking, the VAZ 2114, 2115 phase sensor functions as a fuel injection system. If it breaks down, the work of sparking falls on the crankshaft position sensor. The designs that are used on 16-valve cars differ from eight-valve ones.
Now let's try to explain in simple words how the phased injection system works. It turns out something like this: the DF gives a signal to the electronic engine control system (ECM), and it, in turn, gives a command to inject fuel, while the intake valve begins to open, and after it has opened, air is sucked in and mixed with gasoline to form a mixture.
When not running, fuel can be supplied to two cylinders simultaneously. If there is a breakdown, the on-board computer displays error 0340 or 0343, which indicates a faulty phase sensor.
The following signs may also be observed:
- When the starter rotates for four or five seconds, the engine starts and the check engine light comes on. This means that the ECU is waiting for a signal from the DF and, not receiving it, writes off the data from the crankshaft position sensor.
- Fuel consumption increases quite decently, by 15 percent.
- Self-diagnosis mode does not work.
- Engine dynamics drop.
Phase sensor malfunctions are difficult to determine at home. So its diagnosis needs to be carried out at special service stations, since the equipment for its diagnosis is quite expensive.
How to change the rear oil seal
The job of replacing the rear oil seal is more difficult. If it is faulty, the clutch may stick, so do not delay repairs. As in the first case, turn off the power to the engine. Next, follow the algorithm:
- Remove the clutch flywheel.
- Remove the clutch housing rear shield.
- Locate and remove the bolts securing the rear oil seal holder.
- Remove it from its place along with the gasket.
- Place the holder on a flat surface so that you have easy access to it.
- Remove the oil seal from the cage.
- Carry out a visual inspection of the holder. It should not have chips, cracks or other damage. If they are present, then it is worth replacing this clip. Using a rag, thoroughly clean the holder.
- Install a new one in place of the old cuff.
- Turn the working edge inward and press the part using a special frame. In this case, you will have to more carefully select the frame for the diameter, since it is quite large. It's best to have a set of frames in the garage for this job.
- Inspect the sealing gasket that you removed along with the holder; if it is badly worn, then this consumable must be replaced.
- Clean the edge and flange of the crankshaft from dirt, then lubricate it with machine oil.
- Replace the holder and reassemble the clutch mechanism.
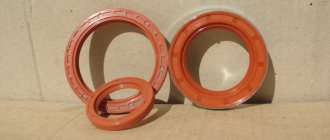
Please note that oil seals are made not only in different diameters. They need to be selected depending on what kind of engine oil you fill in your VAZ-2109. If you buy an oil seal for a mineral composition and fill the engine with a synthetic one, the seal will simply dissolve.
Before installing any oil seal, it is necessary to lubricate the seat with oil. Also be sure to try the cuff on the shaft. Sometimes even branded options do not fit the shaft diameter. In this case, you should not put effort into installing the oil seal, but rather spend additional money on a new component.
Finish the job by checking the seals. To do this, you need to start the engine and warm up the car. Then drive a couple of meters (for example, drive the car out of the garage) and leave the VAZ-2109 in this place for a few minutes. Move to another location (for example, return to the garage) and inspect the parking area. If there are no oil stains on it, then the seals are holding it securely in the system.
Replacing the front crankshaft oil seal on a VAZ 2108, VAZ 2109, VAZ 21099
Welcome! Today you clicked on this link not by chance, since you are looking for detailed instructions on how to replace the front crankshaft oil seal, then we will provide it to you. The instructions for replacing the oil seal will apply only to cars of the Samara family. At the end of the article you can find a visual video that describes in detail the replacement of the crankshaft oil seal!
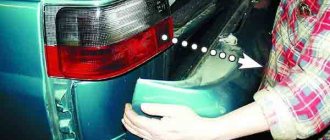
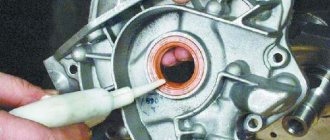
Where is the front crankshaft oil seal located? • It is located in the oil pump cover itself, or to be more precise, it is located on the toe of the crankshaft. In order to see it you will have to remove the timing belt cover. (You will learn how to remove the timing belt cover in this article as we proceed)
• When the cover is removed, turn your attention to the lowest crankshaft pulley, which is indicated by a red arrow in the photo. It is under this pulley that the front oil seal is located.
When should you replace the front crankshaft oil seal? It must be replaced if:
1. The appearance of various kinds of cracks, breaks and defects on it.
2. The oil seal must also be replaced when it becomes oily, that is, when oil leaks are detected on the oil seal.
Note! It is not always necessary to immediately change the oil seal when oil leaks are detected, because oil can also ooze through the oil seal for the following reasons:
- When the crankcase ventilation system is dirty. (You can learn how to clean the ventilation system from an article specifically dedicated to: “Cleaning the system”)
- And also when the hoses of the crankcase ventilation system are strongly pinched. In this case, inspect all system hoses for kinks and correct the problem if possible.
Functionality check
If you decide to check the serviceability of the sensor yourself, treat this procedure responsibly and carry it out correctly. On a VAZ 2114 car, the crankshaft sensor is checked in several ways.
- Using a multimeter. The serviceability of the induction sensor can be assessed by the resistance of its coil. In a working product it is 500-700 Ohms.
- On the multimeter, set the measurement limit to 200 millivolts, connect the probes to the terminals (where the standard wires are connected). Pass a steel object several times in front of the core. The working sensor will “see” the metal and there will be voltage spikes on the multimeter display. If there are none, replace the part.
- But the most accurate results when checking are provided by an oscilloscope. When using this device, one hundred percent results can be guaranteed; it reads all the information from the sensor while the engine is running. It can be observed on the device screen. The engine, during tests, should operate at different speeds. They start with eight hundred revolutions, then two thousand, and raise it to six thousand. If the lines (on the device screen) are of different lengths, you need to look for the cause of the malfunction. Remove dirt, check the pulley for defects, and so on.
Oscillogram of a working sensor
It should be noted that these verification methods work on all VAZ models with DPKV. If you have any doubts about your own abilities, then contact the service. Thanks to specialized equipment, the result will be more accurate, and the check will not take much time.
Remove from the engine
The malfunction has been identified. Let's start eliminating it. Let's look at this operation using the VAZ 2114 as an example.
Turn off the car ignition. We open the hood, fix it firmly, and visually determine where the VAZ 2114 crankshaft sensor is located. Before removal, it is advisable to remove all contaminants in the area where it is located. Next, carefully remove the block with wires from the connector.
Using a “10” wrench, unscrew the fastening bolt.
Let's take it out.
After dismantling the sensor, it is advisable to check the generator drive toothed pulley for defects. Since its damage can introduce errors into the operation of the entire system.
After we are convinced that there are no defects of any kind, we proceed to assembly. The seat must be clean. We install the new part in place and fasten it with a bolt (the tightening torque should not exceed 8-12 Newton meters). In this case we use adjusting washers. They are sold complete with a new sensor. Thus, using a special probe, we ensure that the gap between the pulley and the sensor core is one millimeter. The permissible error is 0.41 millimeters in the larger direction.
We connect the block with wires into place.
After installation and checking the gap, we try to start the engine. With a confident start and stable operation of the engine, we can say that the repair was carried out successfully.
Despite the fact that the breakdown of the synchronizing sensor is not frequent, knowledge of its symptoms and consequences, as well as methods of elimination, will be useful to the car enthusiast.
New sensors are available in almost any auto parts store. The price of DPKV can vary between 200-400 rubles. How much a VAZ 2114 crankshaft sensor costs depends on your region, the location of large spare parts stores nearby (usually cheaper there) and the greed of the seller. Can be ordered in the online store. When purchasing, take the old one with you so as not to make a mistake in choosing a model. To avoid defects and repeated purchases, it is advisable to purchase from well-established sellers.
Welcome, friends, to the DIY car repair website. The VAZ 2114, VAZ 2115 phase sensor is one of the main sensors with which the controller calculates engine operating parameters on Russian-made injection engines.
I would like to immediately say that DF is also found on other VAZ brands, such as Ten, Kalina, Priora, and so on, but in this article we are looking at its description using the example of these models.
This sensor detects the position of the camshaft. It is also called DPRV. The DF is installed on 16-valve VAZ units and on eight-valve ones with EURO-3 toxicity standards, since it saves fuel.
For history buffs, phase sensors began to be installed in mass production at VAZ factories in 2007.
How to replace the front crankshaft oil seal on a VAZ 2108-VAZ 21099?
Removal: 1) At the very beginning of the operation, remove the “Gas Distribution Mechanism” belt from all pulleys. (For information on how to remove the belt, see the article: “Replacing the timing belt”)
2) Next, using two flat-head screwdrivers, pry out the gear-type crankshaft pulley.
3) Then remove the toothed pulley from the crankshaft nose.
4) Now, using a screwdriver, pry and remove the crankshaft key so that it does not get lost when removing the oil seal.
5) Next, without removing the screwdriver, use it to pry the crankshaft oil seal and then remove the oil seal from the cover.
Installation: 1) Before installing the new oil seal, lubricate its working edge with engine oil.
2) Then press the oil seal into place using a socket, or using a piece of pipe of a suitable size, or using a mandrel.
3) After pressing, install the new oil seal in the reverse order of removal, installing a key in the groove of the crankshaft, and the crankshaft toothed pulley on the toe.
Note! When all the parts are installed, install the “Gas Distribution Mechanism” belt in its place!
Additional video clip: Below we have prepared a video clip especially for you, which describes in detail the replacement of the crankshaft oil seal, so watch and delve into it.
Hello. My crankshaft seal has come to an end. I need to install a new one, but the city is 23 kilometers away from me, and there is only an auto shop there, so what should I do? I can’t ask anyone because I came to visit my grandmother, and the village is small and there are almost no young people left here! Will I be able to get to the city with a damaged oil seal? And what can happen to the engine during this time?
Hello Nikita! Is the crankshaft oil seal leaking a lot? In fact, you can drive it, but you definitely need to monitor the level of engine oil in the engine and top it up on time if necessary. After arriving in the city, I recommend using a cloth to go over the engine parts that will be oily, that is, to bring the engine into a clean state, so to speak, and after that you can safely go to replace the oil seal!
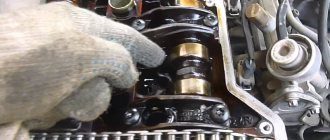
How to tighten main bearings and connecting rod bearings
So, taking into account the above, it becomes clear that the tightening torque of the main and connecting rod bearings is extremely important. Now let's move on to the assembly process itself.
- First of all, molar liners are installed in the bed of the molar necks. Please note that the middle liner is different from the others. Before installing the bearings, the preservative lubricant is removed, after which a little motor oil is applied to the surface. After this, the bed covers are placed, after which the tightening is carried out. The tightening torque should be that recommended for the specific model of the power unit. For example, for engines on the VAZ 2108 model, this figure can be from 68 to 84 Nm.
- Next, the connecting rod bearings are installed. During assembly, it is necessary to accurately install the covers in place. The specified covers are marked, that is, their arbitrary installation is not allowed. The tightening torque of the connecting rod bearings is slightly less compared to the main bearings (the indicator ranges from 43 to 53 Nm). For Lada Priora, the main bearings are tightened with a torque of 68.31-84.38, and the connecting rod bearings have a tightening torque of 43.3-53.5.
It should be separately added that the specified tightening torque assumes the use of new parts. If we are talking about an assembly that uses used spare parts, then the presence of wear or other possible defects may lead to a deviation from the recommended standard. In this case, when tightening the bolts, you can start from the upper bar of the recommended torque, which is indicated in the technical manual.