Replacing the crankshaft is usually part of an engine overhaul. However, unlike many other components you can simply remove around the engine block, removing, machining and installing the crankshaft requires a special procedure. Since you are replacing or rebuilding the crankshaft, plan to install a new set of bearings as well. With the engine out of the car and the remaining components off the block, you are ready to work on the crankshaft.
Removing the crankshaft
Recommendations
Comments 20
When cleaning the oil channels, did you remove the plugs from there?
Do you mean on the crankshaft after processing? I don’t know, it’s unlikely, they probably just blew it out with air. After I picked it up I didn’t do anything with it, I installed it right away
There, a transitional drilling from one neck to another is made through the cheek, and the inlet hole is clogged with a ball, which even has a number in the catalog. Apparently, this means picking it out when cleaning it and installing a new one.
No, these balls were not touched. I don’t think that a lot of “manure” has accumulated under them))) Well, what the heck, they’re pressed in there, you can’t get them out, and then the new ones, God forbid, don’t press in properly and pop out during operation
Above all praise! I give you a standing ovation!
Well done, a lot of work has been done. Congratulations! I didn’t remove the engine, but the floor of the engine was scattered and the gearbox had to be thrown off, this is also not easy. And lubricant for high-speed bearings on the splines is barbaric))) it could have been done with ordinary lithol))) And the question is that the nanogasket was made only on one half ring?
After all that has been done, I would probably still advise removing the engine))) Still, you need to work with the crankshaft when the engine is upside down. But it would not be easy to move it back and forth even if it was removed, especially if there is no tilter and there is no one to help. Yes, and how to remove it up? I don’t have a hook in the ceiling or anything else)))
Well done, a lot of work has been done. Congratulations! I didn’t remove the engine, but the floor of the engine was scattered and the gearbox had to be thrown off, this is also not easy. And lubricant for high-speed bearings on the splines is barbaric))) it could have been done with ordinary lithol))) And the question is that the nanogasket was made only on one half ring?
Yes, this Blue lubricant is, in principle, lithol, only more stable, so it definitely won’t be worse. I only placed a gasket under one half ring. And it would be more logical to put it under the half-ring where the layer of metal was removed on the crankshaft, but I was afraid to put it under the loaded half-ring
It’s understandable, but if you consider that it was with this lining that you removed the longitudinal play of the crankshaft, the entire longitudinal load now lies on this one half-ring. Right?
Why? You probably misunderstood the principle of operation of these half rings. During rotation of the crankshaft, they are not under load at all, the gaps between them and the crankshaft cheeks are still present and the oil is in this gap. That is why there should be axial play in general; the half-rings cannot be pushed tightly into their seats, but it should be small, 0.1-0.3 mm. The pressure load occurs only at the moment the clutch is depressed and the crankshaft cheek presses only on the half-ring that faces the gearbox, and the entire axial clearance becomes maximum between the other cheek and the other half-ring. It turns out that the half-ring under which I put the gasket is always without a load, well, only at the moments of entering a sharp and protracted left turn, when the crankshaft, under the influence of centrifugal force, is pressed against this half-ring, then it experiences a slight load, but this is minuscule. Am I explaining clearly?))) Or do you disagree?)))
Read more: Viscous clutch KAMAZ Euro
Everything was clearly explained. Thank you! When I removed the connecting rods from the engine, I didn’t remove the crankshaft and didn’t check this gap because I don’t have an automatic transmission or clutch to feel these nuances. But we need to adopt your experience!)
Well, yes, with an automatic transmission such a situation with wear due to half rings is completely excluded, because The crankshaft never experiences axial loads, so you have nothing to worry about))) Yes, in principle, and in mechanics, this only happens from holding the clutch for a long time in traffic jams and from starting the engine with the clutch depressed. You see, the first owner of my car managed to ruin the crankshaft in just 35,000 km.
Instructions: Removing and installing the crankshaft
Detailed algorithm for dismantling a part from a car:
- place the car on the overpass;
- remove the crankcase;
- pull out the cage with the rear oil seal;
- remove the camshaft drive cover with the sealing gasket;
- remove the shaft sprocket;
- mark the relative position of the connecting rods relative to their caps, as well as the exposure of the main bearings to the BC;
- Unscrew the connecting rod caps and remove them together with their bearings;
- loosen and remove the rear main bearing cover installed in the crankcase;
- remove the thrust rings by pressing on their crossbars with a screwdriver;
- pull out the remaining covers and liners one by one - secure the crankshaft so that it does not fall;
- remove the crankshaft.
Removing the crankshaft
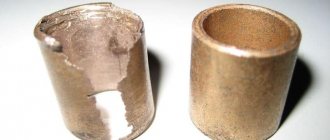
Attention! It is easy to distinguish between connecting rod and main crankshaft bearings. All main journal bearings have a groove. The exception is the third insert. The connecting rod bearings are all identical and interchangeable; they are smaller in diameter than the main bearings.
main liner with groove
The crankshaft is installed in place after washing in kerosene and blowing its cavities with compressed air. It will be necessary to replace all the plain bearings with a new size (depending on the wear check carried out by a specialist). The repair size is stamped by the manufacturer on the outside of the liner.
Be sure to lubricate the shaft journals with auto-breaker during the installation process. The main bearing caps are tightened to a torque of 68.4-84.3 Nm - the shaft must rotate freely. The connecting rod caps are tightened to a torque of 43.4-53.5 Nm. Assembly is carried out in reverse order.
Related actions that are carried out when replacing the crankshaft:
- grinding the journals of the unit to the repair size, installing new liners;
- repair or replacement of the oil pump;
- cleaning, flushing and purging of the oil channels of the cylinder block and crankshaft;
- inspection, repair of the cooling system.
The power system is also checked and, if necessary, repaired.
Wear of seats for half rings
If the cross members under the thrust or stabilizing half rings wear out significantly, then most likely the vehicle’s clutch mechanism is faulty - it is repaired first. The same thing happens to inexperienced drivers who regularly operate a car with the clutch not released. Typically, repair in this case involves processing to the repair size with the further installation of thicker half-rings. The thrust rings must be installed with the grooves facing the crankshaft. The crankshaft itself is usually replaced with a new one in these cases.
persistent half ring
Scratches on the surface of the necks
The cause of scratches is the high mileage of the car or the ingress of foreign particles into the engine oil. Checking the wear, ellipse and taper of each journal is carried out using a micrometer. The obtained data is compared with data from manufacturers. If there are minor deviations, then repairing the crankshaft comes down to grinding the journals to the next repair size. The oil must be replaced with a new composition of proper quality. However, it is advisable to replace the part on older cars.
Deflection
This happens especially often on SUVs, trucks and heavy special equipment. The bend is checked with a dial indicator directly on the shaft laid on a metal plate. The indicator should not exceed 0.05 mm for cars and 0.1 mm for trucks. Next, if the values differ, the part is corrected or replaced.
Cracks
Usually caused by surges in oil pressure, destruction of the piston group due to foreign objects entering the cylinders. In such cases, only replacement helps; repairing the part is impossible.
Also, replacing the crankshaft is necessary in cases of thread destruction, breakage of keyways and seats for pins and bushings, or depletion of the area for oil seals.
Video describes in more detail how to replace the crankshaft
How to replace the crankshaft oil seal?
On most internal combustion engines, if oil oozes from under the crankshaft, this indicates worn out seals. Their purpose is to seal as much as possible the hole in which the crankshaft is installed. They prevent lubricant from leaking out of the internal cavity. There are front and rear oil seals. One is located on the pulley side, the other on the flywheel. It is easier to replace the front crankshaft oil seal.
front oil seal
On some vehicles, the location of the cuffs may differ. For example, on rear-wheel drive classic Zhigulis, the oil seal is placed in the crankshaft shield behind the support bearing. But on VAZ 2109, 2110, Lada Granta, Priora and Kalina, the oil seal is most often located in the cylinder block.
The rapid abrasion of the cuff is not surprising. Its resource is limited, since it is constantly in contact with the moving crankshaft. In addition, the seal is exposed to high temperatures. Therefore, even the highest quality products last no more than 200 thousand km of car mileage. Engine overheating, as well as the use of dirty or low-grade engine oil, further reduces its service life.
The crankshaft seals are replaced at the same time. In other words, if only the front or rear element is damaged, it is still better to replace both.
Below are detailed instructions for replacing car crankshaft oil seals:
- First of all, the pulleys are removed;
- then the timing belt protective cover is dismantled;
- the crankshaft toothed pulley is removed;
- The front oil seal is removed and a new one is installed in its place.
The rear oil seal can only be pulled out after dismantling the gearbox and clutch mechanism. After removing the old seal, the seat must be cleaned. Only then is a new oil seal installed.
On many cars the flywheel is also removed. First, its position relative to the crankshaft is noted. Then the fastening bolts are unscrewed - so that the flywheel does not rotate, it is held in place by a mounting bracket.
An example of replacing crankshaft oil seals on an Opel Astra:
- remove the gearbox and clutch;
- mark the location of the flywheel, then dismantle it;
- pull out the exhaust pipe of the muffler;
- drain the engine oil;
- remove the oil level sensor block;
- Unscrew the engine crankcase clamps securing it to the clutch mechanism;
- also unscrew the crankcase bolts connecting it to the cylinder block;
- remove the oil pan;
- unscrew the crankshaft position regulator DPKV;
- Unscrew the bolts of the rear main bearing caps;
- remove the cover, remove the rear oil seal by prying it off with a flat blade screwdriver.
Removal and installation of the front crankshaft seal are carried out in the usual way.
On many cars, including VAZs, on the rear side of the crankshaft, the oil seal is located in a special aluminum holder. Before removing it, you need to clean the surface of dirt and old oil. The oil seal cage is usually secured with six main bolts. In addition, it is secured by two pallet bolts. The holder is pulled out along with the cuff. There is a gasket between it and the block, which also needs to be replaced.
rear oil seal
It is easy to press the old cuff out of the holder. It is necessary to place the clip on soft wooden stops, then using a drift and a hammer, the element is knocked out from the back side in a circle, since it almost always fits very tightly. The seat must be cleaned - you can use a rag soaked in kerosene.
The edge of the new oil seal is coated with a small amount of fresh engine oil. This is done for ease of installation. Pressing is usually carried out with a special mandrel, but it can also be done by hand. The new cuff is hammered through a wooden adapter or an old oil seal to the intended values. The gap between it and the holder should be 0.5 mm.
Next, all that remains is to put the holder in place with a new seal. The oil seal seat on the crankshaft is also thoroughly cleaned with a rag. First, a new gasket from the repair kit is installed, then the clip. Replacing the front rubber seal is much easier.