The key function of the described part is shock absorption. An elastic coupling on the VAZ 2107 is needed to minimize the effects of shock loads that occur when the crankshaft rotates. The part performs the following functions:
- Protects drives and mechanisms during crankshaft rotation;
- Smoothes out shocks and shocks at the moment of starting the mechanism;
- Connects misaligned shafts.
The coupling is the simplest option for compensating for shock loads that arise during the operation of the cardan. The device is capable of not only absorbing the kinetic energy of rotating elements, but also compensating for the displacement of individual parts. Thanks to its outstanding damping properties, the coupling is able to perform its function even if the engine runs for a long time in intensive mode.
PURPOSE AND DEVICE OF THE VAZ 2107 CARDAN SHAFT
The driveshaft is a mechanism that connects the gearbox to the rear axle gearbox and is designed to transmit torque. This type of transmission is most widespread on vehicles with rear-wheel drive and all-wheel drive.
CARDAN DEVICE
The VAZ 2107 driveshaft consists of the following elements:
- one or more sections of thin-walled hollow pipe;
- splined sliding connection;
- fork;
- crosspiece;
- suspension bearing;
- fastening elements;
- rear movable flange.
The driveshaft of the VAZ 2107 has a fairly simple design.
The driveshaft can be single-shaft or double-shaft. The second option involves the use of an intermediate mechanism, to the back of which a shank with splines is attached to the outside, and a sliding sleeve is fixed to the front through a hinge. In single-shaft structures there is no intermediate section.
The front part of the cardan is attached to the gearbox through a movable coupling with a spline joint. To do this, there is a hole with internal splines at the end of the shaft. The cardan design involves longitudinal movement of these splines at the moment of rotation. The design also includes a suspension bearing attached to the body using a bracket. It is an additional attachment point for the cardan and is designed to limit the amplitude of its movement.
A fork is located between the middle and front element of the propeller shaft. Together with the crosspiece, it transmits torque when the cardan bends. The rear part of the shaft is attached to the rear axle gearbox through a flange. The shank engages with the main gear flange through external splines.
The cardan is unified for all classic VAZ models.
CROSSING DEVICE
The VAZ 2107 crosspiece is designed to align the axes of the cardan and transmit torque when its elements bend. The hinge provides connection for the forks attached to the ends of the mechanism. The main element of the crosspiece is needle bearings, thanks to which the cardan can move. These bearings are inserted into the fork holes and secured with retaining rings. When the joint wears out, the driveshaft begins to knock while driving. A worn crosspiece is always replaced with a new one.
Thanks to the crosspiece, it becomes possible to rotate the cardan at different angles
TYPES OF CARDAN SHAFTS
Cardan shafts are of the following types:
- with constant velocity joint (CV joint);
- with unequal velocity joint (classical design);
- with semi-cardan elastic joints;
- with rigid semi-cardan joints.
The classic cardan consists of a fork and a cross with needle bearings. Most rear-wheel drive cars are equipped with such shafts. Cardan shafts with CV joints are usually installed on SUVs. This allows the selection to be completely eliminated.
There are several types of cardans: on CV joints, with elastic and rigid hinges
The mechanism with elastic hinges consists of a rubber coupling capable of transmitting torque at angles of no more than 8˚. Since the rubber is quite soft, the cardan provides a smooth start to movement and prevents sudden loads. Such shafts do not require maintenance. The rigid semi-cardan joint has a complex design that involves transmitting torque thanks to the gaps in the spline connection. Such shafts have a number of disadvantages associated with rapid wear and complexity of manufacturing, and are not used in the automotive industry.
CV joint
The imperfection of the design of a classic cardan on crosspieces is manifested in the fact that at large angles vibrations occur and torque is lost. The universal joint can deflect by a maximum of 30–36˚. At such angles, the mechanism may jam or completely fail. Cardan shafts on CV joints, usually consisting of:
- balls;
- two rings (outer and inner) with grooves for balls;
- separator that limits the movement of the balls.
The maximum possible angle of inclination of the cardan of this design is 70˚, which is noticeably higher than that of the shaft on the crosses. There are other designs of CV joint cardans.
The CV joint allows you to transmit torque at large angles
Location of the elastic coupling on the seven
The driveshaft of the VAZ 2107 consists of two parts (front and rear), connected to each other by a articulated coupling (cross). This design allows you to avoid loads on the shaft while driving, when the body and chassis of the car begin to “play.”
The end of the rear shaft is connected to the axle gearbox, and the end of the front shaft is connected to the gearbox shaft. The connection to the gearbox is made through an elastic coupling, which is a kind of buffer for leveling shock and dynamic loads on the driveshaft and gearbox shaft. The elastic coupling is located in the lower front part of the car on the rear side of the gearbox. You can see it if you remove the engine protection and climb under the car. The coupling is easily recognizable due to its hexagonal shape.
Diagnostics
The coupling may fail as a result of:
- wear of metal bushings;
- body wear;
- rupture of the body.
In each of these cases, the malfunction will manifest itself in the form of body vibration and extraneous sounds coming from the gearbox.
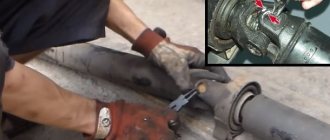
The condition of the coupling can only be checked by inspecting it and assessing the size of the play between the flanges of the gearbox and cardan shafts. This is done as follows.
- The car is driven onto an overpass or inspection hole;
- The engine protection is removed;
- The coupling body is inspected and the condition of the bolted connection is assessed.
- By loosening the cardan, the presence or absence of play is determined.
If signs of wear or mechanical damage are found on the coupling body (the body is partially or completely torn), the part must be replaced. A slight play (provided the body is intact) is eliminated by tightening the nuts of the connecting bolts. If the play is large, the elastic coupling will have to be replaced with a new one.
Algorithm for replacing an elastic coupling on a VAZ 2107
Before carrying out repair work, study the instruction manual to remember the location of the element and the types of fasteners used. If you are not confident in your own qualifications, use the services of experienced servicemen. Poor quality repairs can lead to deterioration in the driving performance of the vehicle, which potentially increases the risk of an accident.
To replace the part you will need a set of screwdrivers and a set of spanners. Before starting work, remove the terminals from the battery.
First, the cardan drive is dismantled (work to remove the cardan drive is carried out on a pit or a lift):
- Unscrew and remove the driveshaft. Read more here.
- Using a 13mm wrench, unscrew the two nuts securing the gearbox cross member. The back of the box will move down along with the coupling.
Diagnosing a malfunction, repairing and replacing the suspension bearing and elastic coupling of the VAZ 2107 propeller shaft with your own hands is quite simple. This requires minimal plumbing skills, a standard set of tools and careful adherence to the recommendations of professionals.
Source
How to replace the driveshaft crosspieces on a VAZ 2101-VAZ 2107?
Note! If you decide to change the crosspieces, then we also recommend sending the outboard bearing for replacement; when purchasing it, make sure that its rubber is elastic (Do not take a bearing with hard rubber under any circumstances), so that the bearing rotates without jamming and without snagging, if so bearing, find it and purchase it, how to change it, read the article entitled: “Replacing an outboard bearing on a car”!
1. First, you will have to remove the shaft itself from the car, removing it will not be difficult, but just before doing this, be sure to mark its position relative to the gearbox and relative to the box, because when you reinstall the shaft, it will have to stand exactly the same as and was installed earlier, otherwise the balancing of the shaft will be disrupted and when the car starts, strong vibration will be transmitted to the body and increased wear of the driveshaft parts will occur (And how to remove it was described in detail in the article entitled: “”) .
2. After the driveshaft is removed from the car, take a marker or punch or use them to make marks on the forks of the universal joints (If they were not made previously), now pry them off using a special tool. pliers, all four retaining rings (see photo below, before prying them off, we recommend that you remember at least a little how the rings were positioned, or even better, make marks as shown in the small photo; when installing new rings, they will need to be installed in approximately the same way) and start removing the crosspiece.
3. To remove you will need heads or special ones. mandrels for pressing out the bearings of the crosspieces and a hammer, placing something under the lower part (so that the propeller shaft forks are suspended), knock out the crosspiece together with the bearing down and tilt it, pull it out of the hole in the fork, thereby the forks will separate and you will only have to knock out the crosspiece from the last one forks.
4. It will be more difficult to knock it out of the last fork, also by placing the head and putting something under the bottom (To have the fork suspended, see the photo below), try to knock it out from above and tilt the cross, remove it from the bottom hole like this on the small one photos shown.
Note! The other crosspiece, which is located in the place where the cardan clings to the gearbox, is removed in the same way, don’t be afraid to remove the crosspieces at all, they are replaceable, so you can do whatever you want with them, knock them out, saw them, and so on, the main thing is not to damage the forks to the cardan shafts and then everything will be fine!
5. Installation of the crosspieces begins with the fact that you will need to remove two cups from them and then the crosspiece will become much more compact and can be easily inserted into the fork; after inserting these cups, these cups are installed in their place using a soft metal hammer and a spacer, you need to drive the cups until the groove is clearly visible into which the retaining ring is installed, when everything is completed, do the same with the other two cups and install another fork (the main thing is to orient everything according to the marks) and by the way, when installing the cups and their When removing, be careful, because there are balls inside them that cannot be scattered, as it will be very difficult to put them back in (see small photo).
Note! During all the work, this kind of problem may arise: The crosspieces cannot be removed due to the fact that they have become sour (Rusted), you can fight this with the help of kerosene, just wet the parts with it or something like that liquid and rub it with a metal brush, this will help and by the way, when the crosspieces are removed, clean their seats with a brush, especially those places where the retaining rings are installed, this is a must!
Additional video clip: Visual instructions for replacing the driveshaft crosspieces are shown in the video clip located just below:
What is a suspension bearing
Whatever type this cardan shaft element belongs to, its main enemy is friction forces. What is a suspension bearing? It is, in fact, designed to combat friction forces. The structure is quite simple: it is a steel or cast iron frame with a cylindrical hole, into which (if it is a sliding bearing) a graphite-coated bushing is tightly driven - this material most successfully resists the effects of frictional forces, even without lubrication at all. However, the cavity between the universal joint and the shaft is filled with thick lubricant, allowing the latter to rotate freely.
If a rolling bearing is used as a support, it is either a standard roller or ball bearing. They, of course, also require constant lubrication.
Important! The purpose of the lubricant is not only and not so much to reduce friction forces (in rolling bearings they tend to zero anyway), but to protect the mechanism from corrosion, which, once formed, can damage any part in a matter of days. even if it is made of high-alloy stainless steel. The best way to combat corrosion of mechanisms is their operation
It is no coincidence that a car parked in a garage rots faster than one actively used.
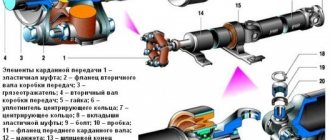
What are the main parts of the VAZ 2107 cardan transmission?
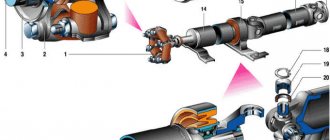
- Parts capable of changing the angle and length of the transmission are the coupling (5), as well as rigid hinges (9.7) and elastic (3). It is called a coupling. The role of the coupling is that it reduces the noise of the connection and angular torque is transmitted. Repair of the driveshaft is required if the coupling material is cracked and crumbled. Simply put, the clutch needs to be replaced.
- The cardan coupling consists of 6 rubber parts (30), with metal spacers (31) between them. These parts are tightly connected into a one-piece unit, so in case of failure, the most correct solution is to replace the coupling.
- The coupling is placed between the flanges (4,2). They are attached to it with 35 bolts.
- Intermediate support (6), which serves to reduce vibrations and various types of beating.
- The front shaft of the VAZ 2107 (5) is a pipe with splines installed by welding. There is a tip (40) at the front. One of the coupling flanges is located on it, and the rear splined end is located on the support bearing (6). The bearing itself is well insulated from dirt by seals. Repair of the driveshaft is necessary if the splines are worn out.
- The rubber pad (12) in which the bearing is located dampens vibration well. On it, the front shaft may move slightly.
- The intermediate cardan support is attached to the bracket (15).
- Important is the safety bracket (27), which prevents the shaft from falling out if the coupling fails. If this bracket was not there, then the cars would overturn at full speed, and such cases have happened before. In this case, repairing the driveshaft is impossible; replacement is required.
- The difference between the rear shaft (8) and the front “neighbor” is that it has a hinge fork at the ends.
- The hinge itself is an important element of the transmission; it consists of a pair of forks (23), one crosspiece (22) and, in a separate figure above, needle-shaped bearings (20) - there are 4 of them, rings (19) and oil seals (21). The bearings are pressed with a fairly large force of about 800 kg into the fork holes. They are non-separable; if they malfunction, they need to be replaced.
- The cross has the required gap, from 0.1 to 0.4 mm. Only within such limits is the crosspiece correctly centered. There are rings in five sizes and five different colors for proper alignment. Repair of the driveshaft most often consists of correcting these gaps and replacing the rings.
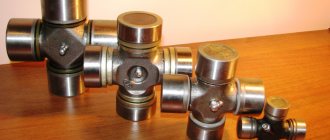
Product Features
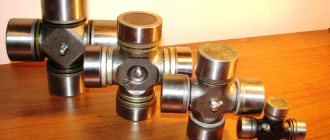
The cross is a cross-shaped part. At the four ends of the product there are needle bearings, thanks to which the device is able to rotate when the cardan rotates.
A cross or cross-shaped joint connects two shaft forks. These forks are fixed at opposite ends of the product. The assembled structure is a kind of hinge. The movement of this hinge is ensured by needle bearings, which are located at the four ends of the product. Retaining rings are used to secure the cardan forks. Thanks to this part, a flexible connection between the car engine and the axle is ensured. This flexible connection ensures the mobility of the connected parts and the transmission of torque to the rear axle of the vehicle.
Causes of product malfunction
Finding out the malfunction of the crosspiece on a VAZ 2107 is not particularly difficult. When extraneous noises appear from under the bottom of the car or knocking noises when starting off, it means it’s time to go to the inspection hole and carry out diagnostics. Even beginners can cope with diagnostics, so there is no particular need to go to a service station. To carry out diagnostics and identify the causes of failure of the part in question on a VAZ 2107, you need to perform the following steps:
If, while driving the car, or during diagnostics of the cardan, a creaking (crunching) of at least one crosspiece was noticed, this indicates that there is no lubrication in it, and accelerated wear of the bearings is occurring. If a grease gun is installed in it, you need to syringe it immediately. If there is no grease fitting, the best option would be to replace this crosspiece.
Experienced craftsmen determine the malfunction of this part by ear after turning on the first speed. What is the replacement of the VAZ 2107 driveshaft joints, we will find out further.
Signs of a malfunctioning speed sensor
During the operation of a car with an electronic on-board device, many motorists have encountered a situation where one or another signal lights up in the error block; it often happens that after turning off the engine and restarting this signal does not appear again, so Russian drivers sometimes develop distrust in readings from this ECU. However, every driver should know what errors indicating problems with the DS light up on the on-board computer display.
- P0500 - lack of speed sensor signal.
- P0503 - intermittent speed sensor signal.
Indeed, quite often the cause of the appearance of such signals is problems in loose contacts or even broken DC wires. It is necessary to take into account where the speed sensor is located on the VAZ 2114
The manual transmission experiences strong vibration during operation, so special attention must be paid to the preventive inspection of this sensor.
In addition to the appearance of error signals on the BC display, other signs of a malfunction of the DS may appear; experts include these signs:
- Unstable, “wandering” idle speed, spontaneous shutdown of the internal combustion engine is possible when the gas pedal is not pressed.
- The speedometer on the VAZ 2114 is unstable or does not work at all.
- Fuel consumption increases significantly.
- Engine power decreases.
Of course, this is not a definite diagnosis for DS; there may be other reasons, for example, problems with the fuel system. However, you should check the functionality of the DS. And the first thing to do is to ring the circuits and make sure the wiring is in good condition. Make sure there is grounding and a 12 V signal is supplied to the contacts.
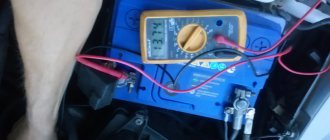
There are several ways to check the performance of the DS:
- remove the problematic sensor. Using a voltmeter, measure the output voltage and signal frequency. To do this, put plastic tubes on the sensor axis and spin the housing to a speed of 3-5 km/h. The faster the sensor rotates, the higher the voltage and frequency;
- the second method does not require removing the sensor.
Raise the front wheel on a jack so that it can be spun. Connect a voltmeter to the sensor contacts. Spin the wheel and take readings from the device; if the voltage and frequency increase adequately to the spin, then everything is fine with the sensor.
The third method involves checking using a “control” or a light bulb.
Raise the front wheel on a jack so that you can spin it. First, you need to disconnect the pulse wire from the sensor. Turn on the ignition. Use the “control” to find “plus” and “minus”. Connect the “control” to the “Signal” wire and spin the wheel. When the sensor is working normally, the “minus” light should light up. If you don’t have a control tool, you can use a light bulb. To do this, you need to connect wires to it.
Connect one wire to the battery positive, and the second to the “Signal” connector output. Spin the wheel. If the light blinks, then the sensor is working.
Car enthusiasts have worked out a technique for checking the DS drive.
To do this, you need to jack up one wheel and remove the speed sensor. Feel for the sensor drive and rotate the wheel. When the drive is working normally, you can feel it rotating with your fingers. And if there are no jams, then the drive is in order.
If, as a result of the test, it is determined that the speed sensor does not work, then it is necessary to remove it and replace it with a new one. This spare part is not in short supply, so you can easily find out how much the speed sensor on a VAZ 2114 costs.
Sources
- https://luxvaz.ru/vaz-2114/195-datchik-skorosti-2.html
- https://nadomkrat.ru/elektrooborudovaniye/datchik-skorosti-vaz-2114
How to check driveshafts, also known as driveshafts, for functionality on a VAZ 2101-VAZ 2107?
Note! Before starting work, we recommend that you use a brush to clean all parts of the cardan transmission from any dirt adhering to them. And also during all the work, you will most likely need to first remove the driveshaft from the car and only then disassemble it! (For information on how to disassemble it, see the article: “”)
1) First, it is recommended to remove the cardan for a more detailed inspection. (How to remove it, see the article: "")
2) After removal, check the condition of absolutely all welds that are present on the cardan. Also check the condition of the splined parts and the front driveshaft pipe itself.
Note! In no case should the splined parts show signs of severe wear; if you find such signs, then it is recommended to replace the shaft on which the splines have become unusable!
3) Then, moving to the rear cardan, inspect it and check for the presence of balancing weights on it, and also look at the condition of the welded seams and look at the diameter of the fork hole.
Note! There should not be any significant dents in the rear driveshaft, and bending of the forks themselves or their holes is also not allowed. For reliability, using a bore gauge together with a dial indicator, measure the diameter of both holes of the fork, which should not exceed “23.825”!
4) Then remove the crosspieces to inspect them, and after removal, check the condition of the bearings, spikes of the crosspiece, as well as oil seals, as well as the clips and the crosspiece itself.
Note! If there are signs of visible wear, then replace the crosspiece along with its bearings with a new one!
5) Next, remove and check the condition of the elastic cardan coupling.
Note! If you find traces of cracks, various types of damage, as well as peeling on the coupling, then replace the coupling with a new one!
6) Now remove and then check the intermediate support of the universal joint drive.
Note! The intermediate support should not have deformations, as well as cracks and breaks in the elastic clip, so if you find at least one defect, then replace the support with a new one!
7) And finally, check the condition of the intermediate support bearing itself, to do this, rotate the inner ring in both directions and at the same time press the inner ring against the outer one.
Note! In this case, the inner ring must rotate smoothly, and the seals of the bearing itself must not be worn out, otherwise they will have to be replaced!
Design
Flexible couplings are based on the principle of modularity and their design is very simple. The products consist of two parts of hubs (the so-called subassemblies), which are mounted on the machine shafts. These parts are connected by elastomeric elastic elements.
The design contains cam parts, socket parts and adapters, which are made of metal. For example, N-EUPEX couplings use gray cast iron for these purposes.
Mandatory structural elements are components made of elastic materials. NBR (nitrile rubber) is used for their production. Depending on the type of product, soft, hard or standard rubber is selected. Less commonly used are NR (polyamide for low temperatures) and HNBR (nitrile rubber for high temperatures).
Source
Replacing the VAZ 2106 universal joint
The cardan crosspieces must only be replaced, since the bearing needles and the outer and inner parts of the race wear out, which leads to the formation of play. This indicates the impossibility and inappropriateness of restoring the part. If characteristic signs indicate that the cardan joints need to be replaced, you will need to dismantle the shaft itself, and then begin repairs. For the upcoming work you will need the following tools and materials:
- open-end wrench 13;
- head 13 with a knob or ratchet;
- copper or aluminum extension;
- hammer;
- compression pliers with thin jaws;
- universal puller;
- chisel;
- new crosspiece;
- lubricant “Fiol-1” or “CV joint-4”;
- large screwdriver.
Removing the cardan
On the VAZ “Six” the driveshaft is mounted to the rear axle gearbox, and closer to the gearbox the driveshaft is held by an outboard bearing. Removing the shaft from the car is carried out as follows:
- Unscrew the cardan mount with a 13 key.
- If the bolts turn when unscrewing the nuts, insert a screwdriver, pressing the fasteners.
- When unscrewing the last bolt, hold the shaft with your other hand, since it may fall on you. We move the cardan to the side after completely unscrewing the bolt.
- Using a chisel on the flange of the elastic coupling, we mark the position of the cardan.
- Using a screwdriver, bend the seal ring near the coupling.
- We move the holder along with the sealing ring to the side.
- We unscrew the central fastening and hold the cardan itself.
- For final dismantling, we pull the shaft off the gearbox.
Removing the cross
After dismantling the driveshaft, you can immediately begin disassembling the crosspiece:
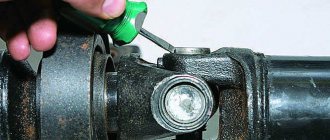
- We mark the universal joint forks to avoid disturbing the factory balancing during assembly. To apply marks, you can use paint (pictured below) or hit it lightly with a chisel.
- We remove the retaining rings using special pliers.
- Having clamped the cardan in a vice, we press out the bearings through suitable mandrels or knock them out with a hammer.
- We disassemble the hinge, moving the crosspiece in the direction of the removed bearing, after which we slightly turn the crosspiece and remove it from the fork.
- Press out the opposite bearing in the same way.
- We repeat the steps described in paragraph 3 and completely dismantle the cross.
- We repeat the same steps with the second hinge, if it needs to be replaced.
Installing the crosspiece and cardan
We install the hinge and shaft in the following order:
- We remove the cups from the new cross and insert it into the eyes.
- Place the cup in place, carefully tapping it with a hammer until a groove for the retaining ring appears. We mount it and turn the cardan.
- In the same way, insert and fix the opposite cup, and then the remaining two.
- Apply Fiol-1 or CV joint grease to the spline joint of the cardan and insert it into the flange of the elastic coupling, fixing the protective ring.
- We attach the driveshaft to the body and to the rear axle gearbox.
Video: replacing the cardan cross on a VAZ 2101–07
The cardan crosspieces are filled with lubricant from the factory. However, when replacing a product, I always syringe the hinge after the repair. There will be no excess lubrication, and its lack will lead to increased wear. For crosspieces, it is recommended to use “Fiol-2U” or “No. 158”, but in extreme cases “Litol-24” will also do. Although I know car owners who use Litol for both crosspieces and spline joints. When injecting, I pump the lubricant until it begins to come out from under the seals. According to the regulations, the hinges must be serviced every 10 thousand kilometers.
You don't have to be an experienced auto mechanic to replace universal joints. The desire of the car owner and step-by-step instructions will help identify the malfunction and carry out repairs in a garage without making mistakes.
Features of the mechanism
The driveshaft transmits the torque generated by the car's engine to the rear axle, causing the wheels to rotate. It is located under the bottom of the VAZ-2107 car, which is why you can find a raised floor in the cabin.
The cardan on the VAZ 2107 consists of two main parts, which are connected to each other using a cross. This design of the device is necessary because the rear suspension constantly “plays” when driving due to shock absorption. The device is a hollow tube, which is the “arm” connecting the engine to the wheels. Despite the simplicity of the product, the shaft, like other car parts, fails and requires repair or replacement.
Currently, cardans on CV joints, rather than on crosspieces, have the least vibration and increased service life. If desired, such a shaft can be installed on the seven by purchasing it at the car market, or ordering it from an online store.
Main cardan malfunctions
The main malfunction of the driveshaft is that elements such as the spider and the outboard bearing fail. It is these parts that are the most loaded. The crosspiece and bearing fail for a simple reason - lack of lubrication. Over time, it is necessary to periodically diagnose these elements with the obligatory addition of lubricants. In rare cases, a cardan malfunction may be associated with a defective crosspiece, which requires its replacement.
The malfunctions of the mechanism in question are as follows:
- failure of crosspieces;
- destruction of the outboard bearing;
- violation of the configuration (imbalance) of the shaft;
- breakage of flanges, splines and couplings, which happens under heavy loads;
- excess moisture and dirt inside the crosspieces.
At the slightest sign of malfunction, it is necessary to diagnose the mechanism and eliminate all resulting damage. The malfunction can be identified by the following signs:
- the appearance of a knocking sound when the clutch is engaged, which may indicate wear of the splines or damage to the elastic coupling;
- the occurrence of a grinding noise when the car is moving indicates a lack of lubrication;
- the appearance of vibration when the car is moving, which indicates a violation of the alignment of the product;
- knocking noise during sudden acceleration or braking, which indicates wear of the crosspieces.
We will discuss how to replace the VAZ 2107 driveshaft in the next paragraph.
The process of removing and replacing the cardan
The mechanism is removed for the purpose of carrying out repair work or replacing it with a new product. Often the driveshaft itself is an unpretentious device, but it is important to periodically check the condition of the bearing, splines and crosses. These are the weak points that you need to periodically pay attention to and monitor their condition.
To avoid misalignment during disassembly, it is necessary to apply marks with chalk or a core, which will avoid incorrect assembly of the product.
Work on dismantling the cardan is carried out in the following order:
- First, you need to secure the car by placing stops under the front wheels, and place the gearshift lever in the “neutral” position.
- Next, jack up the rear of the car, while suspending one of the drive wheels.
- We proceed to disconnect the device from the mount to the differential. To do this, you need to unscrew the 4 fastening nuts and then remove the bolts.
- After unscrewing the fastener, you can separate the product from the differential flange.
After repairing or replacing the shaft, check the rotation of the product. At this point, the work on removing and replacing the propeller shaft on the “seven” is completed. It remains to make sure that extraneous noise has disappeared after the work has been completed. We also recommend reading the article on replacing crosspieces.
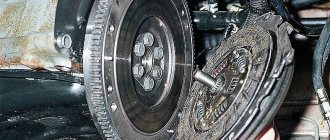
Flexible coupling absorbs driveline noise and vibrations
It is made of six rubber elements, between which there are metal liners with holes for bolts.
There are six projections on the liners, three of which fit into the grooves of the gearbox secondary shaft flange, and the rest into the grooves of the elastic coupling flange.
This ensures that the flexible coupling is centered on the flanges.
To replace the flexible coupling:
Using a 13mm socket, unscrew the two nuts securing the gearbox cross member to the body.
Preparing for work
When buying a new crosspiece for a VAZ 2107, you don’t need to try to save money. Everyone knows that “the miser pays twice,” so it’s better to buy an original part right away than to change a couple of crosses in six months.
The body of the crosspiece is made of heat-treated steel. This is necessary to ensure the special hardness of the studs. Thus, the quality of the material plays a big role in the service life of the part. How long can a car run without replacing crosspieces? It is believed that approximately 500 thousand km!
The retaining rings and bearing also need replacement.
Please note that the rubber of the bearing itself must be sufficiently elastic
What faults occur in this connection?
Typically the bearings will tell you when they need to be repaired or replaced. The sound of the outboard bearing indicates a failure. It can send the following signals:
- Various knocks and noises, such as humming, buzzing or crunching;
- Vibration, such as beating or jerking;
- Play of the outboard bearing if it is subject to visual inspection.
If you hear that the suspension bearing is humming, you need to contact a car service as soon as possible.
As a rule, such elements of the driveshaft do not fail on their own. They break for the following reasons:
- Natural wear and tear of a
structural element, gradual destruction of the rubber that holds the bearing. - Features of operating conditions, for example, low or high temperature conditions, contact with dirt and dust on the bearing, movement over rough terrain, hard gear shifting, increased loads.
- An installation error that can easily be made if an inexperienced person is working.
- Reduced quality characteristics of the components used. The fact is that the installed spare parts must be original or have proven themselves in the market.
Important! If the driver tries to exclude the maximum number of reasons during operation, then he can rest assured that the part will serve him for a very long time. More rare transmission malfunctions of the VAZ 2107:
More rare transmission malfunctions of the VAZ 2107:
- Damage and misconfiguration (hitting rocks when driving in the mountains);
- Abundant amounts of dirt in parts and bearings;
- Failure of flanges, splines and couplings under load.
For lubrication, maintenance, if a part needs to be replaced, first of all, you need to properly remove it from the car and put it back. Repair of the driveshaft is also possible only after removal.
Advantages of a flexible coupling
- The elastomeric elastic elements of the product can be replaced without displacement of the attached mechanisms.
- Most of the models produced are fault-tolerant.
- The operating temperature ranges on average from –30°C to +80°C. However, by replacing individual elastic elements of the low and high temperature couplings, the existing range can be expanded.
- A wear indicator is available as an option, allowing you to assess the condition of the elastic elements.
Coupling parts are supplied from stock, meaning they are finished, ensuring precise and easy installation.
Reasons for a loud sound or diagnostics of the exhaust system of a VAZ 2104
What problems can occur in the exhaust system and when does the muffler need to be replaced? Let's look at it in order:
- The first thing that can cause a loud exhaust is a malfunction of the muffler, or rather its burnout or rotting. This can be determined by external examination. Look for traces of rust - they often hide holes that are hardly noticeable.
- Let's go further - the middle resonator. Again, it could have rotted, or while driving you could have gotten caught in it and punched it. Also carefully inspected for cracks, holes and rust.
- The exhaust pipe or simply pants can also be a cause. They, as a rule, do not burn out. The same thing happens to them as to the resonator. After hitting the bottom of the pants, a dent appears, which then rots and a hole appears.
- If the entire exhaust system, after visual inspection and testing with your own hands, turns out to be safe and sound, then there is only one conclusion - the reason for the loud operation is definitely the gasket between the pants and the exhaust manifold.
Note! When inspecting areas with rust, be sure to test the strength of the surrounding metal. It is possible to repair the muffler.