A cardan transmission is a connection between two shafts using a crosspiece, which is capable of transmitting torque from one shaft to the second. This gear is needed where the longitudinal axes of the two shafts do not lie on the same straight line, i.e. the angle is different from 180°.
In rear-wheel drive cars, which include the entire VAZ family of classics, the cardan transmission transfers all the engine work, converted into torque, to the rear drive wheels. Precisely because there is a cardan under the bottom of the car, the floor in the middle of the car is raised. Front-wheel drive cars do not have such an elevated cabin.
The change in angle did not happen because it was difficult to route the cardan under the bottom without bending. Somehow the engineers would have managed it. The fact is that the height of the rear suspension, and, therefore, the differential, which takes on the torque, constantly “dances” due to the depreciation of the elastic suspension.
It is clear that the cardan transmission is the “workhorse” in the VAZ 2107, and the crosspiece connecting the shafts is a weak point. Today we will talk about this simple, but very important unit. Repairing a driveshaft is a delicate matter, despite its apparent simplicity. Replacing parts requires delicate measurements.
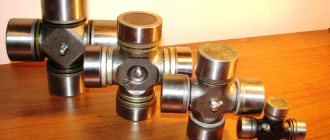
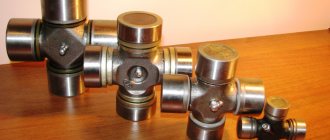
Cross shaft and rings
PURPOSE AND DEVICE OF THE VAZ 2107 CARDAN SHAFT
The driveshaft is a mechanism that connects the gearbox to the rear axle gearbox and is designed to transmit torque. This type of transmission is most widespread on vehicles with rear-wheel drive and all-wheel drive.
CARDAN DEVICE
The VAZ 2107 driveshaft consists of the following elements:
- one or more sections of thin-walled hollow pipe;
- splined sliding connection;
- fork;
- crosspiece;
- suspension bearing;
- fastening elements;
- rear movable flange.
The driveshaft of the VAZ 2107 has a fairly simple design.
The driveshaft can be single-shaft or double-shaft. The second option involves the use of an intermediate mechanism, to the back of which a shank with splines is attached to the outside, and a sliding sleeve is fixed to the front through a hinge. In single-shaft structures there is no intermediate section.
The front part of the cardan is attached to the gearbox through a movable coupling with a spline joint. To do this, there is a hole with internal splines at the end of the shaft. The cardan design involves longitudinal movement of these splines at the moment of rotation. The design also includes a suspension bearing attached to the body using a bracket. It is an additional attachment point for the cardan and is designed to limit the amplitude of its movement.
A fork is located between the middle and front element of the propeller shaft. Together with the crosspiece, it transmits torque when the cardan bends. The rear part of the shaft is attached to the rear axle gearbox through a flange. The shank engages with the main gear flange through external splines.
The cardan is unified for all classic VAZ models.
CROSSING DEVICE
The VAZ 2107 crosspiece is designed to align the axes of the cardan and transmit torque when its elements bend. The hinge provides connection for the forks attached to the ends of the mechanism. The main element of the crosspiece is needle bearings, thanks to which the cardan can move. These bearings are inserted into the fork holes and secured with retaining rings. When the joint wears out, the driveshaft begins to knock while driving. A worn crosspiece is always replaced with a new one.
Thanks to the crosspiece, it becomes possible to rotate the cardan at different angles
TYPES OF CARDAN SHAFTS
Cardan shafts are of the following types:
- with constant velocity joint (CV joint);
- with unequal velocity joint (classical design);
- with semi-cardan elastic joints;
- with rigid semi-cardan joints.
The classic cardan consists of a fork and a cross with needle bearings. Most rear-wheel drive cars are equipped with such shafts. Cardan shafts with CV joints are usually installed on SUVs. This allows the selection to be completely eliminated.
There are several types of cardans: on CV joints, with elastic and rigid hinges
The mechanism with elastic hinges consists of a rubber coupling capable of transmitting torque at angles of no more than 8˚. Since the rubber is quite soft, the cardan provides a smooth start to movement and prevents sudden loads. Such shafts do not require maintenance. The rigid semi-cardan joint has a complex design that involves transmitting torque thanks to the gaps in the spline connection. Such shafts have a number of disadvantages associated with rapid wear and complexity of manufacturing, and are not used in the automotive industry.
CV joint
The imperfection of the design of a classic cardan on crosspieces is manifested in the fact that at large angles vibrations occur and torque is lost. The universal joint can deflect by a maximum of 30–36˚. At such angles, the mechanism may jam or completely fail. Cardan shafts on CV joints, usually consisting of:
- balls;
- two rings (outer and inner) with grooves for balls;
- separator that limits the movement of the balls.
The maximum possible angle of inclination of the cardan of this design is 70˚, which is noticeably higher than that of the shaft on the crosses. There are other designs of CV joint cardans.
The CV joint allows you to transmit torque at large angles
VAZ transmission
The transmission of torque from the gearbox to the final drive is carried out by a cardan drive, which makes it possible to transmit torque at a constantly changing angle (due to the elastic suspension of the rear axle).
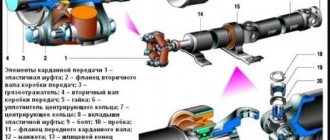
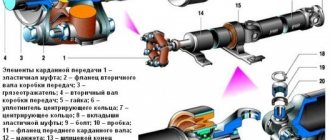
The cardan transmission consists of front 14 and rear 21 cardan shafts, an intermediate support 17, an elastic coupling 23 and two cardan joints. The rear hinge is connected through fork 22 to the flange of the main gear drive gear.
Front driveshaft. Made from thin-walled steel pipe with splined ends welded to both ends. On the splines of the front tip there is a flange 7, which is connected through a rubber elastic coupling to the flange 2 of the secondary shaft 10 of the gearbox with bolts 6. The alignment of the connected shafts is ensured by the centering ring 15, pressed onto the end of the secondary shaft of the gearbox, and the centering sleeve 4, pressed into the flange 7 Ring 15 is fixed on the shaft with a retaining ring 16.
The spline joint is lubricated through a hole closed by plug 18. The lubricant is held by a rubber seal 9, which is placed in a steel cage 8, and on the other side by a seal 13, put on a nut 12. The rear splined tip of the shaft 14 rests on the ball bearing 33 of the intermediate support. The fork 28 of the intermediate cardan joint is secured to the splines of the tip with a nut 34.
Rear driveshaft. It is made of a thin-walled pipe, at the ends of which universal joint forks are welded.
Intermediate support. Absorbs vibrations from the driveshaft. It consists of a bracket secured to the crossbar with 26 bolts and nuts. The cross member, in turn, is secured with nuts on bolts welded to the body. Steel spacer bushings 20 and rubber insulating bushings 19, pressed with washers, are installed on the crossmember mounting bolts. The bracket contains a rubber cushion, which is vulcanized to the surfaces of the bracket and bearing housing.
The bearing housing contains a radial ball bearing 33 with seals, which is fixed in the housing with a retaining ring 27. Dust deflectors 32, installed on both sides of the bearing, protect the bearing from dirt.
Litol-24 lubricant is placed into the bearing during assembly and is not replenished during operation.
Elastic coupling. Absorbs noise and vibration of the driveline. It is made of six rubber elements 3, between which there are metal liners 5 with holes for bolts 1 and 6. The liners have six projections, three of which go into the grooves of the flange of the secondary shaft of the gearbox, and the rest into the grooves of the flange of the elastic coupling. This ensures that the flexible coupling is centered on the flanges.
Cardan joint. It consists of two forks 28 and 36 attached to the shafts and a cross 35, which connects the forks to each other. The hollow tires of the crosspiece are fitted with housings of needle bearings 30. The bearing of the crosspiece is sealed with an oil seal located in a metal cage 31. The assembled needle bearings are fixed in the holes of the forks with retaining rings 29, which are divided into five sizes according to thickness. Each ring size corresponds to a specific color: 1.62 - yellow; 1.59 - black; 1.56 - blue; 1.53 - dark brown; 1.50 - unpainted. By selecting a retaining ring of one thickness or another, the axial clearance of the crosspiece is ensured in the range of 0.01-0.04 mm.
Since 1988, a cardan transmission with joints of increased durability has been installed on parts of cars, and subsequently on all cars. It is externally distinguished by the increased thickness of the forks where the needle bearings are installed, the absence of metal clips for the crosspiece oil seals, and a sharper transition of the front driveshaft pipe into the splined tip (approximately at an angle of 90°). U-joints have improved needle bearing sealing. This is achieved by using oil seals 2 radial mechanical seals. The needle bearing housings are stamped from sheet steel, as opposed to turned from bar steel in the previously used cardan drive.
New and previously produced cardan joint crosspieces are interchangeable. But it is undesirable to install new crosspieces (VAZ-2105) in the forks of old driveshafts (VAZ 2103-06), since in these forks the rigidity of the stamped needle bearing housings decreases.
Due to changes in the size of the universal joint forks, the technology for disassembling and assembling new universal joints has been changed. Therefore, the text describes the technology for repairing both old and new hinges.
Source
How to replace the driveshaft crosspieces on a VAZ 2101-VAZ 2107?
Note! If you decide to change the crosspieces, then we also recommend sending the outboard bearing for replacement; when purchasing it, make sure that its rubber is elastic (Do not take a bearing with hard rubber under any circumstances), so that the bearing rotates without jamming and without snagging, if so bearing, find it and purchase it, how to change it, read the article entitled: “Replacing an outboard bearing on a car”!
1. First, you will have to remove the shaft itself from the car, removing it will not be difficult, but just before doing this, be sure to mark its position relative to the gearbox and relative to the box, because when you reinstall the shaft, it will have to stand exactly the same as and was installed earlier, otherwise the balancing of the shaft will be disrupted and when the car starts, strong vibration will be transmitted to the body and increased wear of the driveshaft parts will occur (And how to remove it was described in detail in the article entitled: “”) .
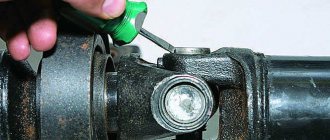
2. After the driveshaft is removed from the car, take a marker or punch or use them to make marks on the forks of the universal joints (If they were not made previously), now pry them off using a special tool. pliers, all four retaining rings (see photo below, before prying them off, we recommend that you remember at least a little how the rings were positioned, or even better, make marks as shown in the small photo; when installing new rings, they will need to be installed in approximately the same way) and start removing the crosspiece.
3. To remove you will need heads or special ones. mandrels for pressing out the bearings of the crosspieces and a hammer, placing something under the lower part (so that the propeller shaft forks are suspended), knock out the crosspiece together with the bearing down and tilt it, pull it out of the hole in the fork, thereby the forks will separate and you will only have to knock out the crosspiece from the last one forks.
4. It will be more difficult to knock it out of the last fork, also by placing the head and putting something under the bottom (To have the fork suspended, see the photo below), try to knock it out from above and tilt the cross, remove it from the bottom hole like this on the small one photos shown.
Note! The other crosspiece, which is located in the place where the cardan clings to the gearbox, is removed in the same way, don’t be afraid to remove the crosspieces at all, they are replaceable, so you can do whatever you want with them, knock them out, saw them, and so on, the main thing is not to damage the forks to the cardan shafts and then everything will be fine!
5. Installation of the crosspieces begins with the fact that you will need to remove two cups from them and then the crosspiece will become much more compact and can be easily inserted into the fork; after inserting these cups, these cups are installed in their place using a soft metal hammer and a spacer, you need to drive the cups until the groove is clearly visible into which the retaining ring is installed, when everything is completed, do the same with the other two cups and install another fork (the main thing is to orient everything according to the marks) and by the way, when installing the cups and their When removing, be careful, because there are balls inside them that cannot be scattered, as it will be very difficult to put them back in (see small photo).
Note! During all the work, this kind of problem may arise: The crosspieces cannot be removed due to the fact that they have become sour (Rusted), you can fight this with the help of kerosene, just wet the parts with it or something like that liquid and rub it with a metal brush, this will help and by the way, when the crosspieces are removed, clean their seats with a brush, especially those places where the retaining rings are installed, this is a must!
Additional video clip: Visual instructions for replacing the driveshaft crosspieces are shown in the video clip located just below:
Removal
1. Place the car on an inspection hole or overpass (see “Preparing the car for maintenance and repair”) and move the gear shift lever to the neutral position.
2. Hanging the rear wheel
3. On a car with an injection system, use a 13 mm socket wrench to unscrew the four nuts securing the heat shield located above the catalytic converter.
4. Remove the screen.
5. Use paint or a center punch to mark the position of the universal joint flange fork relative to the main drive drive gear flange.
6. Using a 13 mm open-end wrench, unscrew the four self-locking nuts, holding the driveshaft from turning with a large screwdriver or other suitable tool. In case of corrosion of the bolt threads, you should “soak” the connection with penetrating lubricant and use a special 13 mm open-end wrench with wide jaws from the kit to adjust the gaps in the valve drive. If the bolts begin to turn, press their heads against the fork flange with a screwdriver.
7. Remove the bolts and separate the flanges, moving the cardan drive forward. If the flanges are stuck together due to corrosion, you can hit the driveshaft flange yoke several times with a hammer.
8. We suspend the rear propeller shaft by tying it by the hinge to the upper reaction rods of the rear axle so that the shaft does not touch the parking brake drive cables.
9. Using a slotted screwdriver, unbend the four fixing tendrils of the front propeller shaft oil seal.
10. Slide the cage along the tip of the propeller shaft.
11. Using a 13 mm socket wrench with an extension, unscrew the two bolts securing the intermediate support to the cross member.
12. We remove the driveshaft from the splined connection with the flange of the elastic coupling and, having untied the cardan drive, remove it in the direction of the rear axle.
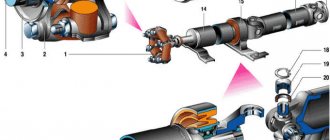
What are the main parts of the VAZ 2107 cardan transmission?
- Parts capable of changing the angle and length of the transmission are the coupling (5), as well as rigid hinges (9.7) and elastic (3). It is called a coupling. The role of the coupling is that it reduces the noise of the connection and angular torque is transmitted. Repair of the driveshaft is required if the coupling material is cracked and crumbled. Simply put, the clutch needs to be replaced.
- The cardan coupling consists of 6 rubber parts (30), with metal spacers (31) between them. These parts are tightly connected into a one-piece unit, so in case of failure, the most correct solution is to replace the coupling.
- The coupling is placed between the flanges (4,2). They are attached to it with 35 bolts.
- Intermediate support (6), which serves to reduce vibrations and various types of beating.
- The front shaft of the VAZ 2107 (5) is a pipe with splines installed by welding. There is a tip (40) at the front. One of the coupling flanges is located on it, and the rear splined end is located on the support bearing (6). The bearing itself is well insulated from dirt by seals. Repair of the driveshaft is necessary if the splines are worn out.
- The rubber pad (12) in which the bearing is located dampens vibration well. On it, the front shaft may move slightly.
- The intermediate cardan support is attached to the bracket (15).
- Important is the safety bracket (27), which prevents the shaft from falling out if the coupling fails. If this bracket was not there, then the cars would overturn at full speed, and such cases have happened before. In this case, repairing the driveshaft is impossible; replacement is required.
- The difference between the rear shaft (8) and the front “neighbor” is that it has a hinge fork at the ends.
- The hinge itself is an important element of the transmission; it consists of a pair of forks (23), one crosspiece (22) and, in a separate figure above, needle-shaped bearings (20) - there are 4 of them, rings (19) and oil seals (21). The bearings are pressed with a fairly large force of about 800 kg into the fork holes. They are non-separable; if they malfunction, they need to be replaced.
- The cross has the required gap, from 0.1 to 0.4 mm. Only within such limits is the crosspiece correctly centered. There are rings in five sizes and five different colors for proper alignment. Repair of the driveshaft most often consists of correcting these gaps and replacing the rings.
Briefly about the purpose of elastic couplings
Before we begin to understand the design of couplings, we suggest that you familiarize yourself with the tasks that they undertake. As you can understand from the introduction to this material, they are needed to dampen loads. The same task is performed by many other car components , but elastic couplings differ from them, at least in shape. An elastic coupling can take on one or all of the following tasks:
- Absorb shocks and impacts caused by rotational moments;
- Connection of misaligned shafts;
- Protection of mechanisms and drives from so-called torsional vibrations.
The couplings themselves are a very inexpensive solution that allows you to reduce the harmful loads that arise during the operation of mechanisms. At the same time, they can compensate for both angular, axial and radial displacements of parts . They are especially effective in mechanisms in which frequent starts and stops alternate - the kinetic energy of impacts in them is accumulated by the clutch itself, which gradually wears out, but at the same time prevents wear of adjacent parts of the mechanisms.
Elastic couplings are used with great success in compressors, pumps, generators and many other drives in electric and diesel locomotives, ships, construction vehicles and, of course, cars. Since the elastic coupling allows you to create a soft but reliable connection, it is used to equip the driveshaft of cars. For this reason, an automobile flexible coupling is often called simply a cardan coupling, and occasionally called a jubo (from the English giubo).
Signs of a malfunctioning speed sensor
During the operation of a car with an electronic on-board device, many motorists have encountered a situation where one or another signal lights up in the error block; it often happens that after turning off the engine and restarting this signal does not appear again, so Russian drivers sometimes develop distrust in readings from this ECU. However, every driver should know what errors indicating problems with the DS light up on the on-board computer display.
- P0500 - lack of speed sensor signal.
- P0503 - intermittent speed sensor signal.
Indeed, quite often the cause of the appearance of such signals is problems in loose contacts or even broken DC wires. It is necessary to take into account where the speed sensor is located on the VAZ 2114
The manual transmission experiences strong vibration during operation, so special attention must be paid to the preventive inspection of this sensor.
In addition to the appearance of error signals on the BC display, other signs of a malfunction of the DS may appear; experts include these signs:
- Unstable, “wandering” idle speed, spontaneous shutdown of the internal combustion engine is possible when the gas pedal is not pressed.
- The speedometer on the VAZ 2114 is unstable or does not work at all.
- Fuel consumption increases significantly.
- Engine power decreases.
Of course, this is not a definite diagnosis for DS; there may be other reasons, for example, problems with the fuel system. However, you should check the functionality of the DS. And the first thing to do is to ring the circuits and make sure the wiring is in good condition. Make sure there is grounding and a 12 V signal is supplied to the contacts.
There are several ways to check the performance of the DS:
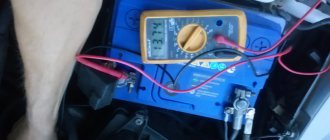
- remove the problematic sensor. Using a voltmeter, measure the output voltage and signal frequency. To do this, put plastic tubes on the sensor axis and spin the housing to a speed of 3-5 km/h. The faster the sensor rotates, the higher the voltage and frequency;
- the second method does not require removing the sensor.
Raise the front wheel on a jack so that it can be spun. Connect a voltmeter to the sensor contacts. Spin the wheel and take readings from the device; if the voltage and frequency increase adequately to the spin, then everything is fine with the sensor.
The third method involves checking using a “control” or a light bulb.
Raise the front wheel on a jack so that you can spin it. First, you need to disconnect the pulse wire from the sensor. Turn on the ignition. Use the “control” to find “plus” and “minus”. Connect the “control” to the “Signal” wire and spin the wheel. When the sensor is working normally, the “minus” light should light up. If you don’t have a control tool, you can use a light bulb. To do this, you need to connect wires to it.
Connect one wire to the battery positive, and the second to the “Signal” connector output. Spin the wheel. If the light blinks, then the sensor is working.
Car enthusiasts have worked out a technique for checking the DS drive.
To do this, you need to jack up one wheel and remove the speed sensor. Feel for the sensor drive and rotate the wheel. When the drive is working normally, you can feel it rotating with your fingers. And if there are no jams, then the drive is in order.
If, as a result of the test, it is determined that the speed sensor does not work, then it is necessary to remove it and replace it with a new one. This spare part is not in short supply, so you can easily find out how much the speed sensor on a VAZ 2114 costs.
Sources
- https://luxvaz.ru/vaz-2114/195-datchik-skorosti-2.html
- https://nadomkrat.ru/elektrooborudovaniye/datchik-skorosti-vaz-2114
How to check driveshafts, also known as driveshafts, for functionality on a VAZ 2101-VAZ 2107?
Note! Before starting work, we recommend that you use a brush to clean all parts of the cardan transmission from any dirt adhering to them. And also during all the work, you will most likely need to first remove the driveshaft from the car and only then disassemble it! (For information on how to disassemble it, see the article: “”)
1) First, it is recommended to remove the cardan for a more detailed inspection. (How to remove it, see the article: "")
2) After removal, check the condition of absolutely all welds that are present on the cardan. Also check the condition of the splined parts and the front driveshaft pipe itself.
Note! In no case should the splined parts show signs of severe wear; if you find such signs, then it is recommended to replace the shaft on which the splines have become unusable!
3) Then, moving to the rear cardan, inspect it and check for the presence of balancing weights on it, and also look at the condition of the welded seams and look at the diameter of the fork hole.
Note! There should not be any significant dents in the rear driveshaft, and bending of the forks themselves or their holes is also not allowed. For reliability, using a bore gauge together with a dial indicator, measure the diameter of both holes of the fork, which should not exceed “23.825”!
4) Then remove the crosspieces to inspect them, and after removal, check the condition of the bearings, spikes of the crosspiece, as well as oil seals, as well as the clips and the crosspiece itself.
Note! If there are signs of visible wear, then replace the crosspiece along with its bearings with a new one!
5) Next, remove and check the condition of the elastic cardan coupling.
Note! If you find traces of cracks, various types of damage, as well as peeling on the coupling, then replace the coupling with a new one!
6) Now remove and then check the intermediate support of the universal joint drive.
Note! The intermediate support should not have deformations, as well as cracks and breaks in the elastic clip, so if you find at least one defect, then replace the support with a new one!
7) And finally, check the condition of the intermediate support bearing itself, to do this, rotate the inner ring in both directions and at the same time press the inner ring against the outer one.
Note! In this case, the inner ring must rotate smoothly, and the seals of the bearing itself must not be worn out, otherwise they will have to be replaced!
Comments
Question
For some time, vibration appeared, it starts at a speed of 60 km/h and stops after 120. I replaced the outboard, replaced the gearbox. Doesn't stop. I climbed in myself. I removed the cardan and inspected it; the holes on the mounting of the pendant to the body were not fully bored out, because of this, the pendant is attached with tension and therefore with an inclination. Bore the holes. The hanging sat well. The vibration is gone. Traveled 20,000 km. Appeared again. It was not the wheels that sinned. It seems to have been balanced, the vibration has not disappeared. I changed from winter to summer tires, still the same. What you didn’t do doesn’t disappear. There is a slight play in the left rear axle shaft. Maybe because of this? Or maybe the spline joint of the cardan is not lubricated?
Your writing is interesting and lifelike.
Your writing is interesting and lifelike. Still, in order to make a truly interesting blog, you need to not only report something, but also do it in an interesting way.
Source
Replacing the VAZ 2106 universal joint
The cardan crosspieces must only be replaced, since the bearing needles and the outer and inner parts of the race wear out, which leads to the formation of play. This indicates the impossibility and inappropriateness of restoring the part. If characteristic signs indicate that the cardan joints need to be replaced, you will need to dismantle the shaft itself, and then begin repairs. For the upcoming work you will need the following tools and materials:
- open-end wrench 13;
- head 13 with a knob or ratchet;
- copper or aluminum extension;
- hammer;
- compression pliers with thin jaws;
- universal puller;
- chisel;
- new crosspiece;
- lubricant “Fiol-1” or “CV joint-4”;
- large screwdriver.
Removing the cardan
On the VAZ “Six” the driveshaft is mounted to the rear axle gearbox, and closer to the gearbox the driveshaft is held by an outboard bearing. Removing the shaft from the car is carried out as follows:
- Unscrew the cardan mount with a 13 key.
- If the bolts turn when unscrewing the nuts, insert a screwdriver, pressing the fasteners.
- When unscrewing the last bolt, hold the shaft with your other hand, since it may fall on you. We move the cardan to the side after completely unscrewing the bolt.
- Using a chisel on the flange of the elastic coupling, we mark the position of the cardan.
- Using a screwdriver, bend the seal ring near the coupling.
- We move the holder along with the sealing ring to the side.
- We unscrew the central fastening and hold the cardan itself.
- For final dismantling, we pull the shaft off the gearbox.
Removing the cross
After dismantling the driveshaft, you can immediately begin disassembling the crosspiece:
- We mark the universal joint forks to avoid disturbing the factory balancing during assembly. To apply marks, you can use paint (pictured below) or hit it lightly with a chisel.
- We remove the retaining rings using special pliers.
- Having clamped the cardan in a vice, we press out the bearings through suitable mandrels or knock them out with a hammer.
- We disassemble the hinge, moving the crosspiece in the direction of the removed bearing, after which we slightly turn the crosspiece and remove it from the fork.
- Press out the opposite bearing in the same way.
- We repeat the steps described in paragraph 3 and completely dismantle the cross.
- We repeat the same steps with the second hinge, if it needs to be replaced.
Installing the crosspiece and cardan
We install the hinge and shaft in the following order:
- We remove the cups from the new cross and insert it into the eyes.
- Place the cup in place, carefully tapping it with a hammer until a groove for the retaining ring appears. We mount it and turn the cardan.
- In the same way, insert and fix the opposite cup, and then the remaining two.
- Apply Fiol-1 or CV joint grease to the spline joint of the cardan and insert it into the flange of the elastic coupling, fixing the protective ring.
- We attach the driveshaft to the body and to the rear axle gearbox.
Video: replacing the cardan cross on a VAZ 2101–07
The cardan crosspieces are filled with lubricant from the factory. However, when replacing a product, I always syringe the hinge after the repair. There will be no excess lubrication, and its lack will lead to increased wear. For crosspieces, it is recommended to use “Fiol-2U” or “No. 158”, but in extreme cases “Litol-24” will also do. Although I know car owners who use Litol for both crosspieces and spline joints. When injecting, I pump the lubricant until it begins to come out from under the seals. According to the regulations, the hinges must be serviced every 10 thousand kilometers.
You don't have to be an experienced auto mechanic to replace universal joints. The desire of the car owner and step-by-step instructions will help identify the malfunction and carry out repairs in a garage without making mistakes.
Cardan malfunctions
The driveshaft of the VAZ 2107 wears out during operation under the influence of constant loads. The crosspiece is subject to the most wear. As a result, the cardan loses its original characteristics, vibration, knocking, etc. appear.
Vibration
Sometimes while driving a VAZ 2107, the body begins to vibrate. The reason for this usually lies in the driveline. This may be due to the installation of an initially poor quality shaft or incorrect assembly of the unit. Vibration can also appear due to mechanical impacts on the cardan when hitting obstacles or during an accident. This problem can also be a consequence of improper hardening of the metal.
There are many reasons leading to an imbalance in the cardan drive. Vibration may occur under heavy loads. In addition, the VAZ 2107 cardan can become deformed even if the vehicle is used infrequently. This will also lead to vibration. In such situations, balancing or replacing the unit is required, and the problem must be corrected immediately. Otherwise, vibration of the cardan can lead to destruction of the crosspieces and rear axle gearbox, and the cost of repairs will increase many times over.
The occurrence of vibration of the VAZ 2107 body may be associated with damage to the outboard bearing
In addition, vibration may occur due to the rubber element of the outboard bearing. Rubber becomes less elastic over time and the balance may become unbalanced. Bearing wear can also lead to vibration of the body when starting off. This, in turn, can cause premature failure of the crosspieces. When purchasing a new outboard bearing, special attention should be paid to the elasticity of the rubber suspension and the ease of rotation of the bearing itself. There should be no jamming or play.
Read about hub bearing faults: https://bumper.guru/klassicheskie-modeli-vaz/hodovaya-chast/zamena-stupichnogo-podshipnika-vaz-2107.html
Knock
Malfunctions and wear of individual elements of the VAZ 2107 driveshaft as a result of friction leads to the formation of backlash in the mechanism and, as a consequence, to the appearance of knocking noises. The most common causes of knocking are:
- Faulty crosspiece. The knock appears as a result of wear and destruction of bearings. The part should be replaced.
- Loosening of the universal joint bolts. The problem can be solved by inspecting and tightening loose connections.
- Severe wear of the spline joint. In this case, the driveline splines are changed.
- Outboard bearing play. The bearing is replaced with a new one.
A knocking sound in the cardan drive may be a result of the spline joint being worn out
To increase the service life of the cardan transmission elements, they require periodic maintenance, which involves lubrication using a special syringe. If the crosspieces are maintenance-free, when play appears, they are simply replaced. The suspension bearing and crosspieces are lubricated with Litol-24 every 60 thousand km. mileage, and the spline part is “Fiolom-1” every 30 thousand km.
Clicking noise when starting
Often, when touching classic VAZ models, you can hear clicks. They have a characteristic metallic sound, are a consequence of play in any element of the cardan and can be caused by the following reasons:
- the crosspiece has failed;
- the spline connection has worn out;
- The cardan mounting bolts are loose.
In the first case, the crosspiece is replaced with a new one. When the spline connection is worn out, the front flange of the cardan will need to be replaced. If this does not help, you will have to change the driveshaft completely. When loosening the mounting bolts, you just need to tighten them securely.
The cause of clicks when starting off may be play in the bearings of the crosspiece.
Preparing for work
When buying a new crosspiece for a VAZ 2107, you don’t need to try to save money. Everyone knows that “the miser pays twice,” so it’s better to buy an original part right away than to change a couple of crosses in six months.
The body of the crosspiece is made of heat-treated steel. This is necessary to ensure the special hardness of the studs. Thus, the quality of the material plays a big role in the service life of the part. How long can a car run without replacing crosspieces? It is believed that approximately 500 thousand km!
The retaining rings and bearing also need replacement.
Please note that the rubber of the bearing itself must be sufficiently elastic
Installation
1. Having cleaned the splines of the elastic coupling flange and the propeller shaft, apply lubricant to them (Fiol-2U, CV joint-4 or similar), after assembling the connection, install the oil seal race in place and bend its fixing tendrils.
2. It is recommended to replace the self-locking nuts securing the universal joint flange yoke to the drive gear shank flange with new ones.
3. Apply a thin layer of any grease to the contacting surfaces of the flange connection to protect against corrosion.
4. Install the cardan drive in the reverse order, aligning the flanges according to the previously applied marks.
Good day, dear reader! In this article you can learn about how to replace a small but very important part in your car. We will talk about how to replace the driveshaft crosspiece of the VAZ 2107, 2106 and the rest of the classic family. But before replacing a part, you need to find out whether it is really faulty? Let me tell you how it's done!
What faults occur in this connection?
Typically the bearings will tell you when they need to be repaired or replaced. The sound of the outboard bearing indicates a failure. It can send the following signals:
- Various knocks and noises, such as humming, buzzing or crunching;
- Vibration, such as beating or jerking;
- Play of the outboard bearing if it is subject to visual inspection.
If you hear that the suspension bearing is humming, you need to contact a car service as soon as possible.
As a rule, such elements of the driveshaft do not fail on their own. They break for the following reasons:
- Natural wear and tear of a
structural element, gradual destruction of the rubber that holds the bearing. - Features of operating conditions, for example, low or high temperature conditions, contact with dirt and dust on the bearing, movement over rough terrain, hard gear shifting, increased loads.
- An installation error that can easily be made if an inexperienced person is working.
- Reduced quality characteristics of the components used. The fact is that the installed spare parts must be original or have proven themselves in the market.
Important! If the driver tries to exclude the maximum number of reasons during operation, then he can rest assured that the part will serve him for a very long time. More rare transmission malfunctions of the VAZ 2107:
More rare transmission malfunctions of the VAZ 2107:
- Damage and misconfiguration (hitting rocks when driving in the mountains);
- Abundant amounts of dirt in parts and bearings;
- Failure of flanges, splines and couplings under load.
For lubrication, maintenance, if a part needs to be replaced, first of all, you need to properly remove it from the car and put it back. Repair of the driveshaft is also possible only after removal.
Why do breakdowns occur?
If you know what shortens the service life of a spare part, you can delay the breakdown as much as possible.
Main reasons
A part can fail due to something as trivial as insufficient lubrication. It is negatively affected by sub-zero winter temperatures, and in addition, the cardan is usually located above the exhaust system; when the engine is running, it heats up and thereby slowly dries out the lubricant. Metal shavings, sand or scale that gets into the lubricant are dangerous.
Two lead to corrosion
main factors:
- water, dirt or other substances that cause corrosion have gotten inside;
- incorrect fit, errors in the shape of the landing sites lead to fetting corrosion, that is, contact destruction.
A part deviates from the seating surface when the base on which it is installed is not flat.
Incorrect handling, disproportionately shared loads and excessive edge loads also take their toll. Problems will also arise if the materials used to make the shaft and bearings are not compatible.
Reasons for a loud sound or diagnostics of the exhaust system of a VAZ 2104
What problems can occur in the exhaust system and when does the muffler need to be replaced? Let's look at it in order:
- The first thing that can cause a loud exhaust is a malfunction of the muffler, or rather its burnout or rotting. This can be determined by external examination. Look for traces of rust - they often hide holes that are hardly noticeable.
- Let's go further - the middle resonator. Again, it could have rotted, or while driving you could have gotten caught in it and punched it. Also carefully inspected for cracks, holes and rust.
- The exhaust pipe or simply pants can also be a cause. They, as a rule, do not burn out. The same thing happens to them as to the resonator. After hitting the bottom of the pants, a dent appears, which then rots and a hole appears.
- If the entire exhaust system, after visual inspection and testing with your own hands, turns out to be safe and sound, then there is only one conclusion - the reason for the loud operation is definitely the gasket between the pants and the exhaust manifold.
Note! When inspecting areas with rust, be sure to test the strength of the surrounding metal. It is possible to repair the muffler.